If you’re looking to take full control of how your WooCommerce products appear on your store, Elementor Pro makes it incredibly easy. With custom templates, loop items, and dynamic WooCommerce elements, you can design a fully branded shop page — no coding required.
In this guide, you’ll learn how to:
- Create a custom WooCommerce archive template
- Build a custom product loop layout with images, pricing, meta info & add-to-cart
- Enable pagination, column control, and product count
- Add category-based sorting functionality for a better user experience
By the end of this tutorial, you’ll have a professional, flexible product layout that matches your brand perfectly.
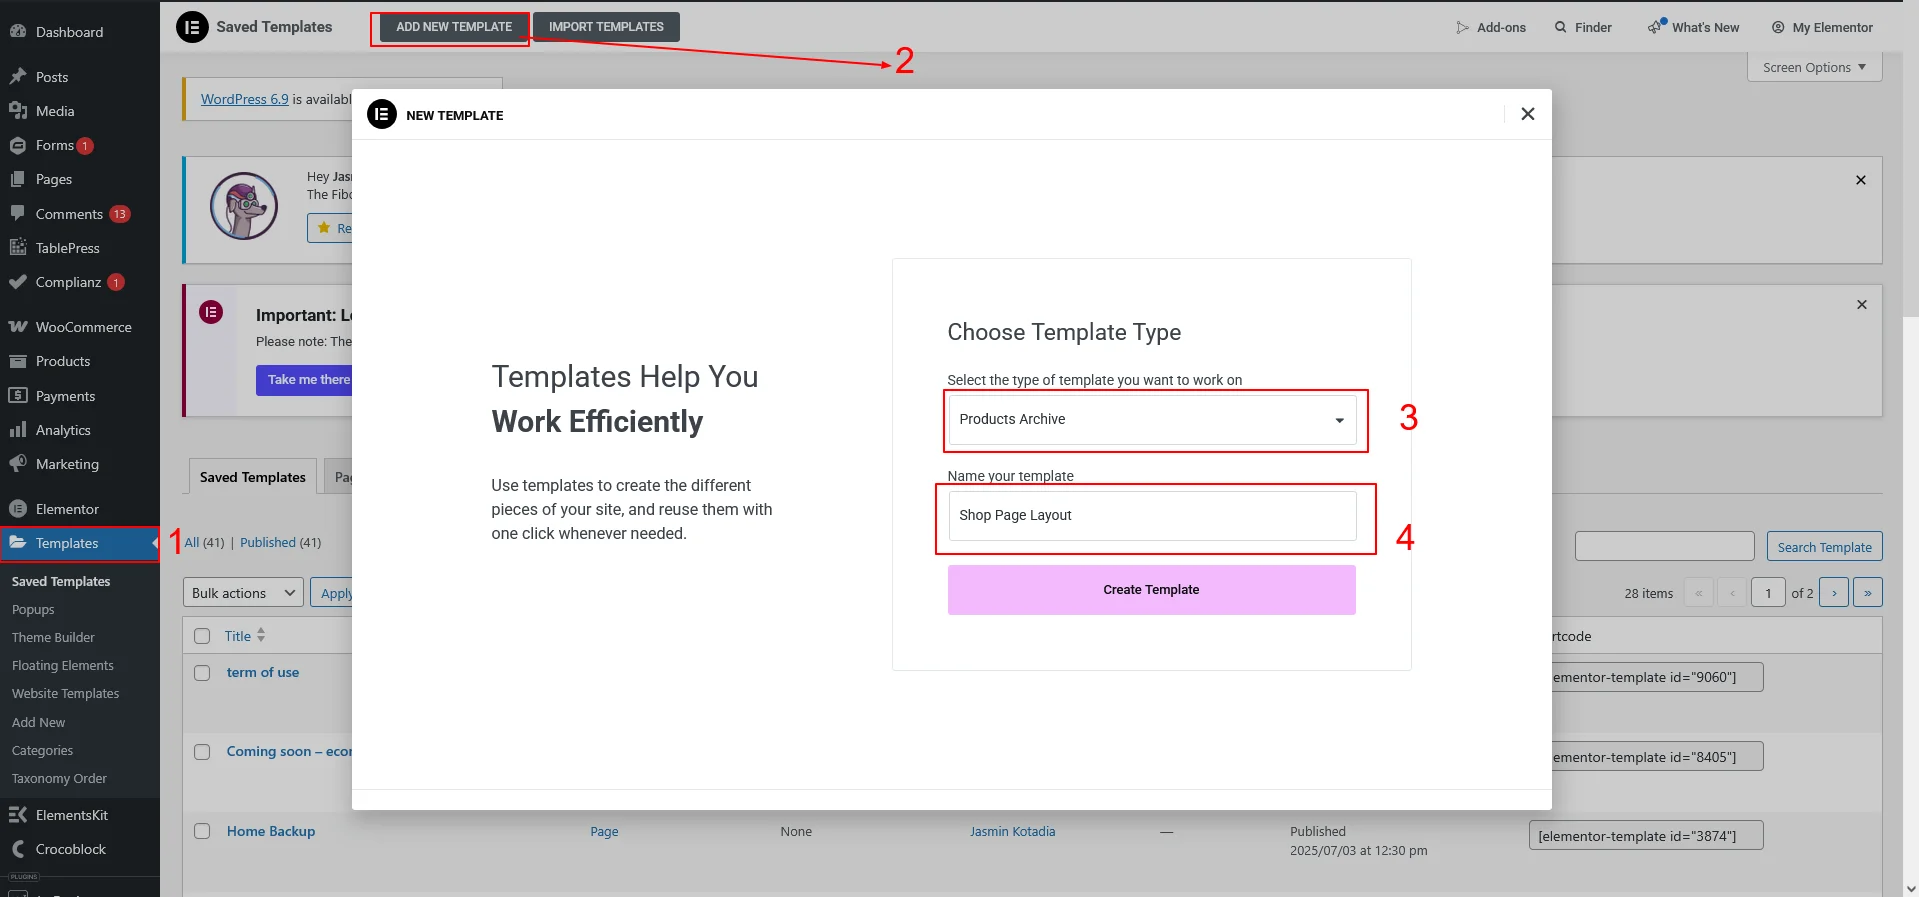
Step 1: Create a Custom Product Archive Template
To start customizing the default WooCommerce Shop and Category pages, follow these steps:
- Go to WordPress Dashboard → Templates → Theme Builder
- Click Add New → Archive Template
- Choose Product Archive
- Give the template a name (example: “Custom Shop Layout”)
- Click Create Template
Once loaded, you’ll see Elementor’s default WooCommerce widgets.
Now customize the layout using:
- Heading or Page Title
- Breadcrumbs
- Search Bar
- Sorting & Filter Options (optional)
Step 2: Create a Custom Product Loop Item
Elementor Pro now offers Loop Grid and Loop Item builder — allowing full control over how each product card looks.
- Add the Loop Grid widget to your archive page
- Click Create Template
- This opens a new “Loop Item” layout canvas
Now build your product card using Elementor widgets:
Include the following elements:
| Element | Widget |
| Product Image | Product Image |
| Product Title | Product Title |
| Short Description | Product Short Description |
| SKU | Product SKU (Dynamic Tags → Woo Meta) |
| Categories | Product Terms |
| Price | Product Price |
| Add to Cart | Add to Cart Button |
Style spacing, borders, typography and hover effects as needed.
Tip: You can make the product image & name clickable by enabling the Link to Product Page option.
Once done → Save & Publish.

Step 3: Set Columns, Layout & Pagination
Back in the Archive template:
- Click on the Loop Grid widget
- Set:
- Columns (Desktop/Tablet/Mobile)
- Number of Items per Page
- Select Loop Template you created earlier
- Enable Pagination
Pagination options include:
- Numeric Pagination
- Load More Button
- Infinite Scroll (Pro)
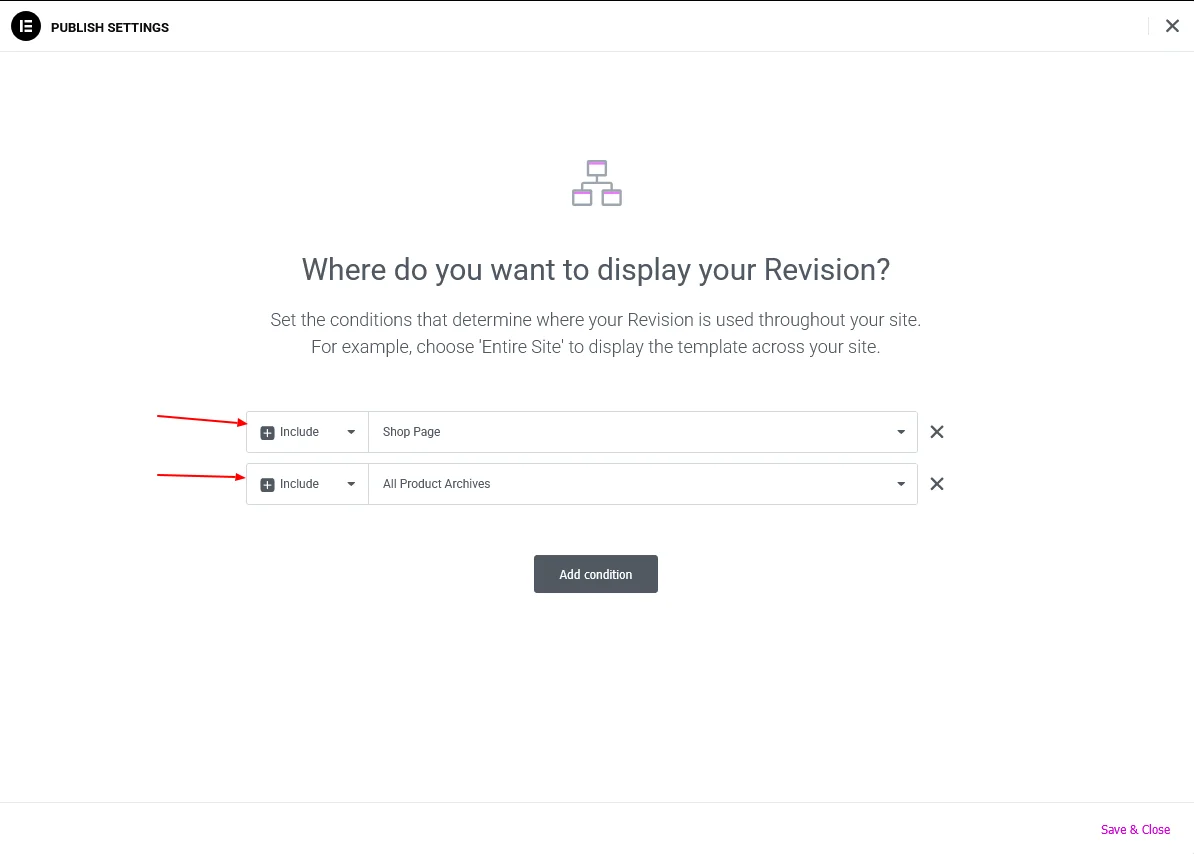
Step 4: Apply the Template to Shop & Category Pages
Before closing the editor:
- Click Publish
- Set Display Conditions:
✔ All Product Archives
✔ Shop Page
✔ Product Categories
Click Save.
Your custom layout is now live!
Step 5: Add Category-Based Sorting to Your WooCommerce Store
By default, WooCommerce lets customers sort products by price, popularity, rating or date — but not by the category order you set. To make browsing easier and more organized, we’ll add a Category-Based Sorting option to both:
- The WooCommerce Sorting Dropdown
- The Default Sorting Setting inside Appearance → Customize
This ensures your products appear in the exact order of their assigned categories — perfect for structured stores like machinery, spare parts, collections, or apparel.
Add Custom Sorting Code
Add the following code to your functions.php or a custom plugin (recommended if using a child theme):
/**
 * Add "Sort by Category Order" option to WooCommerce sorting dropdown.
 */
add_filter( 'woocommerce_get_catalog_ordering_args', 'woolist_catalog_orderby_category_order_args' );
function woolist_catalog_orderby_category_order_args( $args ) {
    $orderby_value = isset( $_GET['orderby'] ) ? wc_clean( $_GET['orderby'] ) : apply_filters(
        'woocommerce_default_catalog_orderby',
        get_option( 'woocommerce_default_catalog_orderby' )
    );

    if ( 'category_order' === $orderby_value ) {
        // Use pre_get_posts instead of the_posts (pagination-safe)
        add_action( 'pre_get_posts', 'woolist_pre_get_products_by_category', 999 );
    }

    return $args;
}

/**
 * Add label in dropdown menu.
 */
add_filter( 'woocommerce_default_catalog_orderby_options', 'woolist_add_category_order_option' );
add_filter( 'woocommerce_catalog_orderby', 'woolist_add_category_order_option' );
function woolist_add_category_order_option( $sortby ) {
    $sortby['category_order'] = __( 'Sort by Category Order', 'woolist' );
    return $sortby;
}

/**
 * Sort WooCommerce products by category order (pagination-safe).
 */
function woolist_pre_get_products_by_category( $query ) {
    if ( is_admin() || ! $query->is_main_query() ) {
        return;
    }

    if ( ! ( is_shop() || is_product_category() ) ) {
        return;
    }

    // Prevent infinite recursion
    remove_action( 'pre_get_posts', 'woolist_pre_get_products_by_category', 999 );

    // 1. Get categories in manual order (respect term_order)
    $get_terms_recursive = function( $parent = 0 ) use ( &$get_terms_recursive ) {
        $ordered = [];
        $terms = get_terms([
            'taxonomy'   => 'product_cat',
            'parent'     => $parent,
            'hide_empty' => false,
            'orderby'    => 'term_order',
            'order'      => 'ASC',
        ]);
        foreach ( $terms as $term ) {
            $ordered[] = $term;
            $children = $get_terms_recursive( $term->term_id );
            if ( ! empty( $children ) ) {
                $ordered = array_merge( $ordered, $children );
            }
        }
        return $ordered;
    };

    $categories = $get_terms_recursive( 0 );
    if ( empty( $categories ) ) {
        return;
    }

    // 2. Assign priority per category
    $priority = 1;
    $cat_priority = [];
    foreach ( $categories as $cat ) {
        $cat_priority[ $cat->term_id ] = $priority++;
    }

    // 3. Fetch all product IDs first (ignore pagination)
    $args = $query->query_vars;
    $args['fields'] = 'ids';
    $args['posts_per_page'] = -1;
    $args['paged'] = 0;
    $all_products = get_posts( $args );

    // 4. Get priority for each product
    $get_priority = function( $product_id ) use ( $cat_priority ) {
        $terms = wp_get_post_terms( $product_id, 'product_cat', ['fields' => 'ids'] );
        if ( empty( $terms ) ) {
            return PHP_INT_MAX;
        }
        $priorities = [];
        foreach ( $terms as $t ) {
            if ( isset( $cat_priority[ $t ] ) ) {
                $priorities[] = $cat_priority[ $t ];
            }
        }
        return ! empty( $priorities ) ? min( $priorities ) : PHP_INT_MAX;
    };

    // 5. Sort all product IDs by category, then menu_order, then title
    usort( $all_products, function( $a, $b ) use ( $get_priority ) {
        $pa = $get_priority( $a );
        $pb = $get_priority( $b );
        if ( $pa !== $pb ) return $pa - $pb;

        $ma = (int) get_post_field( 'menu_order', $a );
        $mb = (int) get_post_field( 'menu_order', $b );
        if ( $ma !== $mb ) return $ma - $mb;

        return strcasecmp( get_the_title( $a ), get_the_title( $b ) );
    });

    // 6. Manual pagination slicing
    $per_page = $query->get( 'posts_per_page' );
    $paged = max( 1, $query->get( 'paged' ) );
    $offset = ( $paged - 1 ) * $per_page;
    $paged_products = array_slice( $all_products, $offset, $per_page );

    // 7. Update query vars for WooCommerce
// Get full, sorted list of product IDs
$query->set( 'post__in', $all_products );
$query->set( 'orderby', 'post__in' );
// DO NOT do array_slice or manual slicing
    $query->set( 'posts_per_page', $per_page );
    $query->set( 'paged', $paged );

    // 8. Correct pagination count
    add_filter( 'found_posts', function( $found, $q ) use ( $all_products ) {
        if ( $q->is_main_query() && ( is_shop() || is_product_category() ) ) {
            return count( $all_products );
        }
        return $found;
    }, 10, 2 );
}
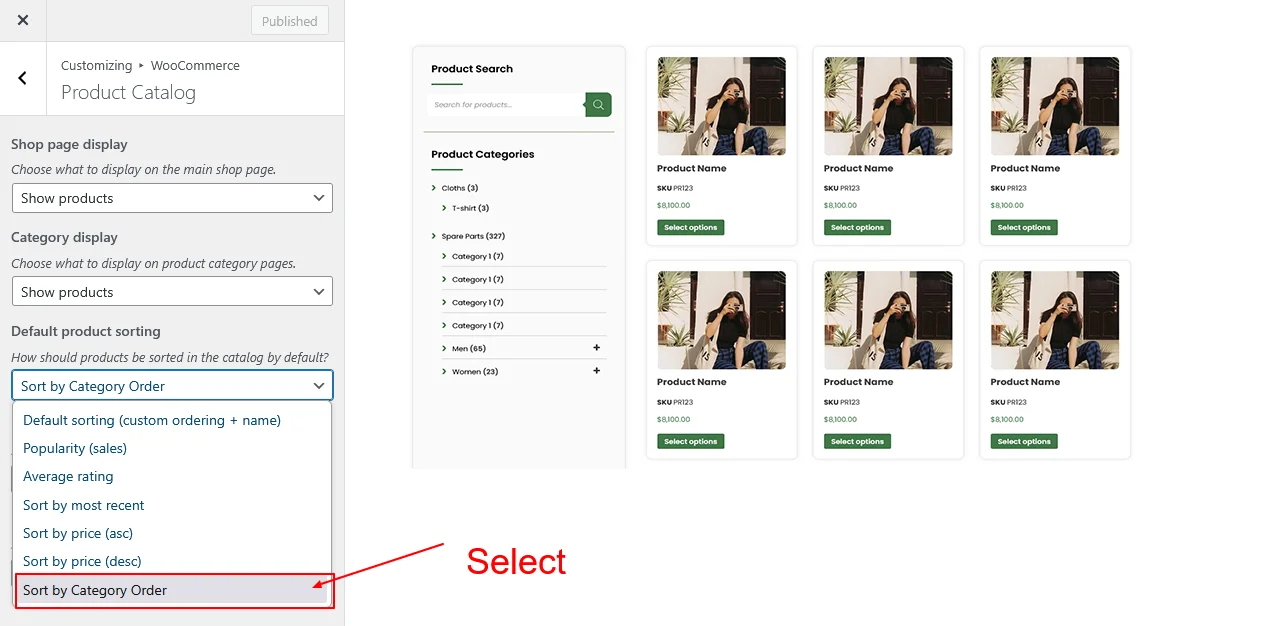
Step 6: Enable It from WooCommerce Customizer
Once the code is added successfully, go to: Appearance → Customize → WooCommerce → Product Catalog → Default Product Sorting
You’ll now see a new option: Sort by Category Order
Select it — and from now on, your shop and category pages will automatically display products grouped and ordered by the category hierarchy.
(Optional) Organize Categories Manually
If you want full drag-and-drop control over category ordering, install:
➡ Category Order and Taxonomy Terms Order Plugin
https://wordpress.org/plugins/taxonomy-terms-order/ (Free from WordPress.org)
This plugin allows you to reorder product categories visually, and the sorting function will respect that order automatically.
Step 7: Test Your Sorting & Ensure Everything Works
Now that your custom product template and category-based sorting are in place, it’s important to verify everything is functioning correctly.
Go to: YourSite.com/shop
Check the following:
- Products display in the correct category-based sequence
- The layout matches your Elementor loop template
- Pagination works (example: clicking page 2 continues the ordered list)
- Sorting dropdown shows “Sort by Category Order”
Try switching between sorting options:
- Default Sorting
- Price (asc/desc)
- Category Order
Then return to Sort by Category Order to ensure your custom order re-applies correctly.
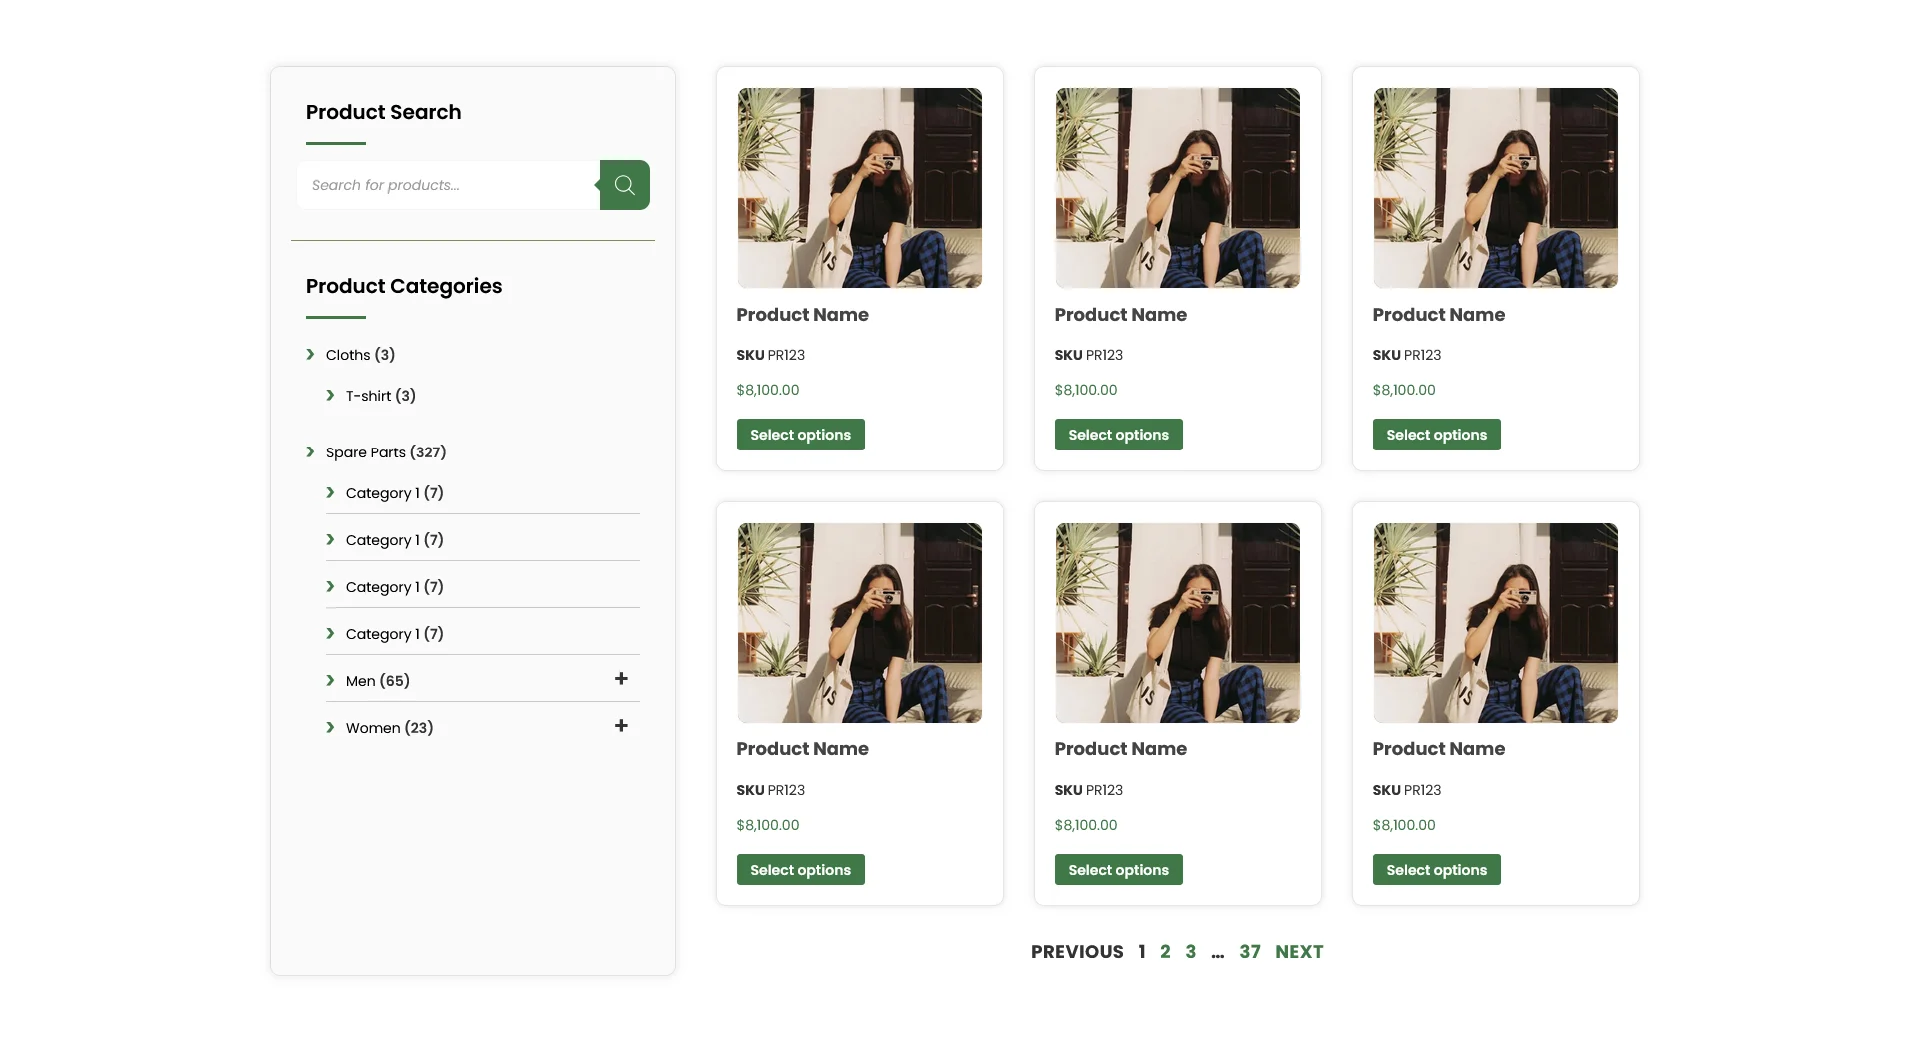
Final Result
If everything is configured correctly, your WooCommerce shop will now:
- Display products grouped and ordered by category hierarchy
- Use a fully custom Elementor loop layout
- Support pagination, sorting, and filtering
- Allow you to change category order easily without editing loops
- Automatically update sorting whenever you rearrange categories
Conclusion
Congratulations — you now have a fully customized WooCommerce product archive with:
- A unique Elementor product card design
- Pagination and responsive layout control
- Smart category-based sorting
- Optional manual drag-and-drop category ordering
This setup gives your WooCommerce store a clean, organized, and intuitive structure — especially useful for businesses with large catalogs, product families, or grouped collections.