Table of Contents
If you’re using Directorist – Business Directory Plugin and want to customize your single listing page layout using Elementor without writing complex templates, you’re in the right place.
In this tutorial, you’ll learn how to structure your single business listing page into a two-column layout and control what content appears on the left or right—using a simple CSS class and small JavaScript snippet.
Step 1: Install the Directorist Plugin
First, install the plugin from the official WordPress repository:
Directorist – Business Directory Plugin (Available in WordPress Plugins Directory)
you can direct download and install from official worpress : https://wordpress.org/plugins/directorist/
You can install it here:
Go to Plugins → Add New → Search “Directorist” → Install → Activate
Step 2: Open the Directory Builder
Once installed, go to:
Dashboard → Directory Listings → Directory Builder → Single Page Layout
This is where you will customize the single listing design.
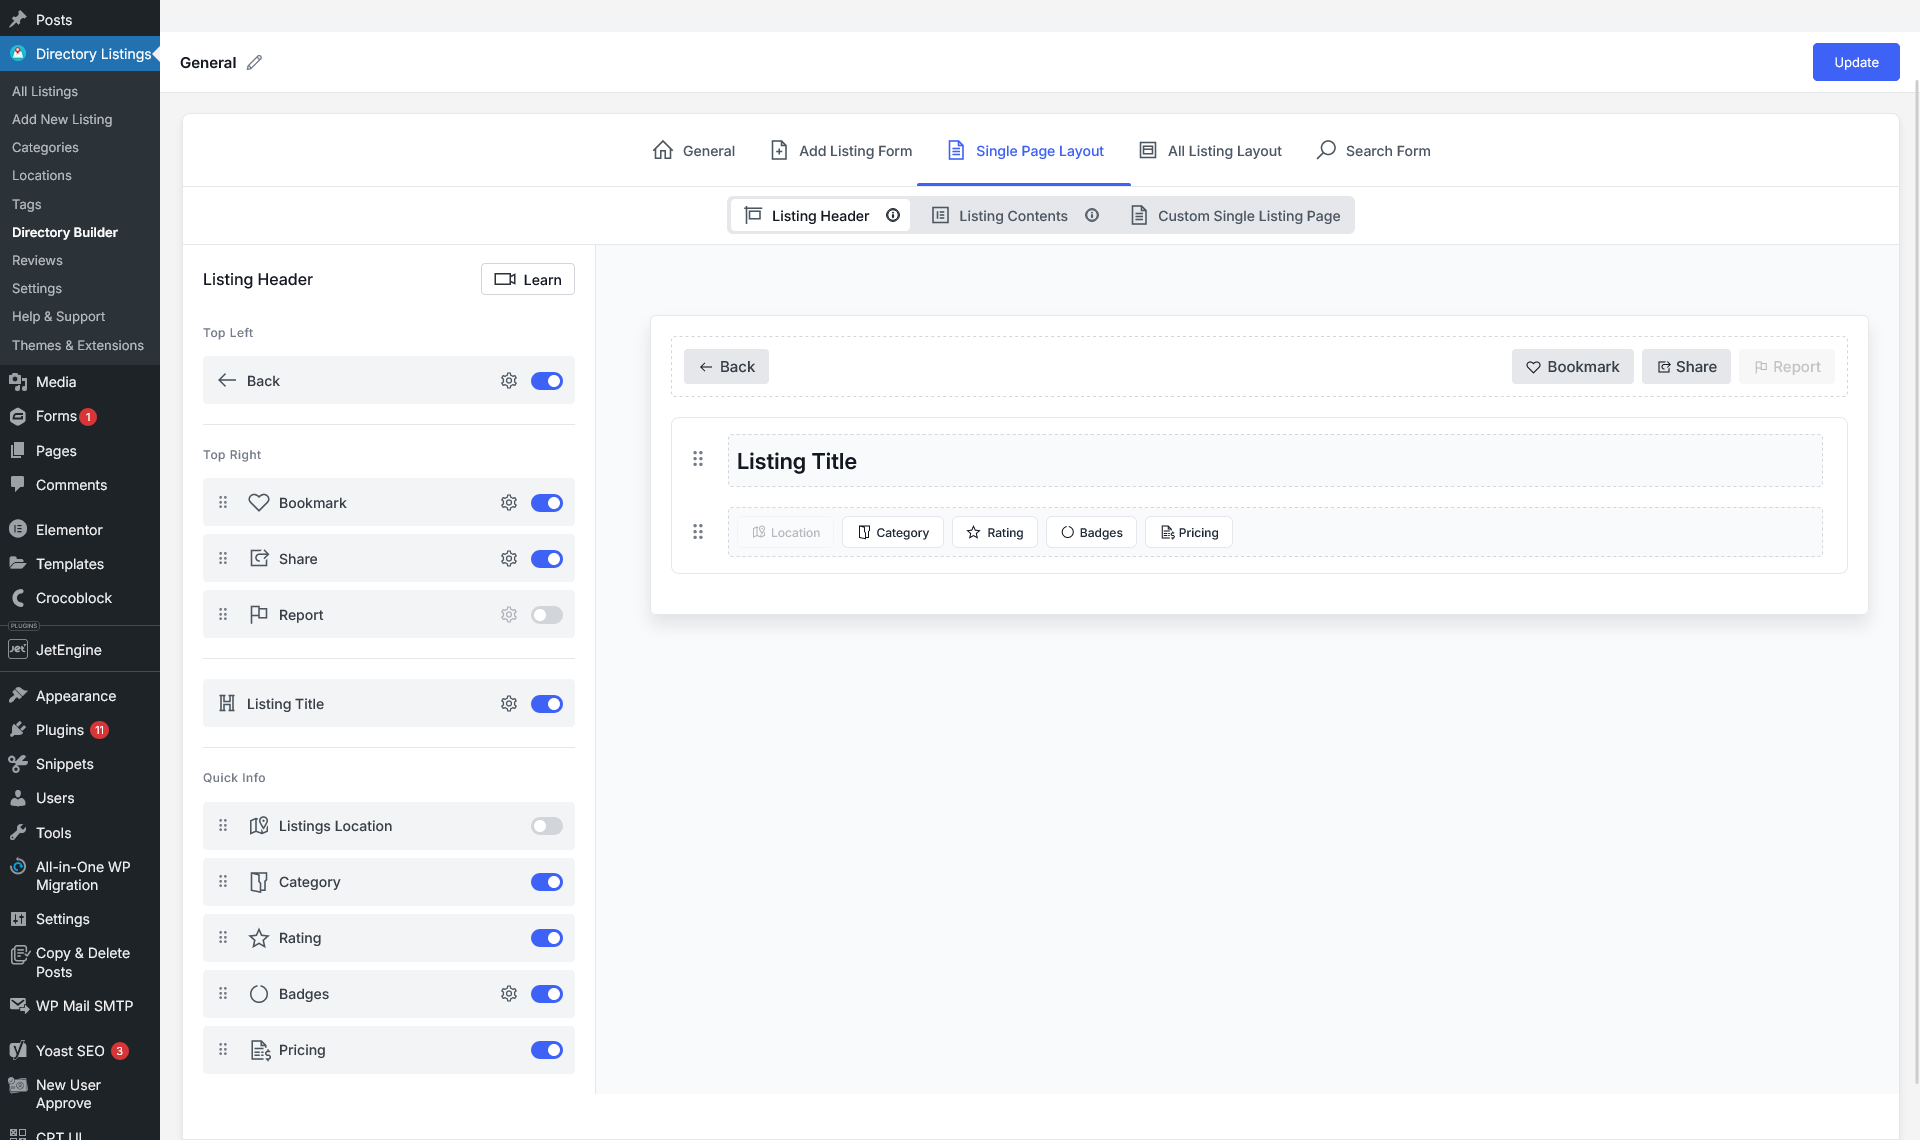
Configure the Listing Header
Click on Listing Header and toggle ON/OFF the elements you want to display:
- Back Button
- Bookmark
- Share
- Report
- Listing Title
- Location
- Category
- Rating
- Badges
- Pricing
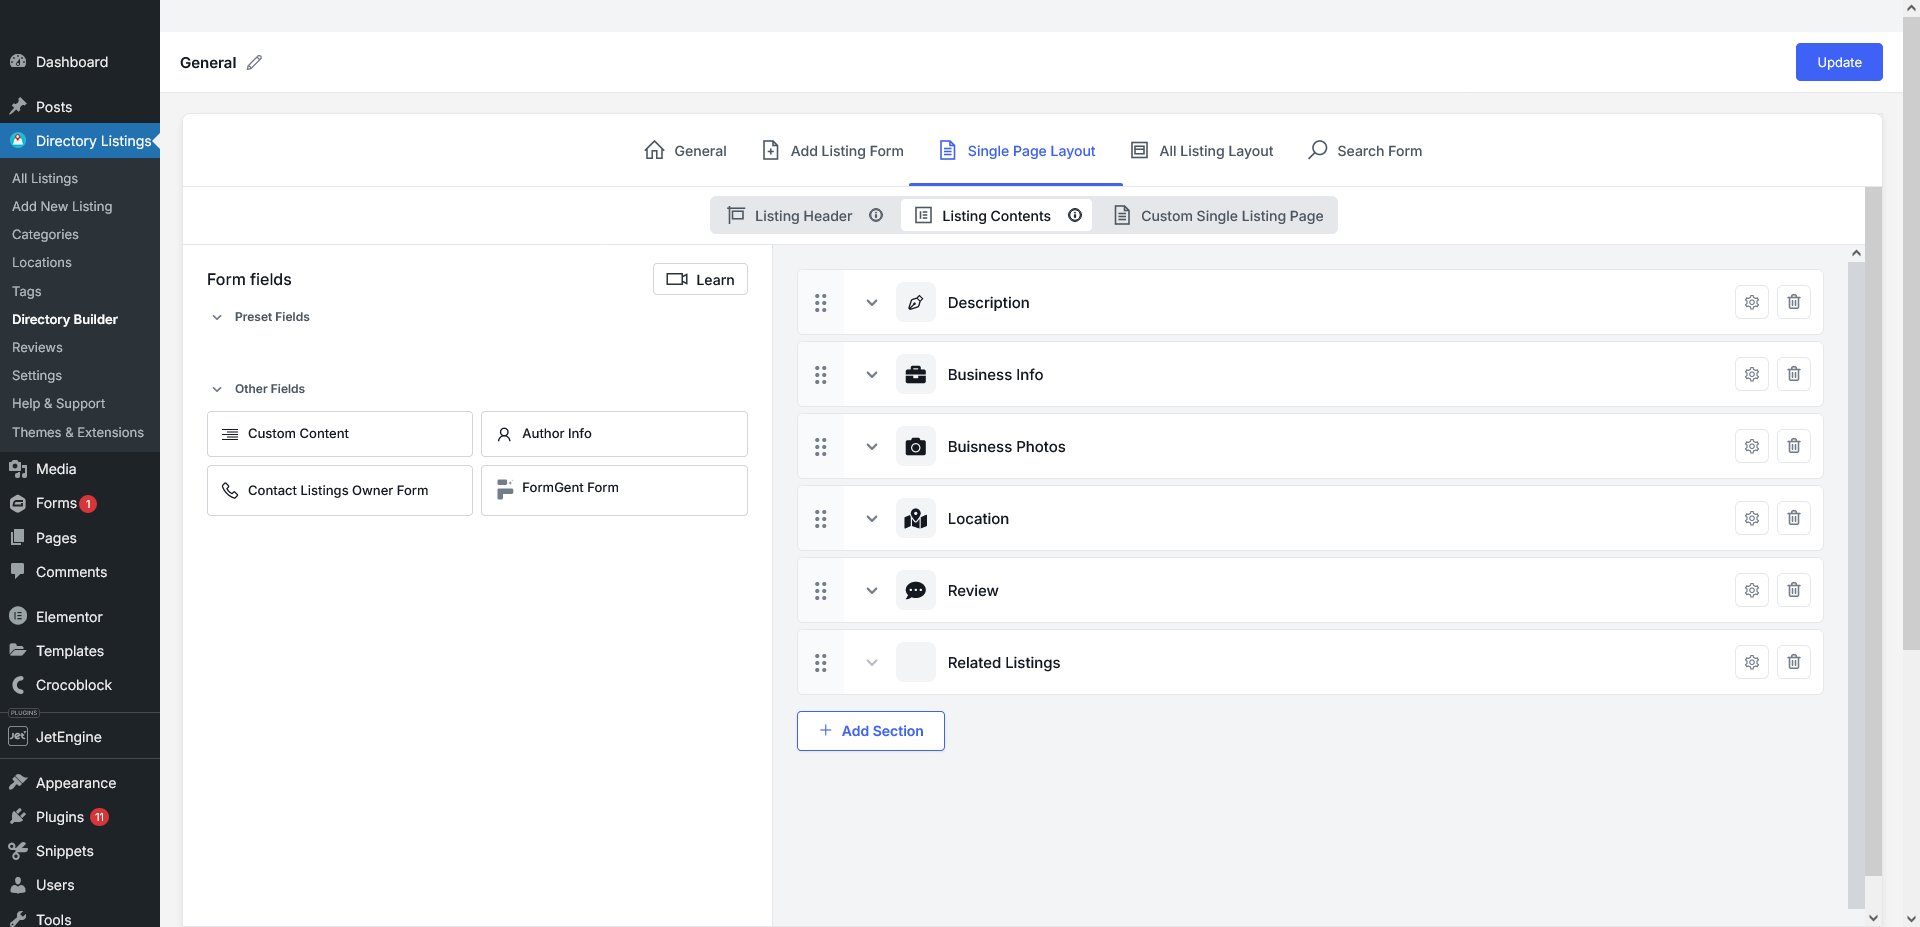
Configure Your Listing Contents
Next, go to:
Listing Contents
Drag, reorder, or remove blocks like:
- Description
- Business Information
- Business Photos
- Location Map
- Reviews
- Related Listings
- Author Info
- Custom Content
After you finish arranging fields, click Update.
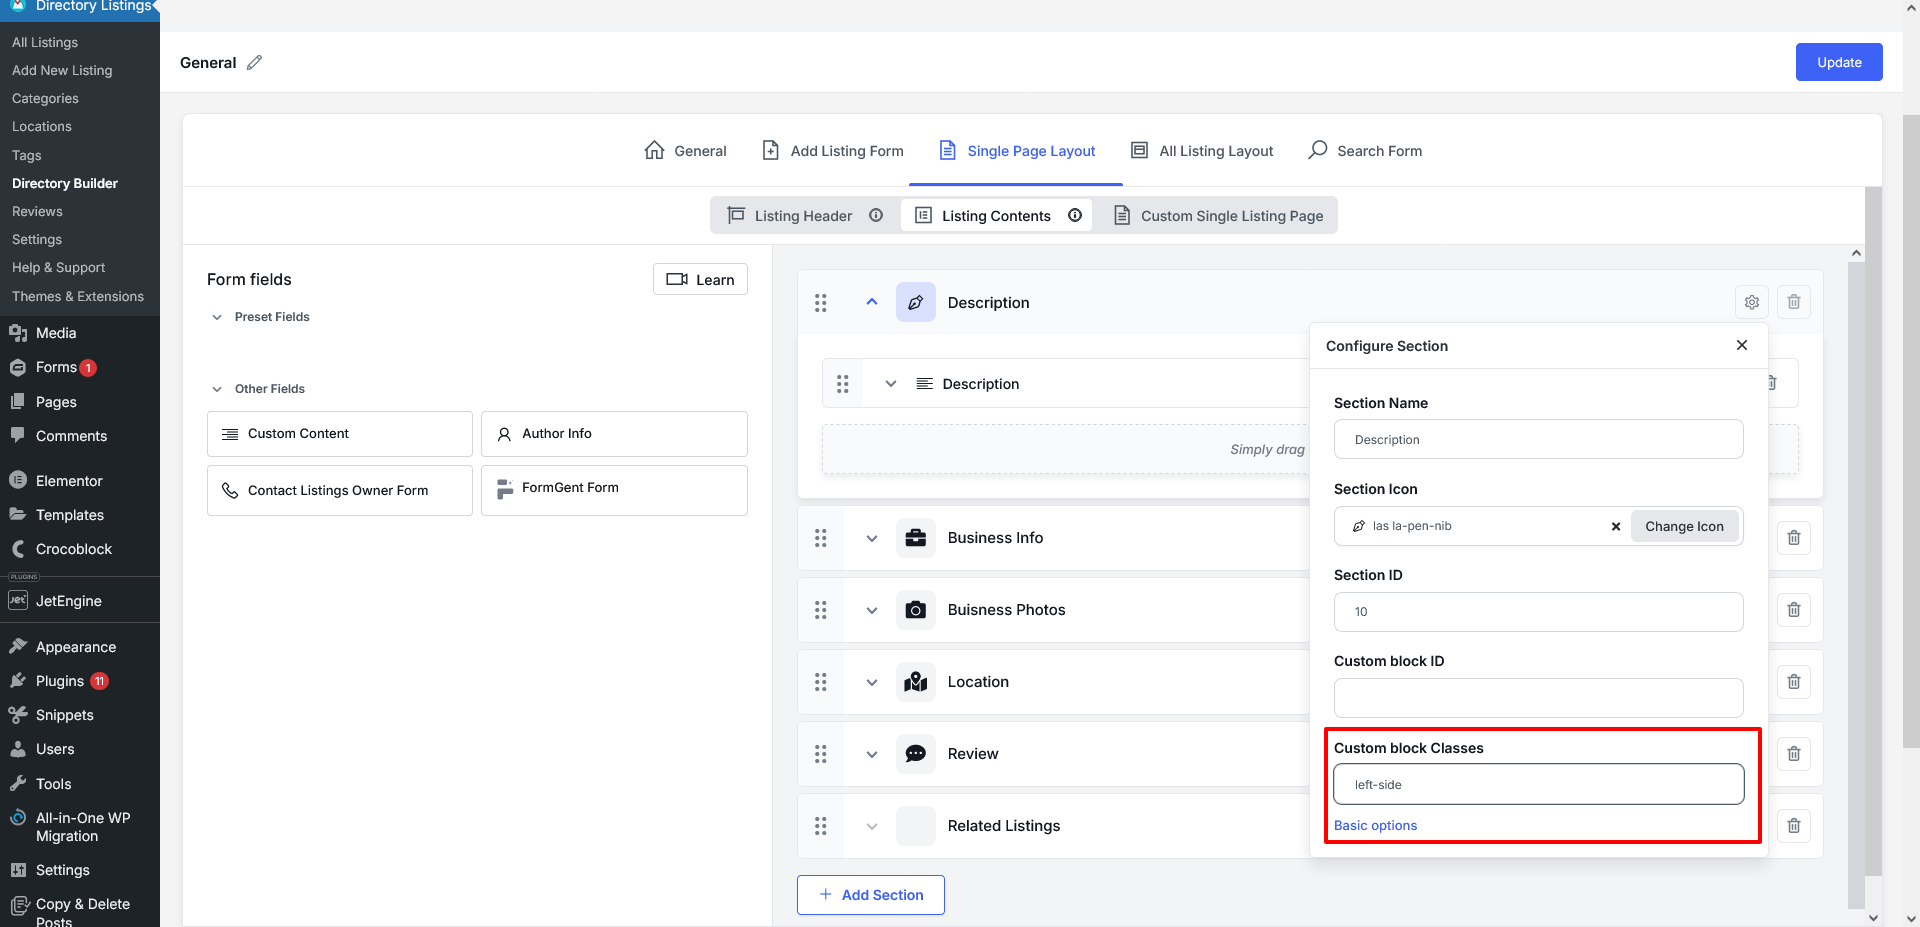
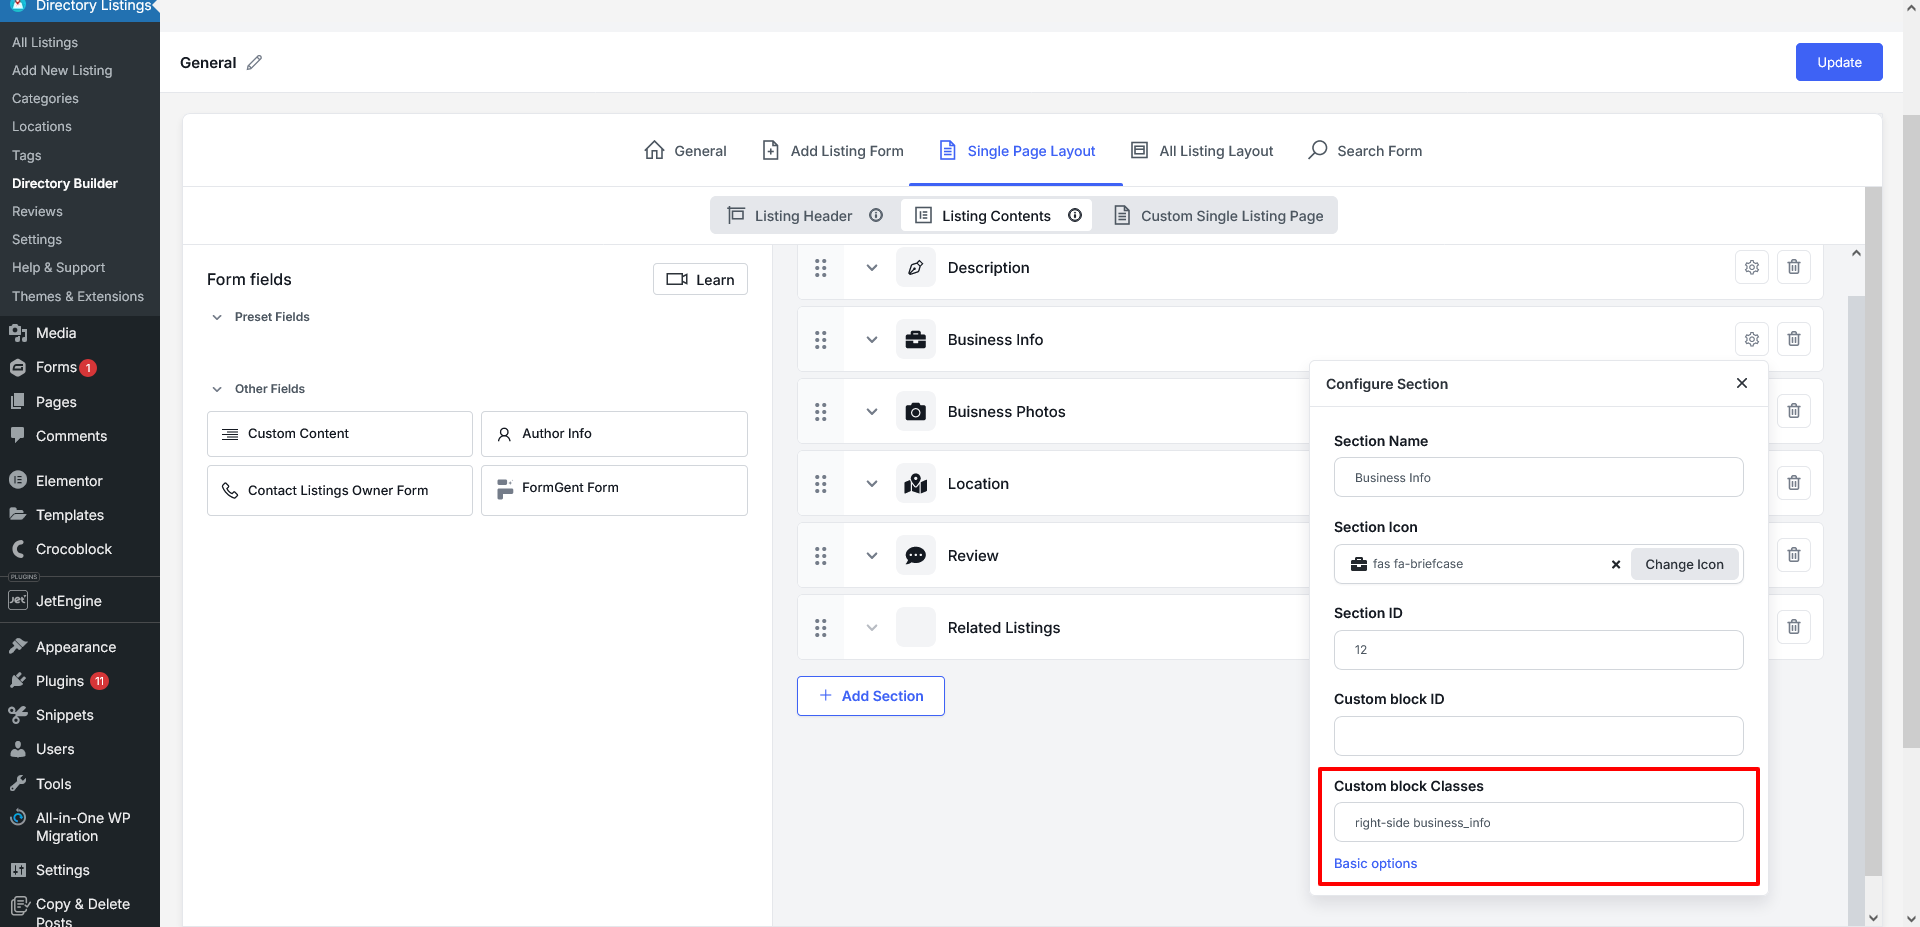
Step 3: Assign Left or Right Column Placement
Now we need to tell the system which content belongs in the sidebar and which belongs in the main content area.
Click a section → open its settings → find Custom Block Classes.
Add one of the following:
| Class Name | Layout Position |
|---|---|
| left-side | Appears in left/main content section |
| right-side | Appears inside the sidebar |
Example:
- Description → left-side
- Business Info / Contact Form → right-side
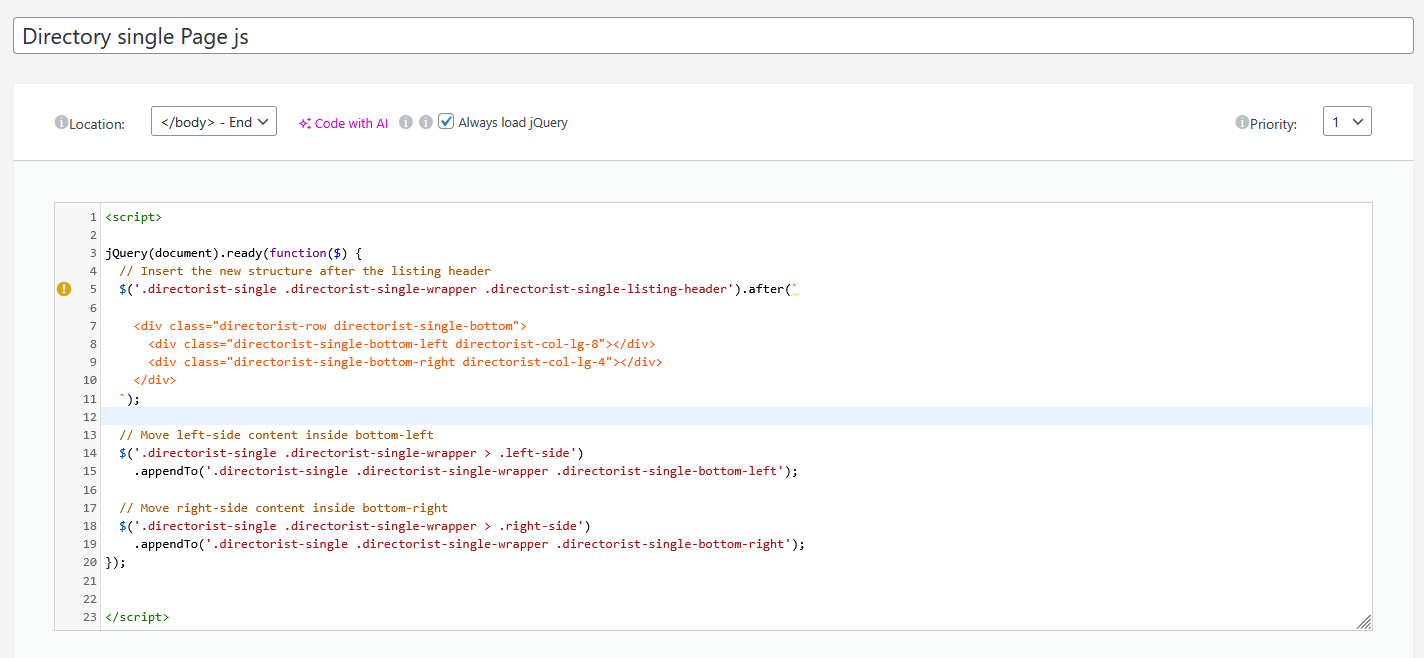
Step 4: Add Custom Elementor JavaScript
Now we’ll use a small script to organize the layout structure.
Go to:
Elementor → Custom Code → Add New
- Name: Create Directory Single Page JS
- Location: Header or Footer (recommended Footer)
Paste this script:
<script>
jQuery(document).ready(function($) {

  // Insert new layout row after the listing header
  $('.directorist-single .directorist-single-wrapper .directorist-single-listing-header').after(`
    <div class="directorist-row directorist-single-bottom">
      <div class="directorist-single-bottom-left directorist-col-lg-8"></div>
      <div class="directorist-single-bottom-right directorist-col-lg-4"></div>
    </div>
  `);

  // Move left-side items into left content area
  $('.directorist-single .directorist-single-wrapper > .left-side')
    .appendTo('.directorist-single .directorist-single-wrapper .directorist-single-bottom-left');
  // Move right-side items into sidebar
  $('.directorist-single .directorist-single-wrapper > .right-side')
    .appendTo('.directorist-single .directorist-single-wrapper .directorist-single-bottom-right');
});
</script>
Save and make sure it applies sitewide or only on Directorist single pages (recommended).
Step 5: Style and Customize
Now that the structure is created, you can:
- Add spacing
- Add backgrounds
- Customize typography
- Style widgets
Make it visually match your directory branding.
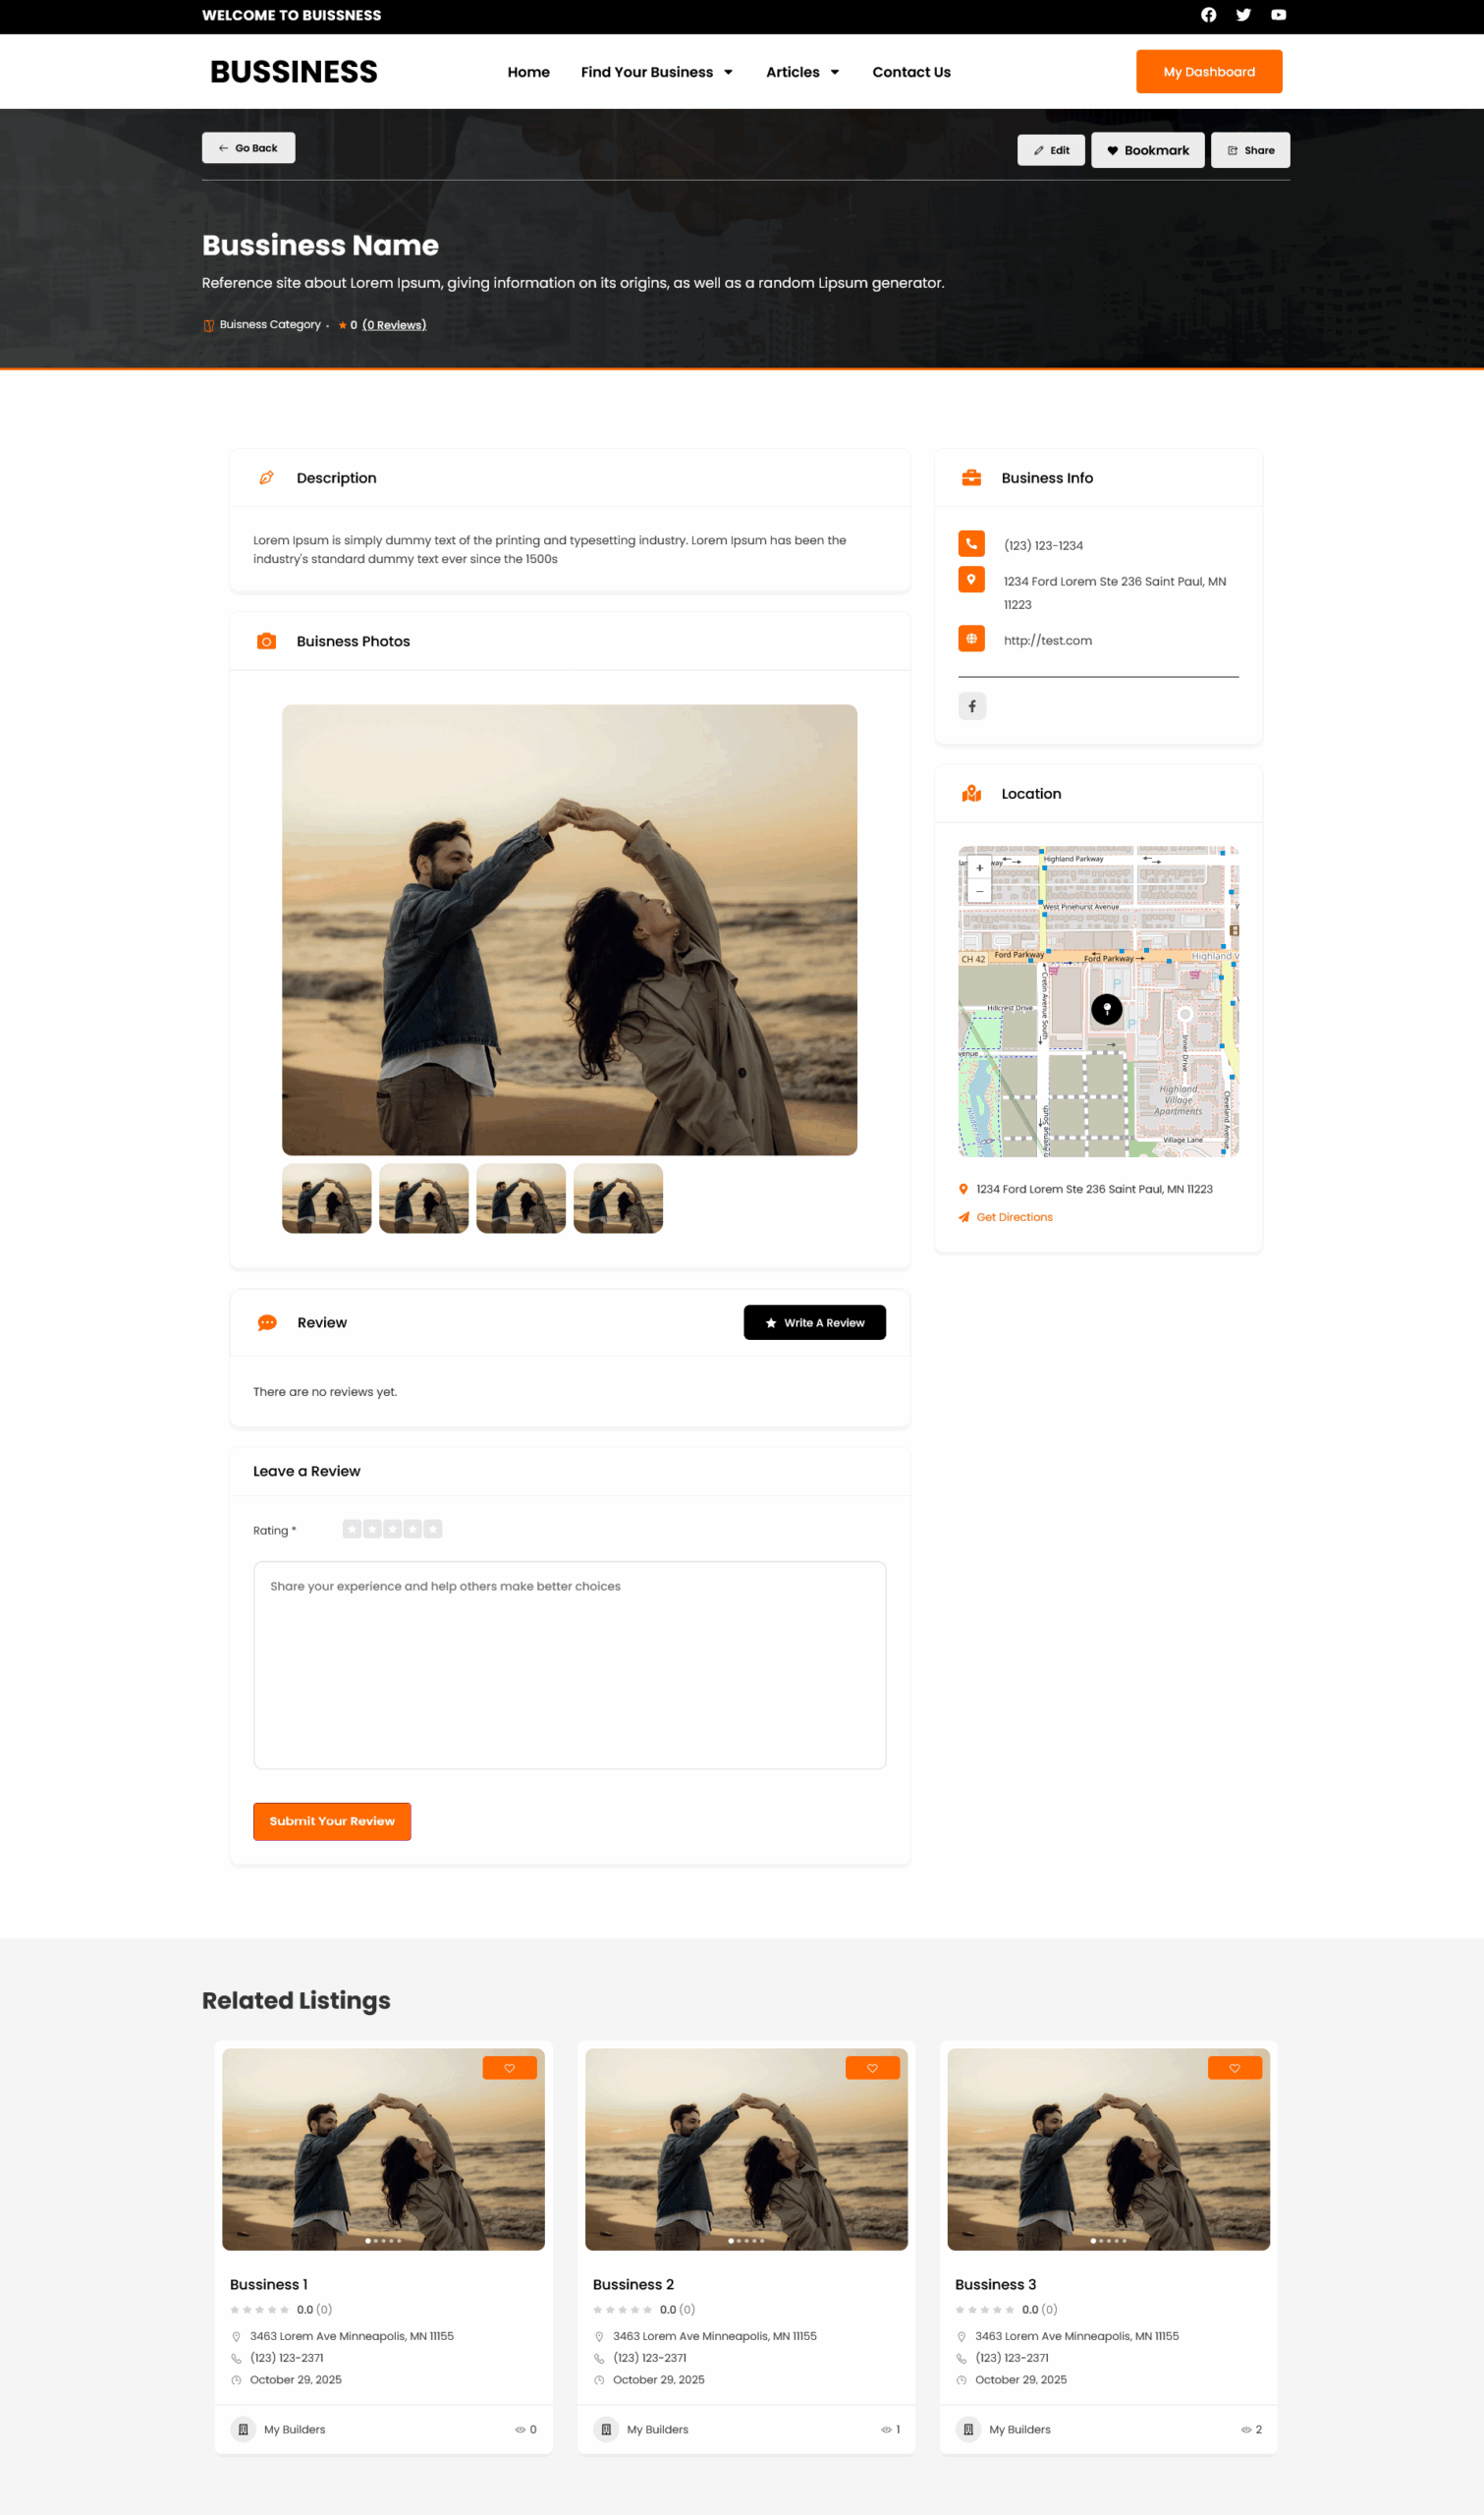
Final Output
You’ll now have a clean, structured two-column layout where:
- Main business details appear on the left
- Contact, map, info, and widgets appear on the right sidebar
Conclusion
With just a few simple steps and a small JavaScript tweak, you can fully customize the Directorist Single Listing Page layout using Elementor—without editing plugin files or writing a custom template.
This method gives you complete layout control and makes your business directory look more professional and user-friendly.
If you’re building a business directory, custom listing platform, or Elementor-based marketplace, our team can handle the complete project—from data structure and custom templates to dynamic integrations and performance optimization.
You can Book a Free Project Consultation to discuss your requirements, timelines, and how we can deliver a scalable, production-ready solution for your directory website.