
Table of Contents
- Why Add Custom Fields to WooCommerce Registration Forms?
- Method 1: Add Custom Fields Using WooCommerce Hooks
- Method 2: Add Custom Fields with JetFormBuilder and JetEngine
- Method 3: Use a WooCommerce Registration Plugin
- When Should You Use a Plugin?
- Which Method Should You Choose?
- Best Practices for WooCommerce Custom Registration Fields
- Final Thoughts
The default WooCommerce registration form provides the basic fields customers need to create an account. However, many online stores need additional information, such as a phone number, date of birth, preferred contact method, or marketing preferences.
Adding custom fields to the WooCommerce registration form allows store owners to collect this information during account creation and use it to improve customer communication and personalization.
In this guide, we’ll explore three easy methods to add custom fields to WooCommerce registration forms: using WooCommerce hooks, JetFormBuilder with JetEngine, and a dedicated WooCommerce registration plugin.
Why Add Custom Fields to WooCommerce Registration Forms?
Additional registration fields can help you collect useful customer information from the beginning of the relationship.
For example, you can add fields for:
- Phone numbers;
- Date of birth;
- Company name;
- Preferred contact method;
- Newsletter subscription;
- Terms and Conditions acceptance;
- How customers discovered your store;
- Additional customer preferences.
However, avoid adding unnecessary fields. A long registration form can make the signup process more complicated and may discourage customers from completing it. Only request information that has a clear purpose.
Method 1: Add Custom Fields Using WooCommerce Hooks
The first method is suitable for developers who are comfortable working with PHP. WooCommerce provides hooks that allow you to add fields to the registration form, validate submitted information, and save the values to the customer’s account.
Three useful hooks are:
- woocommerce_register_form – displays additional fields on the registration form.
- woocommerce_register_post – validates the submitted values.
- user_register – saves the submitted information to user meta.
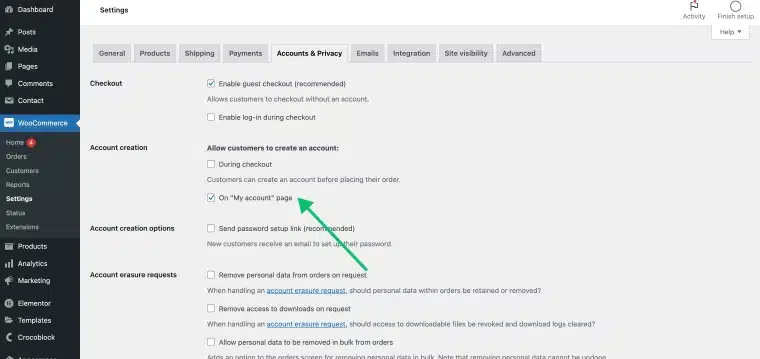
Before adding custom fields, make sure customer registration is enabled under WordPress Dashboard → WooCommerce → Settings → Accounts & Privacy.
Add a Phone Number Field
For example, you can add a phone number field to the registration form with PHP:
add_action( 'woocommerce_register_form', 'add_custom_phone_field' );

function add_custom_phone_field() {
?>
<p class="form-row form-row-wide">
<label for="reg_phone">
<?php esc_html_e( 'Phone Number', 'woocommerce' ); ?>
<span class="required">*</span>
</label>

<input
type="tel"
class="input-text"
name="phone"
id="reg_phone"
value="<?php echo isset( $_POST['phone'] ) ? esc_attr( wp_unslash( $_POST['phone'] ) ) : ''; ?>"
required
/>
</p>
<?php
}
The field will now appear on the WooCommerce registration form.
Validate the Custom Field
You should also validate the information before creating the account:
add_action( 'woocommerce_register_post', 'validate_custom_phone_field', 10, 3 );

function validate_custom_phone_field( $username, $email, $validation_errors ) {

if ( empty( $_POST['phone'] ) ) {
$validation_errors->add(
'phone_error',
__( 'Please enter your phone number.', 'woocommerce' )
);
}

}
Save the Field Value
Finally, save the submitted value to the customer’s user account:
add_action( 'user_register', 'save_custom_phone_field' );

function save_custom_phone_field( $user_id ) {

if ( isset( $_POST['phone'] ) ) {
update_user_meta(
$user_id,
'phone',
sanitize_text_field( wp_unslash( $_POST['phone'] ) )
);
}

}
This approach gives developers complete control over how the field is displayed, validated, and stored. However, it requires PHP knowledge and additional maintenance.
Tip: If you add custom code, use a child theme or a suitable code-management solution so theme updates do not overwrite your changes.
Method 2: Add Custom Fields with JetFormBuilder and JetEngine
If you want a more visual approach without manually coding every part of the registration process, you can use JetFormBuilder together with JetEngine.
JetEngine can create custom fields for WordPress users through its Meta Boxes feature, while JetFormBuilder can display those fields in a front-end registration form and map submitted values to the user’s account.
Step 1: Create Custom User Fields
First, create the fields that you want to collect from customers.
Go to:
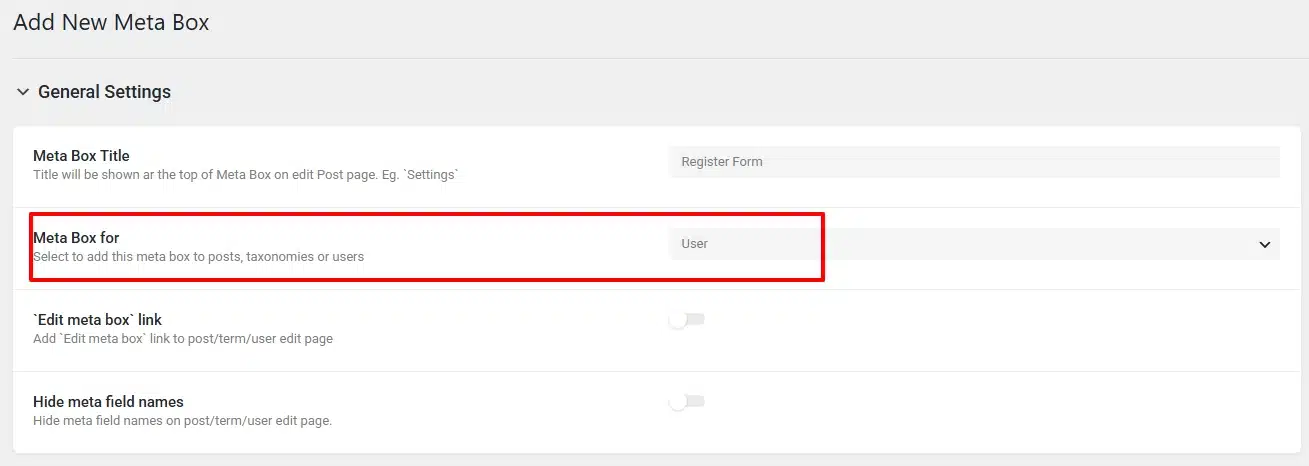
WordPress Dashboard → JetEngine → Meta Boxes
Create a new Meta Box and set it to work with the User object.
For example, you could create:
- Phone Number;
- Company Name;
- Date of Birth;
- Preferred Contact Method;
- Newsletter Subscription.
For a phone number field, you could use:
- Label: Phone Number
- Name/ID: phone
- Object Type: Field
- Field Type: Number or appropriate text/tel field
Once the Meta Box is created, the custom field becomes available as part of the user’s profile data.
Step 2: Create the Registration Form
Next, go to:
JetFormBuilder → Add New Form
Create a registration form and add the fields you want customers to complete.
For example:
- Username;
- Email;
- Password;
- Phone Number;
- Company Name;
- Preferred Contact Method.
Make the important registration fields required and configure validation rules where necessary.
Step 3: Map the Fields
After adding the form fields, configure the Register User post-submit action.
Map each form field to the corresponding user field created with JetEngine.
For example:
Phone Number form field → phone user meta field
This ensures that information entered during registration is stored in the customer’s account.
JetFormBuilder can also be used with additional form functionality such as conditional logic, email notifications, and different field types, making this method useful for more advanced registration workflows.
Method 3: Use a WooCommerce Registration Plugin

The third option is to use a dedicated WooCommerce registration plugin.
This approach is useful if you want to customize registration forms through a graphical interface rather than writing PHP code or building the entire workflow manually.
WooCommerce registration plugins can provide features such as:
- Custom text fields;
- Dropdowns;
- Checkboxes;
- File uploads;
- Multiple registration forms;
- Conditional fields;
- User role assignment;
- Email verification;
- Manual registration approval.
For example, a dedicated registration plugin can extend the default WooCommerce registration process and give you a form-building interface for adding additional customer information.
When Should You Use a Plugin?
A dedicated plugin can be a good choice when:
- You don’t want to write custom PHP;
- You need several different registration forms;
- You need conditional fields;
- You want advanced user-management features;
- You need email verification or manual approval;
- You want to manage registration fields from the WordPress dashboard.
The main advantage is convenience. Instead of manually creating, validating, and saving every field, many of these functions are handled through the plugin interface.
Which Method Should You Choose?
The best method depends on your technical requirements and experience.
| Method | Best For | Coding Required |
|---|---|---|
| WooCommerce Hooks | Developers who need complete control | Yes |
| JetFormBuilder + JetEngine | Flexible visual registration forms | Little to none |
| WooCommerce Registration Plugin | Quick setup and advanced registration features | No |
If you are comfortable with PHP and only need a few custom fields, WooCommerce hooks can be a lightweight solution.
If you want a flexible form-building workflow with custom user fields, JetFormBuilder and JetEngine provide a visual approach.
If you need advanced registration management and want to avoid coding, a dedicated WooCommerce registration plugin may be the easiest option.
Best Practices for WooCommerce Custom Registration Fields
Before adding custom fields to your registration form, keep these practices in mind:
Only Ask for Necessary Information
Every additional field increases the amount of information customers need to provide. Keep the registration process as short as possible.
Clearly Explain Optional Fields
If a field isn’t required, make its optional status clear. Customers should understand which information is necessary to create their account.
Validate Submitted Data
Phone numbers, dates, email addresses, and other structured information should be validated before being stored.
Protect Customer Data
Only collect information that you actually need, and make sure customer data is stored and handled securely.
Test the Registration Process
After adding custom fields, test the entire workflow. Check that:
- The fields appear correctly;
- Required fields cannot be skipped;
- Validation messages work;
- Registration succeeds with valid information;
- Submitted values are saved to the correct user account.
Final Thoughts
Adding custom fields to WooCommerce registration forms gives store owners more control over the information collected during customer signup. Whether you prefer custom PHP, a visual form builder, or a dedicated WooCommerce plugin, there are several ways to extend the default registration experience.
For developers, WooCommerce hooks offer maximum control. For a flexible no-code or low-code workflow, JetFormBuilder with JetEngine provides a convenient way to create and map custom user fields. A dedicated WooCommerce registration plugin is another practical option when you need advanced registration features without writing custom code.
Choose the method that matches your store’s requirements, and remember to keep the registration form simple so customers can complete it quickly.