Table of Contents
- What Is JetCompareWishlist?
- Why Add a Wishlist to WooCommerce?
- Step 1: Install and Activate JetCompareWishlist
- Step 2: Configure the Wishlist Settings
- Step 3: Create a Wishlist Page
- Step 4: Add the Wishlist Button
- Step 5: Customize the Wishlist Button
- Step 6: Display Saved Products
- Step 7: Test the Wishlist Functionality
- Tips for Using Wishlists Effectively
- Conclusion
A wishlist gives WooCommerce customers an easy way to save products they are interested in and return to them later. Instead of searching for the same products repeatedly, shoppers can keep their preferred items in one convenient place.
With the JetCompareWishlist plugin, you can add wishlist functionality to your WooCommerce store and allow customers to save products directly from your shop and product pages.
In this guide, you’ll learn how to enable a wishlist for WooCommerce products using JetCompareWishlist and configure the basic settings for your store.
What Is JetCompareWishlist?
JetCompareWishlist is a Crocoblock plugin that adds comparison and wishlist functionality to WooCommerce websites. It allows you to provide customers with options to save products, compare products, and access their saved items while browsing your store.
For this tutorial, we’ll focus specifically on the wishlist functionality.
Why Add a Wishlist to WooCommerce?
A wishlist can make product browsing more convenient and encourage customers to return to your store. It is particularly useful for stores with a large product catalog where visitors may want to save several products before deciding what to purchase.
A wishlist can help customers:
- Save products for later.
- Keep track of products they are interested in.
- Quickly return to previously saved products.
- Organize their shopping journey without adding products directly to the cart.
Now, let’s see how to set up this functionality.
Step 1: Install and Activate JetCompareWishlist
First, make sure the JetCompareWishlist plugin is installed and activated on your WordPress website.
After activation, the plugin adds its own settings that allow you to configure wishlist and comparison features for WooCommerce.
Once the plugin is active, you can start configuring the wishlist functionality.
Step 2: Configure the Wishlist Settings
From your WordPress dashboard, open the JetCompareWishlist settings.
Look for the Wishlist section and enable the wishlist functionality.
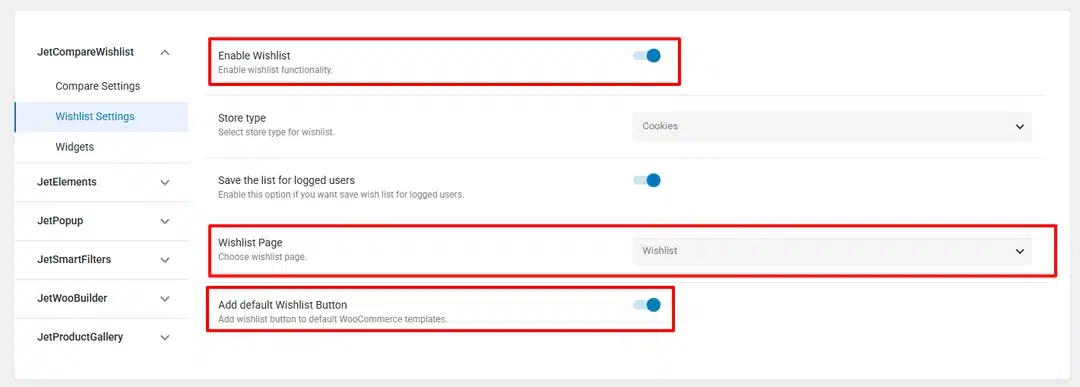
Here, you can configure the way wishlist actions should work on your website. Depending on your store setup, you can adjust options related to wishlist buttons, saved products, and the wishlist page.
Make sure the wishlist feature is enabled before moving on to the next step.
Step 3: Create a Wishlist Page
Your customers need a dedicated location where they can view the products they have saved.
Create a new WordPress page that will be used as the wishlist page. Give the page a suitable title, such as Wishlist.
You can then configure JetCompareWishlist to use this page for displaying saved WooCommerce products.
The exact page layout can be customized to match the design of your store.
Step 4: Add the Wishlist Button
The next step is to provide customers with a way to add products to their wishlist.
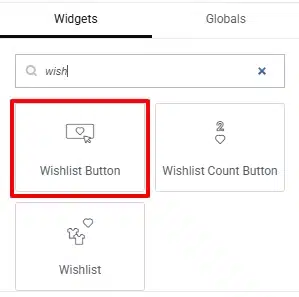
JetCompareWishlist provides wishlist widgets and functionality that can be integrated into your WooCommerce product layouts.
If you are using Elementor, add the appropriate JetCompareWishlist widget to your product listing or single-product template.
You can place the wishlist button near the product image, title, price, or add-to-cart button.
For example, your product layout could include:
- Product image
- Product title
- Price
- Add to Cart button
- Add to Wishlist button
This makes the wishlist option easy for customers to find while browsing products.
Step 5: Customize the Wishlist Button
After adding the wishlist functionality, customize its appearance to match your WooCommerce website.
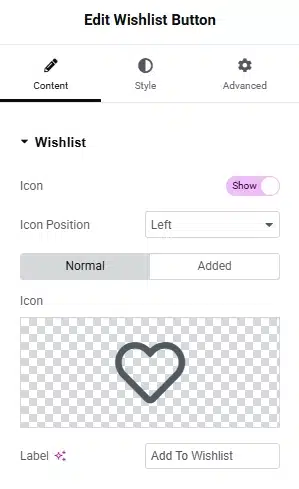
Depending on your design, you can use a heart icon, text label, or another visual indicator for the wishlist action.
You may also want to customize the appearance of the button when a product has already been added to the wishlist.
For example, the button can visually indicate that the product is already saved. This gives customers immediate feedback when they interact with it.
Step 6: Display Saved Products
Once customers start adding products to their wishlist, they need to be able to view their saved items.
Use the wishlist page you created earlier to display these products.
The wishlist layout can include useful product information such as:
- Product image
- Product name
- Price
- Product availability
- Link to the product
- Remove-from-wishlist option
- Add-to-cart option
You can adjust the layout according to the design and requirements of your WooCommerce store.
Step 7: Test the Wishlist Functionality
Before making the feature available to customers, test the complete wishlist workflow.
Open your WooCommerce shop as a customer and check the following:
- Open a product or product archive.
- Click the Add to Wishlist button.
- Confirm that the product is added successfully.
- Open the Wishlist page.
- Check that the saved product appears correctly.
- Remove the product from the wishlist.
- Add another product and test the process again.
Also check the wishlist on different screen sizes to make sure the button and saved-product layout work properly on desktop, tablet, and mobile devices.
Tips for Using Wishlists Effectively
Adding the feature is only part of the process. The wishlist should also be easy to use.
Consider these practices:
Make the Wishlist Button Easy to Find
Place the wishlist button close to other important product actions so customers can find it without searching through the page.
Use Clear Visual Feedback
Show customers whether a product has been added to their wishlist. A changed icon, label, or button state can make the interaction clearer.
Keep the Wishlist Page Simple
Avoid unnecessary elements that make it difficult for customers to manage their saved products. Focus on the products and the actions customers are most likely to use.
Check Mobile Layouts
Many WooCommerce customers browse products on mobile devices. Make sure wishlist controls are easy to tap and that saved products display correctly on smaller screens.
Conclusion
Adding wishlist functionality can give WooCommerce customers a convenient way to save products they may want to purchase later. With JetCompareWishlist, you can add wishlist controls to your WooCommerce product layouts, create a dedicated wishlist page, and customize the experience to fit your store.
Once configured, test the complete workflow across your product pages and devices to make sure customers can easily save, view, and remove products from their wishlist.