Table of Contents
- What is a Floating Image Animation?
- What You’ll Build
- Step 1: Create a 4 Column Layout
- Step 2: Style the Images
- Step 3: Apply Animation Settings
- Step 4: Add CSS for Smooth Floating Effect
- Step 5: Add Animation Delay (Key Step)
- Step 6: Fine-Tune the Animation
- Step 7: Make It Responsive
- Final Result
- Why This Method Works
- Pro Tips for Better Results
- Conclusion
Animations can instantly elevate your website design. With Divi 5, you can create smooth, modern effects without writing complex code.
In this tutorial, you’ll learn how to create a floating image animation using a simple 4-column layout, built-in animation settings, and a small CSS enhancement.
What is a Floating Image Animation?
A floating animation creates a subtle up-and-down movement that makes elements feel alive.
It’s commonly used in:
- Hero sections
- Feature layouts
- Product showcases
- Creative portfolios
The goal is simple: add motion without distracting the user
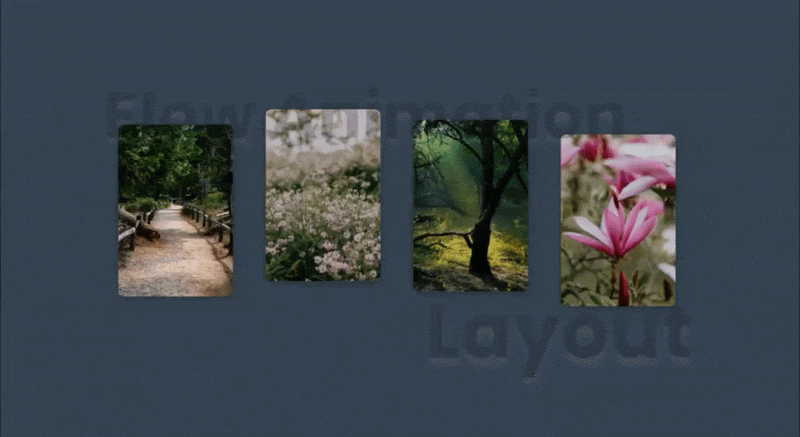
What You’ll Build
- A 4-column image layout
- Smooth floating animation
- Staggered animation timing
- Clean and modern UI
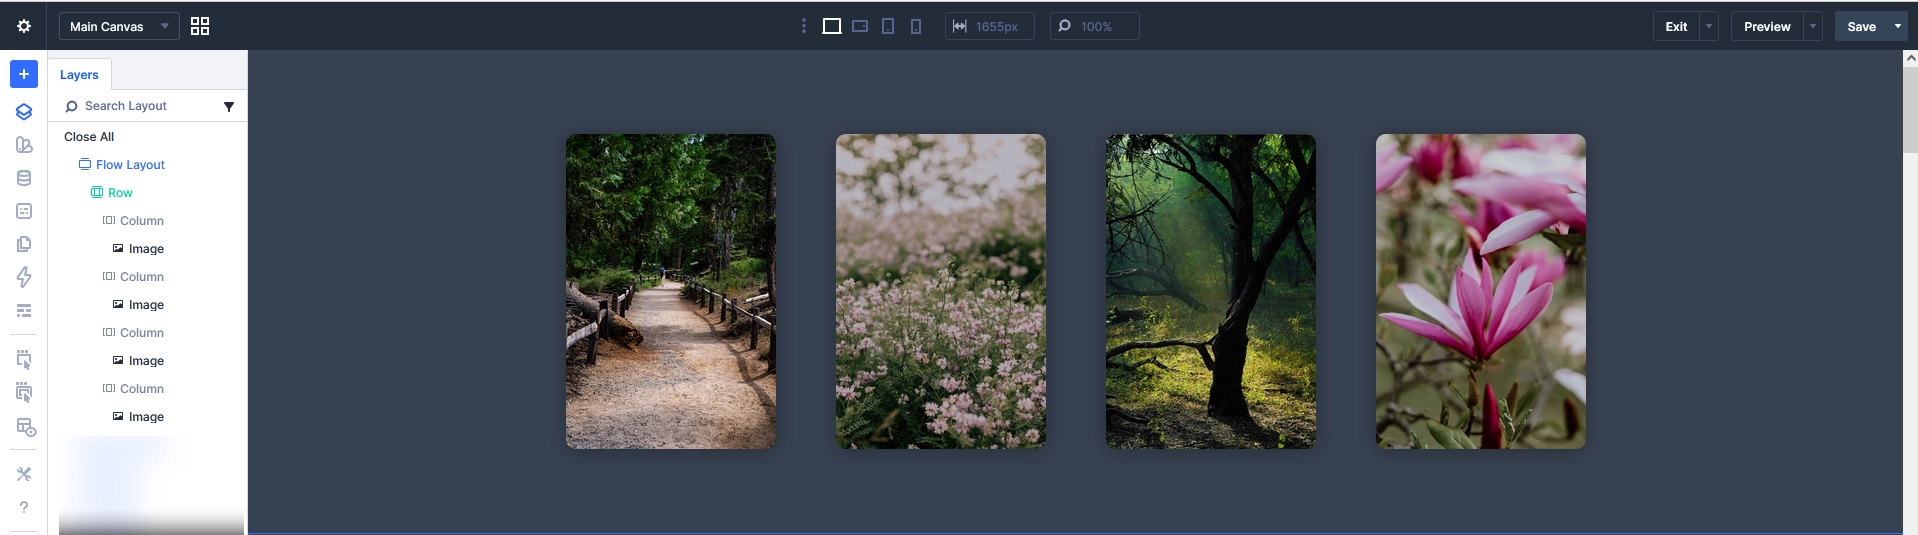
Step 1: Create a 4 Column Layout
Start by building your layout structure.
- Add a new Section
- Insert a Row with 4 Columns
- Add an Image Module inside each column
Keep spacing equal for a balanced layout.
Step 2: Style the Images
Make your layout visually appealing.
Image Design Settings:
- Border Radius: 12px–16px
- Box Shadow: Soft shadow for depth
- Spacing: Add margin between columns
This creates a clean, card-style layout.
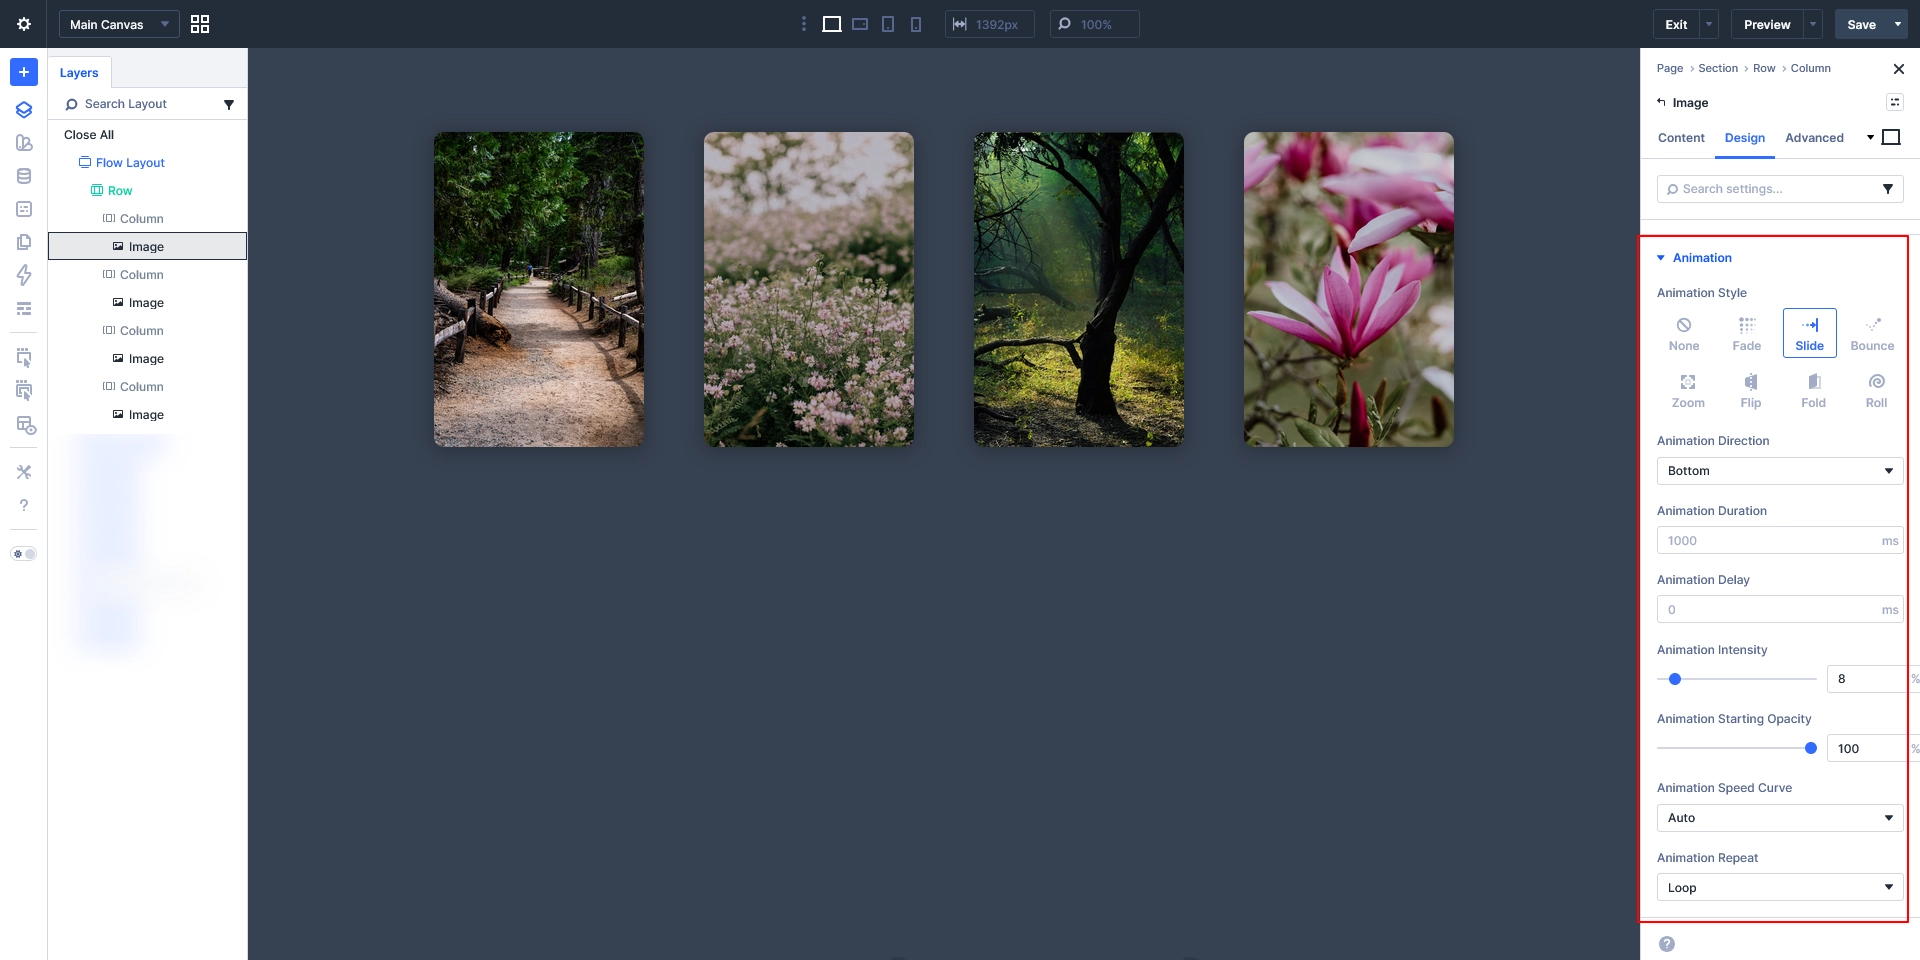
Step 3: Apply Animation Settings
Now add the base animation.
- Select an Image Module
- Go to Design → Animation
Use These Settings:
- Animation Style: Slide
- Animation Direction: Bottom
- Animation Duration: 1000ms
- Animation Intensity: 8%
- Animation Starting Opacity: 100%
- Animation Speed Curve: Auto
- Animation Repeat: Loop
This creates a continuous movement effect.
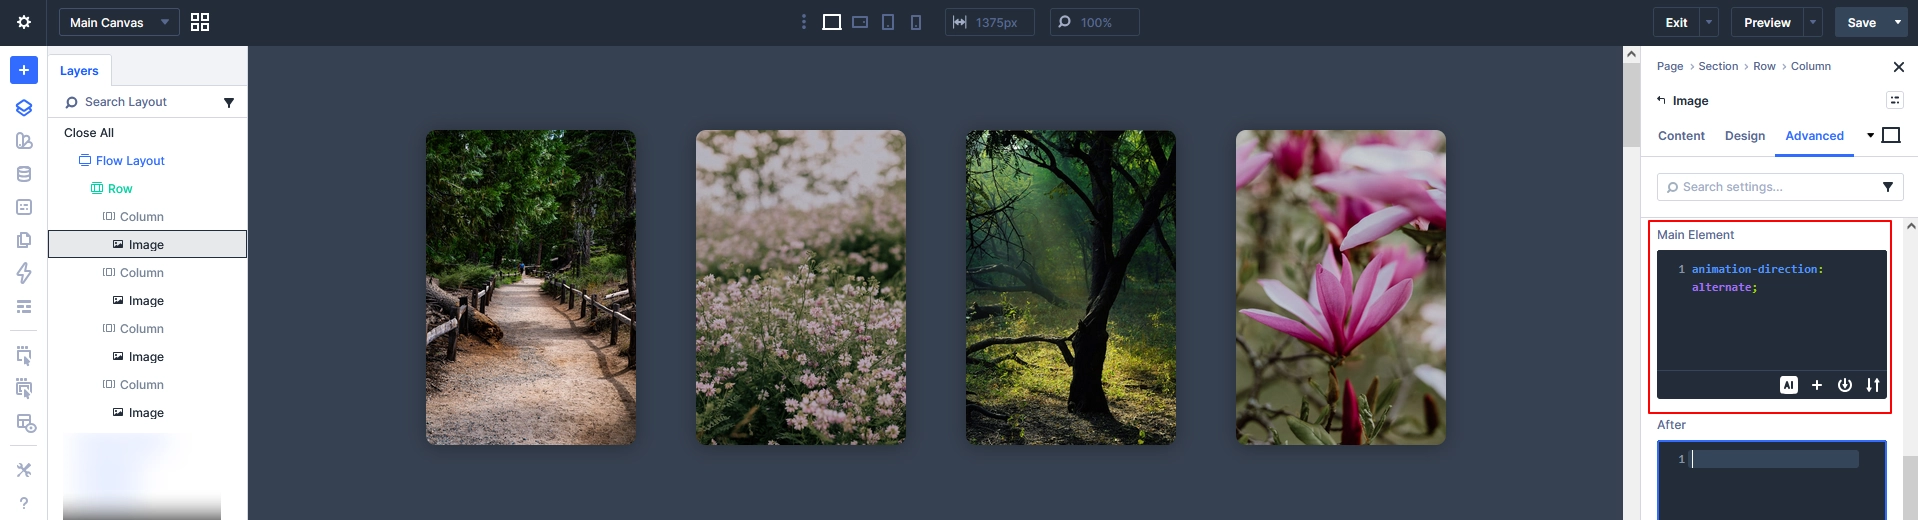
Step 4: Add CSS for Smooth Floating Effect
Now enhance the animation using a small CSS tweak.
Add this inside the Image Module → Advanced → Custom CSS:
animation-direction: alternate;
Why This is Important
By default, animations reset abruptly.
This CSS makes the animation:
- Move up and down smoothly
- Feel more natural
- Look like a true floating effect
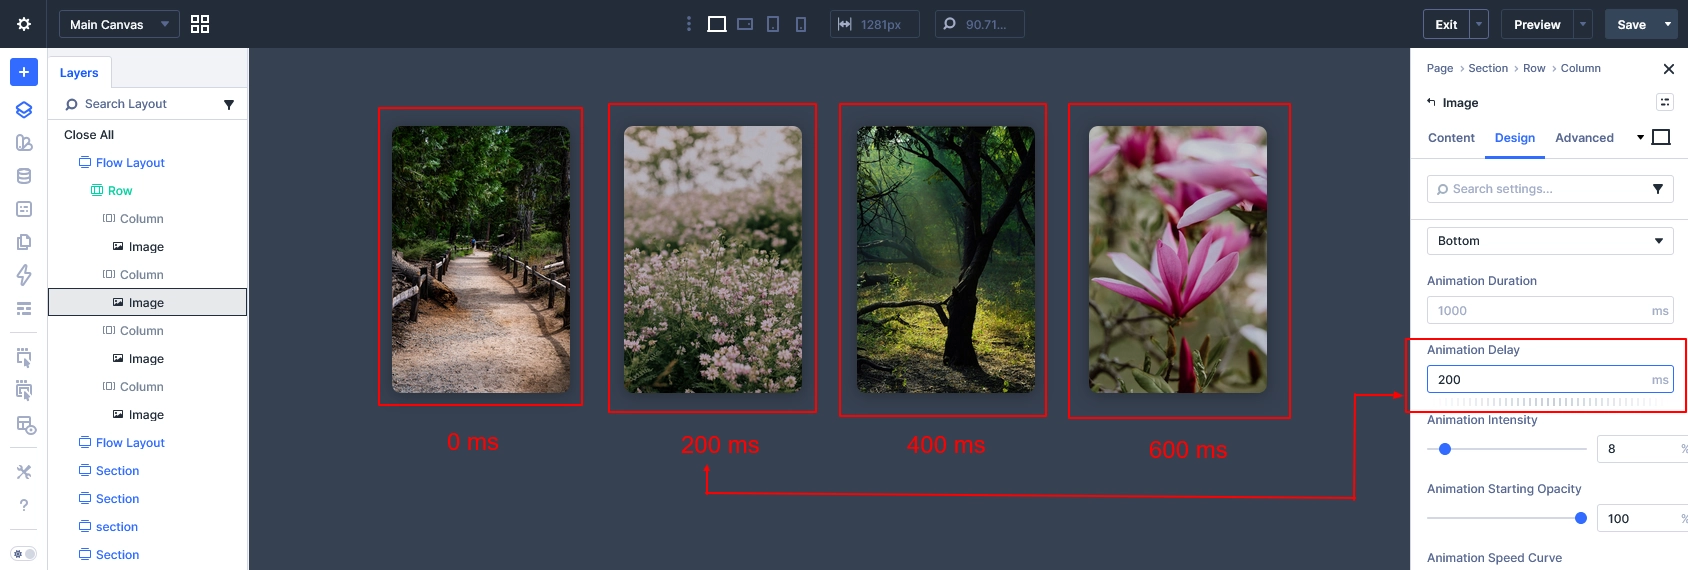
Step 5: Add Animation Delay (Key Step)
To make the animation more dynamic, apply different delays.
Recommended Delay Setup:
- Image 1 → 0ms
- Image 2 → 200ms
- Image 3 → 400ms
- Image 4 → 600ms
This creates a staggered animation effect, making it feel more organic.
Step 6: Fine-Tune the Animation
For a more premium result:
- Increase duration → 1200–2000ms
- Keep intensity low → 6%–8%
- Avoid fast or aggressive motion
Subtle animation always looks more professional.
Step 7: Make It Responsive
Ensure your layout works across all devices.
Mobile Optimization:
- Stack images vertically
- Reduce animation intensity
- Add spacing between images
Final Result
You now have a:
- Smooth floating animation
- Clean 4-column layout
- Natural motion using CSS
- Staggered timing for better UX
Why This Method Works
- Uses Divi’s native animation system
- No JavaScript required
- Lightweight and fast
- Easy to customize and reuse
Pro Tips for Better Results
- Use high-quality images
- Combine with gradient backgrounds
- Add hover effects for interaction
- Use uneven image heights for variation
Conclusion
With Divi 5, creating advanced animations like floating images is simple and efficient.
By combining:
- Built-in animation settings
- A small CSS tweak
- Smart delay timing
You can create a modern, engaging design that improves user experience without adding complexity.