Table of Contents
- What Is a Product Lightbox in WooCommerce?
- How to Create a Product Lightbox in WooCommerce
- Step 1: Choose a Lightbox Solution
- Step 2: Open Your WooCommerce Product Template
- Step 3: Add a Product Gallery
- Step 4: Connect the Gallery to WooCommerce Products
- Step 5: Enable the Lightbox
- Step 6: Configure Lightbox Options
- Step 7: Style the Lightbox
- Step 8: Test the Product Lightbox
- Best Practices for WooCommerce Product Lightboxes
- Use High-Quality Product Images
- Show Multiple Product Angles
- Optimize Images Before Uploading
- Keep Controls Easy to Understand
- Test on Mobile Devices
- Product Lightbox vs. WooCommerce Quick View
- Does a Product Lightbox Slow Down WooCommerce?
- Conclusion
Product images play an important role in an online store. Since customers cannot physically examine products before purchasing, clear and detailed visuals can help them understand what they are buying.
A WooCommerce product lightbox provides a convenient way for shoppers to view product images in a larger overlay without leaving the product page. Depending on the solution you use, customers can also zoom into images, move between gallery images, view captions, or open images in fullscreen mode.
In this guide, we’ll explain what a WooCommerce product lightbox is, why it can be useful, and how you can add one to your store.
What Is a Product Lightbox in WooCommerce?
A product lightbox is an image-viewing feature that opens a product image in an overlay when a customer clicks on it.
Instead of navigating to another page or opening the image in a separate browser tab, the visitor can inspect the product while staying on the same page.
A typical product lightbox may include features such as:
- Enlarged product images
- Image zoom
- Previous and next navigation
- Fullscreen viewing
- Image captions
- Image counters
- Multiple product gallery images
- Video support, depending on the implementation
This can be particularly useful for products where visual details matter, such as clothing, jewelry, furniture, artwork, accessories, and electronics.
How to Create a Product Lightbox in WooCommerce
There are different ways to implement a lightbox, including dedicated WooCommerce plugins, gallery plugins, and custom JavaScript solutions.
For stores using Elementor, a gallery solution such as JetProductGallery can provide WooCommerce product image layouts with lightbox functionality. The reference implementation uses JetProductGallery widgets and connects them to the WooCommerce product gallery.
Here is a general step-by-step approach.
Step 1: Choose a Lightbox Solution
First, choose how you want to add the lightbox functionality to your store.
A dedicated plugin can be useful if you want features such as:
- Image zoom
- Gallery navigation
- Fullscreen mode
- Custom lightbox triggers
- Captions
- Image counters
- Multiple gallery layouts
If your store already uses Elementor, choose a solution that integrates with your existing product templates.
Step 2: Open Your WooCommerce Product Template
Next, open the template responsible for displaying your individual WooCommerce products.
If you are using Elementor, this is generally your Single Product Template.
You can either edit an existing template or create a new one if your store does not already have a customized product layout.
The goal is to replace or modify the standard WooCommerce product image area so that it uses your chosen gallery/lightbox component.
Step 3: Add a Product Gallery
Add your preferred product gallery widget to the single product template.
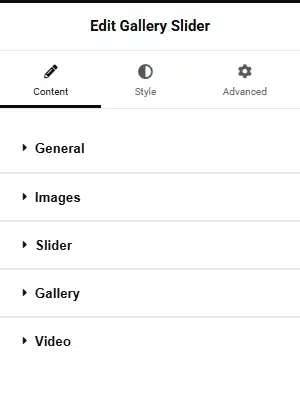
For example, a gallery plugin may provide different layouts, such as:
- Gallery Grid
- Gallery Slider
- Modern Gallery
- Thumbnail or Anchor Navigation
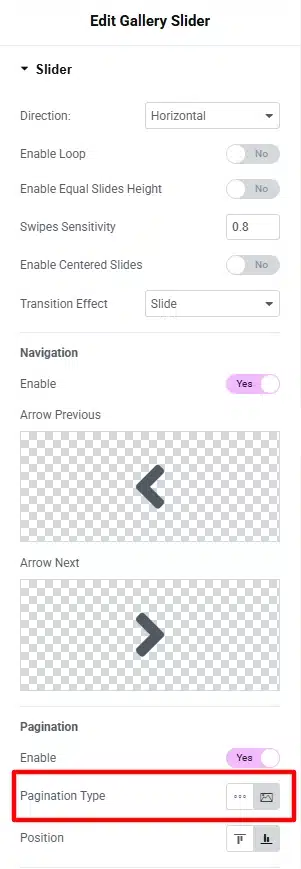
The right layout depends on the number of images you normally use and how you want customers to browse them.
The gallery should be connected to your WooCommerce product data so that each product automatically displays its own images.
This means you don’t need to manually add images every time you create a new product.
Step 4: Connect the Gallery to WooCommerce Products
Look for the gallery’s Source or dynamic content setting.
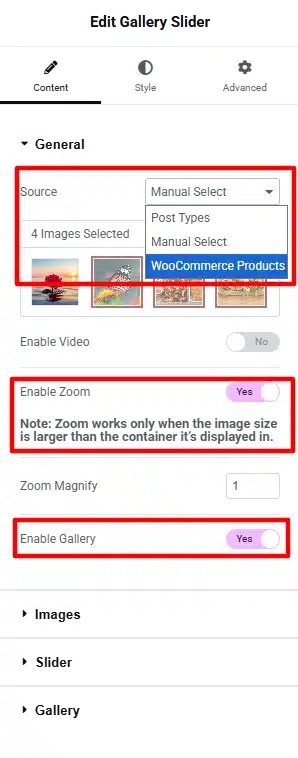
Select the option that retrieves images from the WooCommerce product gallery.
Once connected, the gallery should automatically use the featured image and additional gallery images assigned to each product.
Some tools may also provide a manual image-selection option if you need to create a custom gallery for a specific product.
Step 5: Enable the Lightbox
After adding the gallery, enable its lightbox functionality.
Depending on the plugin you’re using, you may find this under the widget’s content, gallery, or lightbox settings.
Configure how visitors should open the lightbox. For example, you might use an icon over the product image that customers can click to enlarge the image.
A magnifying-glass icon is commonly used because it clearly indicates that an image can be viewed in greater detail.
Step 6: Configure Lightbox Options
Once the lightbox is enabled, customize the available options to match your store.
Common settings include:
Trigger Type
Choose how customers activate the lightbox.
You might allow users to click directly on the image or use a dedicated button/icon.
Button Position
If the lightbox uses an icon, choose where it appears on the product image.
Common positions include:
- Top left
- Top right
- Bottom left
- Bottom right
- Center
Zoom
Enable zoom if your product photography contains details customers may need to inspect closely.
Fullscreen
Fullscreen mode allows customers to use more of the available screen space when viewing product images.
This can be especially useful on mobile devices and smaller screens.
Navigation Arrows
Navigation arrows allow visitors to move between product images without closing the lightbox.
This is useful when a product has several images showing different angles.
Image Counter
An image counter such as “2 of 6” tells customers where they are within the product gallery.
Captions
Captions can provide additional information about an image, such as a product feature, material, or specific detail.
Share Options
Some lightbox tools can also display sharing controls, allowing visitors to share product images.
Not every store needs every option, so only enable features that support your customers’ shopping experience.
Step 7: Style the Lightbox
After configuring the functionality, adjust the appearance of the lightbox so it fits your website design.
Depending on the tool, you may be able to customize:
- Overlay appearance
- Navigation icons
- Button icons
- Spacing
- Image positioning
- Captions
- Typography
- Close button
- Gallery controls
Keep the design simple and make sure the product image remains the primary focus.
Step 8: Test the Product Lightbox
Before publishing the changes, test the lightbox on the front end.
Check several different products rather than testing only one.
Make sure:
- The correct product images appear.
- Clicking the image opens the lightbox.
- Zoom works correctly.
- Navigation moves between the correct images.
- The close button works.
- Fullscreen mode works if enabled.
- Captions display correctly.
- The lightbox works on mobile and tablet devices.
- Product images do not become distorted.
- The lightbox does not interfere with add-to-cart or other product functionality.
Testing different products is important because WooCommerce products may have different numbers of gallery images and different image dimensions.
Best Practices for WooCommerce Product Lightboxes
Adding a lightbox is only part of creating an effective product image experience. The images themselves should also be prepared properly.
Use High-Quality Product Images
Use sufficiently large images so customers can inspect important details when zooming.
At the same time, avoid uploading unnecessarily huge files. Image dimensions and file size should be balanced with the needs of your store.
Show Multiple Product Angles
Instead of relying on a single product photograph, consider showing several useful views.
For example:
- Front view
- Side view
- Back view
- Close-up detail
- Product in use
The appropriate number depends on the product.
Optimize Images Before Uploading
Large, unoptimized images can increase page weight.
Compress product images while maintaining enough quality for customers to examine the product clearly. Lazy loading can also help reduce the amount of content loaded immediately.
Keep Controls Easy to Understand
Avoid adding too many unnecessary controls.
Customers should immediately understand how to:
- Open the image
- Zoom
- Move between images
- Close the lightbox
Test on Mobile Devices
A lightbox that looks good on desktop may not work as expected on smaller screens.
Test the image viewer on mobile and tablet widths to make sure controls remain accessible and images fit properly within the viewport.
Product Lightbox vs. WooCommerce Quick View
A product lightbox and a quick-view feature serve different purposes.
A product lightbox primarily focuses on displaying product images or videos in a larger overlay. It is useful when customers need to inspect visual details.
A quick-view popup, on the other hand, typically displays more product information, such as the product name, price, description, variations, and add-to-cart controls.
If your main goal is to help customers examine product photography, a lightbox is usually the more focused solution.
If you want customers to quickly review product information and potentially add an item to their cart without opening the full product page, a quick-view feature may be more appropriate.
Does a Product Lightbox Slow Down WooCommerce?
A lightbox does not necessarily make a WooCommerce store slow, but its implementation and the size of your product images can affect performance.
To keep your store efficient:
- Compress product images.
- Use appropriate image dimensions.
- Avoid uploading unnecessarily large files.
- Use lazy loading where appropriate.
- Avoid installing multiple plugins that provide overlapping functionality.
- Test your product pages after enabling the lightbox.
A good balance between image quality and performance is especially important for stores with large product catalogs.
Conclusion
A product lightbox can give WooCommerce customers a more convenient way to explore product images without leaving the product page.
With the right gallery and lightbox setup, you can provide features such as zoom, fullscreen viewing, image navigation, captions, and multiple product images.
The implementation process is straightforward: choose a suitable lightbox solution, add it to your single product template, connect it to your WooCommerce product gallery, configure the viewing options, style the interface, and test it across desktop, tablet, and mobile devices.
Most importantly, use the lightbox to make your product photography more useful—not simply to add another visual effect to the store. When customers can easily inspect the details that matter to them, product images become a more effective part of the overall shopping experience.