Table of Contents
- What Are Composable Settings?
- Why Use Composable Settings with Presets?
- 1. Open Your Module Settings
- 2. Find the Sub-Element
- 3. Enable Additional Design Options
- 4. Create or Select a Preset
- 5. Add Composable Settings to the Preset
- 6. Save the Preset
- How the Preset Works
- Example: Create a Default Blurb Setup
- Why This Is Useful
- What Can You Enable?
- A Simple Workflow to Remember
- Final Result
Divi 5’s Composable Settings let you add extra design options to module sub-elements. When you combine Composable Settings with Presets, you can save those additional options and make them available automatically whenever that preset is used.
For example, a module’s Button sub-element may not have every design option enabled by default. You can enable options such as Background, Border, Sizing, Transform, or Animation, save them in a preset, and then reuse that setup without enabling the options again.
In this guide, we’ll explain what Composable Settings are, how to enable them, and how to save them in a Divi 5 Preset.
What Are Composable Settings?
Many Divi modules contain smaller elements, also called sub-elements.
For example, a module might contain:
- Image
- Title
- Body Text
- Button
Each sub-element has its own design settings.
Normally, Divi only shows the design options that are available for that particular sub-element. Composable Settings let you enable additional option groups when you need them.
For example, you could enable:
- Sizing
- Border
- Background
- Transform
- Animation
This gives you more control over individual parts of a module without needing custom CSS.
Why Use Composable Settings with Presets?
Let’s say you regularly design a Button sub-element.
Every time you add a new module, you might want the Button to have:
- Background
- Border
- Transform
- Animation
Without a preset, you may need to enable these options manually each time.
With a Preset, you can enable those option groups once, save the preset, and reuse it.
The basic idea is:
Enable Options → Save Preset → Reuse Preset
When the preset is applied to another element, the additional option groups you’ve enabled in that preset are available automatically.
1. Open Your Module Settings
First, open the Divi 5 Visual Builder.
Add or select a module that contains the sub-element you want to customize.
For example, open a module and go to: Design
You will see the available option groups for that module.
2. Find the Sub-Element
Now find the sub-element you want to customize.
For example:
Title Text
Button
Body Text
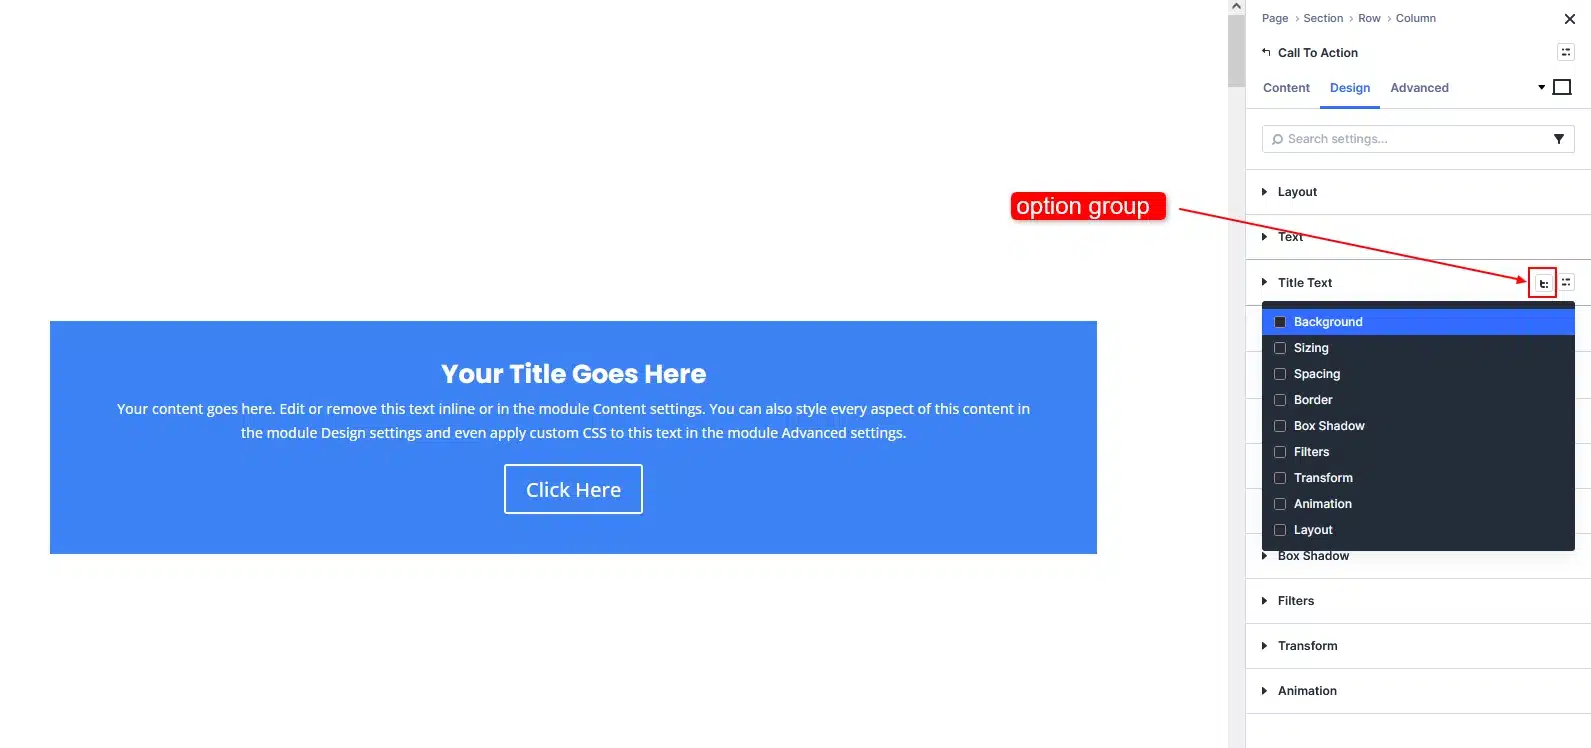
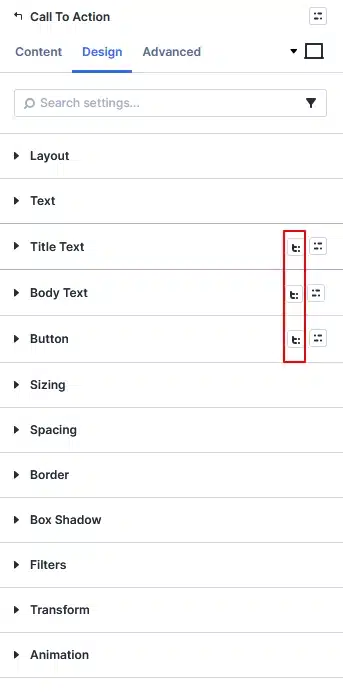
Hover over the sub-element’s option group.
You will see the Toggle Options icon.
Click it to see the additional design options available for that sub-element.
3. Enable Additional Design Options
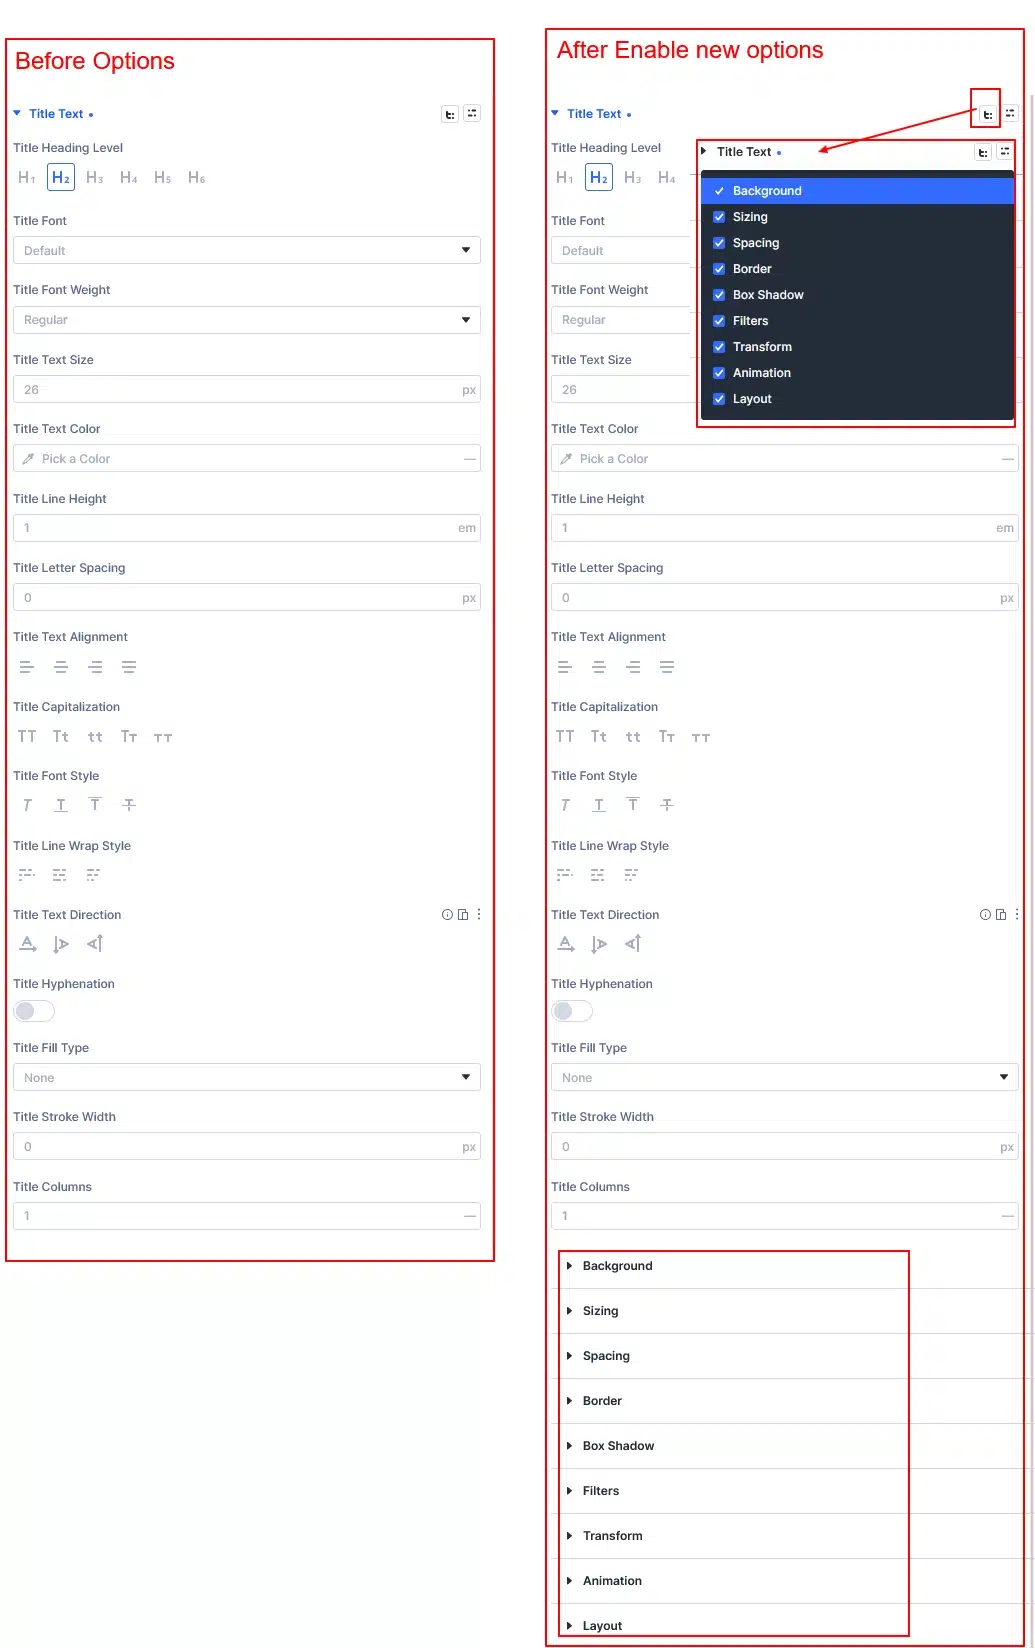
After clicking the Toggle Options icon, Divi will show the available option groups.
For example, you might see:
- Sizing
- Border
- Background
- Transform
- Animation
Select the options you want to use.
For example, if you want to add a border to a Button sub-element, enable:
Border
If you also want to control its size, enable:
Sizing
The selected option groups will immediately appear under that sub-element.
You can now configure these settings just like any other Divi design option.
4. Create or Select a Preset
Now let’s make these Composable Settings reusable.
Open the Presets dropdown at the top of the module settings.
You can either:
- Select an existing preset, or
- Create a new preset
For this example, let’s create a new preset.
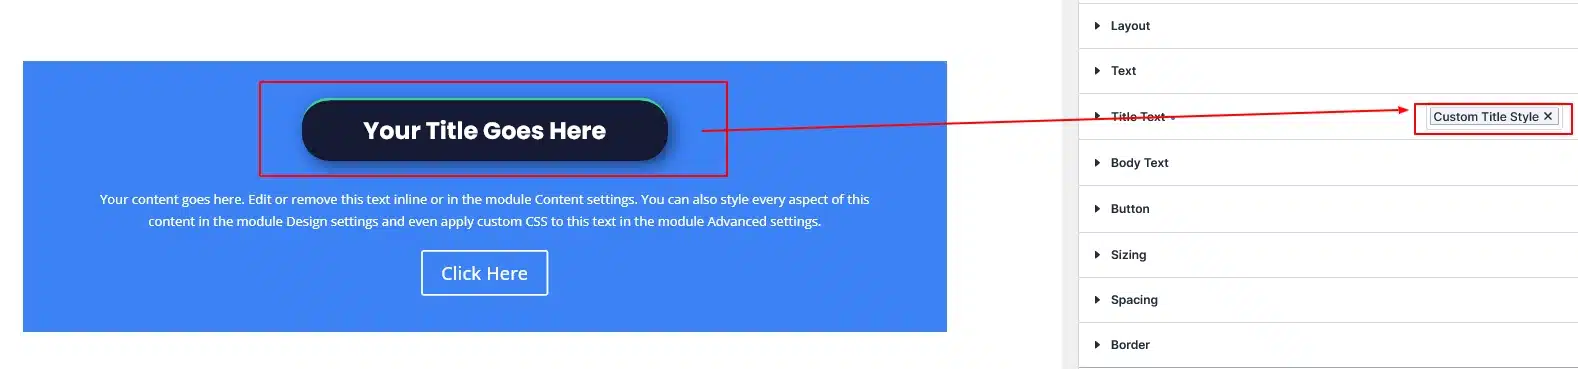
Give your preset a useful name, such as: Custom Title Style
5. Add Composable Settings to the Preset
With your preset selected, go back to the Design tab.
Find the sub-element you want to customize.
For example:
Button → Toggle Options
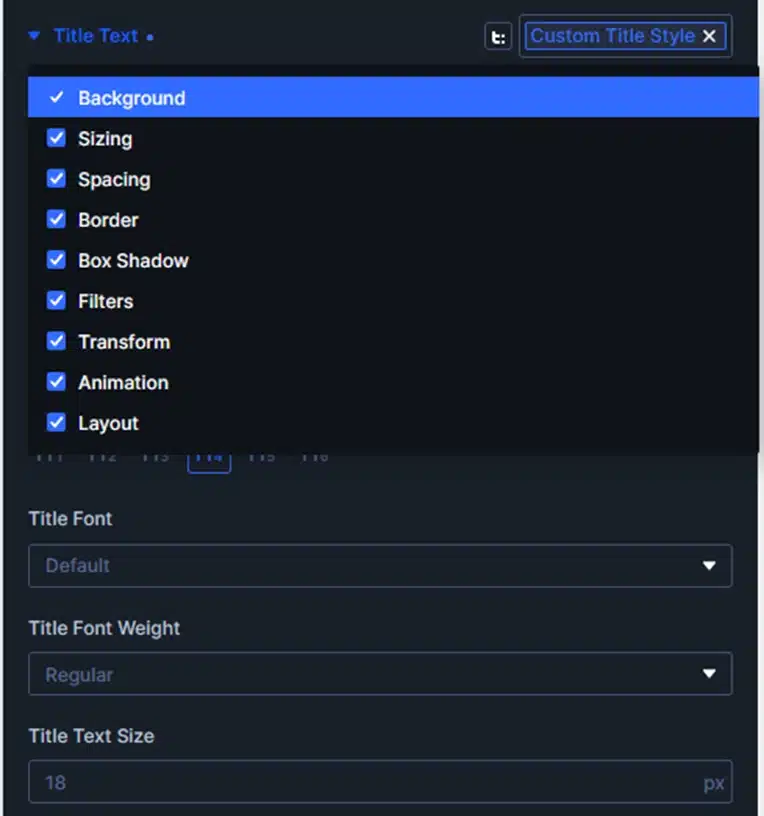
Enable the design options you want to make available in this preset.
For example:
- Background
- Border
- Sizing
- Transform
Configure the settings as needed.
The important part is that the enabled option groups become part of the preset.
6. Save the Preset
Once your settings are ready, save the preset.
Now your preset contains both:
- Your design settings
- The additional Composable Settings you enabled
Whenever this preset is applied, those additional option groups will be available automatically.
How the Preset Works
Let’s use a Heading Preset as a simple example.
Suppose you regularly use the same styling for your headings. Instead of enabling and configuring the same design options every time, you can save those settings in a preset.
Create Your Heading Preset
First, customize the Title Text sub-element of your module.
For example, you can enable additional Composable Settings such as:
- Sizing
- Spacing
- Border
- Background
Configure these options to create your preferred heading style.
Then save these settings as a preset, such as: Custom Title Style
Once the preset is created, you’ll see Custom Title Style applied to the Title Text option group.
Reuse the Preset
Now, when you use another module that supports the same Title Text sub-element, you can select the Custom Title Style preset.
The preset brings your saved heading styling and enabled option groups with it, so you don’t have to set up the same options again.
Without a Preset
You would need to:
Add Module → Open Settings → Design → Title Text → Enable Options → Configure Settings
With Your Heading Preset
You can simply:
Add Module → Select Title Text Preset → Custom Title Style
This makes it much easier to maintain the same heading design across your website and quickly reuse your Composable Settings.
Example: Create a Default Blurb Setup
Let’s use a Blurb module as a practical example.
Imagine you want your Blurb titles to have the same styling across your website. You can enable additional Composable Settings for the Title Text sub-element and save them in a preset.
Step 1
Open your Blurb module settings.
Step 2
Go to:
Design → Title Text
Step 3
Hover over Title Text and click the Toggle Options icon.
Step 4
Enable the additional options you want to use, such as:
- Sizing
- Spacing
- Border
- Background
Then configure these settings to create your preferred title style.
Step 5
Create or select a preset for the Title Text.
For example:Custom Title Style
Step 6
Save the preset.
Now, whenever you apply the Custom Title Style preset to the Title Text of another Blurb module, the saved styling and enabled Composable Settings will be available automatically.
This makes it easier to create consistent Blurb designs across your website without setting up the same options every time.
Why This Is Useful
Composable Settings become especially useful when you have a consistent design system.
For example, you might create a preset for your:
- Buttons
- Headings
- Images
- Cards
- Text elements
You can enable the design options you commonly use and save them with your presets.
This means you can build your design settings once and reuse them instead of repeatedly enabling the same option groups.
What Can You Enable?
Composable Settings can give your sub-elements access to additional design controls such as:
Sizing
Control the width, height, and other sizing properties of the sub-element.
Background
Add a background color, gradient, image, or other background styling.
Border
Add borders and customize their appearance.
Transform
Apply transform effects to the individual sub-element.
Animation
Add animation settings to the sub-element.
These options depend on the sub-element and the available Composable Settings in Divi 5.
A Simple Workflow to Remember
If you’re new to Composable Settings, remember this process:
- Open Module
↓ - Go to Design
↓ - Find a Sub-Element
↓ - Click Toggle Options
↓ - Enable Additional Settings
↓ - Create or Select a Preset
↓ - Save the Preset
↓ - Reuse the Preset
↓
That’s the basic workflow.
Final Result
Divi 5 Composable Settings make it possible to add additional design controls to module sub-elements, while Presets let you save those settings for reuse.
Instead of repeatedly enabling the same options, you can create a preset with your commonly used Composable Settings and apply it wherever that preset is needed.
For example:
Button Preset → Background + Border + Sizing + Transform
Once saved, you can reuse that preset and have those additional options available without setting them up from scratch every time.
Composable Settings + Presets = More flexible sub-element styling and a faster design workflow.