Creating a dynamic, visually appealing mega menu can significantly improve your website’s navigation and user experience. With the Essential Addons for Elementor (ElementsKit), you can easily build a custom mega menu that enhances the structure and accessibility of your site, all without needing any coding knowledge.
This guide walks you through setting up a fully customizable mega menu that integrates perfectly with your website’s design. Let’s begin making your site’s navigation more user-friendly and engaging!
Step 1: Install Required Plugins
- Install Elementor and Elementor Pro (if you don’t have it installed).
- Install and activate Essential Addons for Elementor (Elements Kit).
- Navigate to ElementsKit> Modules to ensure the ElementsKit Mega Menu module is activated, then enable the Mega Menu option.
Step 2: Enable Mega Menu for Your Theme
Some themes need a slight adjustment to support the Mega Menu.
- Go to ElementsKit > Header Footer & Mega Menu.
- Enable the Header Footer builder.
- Make sure the Mega Menu module is activated.
Step 3: Create a New Mega Menu Template
- Go to Templates > Add New in the WordPress dashboard.
- Choose Section as the type, and name it appropriately (e.g., “Mega Menu Section”).
- Click Create Template to open the Elementor editor.
1. Design Your Mega Menu Content
- In the Elementor editor, design the content you want to display in your mega menu.
- To organize the mega menu layout, use sections, Columns, and Widgets (such as images, headings, or icons).
- Add Navigational Links, Product Listings, Images, or Custom Widgets as needed.
- Style your menu using Elementor’s design options to fit your site’s theme.
2. Save the Mega Menu Template
- Once you’ve finished designing, click Publish.
Step 4: Assign the Template to the Menu Item
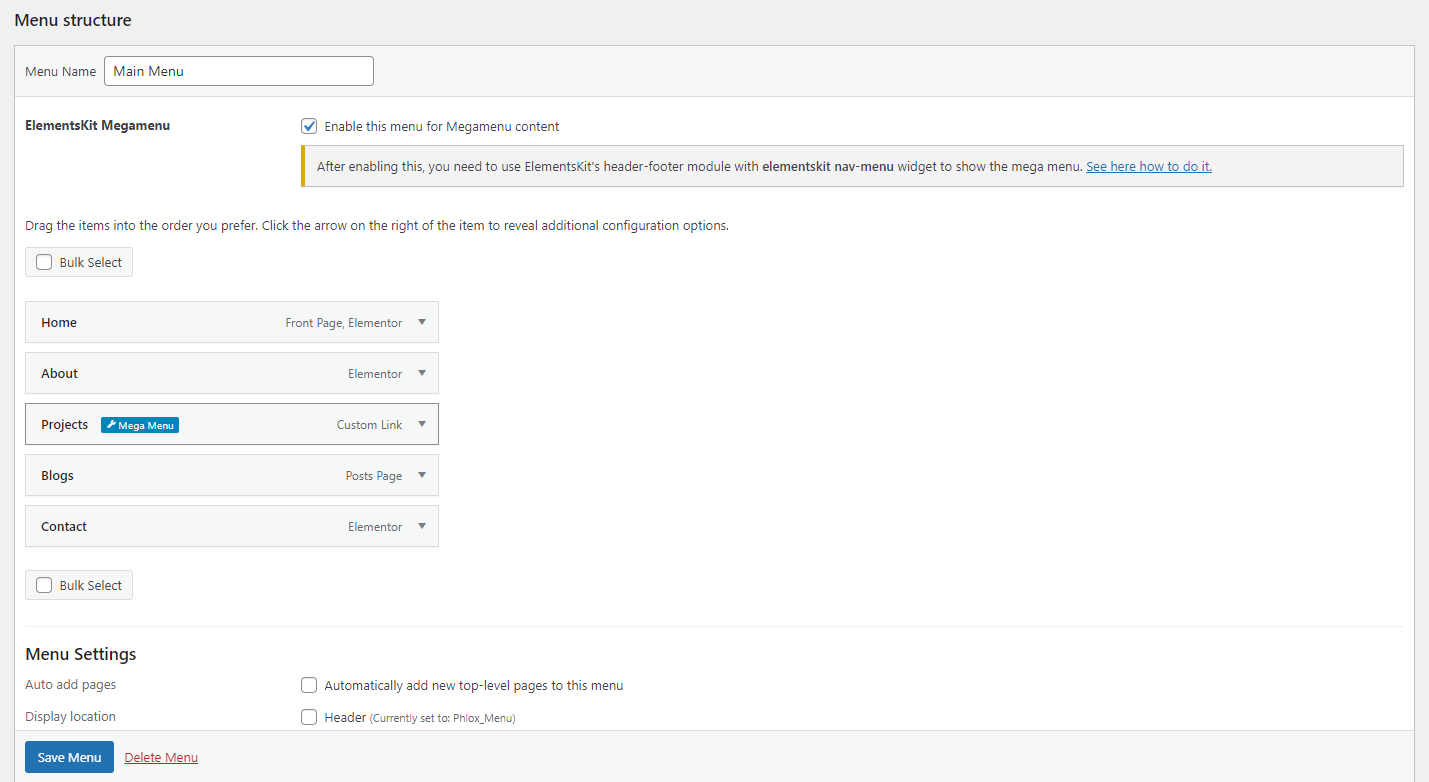
- Go to Appearance > Menus.
- Find the menu item where you want to apply the mega menu (create one if needed).
- Expand the menu item by clicking the arrow.
- You will see an ElementsKit Mega Menu Options section under the menu item.
- Toggle the Enable button to activate the mega menu for that specific item.
- In the Mega Menu Template dropdown, select the template you created earlier.
- You can also enable Full Width if you want the mega menu to span across the screen.
Step 5: Configure Mega Menu Settings
1. Mega Menu Column Settings:
- You can set the width for each column inside your mega menu template.
- If you want a custom width for each column, go to the Columns settings in Elementor and adjust the width for desktop, tablet, and mobile.
2. Mega Menu Alignment:
- In the ElementsKit Mega Menu Options, choose how you want the mega menu to appear (left-aligned, right-aligned, or centered).
Step 6: Add Styling (Optional)
You can customize the hover effects, background colors, padding, and typography of your mega menu to match your website’s branding. To further customize, use Elementor’s styling options in the editor.
Step 7: Preview and Publish
1. Preview Your Mega Menu:
- After assigning the template, visit your website and hover over the menu item to see how the mega menu appears.
2. Return to Appearance > Menus if everything looks good and click Save Menu.
Conclusion:
Building a mega menu with ElementsKit is a simple yet powerful way to enhance your site’s navigation and showcase more content in a structured way. By following these steps, you can create a custom, visually striking menu that fits seamlessly with your website’s style and offers a smooth browsing experience for your visitors. Once your mega menu is live, managing and updating it is just as easy, making it a valuable addition to any website requiring robust navigation options. Your site is ready to impress with a sleek and functional mega menu!
Mega menus make complex websites easier to navigate and more engaging. If you’re planning a new WordPress project or redesign, Book a Free Consultation.


