Table of Contents
- What Are Relationship Filters?
- Why Use JetSmartFilters With Divi 5?
- Step 1: Install Required Plugins
- Step 2: Create a Custom Post Type
- Step 3: Create Relationships in JetEngine
- Step 4: Add Related Content
- Step 5: Create a Listing Template
- Step 6: Add Listing Grid in Divi 5
- Step 7: Create Relationship Filters in JetSmartFilters
- Step 8: Connect Filter With Listing Grid
- Step 9: Customize Styling in Divi 5
- Benefits of Relationship Filters
- Better Content Organization
- Faster Navigation
- Improved User Experience
- Scalable Website Structure
- No Custom Coding Required
- Use Cases for Relationship Filters
- Final Thoughts
Creating advanced filtering systems is essential for dynamic WordPress websites like directories, real estate platforms, marketplaces, event portals, and business listings. With the combination of Divi 5, JetEngine, and JetSmartFilters, you can easily build powerful relationship-based filtering systems without custom coding.
In this tutorial, you’ll learn how to create relationship filters in Divi 5 using JetSmartFilters step by step.
What Are Relationship Filters?
Relationship filters allow users to filter connected content based on relationships created between custom post types.
For example:
| Parent Content | Related Content |
| Property Type | Properties |
| Doctor | Hospitals |
| Brand | Products |
| Country | Cities |
| Event Category | Events |
Instead of showing unrelated content, relationship filters display only connected items dynamically.
This improves:
- User experience
- Website organization
- Search accuracy
- Dynamic content management
Why Use JetSmartFilters With Divi 5?
Divi provides flexible visual design tools, while JetEngine and JetSmartFilters add dynamic website functionality.
Together, they help you:
- Create dynamic listing websites
- Connect custom post types
- Build advanced AJAX filters
- Display dynamic related content
- Improve frontend usability
This combination is perfect for scalable and interactive WordPress websites.
Step 1: Install Required Plugins
Before starting, make sure the following plugins are installed:
- Divi 5
- JetEngine
- JetSmartFilters
Activate all plugins before continuing.
Step 2: Create a Custom Post Type
The first step is creating a Custom Post Type (CPT).
Go to:
JetEngine → Post Types
Click:
Add New
Example custom post types:
- Properties
- Cars
- Events
- Jobs
- Restaurants
Add:
- Post type name
- Labels
- Slug
- Icons
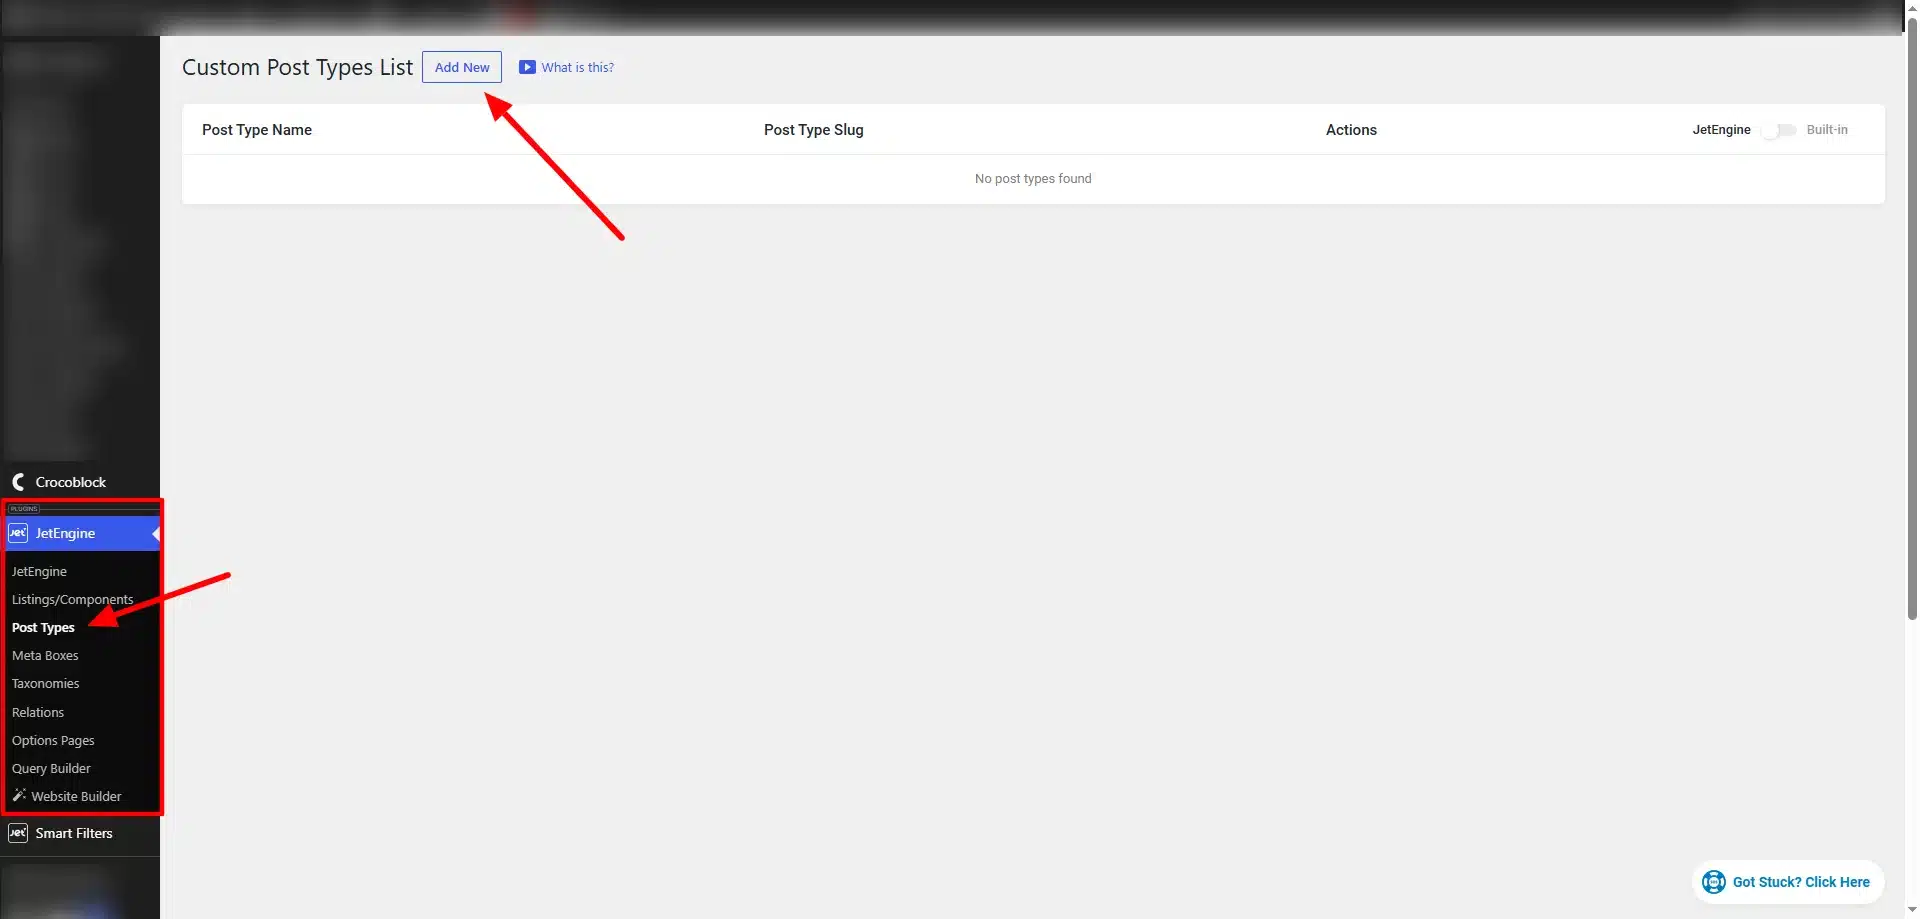
Then save the post type.
Step 3: Create Relationships in JetEngine
Now create the relationship between post types.
Go to:
JetEngine → Relations
Click:
Add New
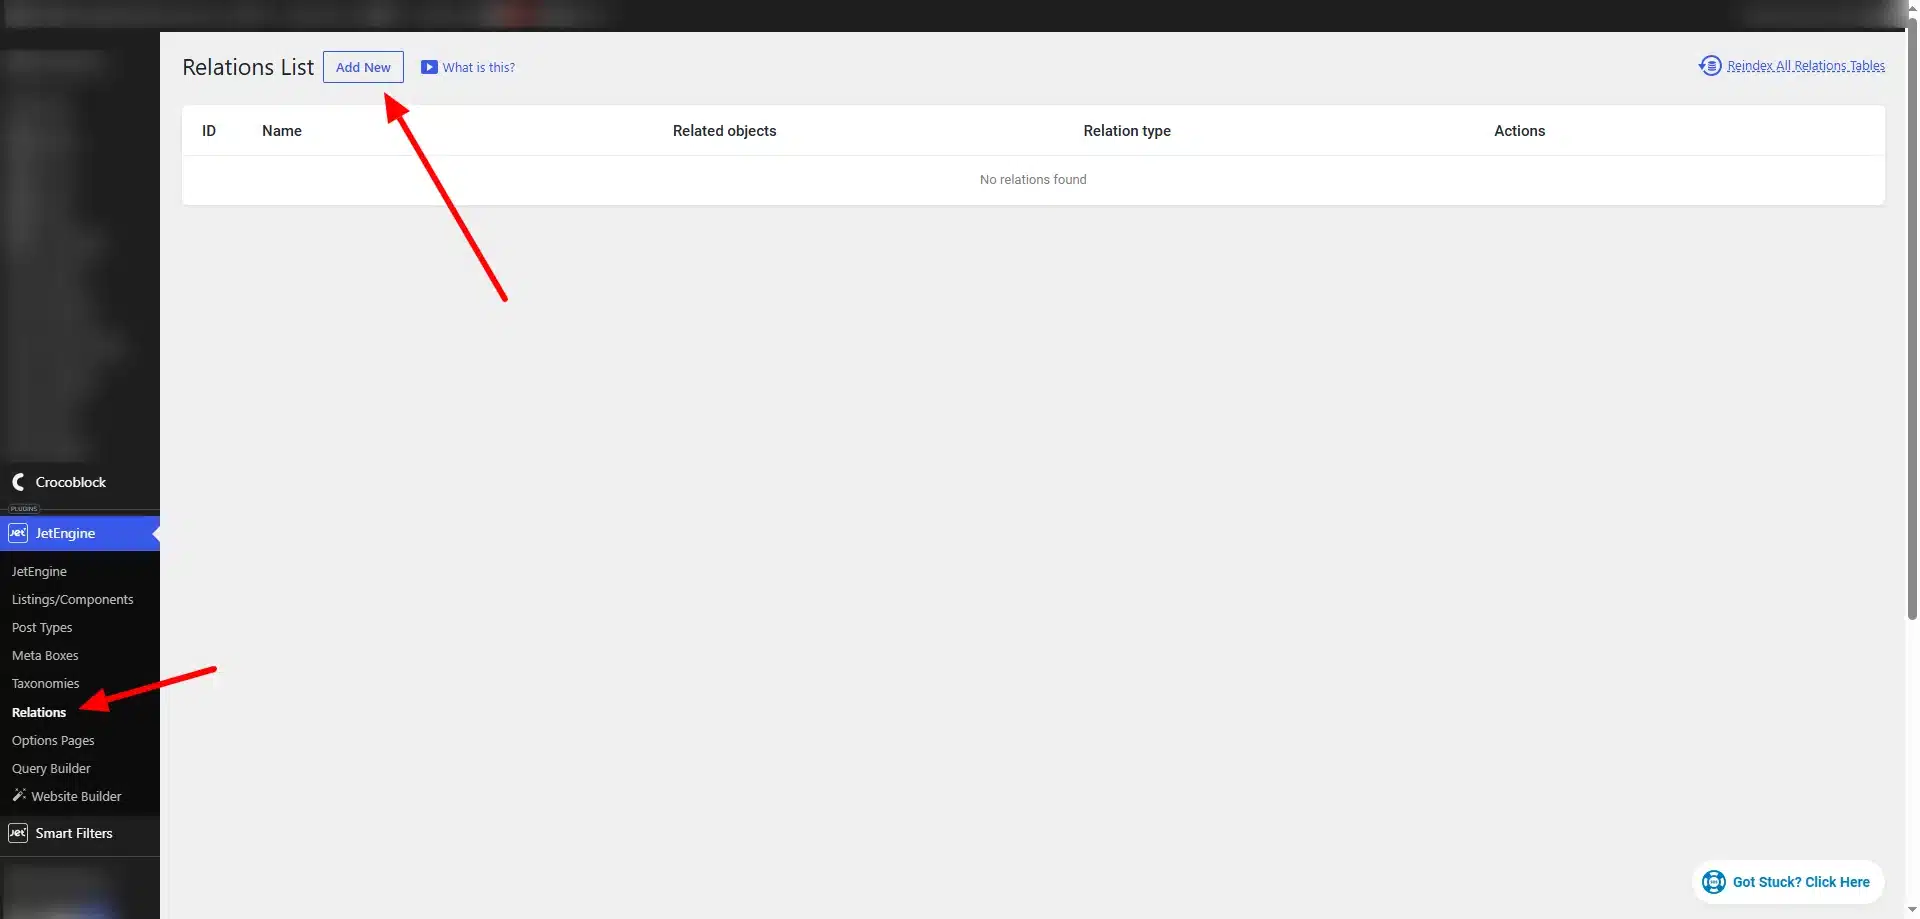
Configure:
- Parent Object
- Child Object
- Relation Type
Common relationship types:
- One to One
- One to Many
- Many to Many
Example:
Country → Cities
Or:
Brand → Products
Save the relation after setup.
Step 4: Add Related Content
Now edit your posts and assign connected items.
Example:
- Assign products to brands
- Assign properties to locations
- Assign doctors to hospitals
JetEngine automatically displays relationship fields inside the WordPress editor.
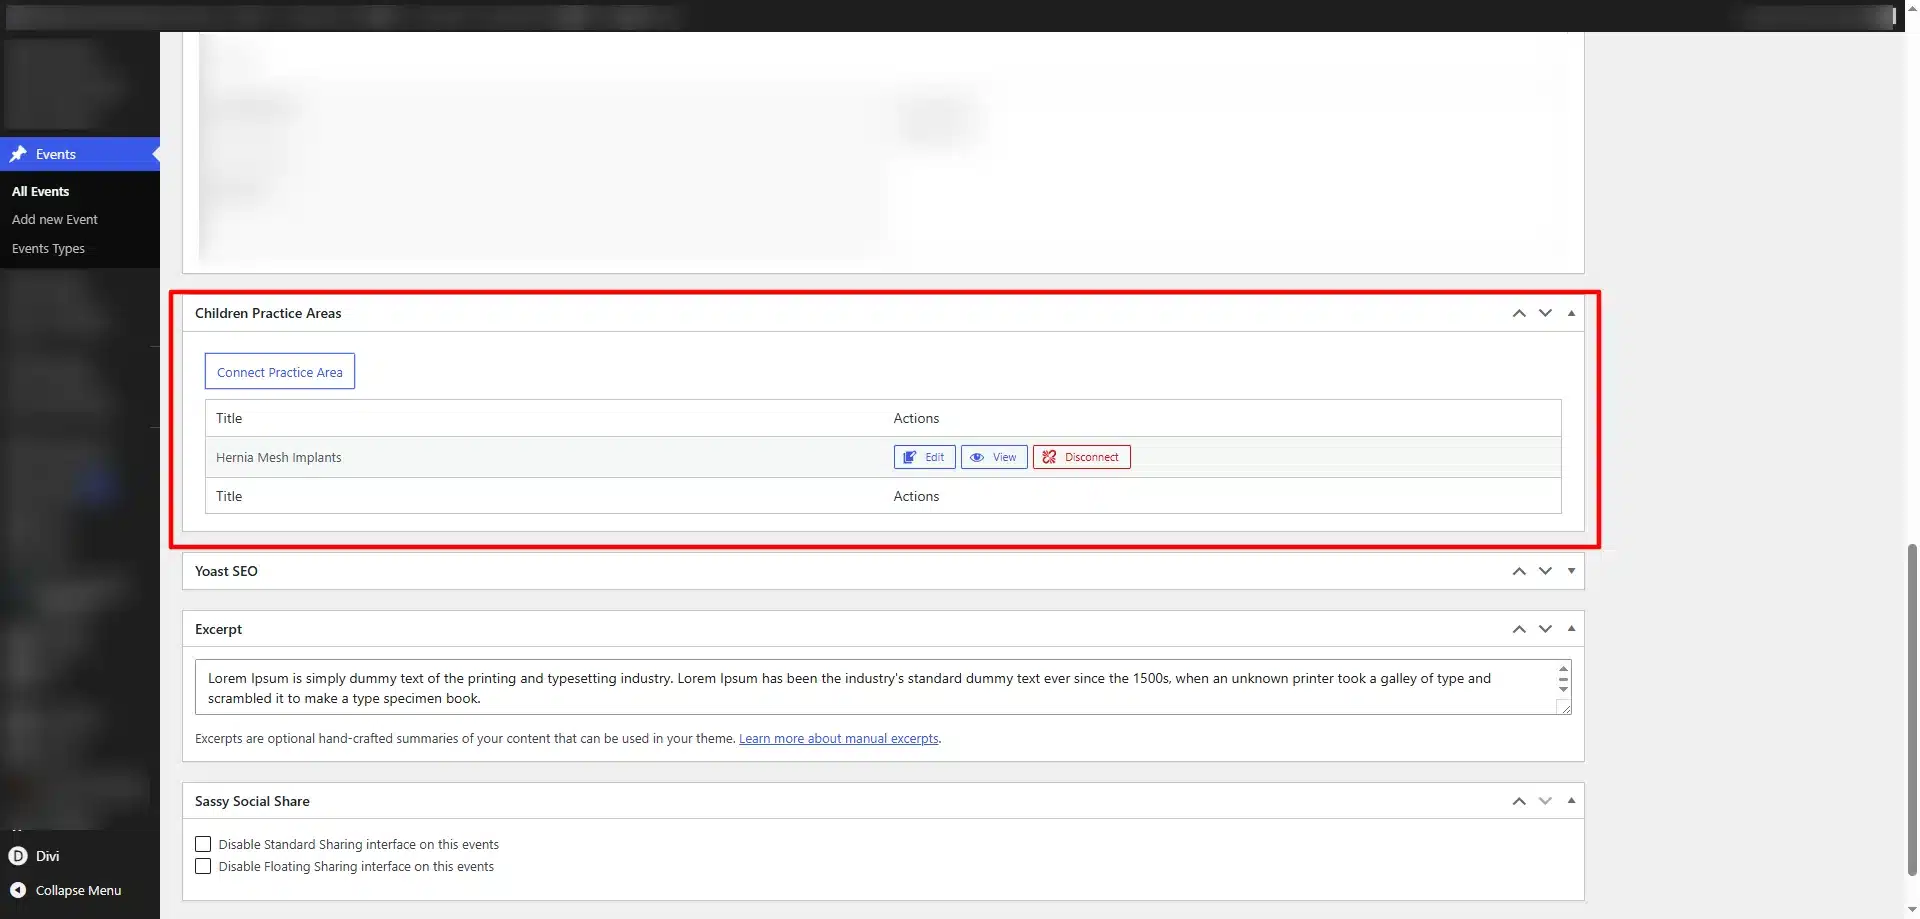
This creates the dynamic connection between content types.
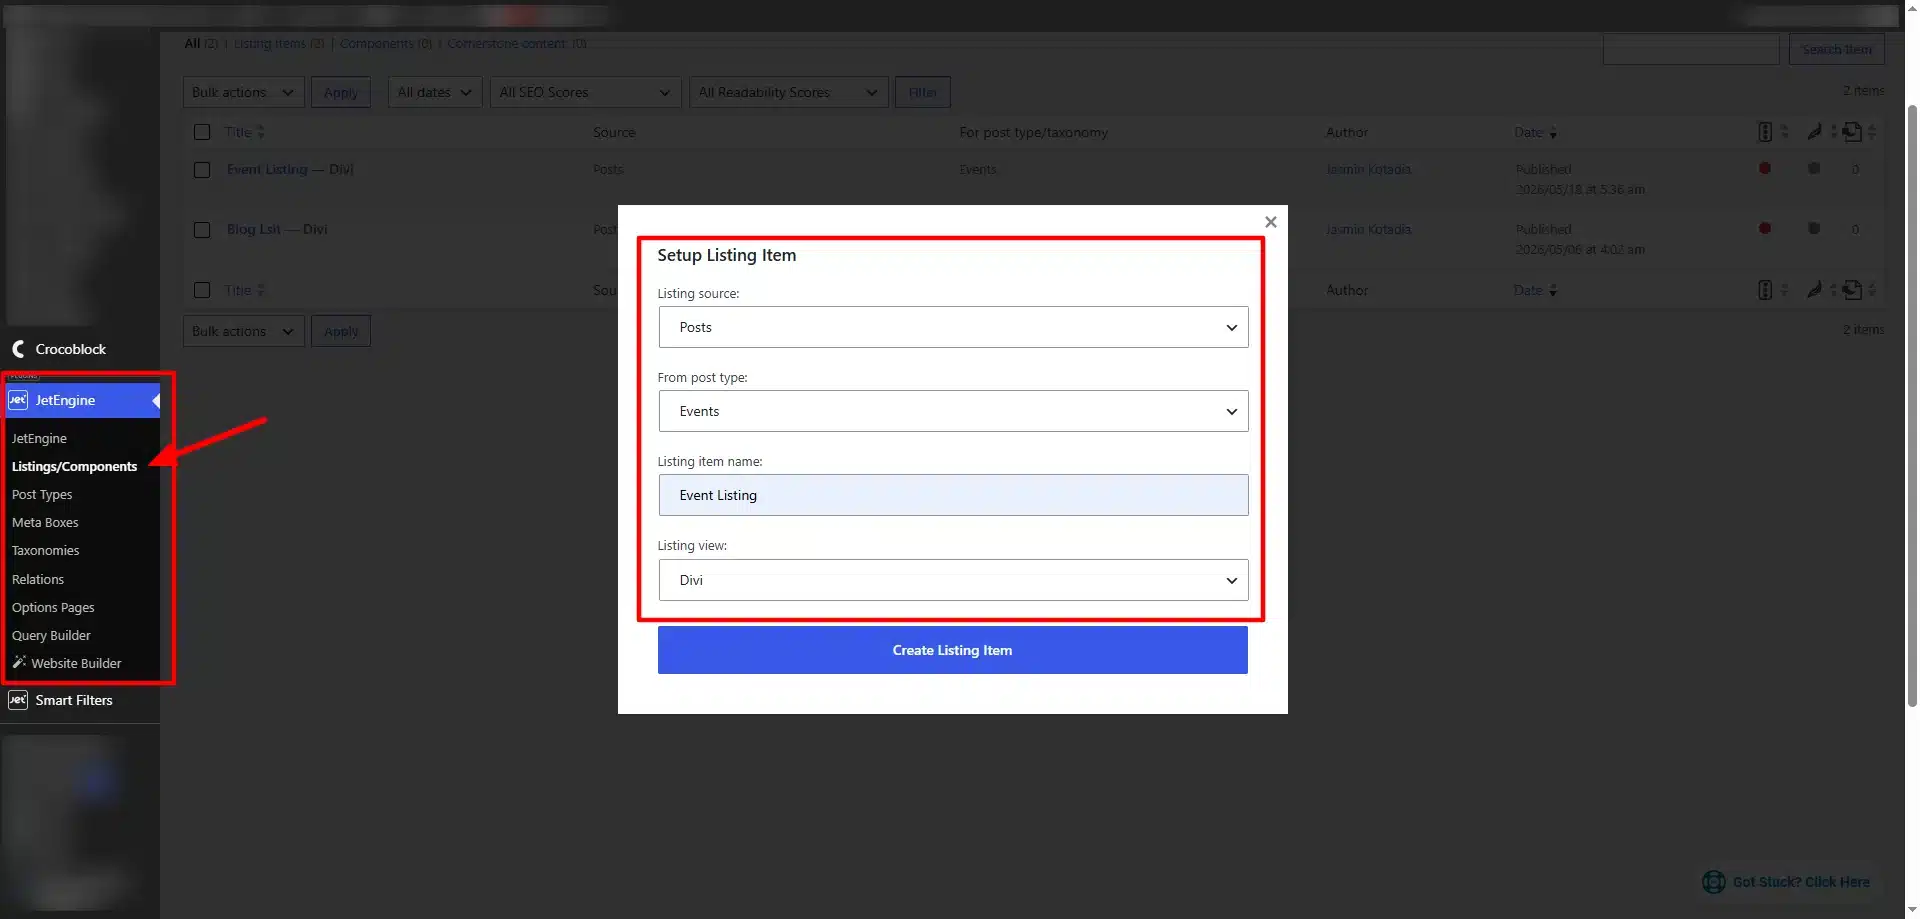
Step 5: Create a Listing Template
Go to:
JetEngine → Listings
Create a new listing template for your child post type.
Example:
Products Listing
Or:
Property Listing
Design your layout using Divi 5.
You can dynamically display:
- Featured Images
- Titles
- Prices
- Categories
- Custom Meta Fields
- Buttons
Step 6: Add Listing Grid in Divi 5
Open your page with Divi Builder.
Add the JetEngine Listing Grid module.
Select your listing template and configure:
- Number of posts
- Grid columns
- Pagination
- Query settings
Your dynamic content will now display automatically.
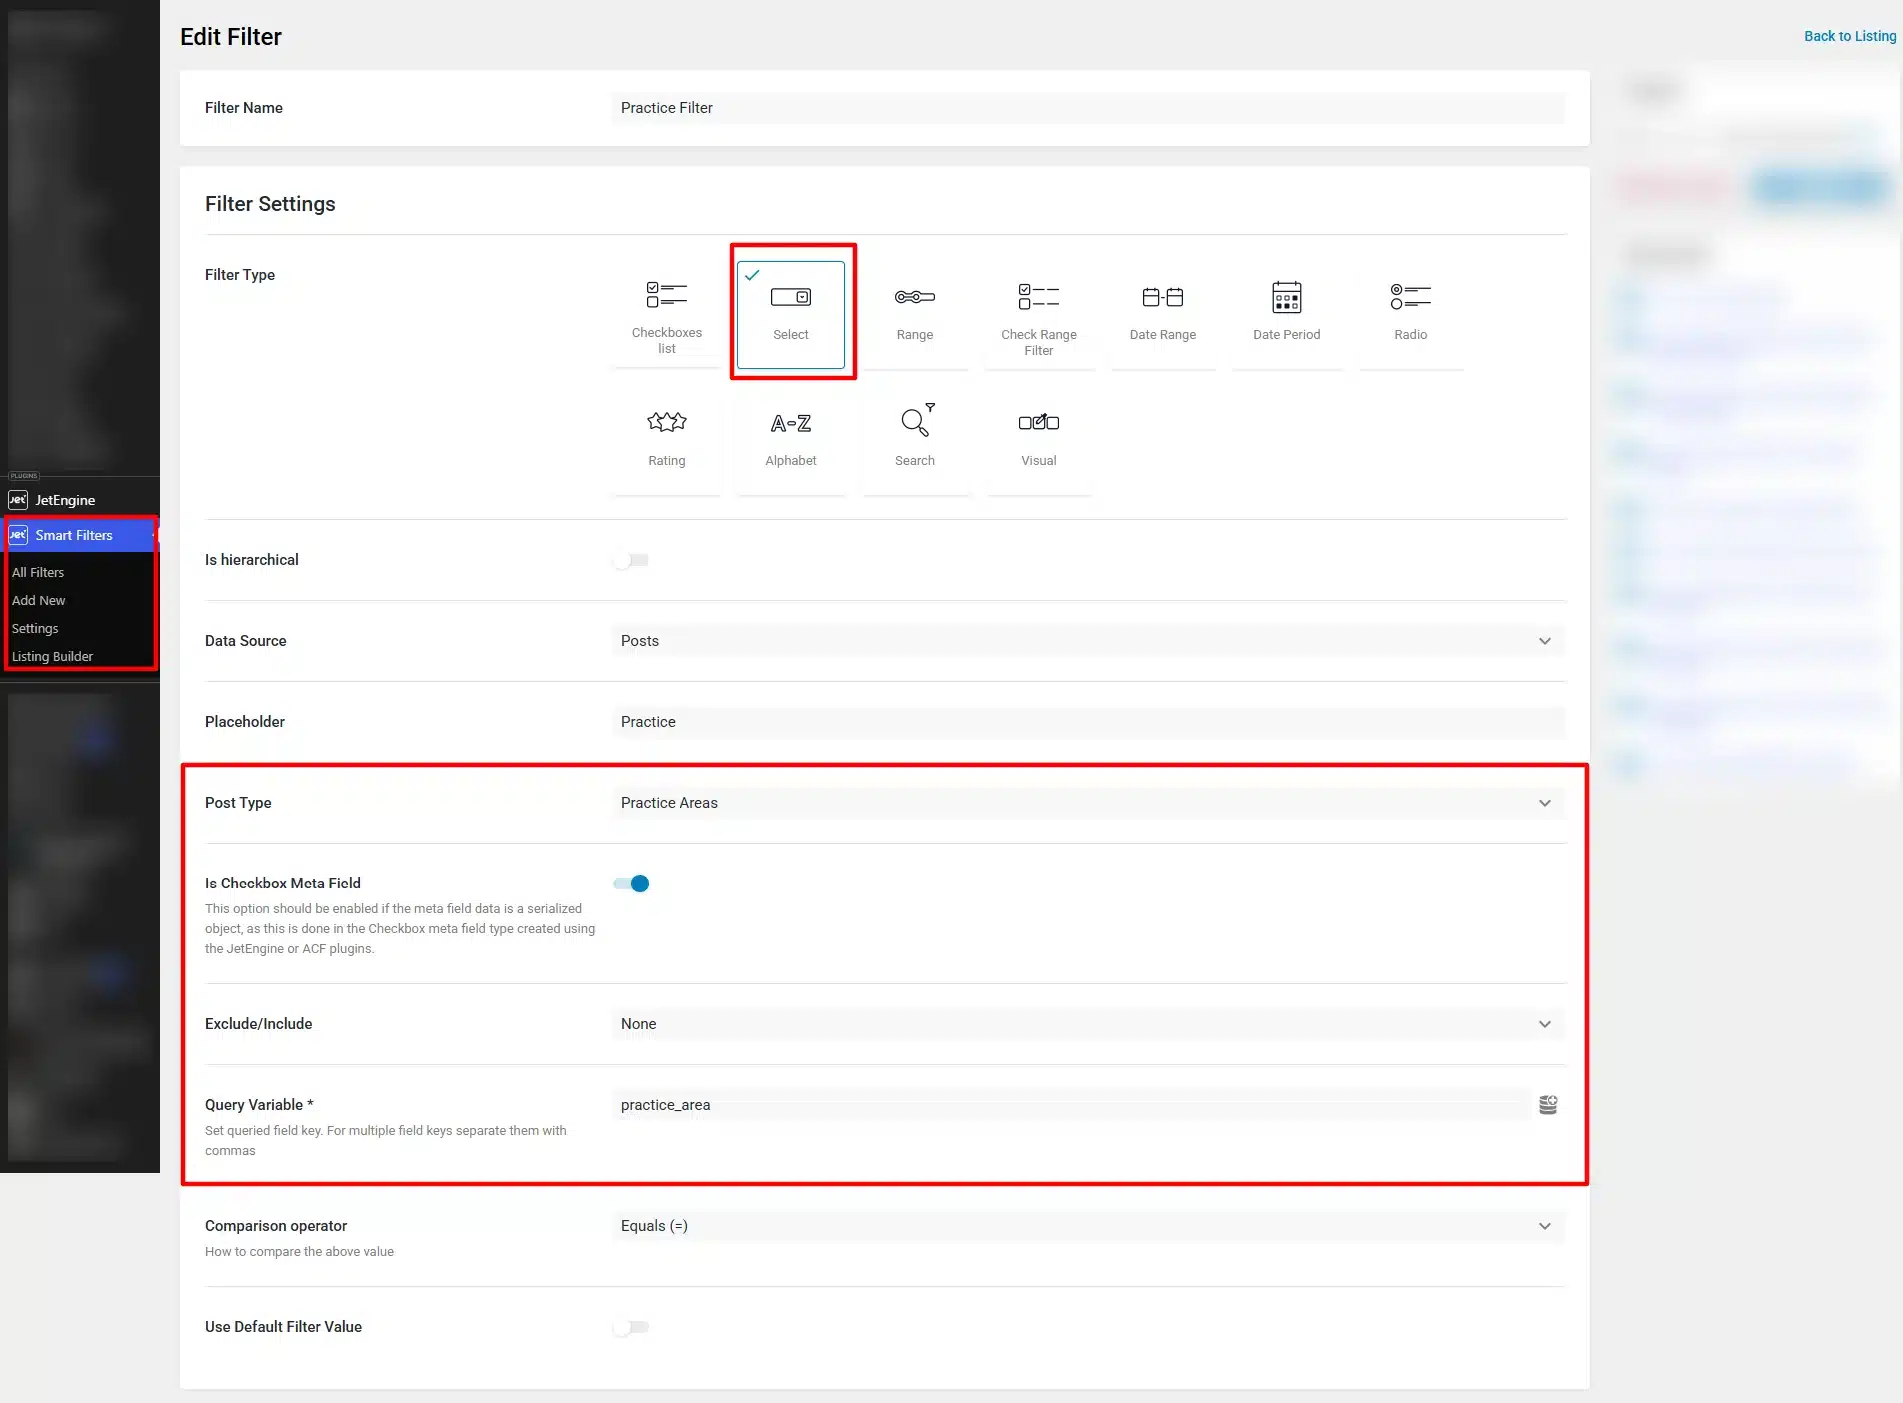
Step 7: Create Relationship Filters in JetSmartFilters
Now create the actual relationship filter.
Go to:
JetSmartFilters → Add New
Choose filter type:
- Select Filter
- Checkbox Filter
- Radio Filter
- Search Filter
Set:
Data Source → JetEngine Relation
Then select your relation.
Example:
Event → Practice
Configure filter labels and save.
Step 8: Connect Filter With Listing Grid
Now return to Divi Builder.
Add the JetSmartFilters widget above your listing grid.
Configure:
- Provider
- Query ID
- Filter Type
- AJAX Settings
Connect it to your listing grid.
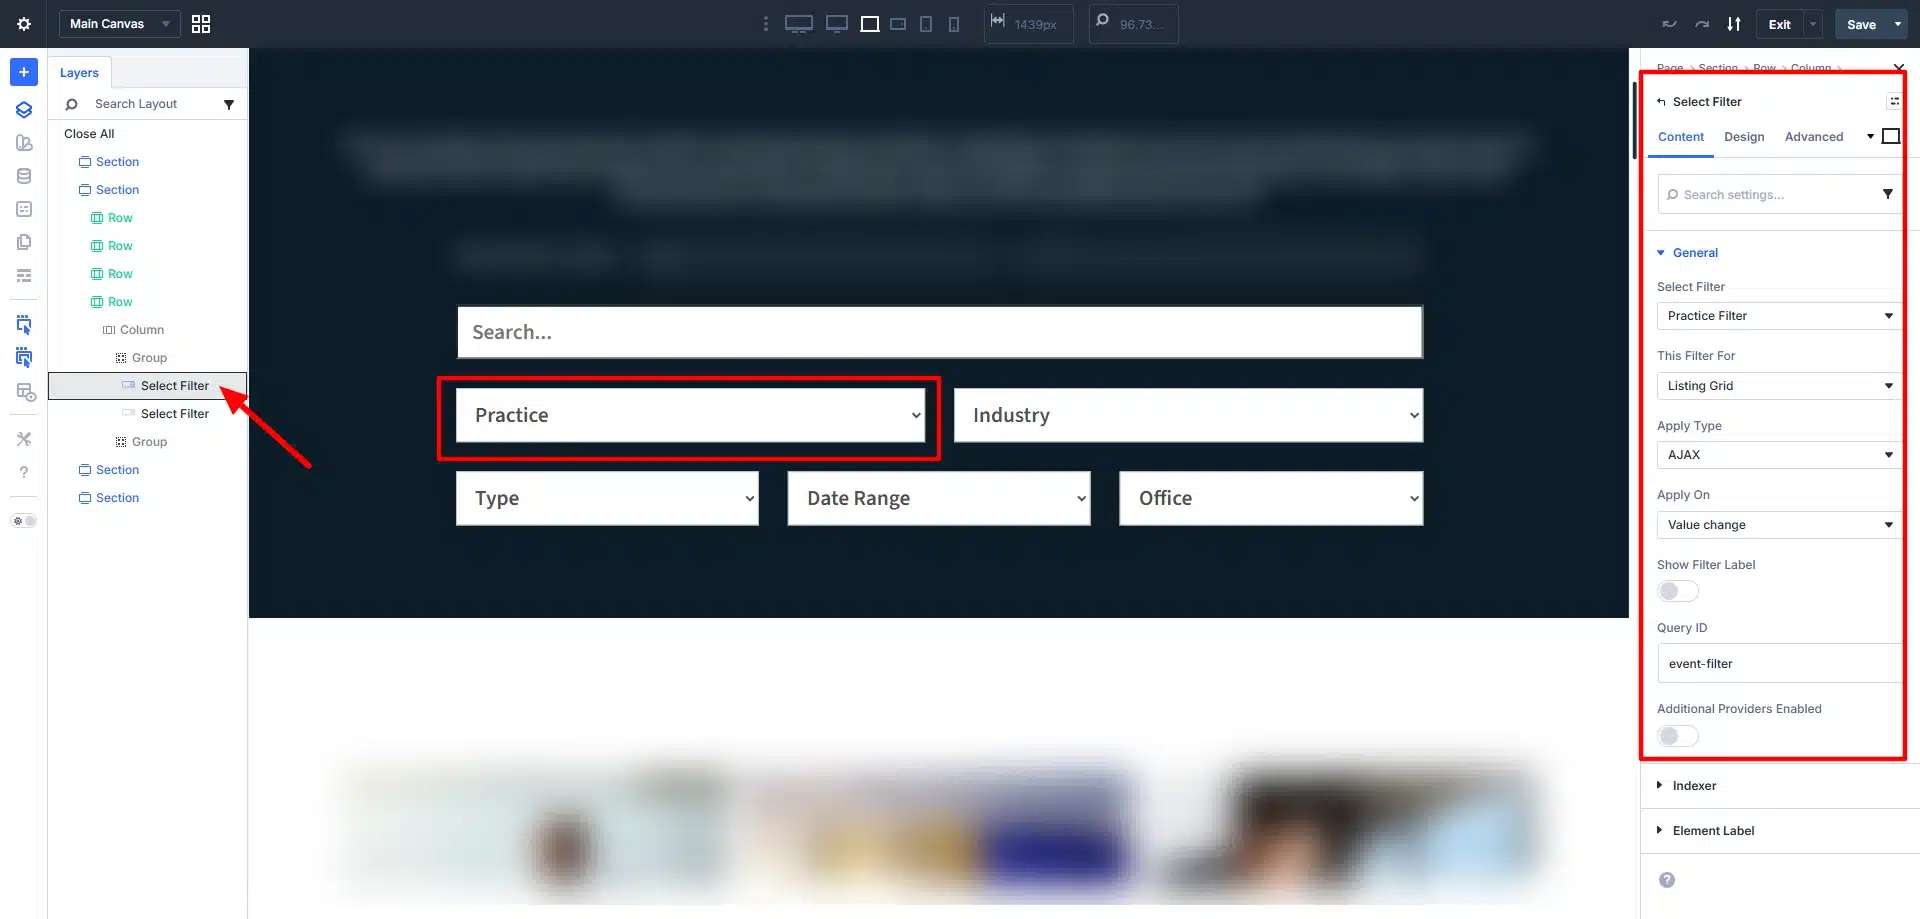
Now users can dynamically filter related content instantly without page reloads.
Step 9: Customize Styling in Divi 5
Use Divi 5’s design options to customize:
- Filter layouts
- Dropdown styles
- Typography
- Colors
- Buttons
- Responsive behavior
This helps create a clean and modern frontend experience.
Benefits of Relationship Filters
Better Content Organization
Users only see related and relevant content.
Faster Navigation
Visitors can quickly narrow down results.
Improved User Experience
AJAX filtering provides instant results.
Scalable Website Structure
Perfect for large dynamic websites.
No Custom Coding Required
Everything can be configured visually.
Use Cases for Relationship Filters
Relationship filters are commonly used for:
- Real Estate Websites
- Automotive Listings
- Doctor & Hospital Directories
- Event Websites
- Product Catalogs
- Business Directories
- Marketplace Platforms
Final Thoughts
Creating relationship filters in Divi 5 using JetSmartFilters and JetEngine is one of the best ways to build advanced dynamic WordPress websites.
With custom post relationships, dynamic listing grids, and AJAX-powered filtering, you can create highly interactive and scalable websites without relying heavily on custom development.
Whether you’re building a directory, marketplace, real estate platform, or custom business website, Divi 5 and Crocoblock provide a powerful combination for modern WordPress development.