Table of Contents
- What You Need
- Step 1: Enable Dynamic Visibility in JetEngine
- Step 2: Open Your WooCommerce Product Template
- Step 3: Configure a Dynamic Visibility Condition
- Example 1: Show an “Almost GONE” Message for Low Stock
- Example 2: Display Content for Downloadable Products
- Example 3: Add a “Best Selling!” Message to Featured Products
- Example 4: Show an “Out of Stock” Message
- Example 5: Display an “On Backorder” Message
- Example 6: Add an “On Sale!” Label
- Example 7: Display “Item for Free” Content
- Example 8: Show a Download Button After Purchase
- Example 9: Limit Products Sold Individually
- Example 10: Display Content for External/Affiliate Products
- Example 11: Show a “Virtual Product” Message
- Step 4: Combine Multiple Conditions
- Step 5: Use Conditional Content in Product Loops
- Step 6: Test Your Conditions
- Conclusion
WooCommerce product pages often contain information that only applies to certain products. For example, you may want to display an “Almost GONE” message when stock is low, show a “Best Selling!” label for featured products, or display a download link only when a product is downloadable.
Instead of creating separate product templates for every situation, you can use JetEngine Dynamic Visibility to control which content appears based on WooCommerce product data.
JetEngine provides WooCommerce-specific visibility conditions that can be applied to widgets, columns, and sections. This allows you to show or hide product content according to stock, product type, sale status, purchase history, and other product settings.
In this guide, we’ll look at how to create conditional WooCommerce product content with JetEngine.
What You Need
Before getting started, make sure you have:
- WordPress
- WooCommerce
- Elementor
- JetEngine
- A WooCommerce Single Product or Shop template
The reference setup uses JetEngine’s Dynamic Visibility module with WooCommerce product templates.
Step 1: Enable Dynamic Visibility in JetEngine
First, enable the Dynamic Visibility module.
From the WordPress dashboard, go to:
JetEngine → JetEngine → Modules
Find Dynamic Visibility for Widgets and Sections and enable it.
Save the settings.
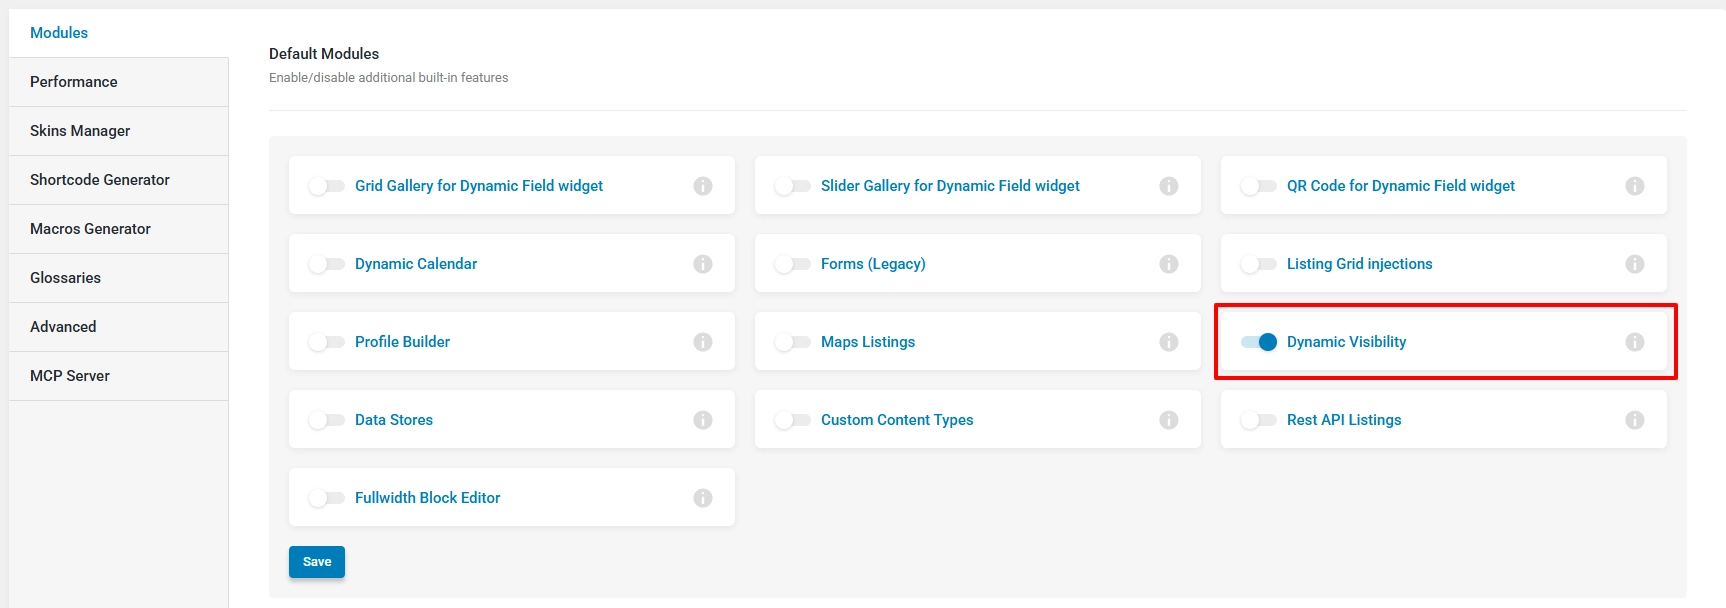
Once enabled, Dynamic Visibility becomes available inside Elementor’s Advanced settings for supported widgets and sections.
Step 2: Open Your WooCommerce Product Template
Next, open the WooCommerce template where you want to add conditional content.
If you’re using Crocoblock’s WooCommerce tools, you can access your templates through:
Crocoblock → Woo Page Builder
Open the appropriate Single Product or Shop template and select Edit with Elementor.
You can apply Dynamic Visibility to individual widgets, columns, or sections.
Step 3: Configure a Dynamic Visibility Condition
Select the Elementor widget that should appear conditionally.
Go to:
Advanced → Dynamic Visibility
Enable the Dynamic Visibility option.
You will find settings for:
- Visibility condition type
- Conditions
- Relations
The visibility condition can either show an element when the condition is met or hide an element when the condition is met. Multiple conditions can also be connected using AND or OR logic.
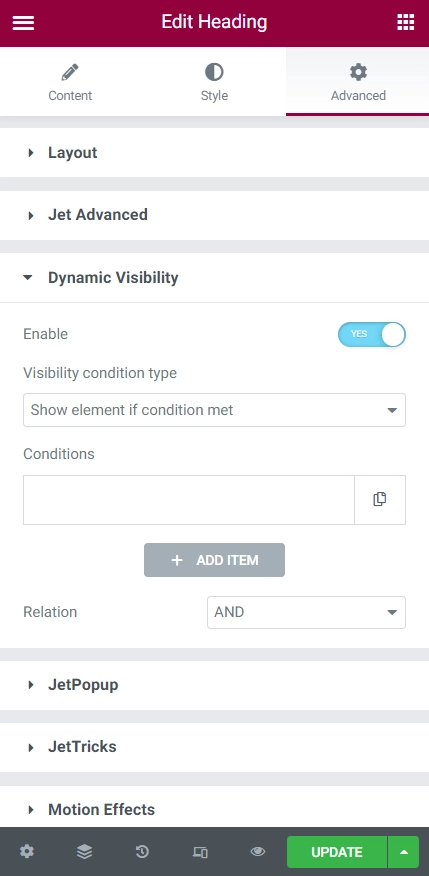
Now let’s look at practical WooCommerce examples.
Example 1: Show an “Almost GONE” Message for Low Stock
A useful example is displaying an “Almost GONE” message when a product has fewer than five items remaining.
First, make sure stock management is enabled for the product.
Go to:
Products → All Products → Edit Product → Inventory
Enable Manage stock? and enter the product’s stock quantity.
Now return to your Single Product template and add a Heading widget with text such as:
Almost GONE
Open:
Advanced → Dynamic Visibility
Set:
- Visibility condition type: Hide element if condition met
- Condition: Product has Enough Stock
- Quantity: 5
This means the heading will be hidden when the product has five or more items available.
If the stock quantity falls below five, the “Almost GONE” message becomes visible.
Example 2: Display Content for Downloadable Products
You can also show specific content only when a product is downloadable.
Edit the WooCommerce product and enable the Downloadable option.
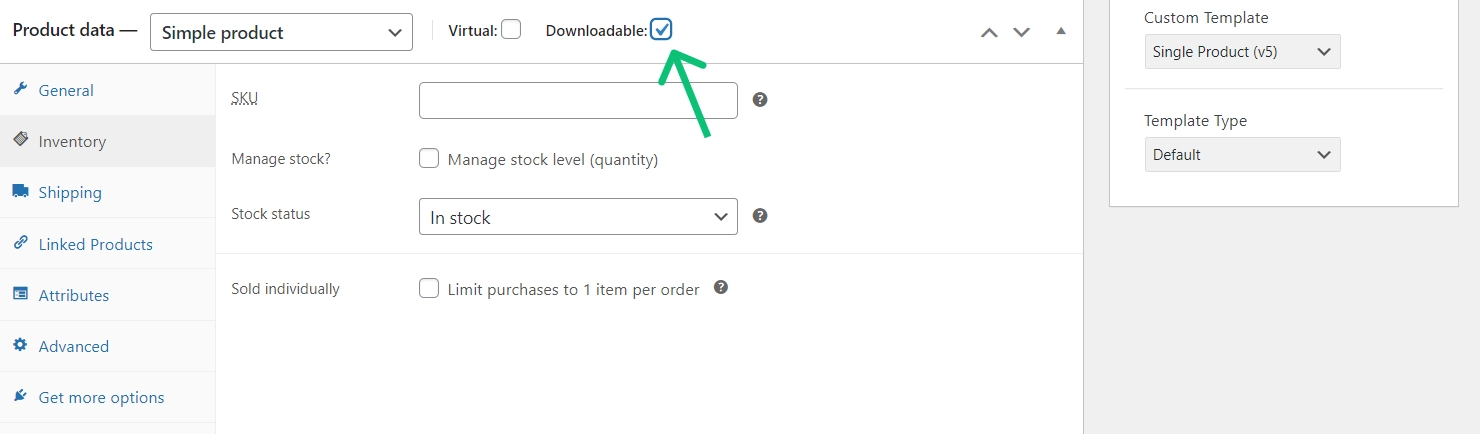
Then add a Heading or Dynamic Link widget to your product template.
For example, you could display:
Download Your Product
or provide a link to the downloadable file.
For the visibility condition, select:
Product is Downloadable
The element will appear when the product has the Downloadable option enabled.
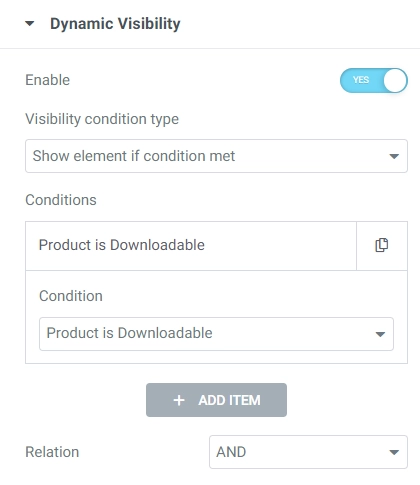
This can be particularly useful for digital products where customers need different information from physical-product buyers.
Example 3: Add a “Best Selling!” Message to Featured Products
JetEngine can also display content based on whether a WooCommerce product is marked as Featured.
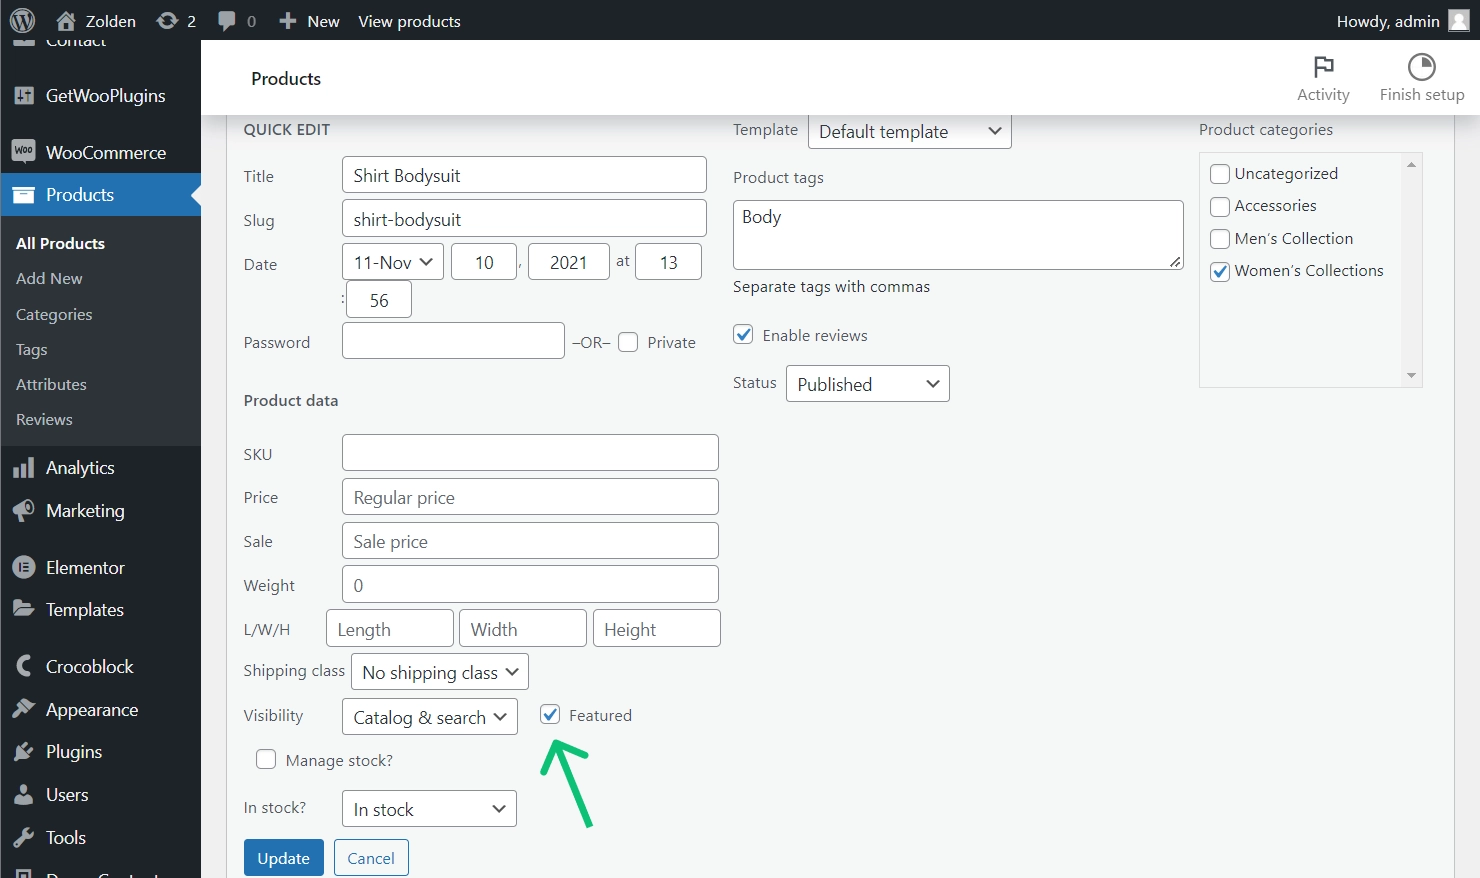
First, mark the appropriate product as featured.
Go to:
Products → All Products → Quick Edit
Enable the Featured option.
Then add a Heading widget containing:
Best Selling!
Under:
Advanced → Dynamic Visibility
select:
Product is Featured
The heading will now appear only for products marked as Featured.
This can be used as a promotional label in product cards or on individual product pages.
Example 4: Show an “Out of Stock” Message
Another common use is displaying an “Out of Stock” message when a product is unavailable.
Add a Heading widget with:
Out of Stock
Then configure Dynamic Visibility with:
- Visibility condition type: Hide element if condition met
- Condition: Product is in Stock
When the product is in stock, the heading is hidden.
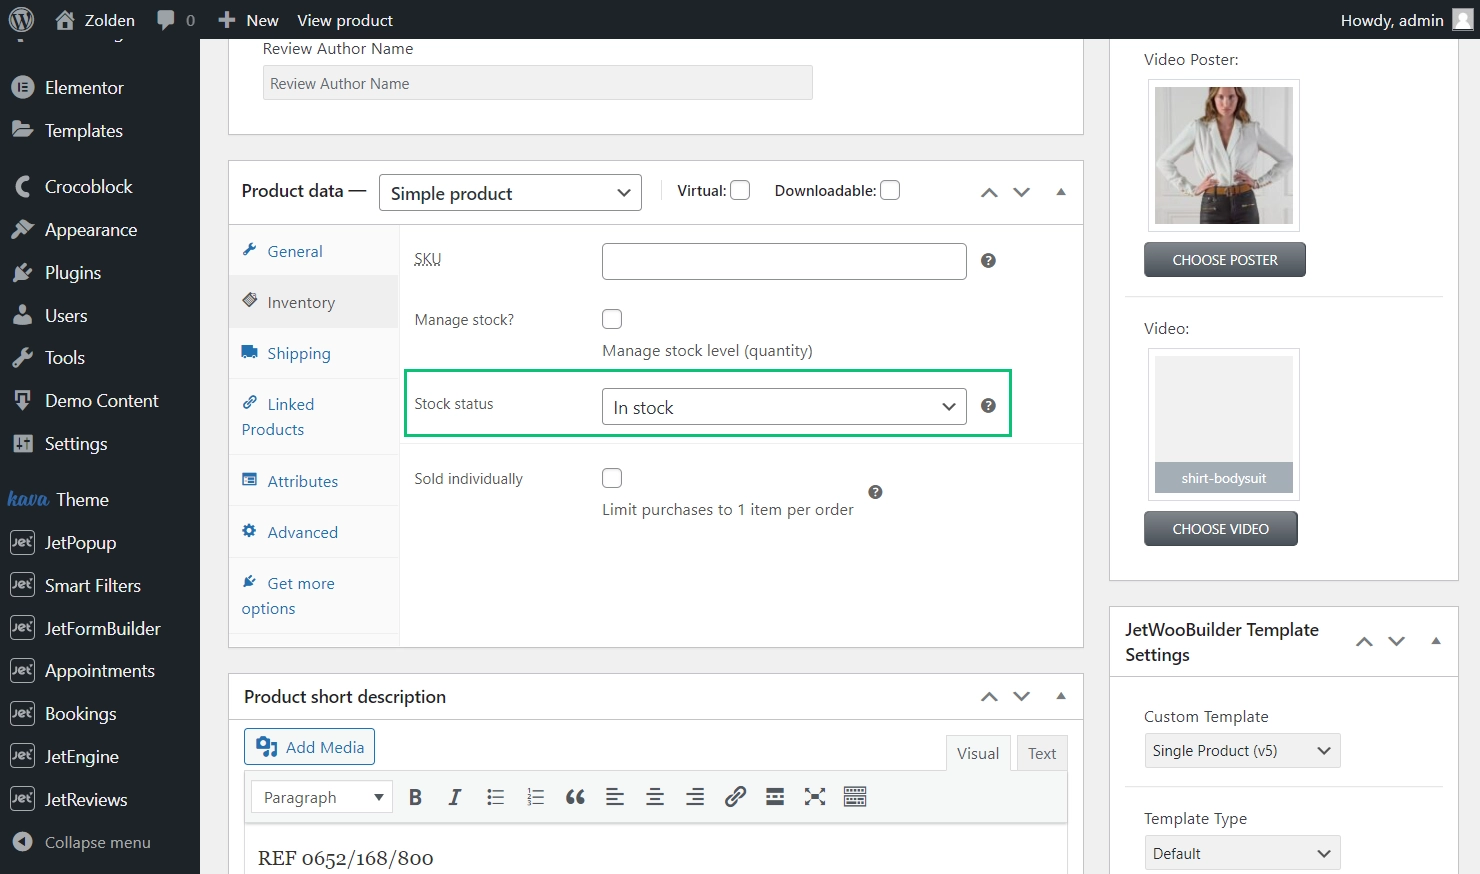
When the product is not in stock, the heading becomes visible.
One thing to remember is that this setup can also display the message for products with an On Backorder status, so check your desired stock behavior before using this approach.
Example 5: Display an “On Backorder” Message
You can create a separate message for products that are specifically available on backorder.
Add a Heading widget containing:
On Backorder
Then select:
Product is on Backorder
as the Dynamic Visibility condition.
The heading will appear when the product’s WooCommerce stock status is set to On backorder.
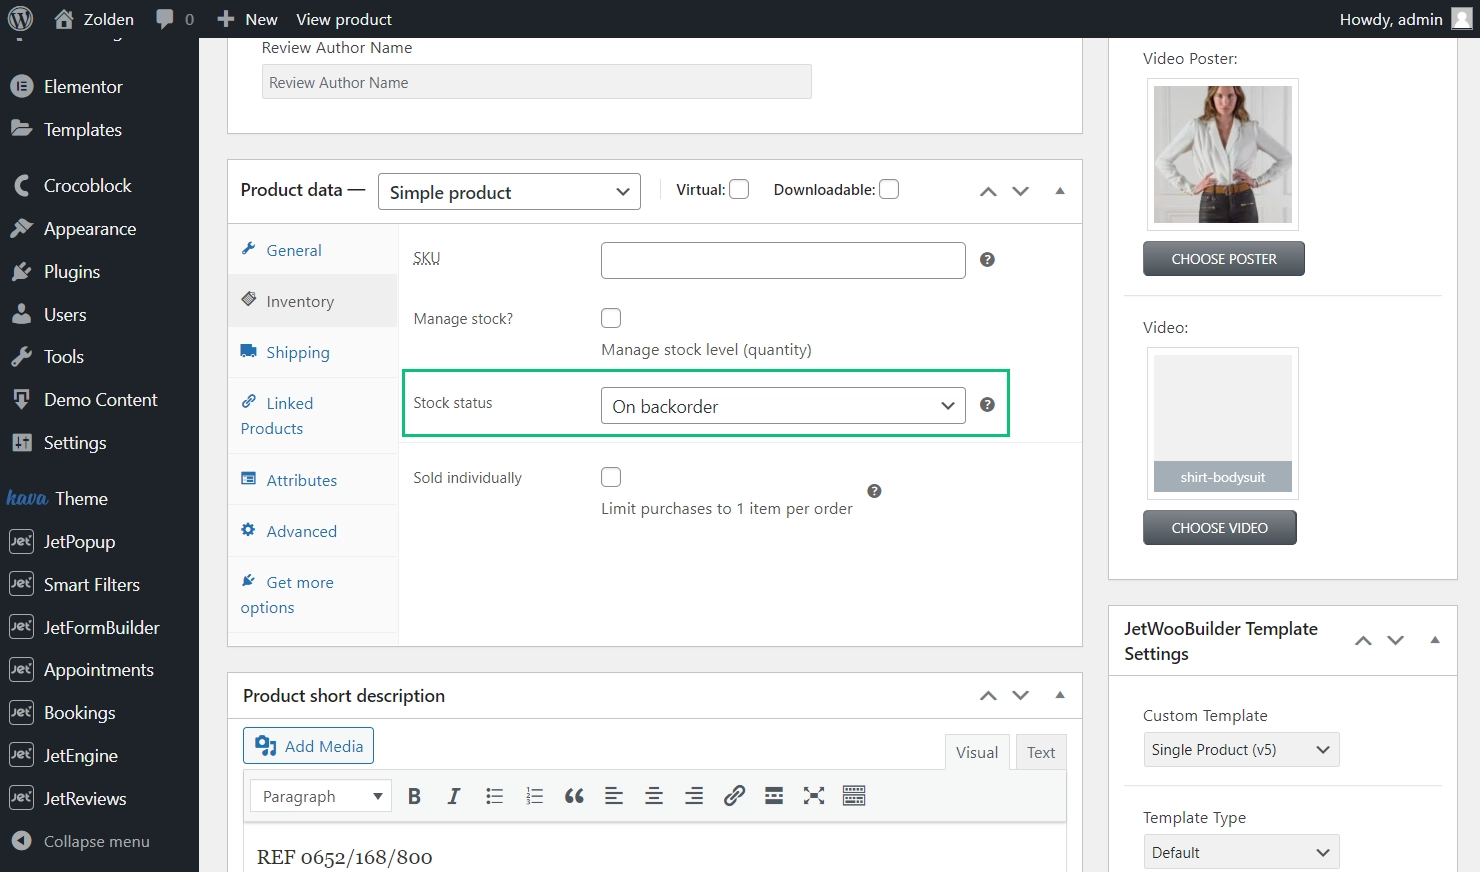
This gives customers immediate information about why the product may not be available for immediate shipment.
Example 6: Add an “On Sale!” Label
Conditional content can also be used to highlight products currently on sale.
Add a Heading widget with:
On Sale!
Then select:
Product is on Sale
as the visibility condition.
The element will appear when the product has a Sale Price.
If a sale price has been scheduled, the condition can follow the scheduled sale period.
This allows you to create a reusable sale badge without manually adding it to every product.
Example 7: Display “Item for Free” Content
You can use the Product is Purchasable condition to control content based on whether a product has a price.
For example, you could create a Heading widget with:
Item for Free
Then use:
Visibility condition type: Hide element if condition met
Condition: Product is Purchasable
If the product does not have a price and therefore isn’t purchasable, the message can be displayed.
This type of setup can be useful for products that are being offered as free or donated items.
Example 8: Show a Download Button After Purchase
JetEngine can also create conditional content based on whether the current customer has already purchased a product.
The Product is Purchased condition checks whether the current logged-in user has purchased the product.
For example, you could display a:
Download
button only after the customer has purchased a digital product.
For a Single Product template, the Product ID field can remain blank because the condition can use the current product. On static pages containing product lists, the relevant Product ID needs to be specified.
This creates a more personalized experience for returning customers.
Example 9: Limit Products Sold Individually
Some WooCommerce products can only be purchased one at a time.
If the Sold individually option is enabled in the product’s Inventory settings, you can use the Product is Sold Individually condition.
For example, add a Heading widget containing:
You can buy only one item per order
Then configure its Dynamic Visibility condition to:
Product is Sold Individually
The message will appear only for products that have this WooCommerce setting enabled.
Example 10: Display Content for External/Affiliate Products
WooCommerce supports several product types, including External/Affiliate products.
You can use the Product is Type condition to display content based on the selected product type.
For example, if a product is an External/Affiliate product, you could display the name of the company that offers the product.
Set the condition to check for the appropriate product type and place the relevant content inside the conditionally visible widget.
Example 11: Show a “Virtual Product” Message
For virtual products, customers may not need shipping information.
You can create a Heading widget containing:
Virtual Product
Then select:
Product is Virtual
as the visibility condition.
The message will appear when the Virtual option is enabled for the WooCommerce product.
The same approach can be used to display a message such as:
No shipping required! You’ll receive access via email after purchase.
This makes the product page more relevant to customers purchasing digital or virtual products.
Step 4: Combine Multiple Conditions
JetEngine also lets you combine multiple visibility conditions.
For example, suppose you want content to appear only when two conditions are satisfied.
You can add multiple conditions and select:
AND
This means every condition must be true.
Alternatively, select:
OR
when you want the element to appear if any of the conditions are satisfied.
This is useful when you need more specific product-display rules.
Step 5: Use Conditional Content in Product Loops
Conditional product content isn’t limited to Single Product pages.
You can also use Dynamic Visibility in product listing or archive templates.
For example, you could create an Archive Item template with different image or badge elements.
One image could use:
Product is on Sale
Another could use:
Product is Virtual
Another could use:
Product is Featured
You can then place this archive template inside a WooCommerce Products Loop.
Each product will display the appropriate content according to its own settings.
This is particularly useful for creating dynamic product cards.
Step 6: Test Your Conditions
After configuring your conditional content, test products with different settings.
For example:
- Product with stock quantity of 7
- Product with stock quantity below 5
- Downloadable product
- Featured product
- Out-of-stock product
- Backordered product
- Product on sale
- Free product
- Previously purchased product
- Individually sold product
- External/Affiliate product
- Virtual product
Check both the Elementor template and the front end to make sure each element appears or disappears as expected.
Conclusion
JetEngine’s Dynamic Visibility feature makes it easier to create conditional WooCommerce product content without building separate templates for every product scenario.
You can use WooCommerce-specific conditions to display messages such as “Almost GONE,” “Best Selling!,” “On Sale!,” “Out of Stock,” “On Backorder,” and “Virtual Product.” You can also create more advanced experiences, such as showing download buttons only to customers who have purchased a product.
The main advantage is that one product template can respond dynamically to each product’s WooCommerce settings. Once the visibility rules are configured, JetEngine automatically determines which content should be displayed to shoppers.
This makes WooCommerce product pages more informative, personalized, and easier to manage.