Table of Contents
- How Divi 5 Global Form Styles Work
- Method 1: Save the Complete Form as an Element Preset
- Step 1: Create and Style Your Form
- Step 2: Save the Form as an Element Preset
- Step 3: Apply the Preset to Another Contact Form
- Method 2: Save Individual Form Styles as Presets
- Step 1: Create Your Input Field Preset
- Step 2: Create a Checkbox Preset
- Step 3: Create a Radio Button Preset
- Step 4: Create Your Button Preset
- Step 5: Don’t Forget Focus and Checked States
- Now You Can Use These Styles on Different Forms
- Complete Form Preset vs Individual Presets
- Use Design Variables With Your Form Presets
- Manage Your Presets From One Place
- Style Your Forms Faster With Divi 5
When a website has multiple forms, styling each form separately can take a lot of time.
You may have a Contact Form on your contact page, a newsletter signup form, a login form, a Contact Form 7 form, or a Gravity Forms form. If you manually style each one, keeping everything consistent becomes difficult.
Divi 5 makes this easier with Form Field Presets, Element Presets, and Design Variables.
The most useful part is that you can approach form styling in two different ways:
- Save the complete form as an Element Preset when you want to reuse the entire form design.
- Save individual field styles as Option Group Presets when you want to reuse only specific parts, such as inputs, checkboxes, radio buttons, or buttons.
This gives you flexibility whether you’re building the same contact form multiple times or using completely different form modules across your website.
How Divi 5 Global Form Styles Work
Before we start, it’s important to understand the two types of presets.
Method 1: Complete Form Element Preset
An Element Preset saves the design of the entire form module.
For example, you create a Contact Form and customize:
- Input fields
- Labels
- Checkboxes
- Radio buttons
- Button
- Spacing
- Typography
- Borders
- Background
- Other module settings
You can save all of those settings as one Contact Form Element Preset.
Then, when you add another Contact Form module, you can simply select that preset instead of styling the entire form again.
Create Once → Save Preset → Apply to Another Form
This method is perfect when you want multiple forms using the same complete design.
Method 2: Individual Form Field Presets
Sometimes you don’t want the entire form to look exactly the same.
For example, you may have:
- A Contact Form
- A Gravity Form
- A Contact Form 7 form
- A Login form
- An Email Optin form
These forms may have different layouts and purposes, but you might still want all of them to use the same input field design.
This is where Option Group Presets are useful.
Instead of saving the entire form, you can save individual styles for:
- Input fields
- Checkboxes
- Radio buttons
- Field labels
- Placeholder text
- Focus states
- Checked states
- Form buttons
Divi 5 separates Input, Checkbox, and Radio controls into dedicated option groups, and these groups can be saved as reusable presets.
So you can create your form design system once and apply those individual styles to compatible form modules throughout your website.
Method 1: Save the Complete Form as an Element Preset
Let’s start with the easiest method.
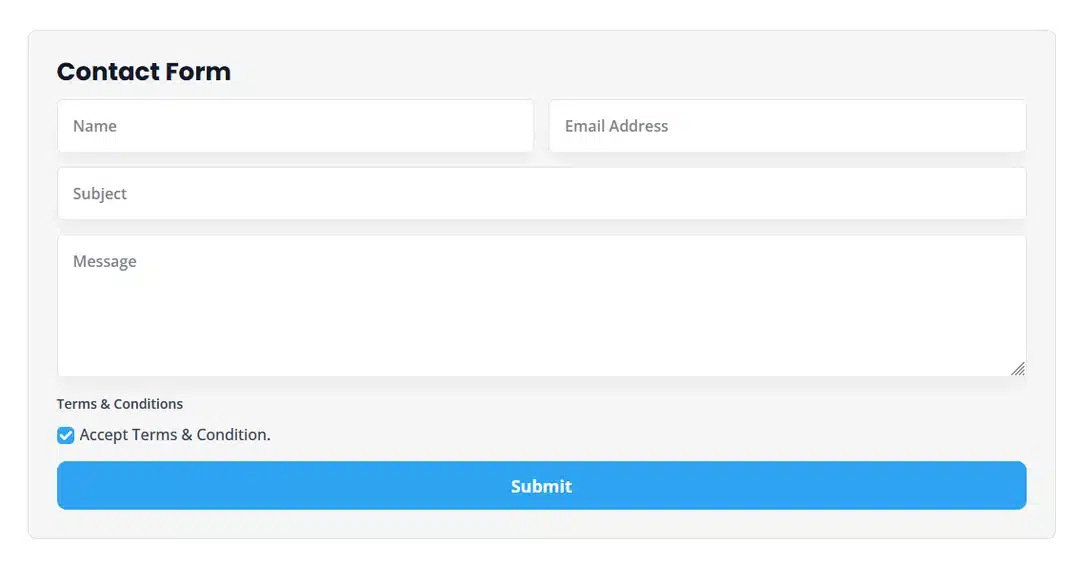
Step 1: Create and Style Your Form
Open your page with the Divi 5 Visual Builder.
Add a Contact Form module.
Create the fields you need and style the entire form.
For example:
- Name
- Phone
- Message
- Checkbox
- Radio buttons
- Submit button
Then customize the form design.
You can adjust the typography, spacing, field backgrounds, borders, button styles, and other available settings.
Step 2: Save the Form as an Element Preset
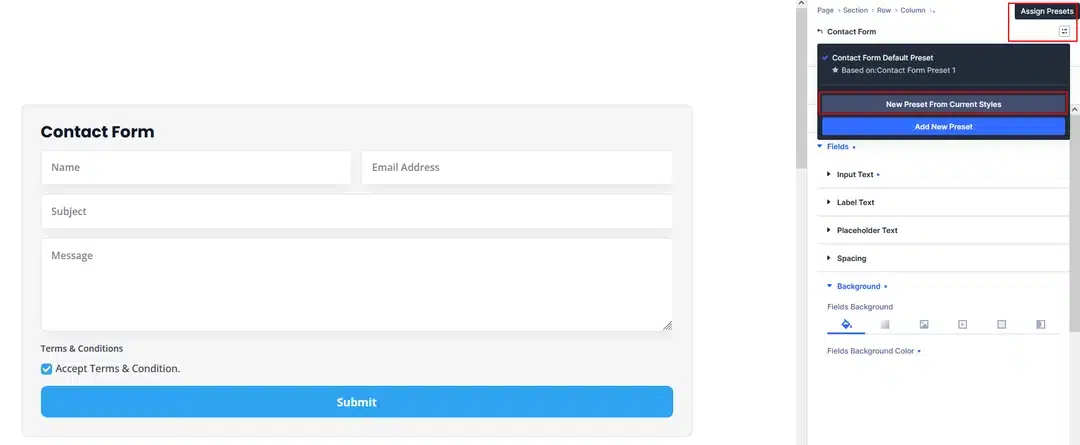
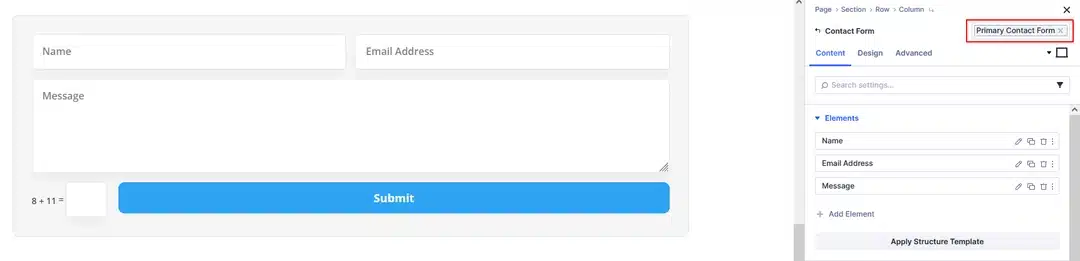
Once your form design is finished, open the Element Preset menu for the Contact Form module.
Choose: New Preset From Current Styles
Give your preset a clear name.
For example: Primary Contact Form
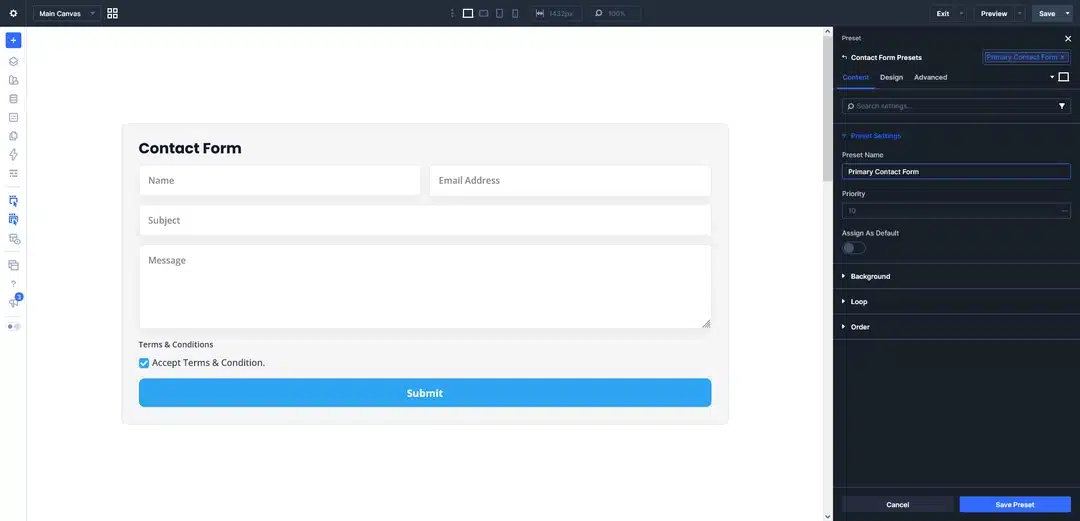
Save the preset.
Your complete Contact Form design is now stored as a reusable preset.
Step 3: Apply the Preset to Another Contact Form
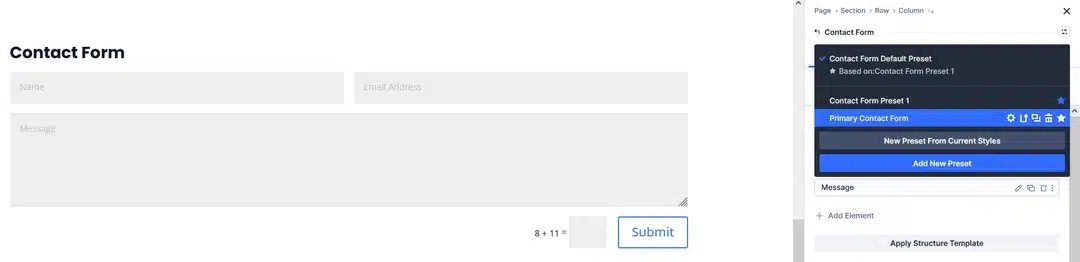
Now add another Contact Form module.
Instead of styling everything again, open the module’s preset menu.
Select: Primary Contact Form
The new Contact Form will use the design saved in your Element Preset.
This can include the form’s field styling, button design, spacing, typography, and other module-level settings.
When Should You Use an Element Preset?
Use an Element Preset when you want the whole form to follow the same design.
For example: Primary Contact Form
can be used for all of the standard contact forms across your website.
You could also create different complete form presets:
- Primary Contact Form
- Compact Contact Form
- Newsletter Form
- Dark Contact Form
- Landing Page Form
Method 2: Save Individual Form Styles as Presets
The second method is more flexible.
Instead of saving the entire form, you can save individual parts of the form.
This is especially useful when you use different form modules on the same website.
Divi 5’s standardized form field groups make this possible across compatible form-based modules.
Step 1: Create Your Input Field Preset
Open any form module.
Go to: Design → Input
Style your input fields.
You can customize things such as:
- Background
- Border
- Border radius
- Input text
- Label text
- Placeholder text
- Spacing
- Focus state
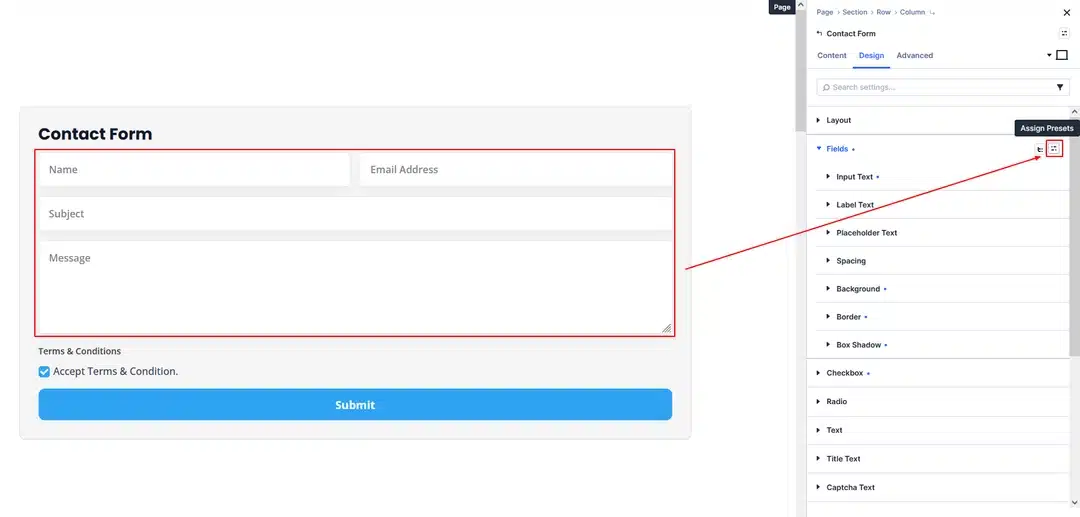
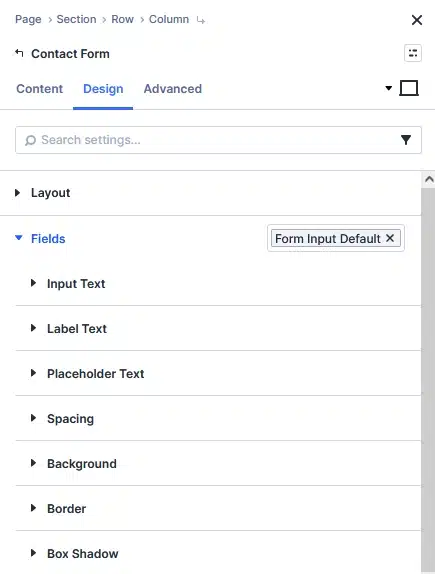
Once you’re happy with the design, save the Input option group as a preset.
For example: Form Input Default
Now this input design can be reused on other compatible form modules.
Step 2: Create a Checkbox Preset
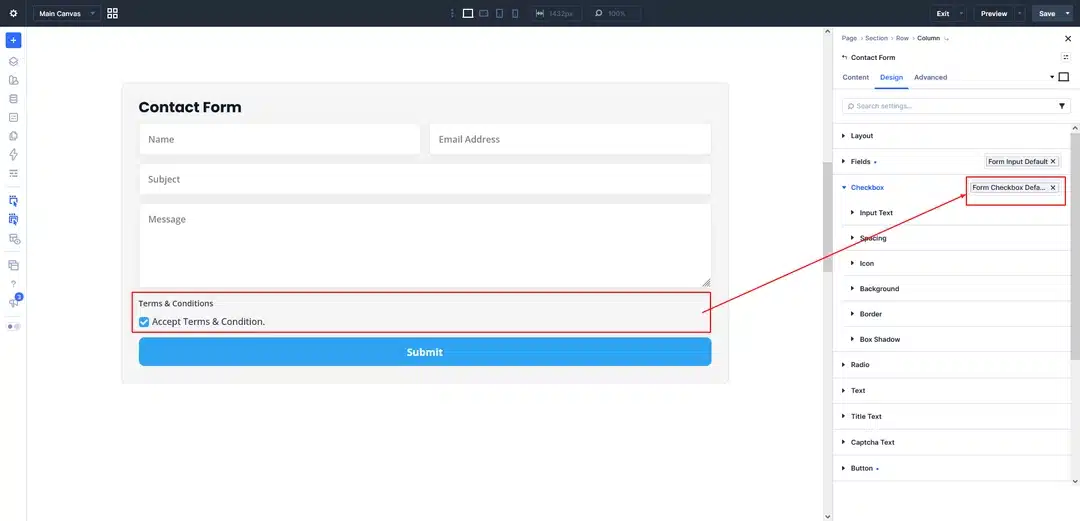
Next, open the:Checkbox option group.
Customize the checkbox design.
You can adjust the checkbox appearance, labels, spacing, borders, and checked state.
Save it as: Form Checkbox Default
Now you have a reusable checkbox style.
Step 3: Create a Radio Button Preset
Open the:
Radio
option group.
Customize the radio buttons so they match your website design.
For example, you can customize:
- Radio appearance
- Border
- Selected state
- Label
- Spacing
Save the style as: Form Radio Default
Step 4: Create Your Button Preset
You can also create a reusable style for your form buttons.
Open the Button option group where it is available.
Customize:
- Button background
- Text color
- Typography
- Border
- Border radius
- Padding
- Hover state
Then save the style as: Form Button Primary
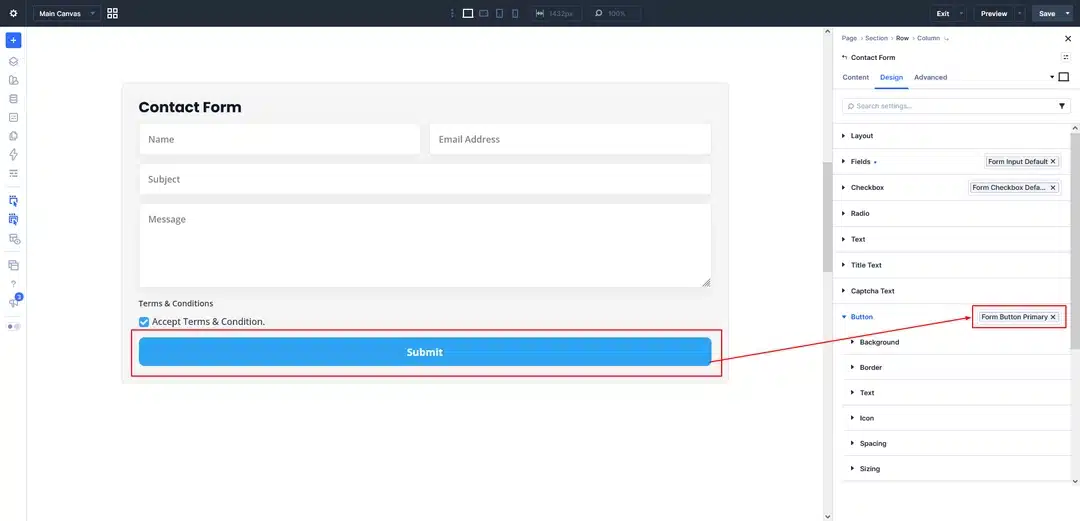
Now you have a reusable button design that can be used with compatible form modules.
Step 5: Don’t Forget Focus and Checked States
Form styling isn’t only about how the fields look when the page first loads.
You should also style the states that appear when visitors interact with the form.
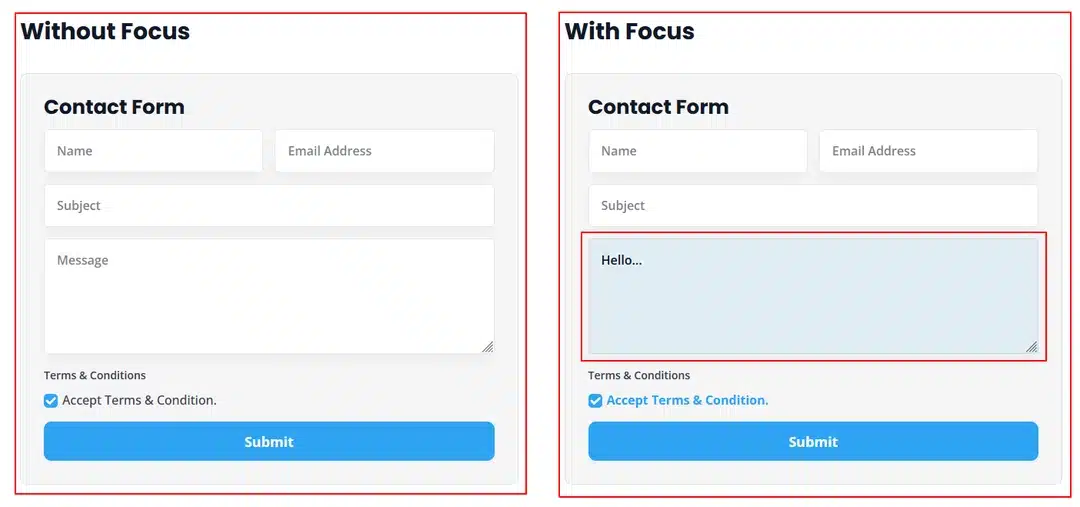
Focus State
The Focus state controls how an input looks when someone clicks or tabs into it.
For example, you could change the border to your primary brand color.
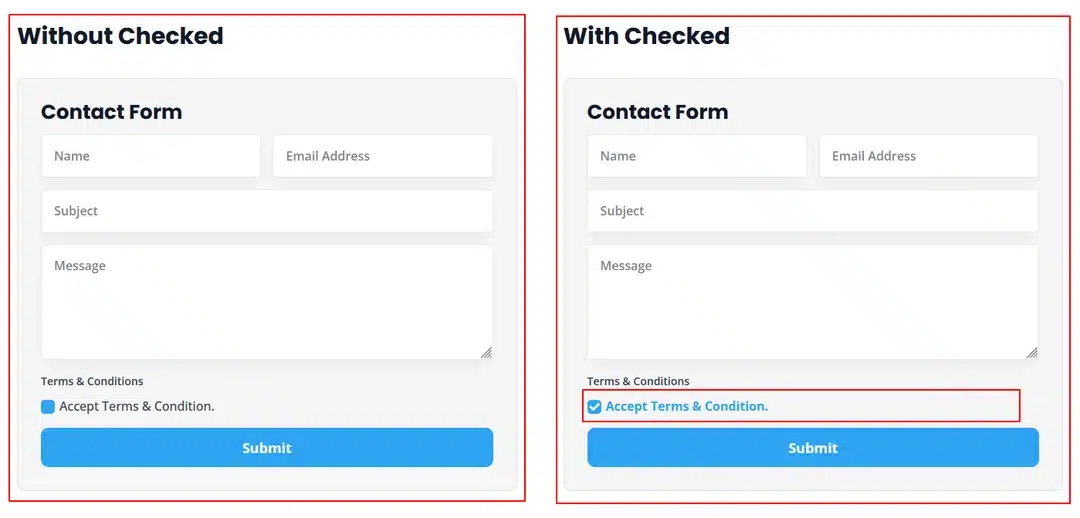
Checked State
The Checked state controls how checkboxes and radio buttons look when selected.
Use a clear visual difference so visitors can easily understand which option they selected.
Divi 5 lets you edit these states directly from the field option groups.
Now You Can Use These Styles on Different Forms
This is where the individual presets become really useful.
Imagine your website uses:
Contact Form
You can apply:
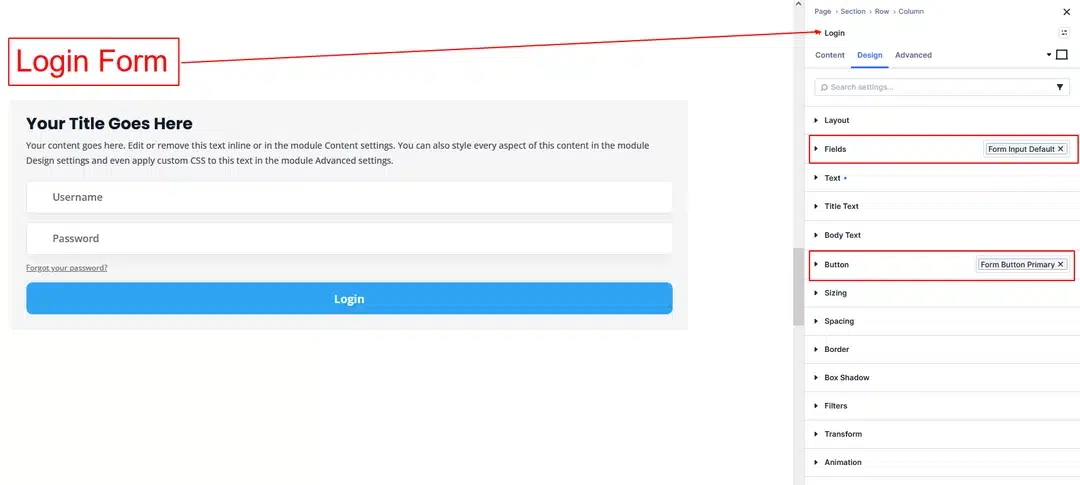
- Form Input Default
- Form Checkbox Default
- Form Radio Default
- Form Button Primary
Gravity Forms
Divi 5 now has a native Gravity Form module, which allows Gravity Forms to be displayed and styled inside the Divi Visual Builder. Its Design tab includes Input, Checkbox, Radio, and button styling.
You can apply your reusable field presets here as well
Contact Form 7
Divi 5 also provides a Contact Form 7 Styler module, with Input, Checkbox, Radio, Button, and other styling options.
You can use your reusable field styles instead of recreating the same design.
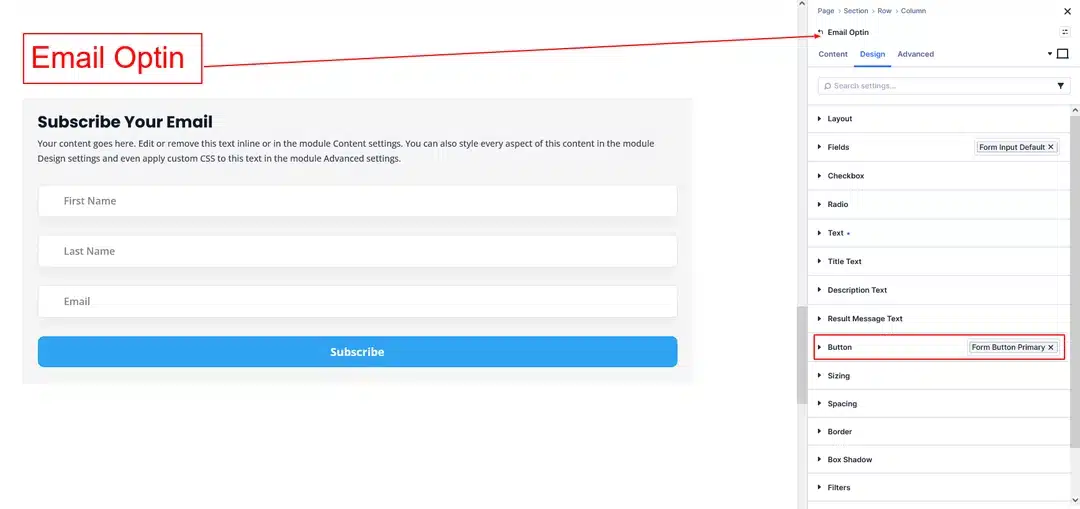
Email Optin
The Email Optin module also includes Input, Checkbox, Radio, and Button design groups.
So your newsletter form can use the same field styling as your main contact forms.
Login Form
The same concept can be used with compatible form-based modules such as the Login module. Divi 5’s standardized form field groups are designed to provide consistent styling across form-based modules.
Complete Form Preset vs Individual Presets
Now let’s make the difference simple.
| Method | What It Saves | Best For |
|---|---|---|
| Element Preset | Complete form design | Reusing the same entire form |
| Input Preset | Input field styling | Sharing input styles across forms |
| Checkbox Preset | Checkbox styling | Sharing checkbox styles |
| Radio Preset | Radio styling | Sharing radio styles |
| Button Preset | Button styling | Sharing button styles |
| Focus / Checked styles | Interaction states | Keeping interactions consistent |
Use an Element Preset when:
You want another form to have the same complete design.
Example:
Primary Contact Form → Primary Contact Form Preset
Add another Contact Form → Select the preset → Complete design is applied.
Use Individual Presets when:
You have different types of forms but want them to share certain design elements.
For example:
Contact Form + Gravity Forms + Contact Form 7 + Email Optin + Login
can all use the same:
Form Input Default
Form Checkbox Default
Form Radio Default
Form Button Primary
This gives you much more flexibility.
Use Design Variables With Your Form Presets
You can make your system even easier to maintain by combining presets with Design Variables.
For example, create variables for:
- Primary Color
- Field Background
- Field Border
- Focus Border
- Text Color
- Field Radius
- Field Padding
- Button Radius
Then use those variables inside your form presets.
For example:
Primary Color Variable
↓
Form Button Preset
↓
Contact Form / Gravity Forms / CF7 / Email Optin
If you later change your brand color, you can update the variable rather than manually changing the color in every form.
Divi 5’s design-system approach is intended to connect variables, option group presets, and complete element presets.
Manage Your Presets From One Place
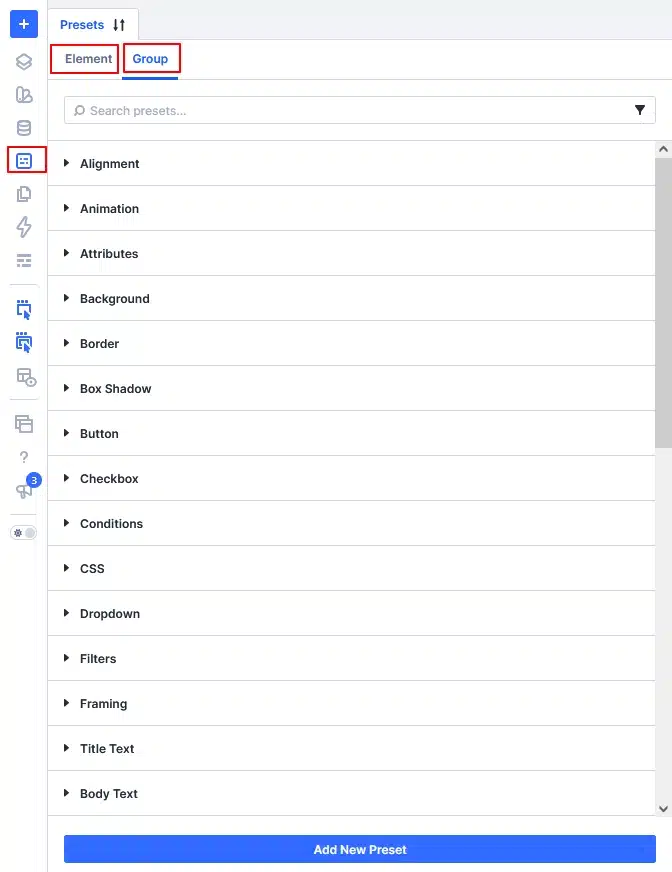
Once you’ve created several presets, you can manage them using Divi 5’s Preset Manager.
Open the Visual Builder and access the Preset Manager.
From there, you can find and edit your Element Presets and Option Group Presets.
If you update a reusable preset, the forms using that preset can receive the updated styling.
This means you don’t have to open every form individually just to make the same design change.
Style Your Forms Faster With Divi 5
Divi 5 gives you a much more flexible way to manage form design.
Instead of styling every form separately, you can create a reusable system with two levels:
Complete Element Presets
→ Save and reuse the entire form design.
Individual Option Group Presets
→ Reuse specific field styles across different form modules.
You can then use Design Variables to control shared colors, spacing, typography, and other design values.
The result is a simple workflow:
Create → Style → Save Presets → Reuse
Whether you’re working with a standard Divi Contact Form, Gravity Forms, Contact Form 7, Email Optin, or another compatible form module, this approach can help you keep your forms consistent while reducing repetitive styling work.