Table of Contents
- Why Use a Custom Font?
- How to Add a Custom Font to Divi 5
- Step 1: Open a Page in the Divi Visual Builder
- Step 2: Add a Heading or Text Element
- Step 3: Go to Heading Font or Text Font
- Step 4: Upload Your Custome Fonts
- Step 5: Find Your Font Under Custom Fonts
- Use Your Custom Font Throughout Your Website
- Use Custom Fonts with Divi 5 Global Variables
- Custom Fonts vs Google Fonts
- Final Thoughts
Not every website uses a font available in Google Fonts. Sometimes a brand design requires a custom font to achieve the right look and feel.
In older workflows, adding custom fonts to WordPress could require custom CSS, theme files, or additional plugins. Divi 5 makes the process much simpler by allowing you to upload custom fonts directly from the Visual Builder and then use them in your headings, text, buttons, and other elements.
In this guide, we’ll show you how to upload a custom font to Divi 5 and use it throughout your website, while also keeping performance in mind.
Why Use a Custom Font?
Google Fonts provides a huge collection of fonts, but sometimes the font you need isn’t available there.
You may need a custom font because:
- Your brand uses a unique typeface.
- The client’s design uses a licensed font.
- The font isn’t available in Google Fonts.
- You need to match an existing brand identity.
- You want a specific display or decorative font.
With Divi 5, you can upload your font directly and make it available in the Visual Builder.
How to Add a Custom Font to Divi 5
The process is simple. You can upload your font directly from the font settings of a Divi 5 element.
Step 1: Open a Page in the Divi Visual Builder
First, open any page where you want to use your custom font.
Launch the Divi 5 Visual Builder.
You can use an existing page or create a new page for testing.
Step 2: Add a Heading or Text Element
Add a Heading/Text element to the page.
You can use a heading if you want to test the font on your H1–H6 headings, or use a text element if you want to test it with regular content.
Once the element is added, open its settings.
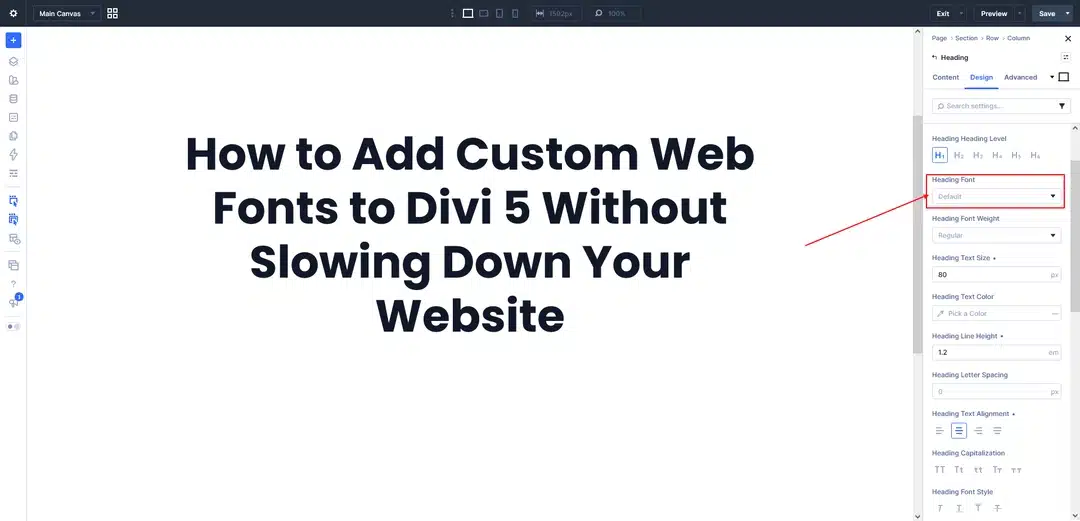
Step 3: Go to Heading Font or Text Font
Open the Design tab.
Depending on the element you’re editing, locate the appropriate typography setting.
For a heading, go to:
Design → Heading → Heading Font
Click the font dropdown.
You will see the available fonts in Divi.
You will also find an Upload button for adding a custom font.
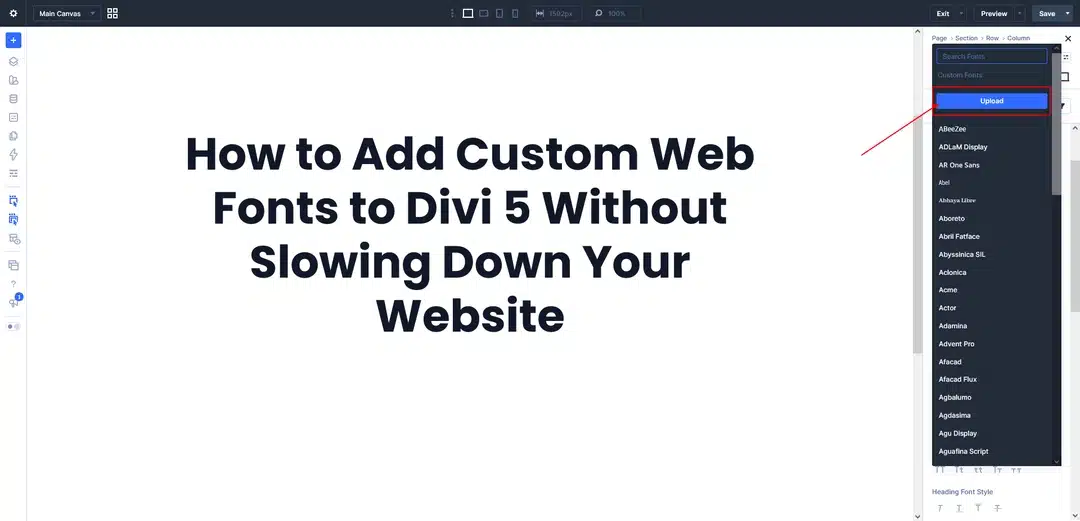
Step 4: Upload Your Custome Fonts
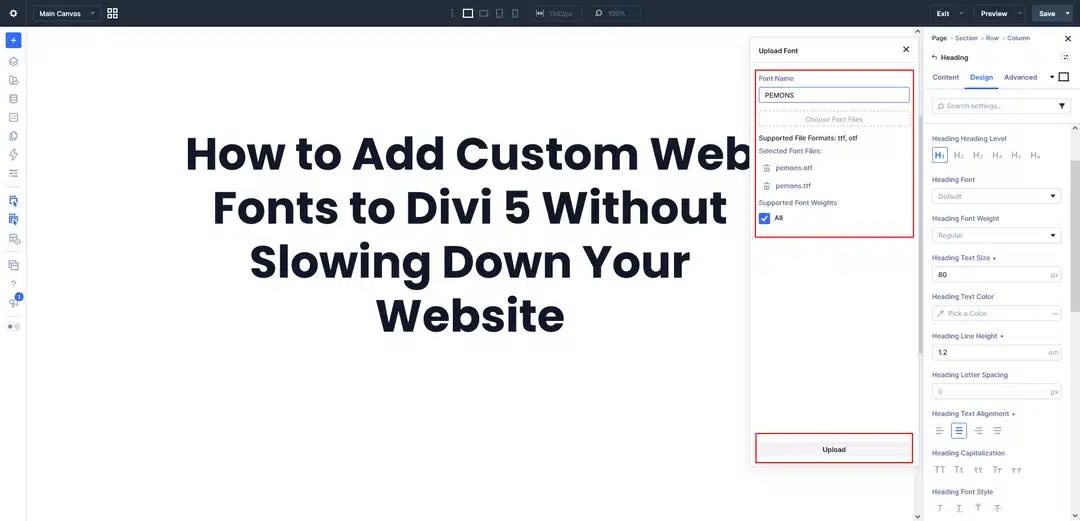
Click the Upload button from the font dropdown to open the Upload Font panel.
Enter a name for your font, such as PEMONS, and then click Choose Font Files to select your font files from your computer.
Divi 5 supports font formats such as .ttf and .otf. If your font includes different weights or styles, select the files you need.
Once you’ve selected the files and entered the font name, click Upload.
Step 5: Find Your Font Under Custom Fonts
After the upload is complete, open the font dropdown again.
Your new font will appear under Custom Fonts.
For example:
Custom Fonts → PEMONS
Select it to apply the font to your element.
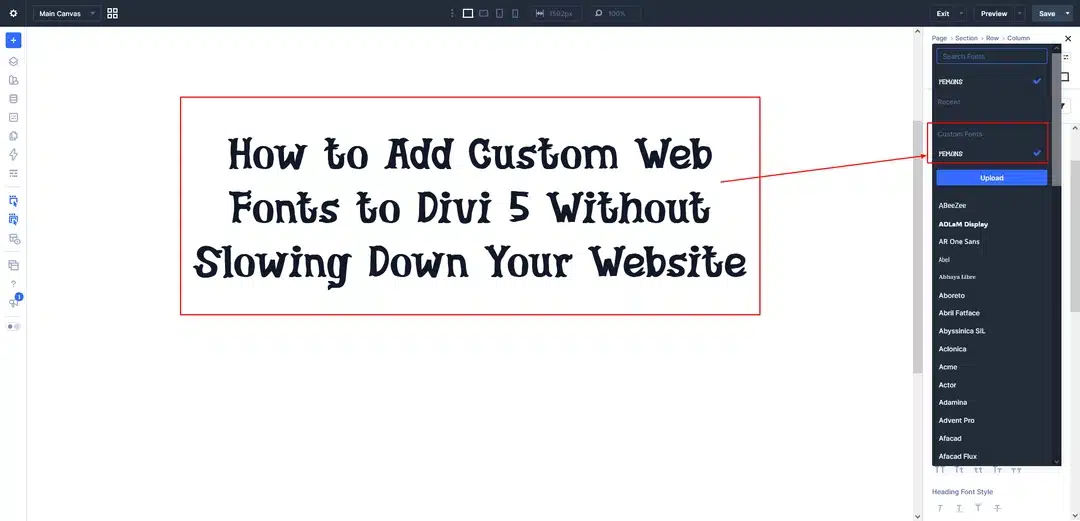
You can now use your custom font just like other fonts available in Divi.
Use Your Custom Font Throughout Your Website
Once your custom font has been uploaded, you can use it wherever you need it.
For example:
- H1
- H2
- H3
- H4
- H5
- H6
- Body text
- Buttons
- Captions
- Subtitles
- Other typography elements
If your website uses the same custom font throughout the design, you can also use it as part of your global typography system.
For example:
Heading Font → Custom Font
Body Font → Your chosen body font
This is especially useful when building a website with Divi 5 Global Variables and Presets.
Use Custom Fonts with Divi 5 Global Variables
If you’re creating a complete Divi 5 design system, it’s better to avoid selecting your custom font manually on every element.
Instead, add the custom font and then use it as part of your global font setup.
For example:
Global Fonts
Heading: PEMONs
Body: Inter
Then your heading presets can use the global heading font.
This means your typography system stays consistent across the website.
If you later decide to replace the heading font, you can update the global font variable instead of changing every heading individually.
Custom Fonts vs Google Fonts
There is nothing wrong with using Google Fonts when they fit your design.
But when a project requires a specific typeface that isn’t available through Google Fonts, Divi 5’s custom font upload feature provides a convenient way to add it directly to your project.
The important thing is not simply where the font comes from, but how many font files, weights, and styles you load.
A well-planned font system can help you maintain both design consistency and good website performance.
Final Thoughts
Adding a custom font to Divi 5 is a straightforward process.
You can:
Open Divi Visual Builder
↓
Add a Heading or Text element
↓
Design → Heading/Text → Font
↓
Click Upload
↓
Enter your Font Name
↓
Choose your Font Files
↓
Click Upload
↓
Select your font from Custom Fonts
Once uploaded, your custom font is available to use throughout your Divi 5 website.
For the best results, combine your custom font with Divi 5 Global Variables and Presets. This allows you to create a consistent typography system and makes future changes much easier.
And remember: don’t load more font families or weights than your design actually needs. A simple, well-planned font setup can give you the custom branding you want without unnecessarily adding to your website’s performance overhead.