
Table of Contents
- Why Add Search Filtering to Search Results?
- What You Need to Create Search Filtering
- Step 1: Create a Search Filter
- Step 2: Create the Search Results Template
- Step 3: Add a Results Grid
- Step 4: Add the Search Filter to the Page
- Step 5: Connect the Filter with the Correct Results Grid
- Step 6: Add Additional Filters
- Step 7: Choose the Appropriate Apply Type
- Step 8: Style the Search Results Page
- Step 9: Test the Search Filtering
- Improve WordPress Search with JetSmartFilters
- Conclusion
A website’s search feature helps visitors find relevant content quickly, but a basic search bar may not always be enough. On websites with a large number of posts, products, or other content, search results can still contain too many irrelevant items.
Adding search filtering to the search results page gives visitors more control over what they see. With JetSmartFilters, you can create a search filter that works alongside other filters, allowing users to narrow down results by keywords, categories, attributes, prices, and more.
In this guide, we’ll explore how to add search filtering to a WordPress search results page using JetSmartFilters and Elementor.
Why Add Search Filtering to Search Results?
A standard WordPress search allows users to enter a keyword and receive matching results. However, those results may come from different post types, categories, or content groups.
For example, a visitor searching for “marketing” might see:
- Blog posts about marketing
- Product pages containing the word marketing
- Documentation pages
- Service pages
- Other content that mentions the keyword
Additional filters make it easier to refine these results.
Users could combine their initial search with filters such as:
- Content category
- Product type
- Price range
- Color
- Custom fields
- Specific keywords
This creates a more convenient browsing experience and helps visitors reach the content they need without repeatedly performing new searches.
What You Need to Create Search Filtering
Before getting started, make sure your WordPress website has the required tools installed and activated.
For this setup, you can use:
- WordPress
- Elementor
- JetSmartFilters
- JetThemeCore for creating and assigning the search results template
- JetWooBuilder for WooCommerce product grids, if required
For non-WooCommerce websites, you can also use a Listing Grid to display your search results.
JetSmartFilters supports Search Filters in Elementor, Gutenberg, and Bricks, and the Search Filter can work with the default WordPress search or a specific custom field.
Step 1: Create a Search Filter
Start by opening your WordPress Dashboard and navigating to:
Smart Filters → Add New
Give your filter a suitable name, such as Search Results Filter.
Next, select Search as the filter type.
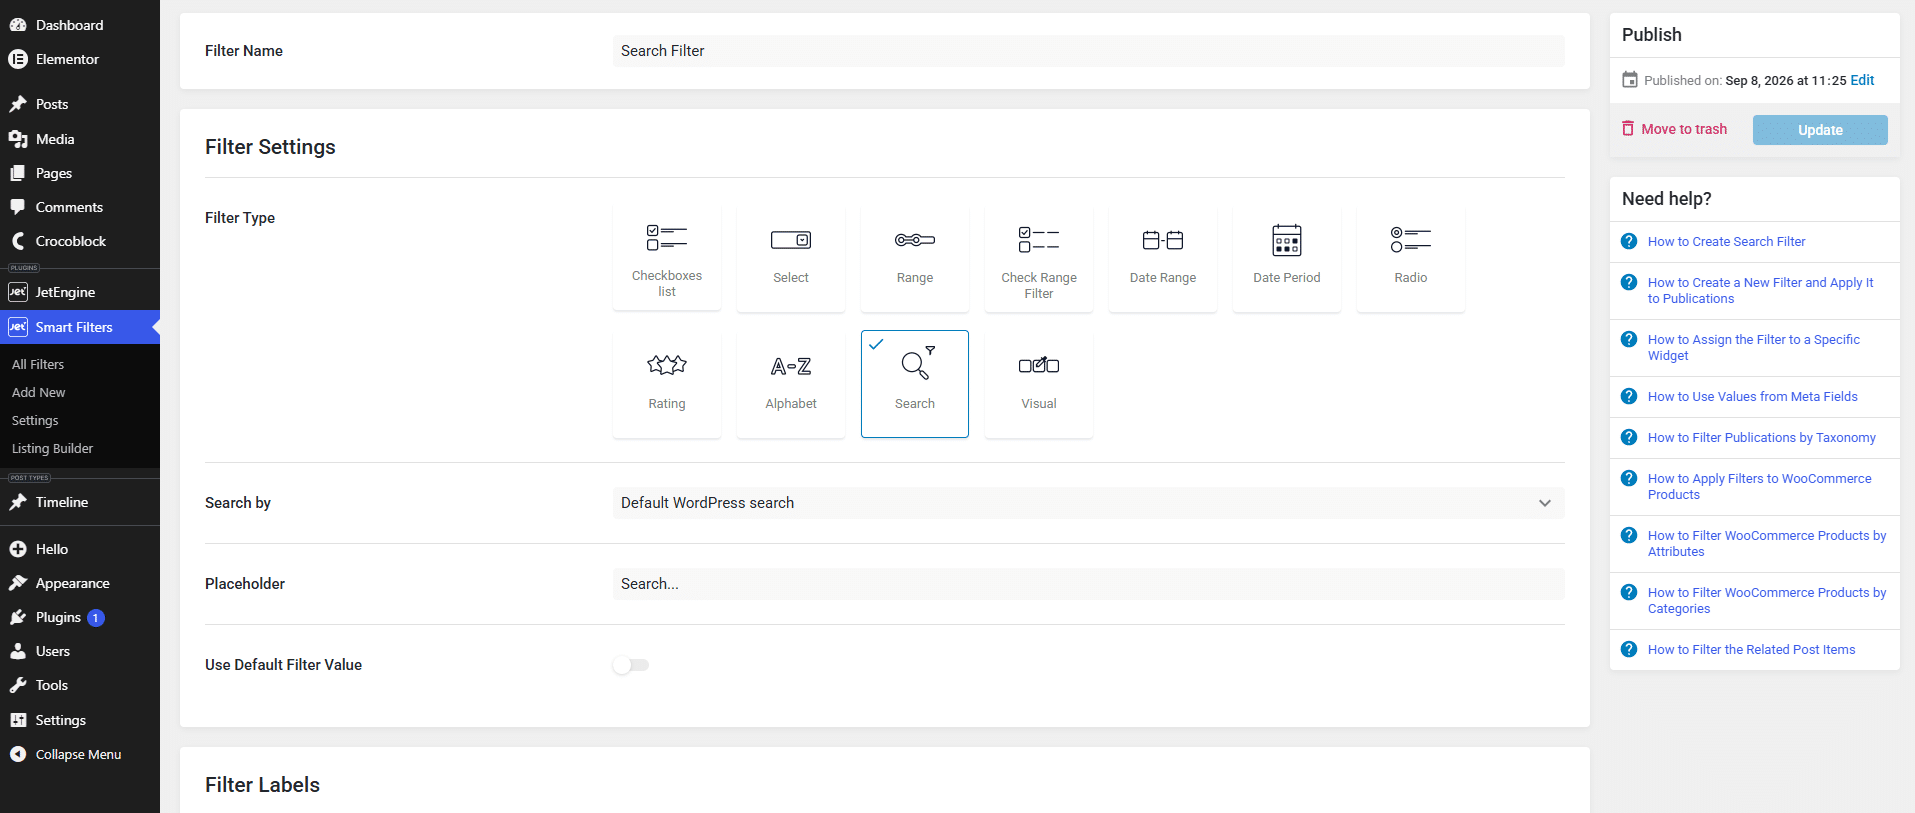
JetSmartFilters allows you to configure the Search Filter for the default WordPress search or use a specific query variable/custom field when you need to search a particular field.
For a general search results page, the default WordPress search option is usually the most suitable choice.
You can also configure settings such as:
- Filter label
- Active filter label
- Default value
- Search button text
- Search button icon
- Apply type
After configuring the settings, save the filter.
Step 2: Create the Search Results Template
The next step is to create a template that will display your search results.
If you’re using JetThemeCore, create a new template and assign it to the Search Page condition. This allows the template to automatically appear when visitors perform a search on your website.
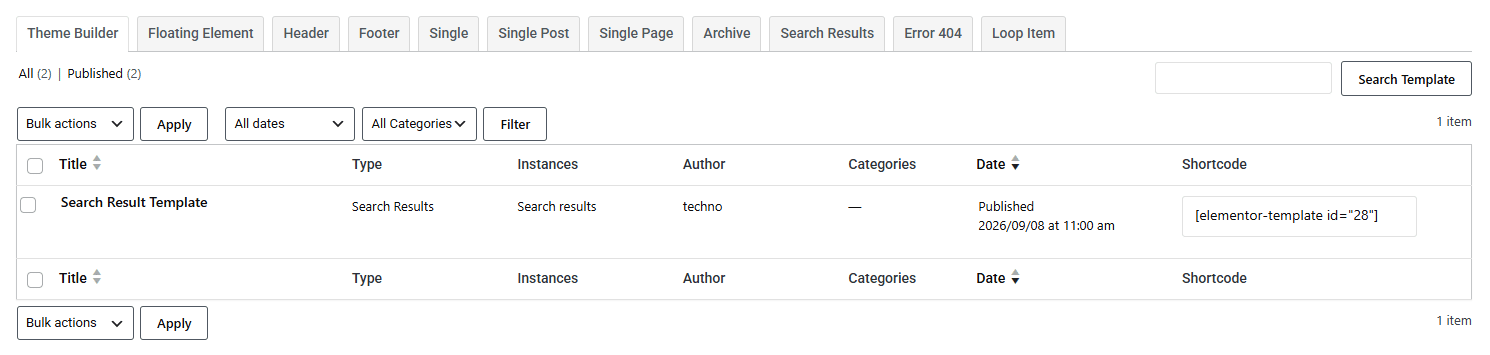
Open the template with Elementor and create the layout for your search results page.
You can include:
- Search filter
- Category filters
- Price or range filters
- Product or post grid
- Pagination
- Active filter tags
- Other supporting content
The goal is to create a page where visitors can refine the results without leaving the search results screen.
Step 3: Add a Results Grid
Now add the element that will display your search results.
For a WooCommerce website, you can use a product grid such as JetWooBuilder or another compatible product provider.
For regular WordPress content, you can use a Listing Grid or another supported provider.
JetSmartFilters works by connecting filters to a provider, meaning the filter needs to know which results container it should update.
Once your results grid is added, configure it to display the appropriate posts or products.
Step 4: Add the Search Filter to the Page
Return to the Elementor editor and add the Search Filter widget where you want visitors to search.
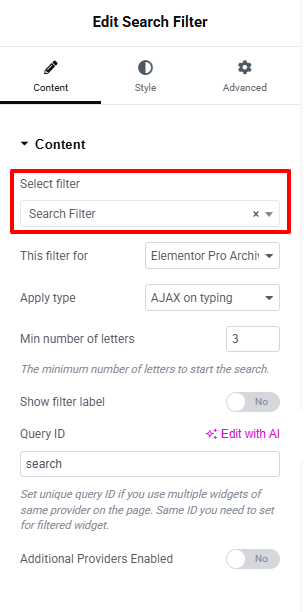
In the widget settings, select the Search Filter you created earlier.
Then configure the This filter for option to connect the filter with your results provider.
JetSmartFilters provides several application methods, including AJAX, AJAX on typing, Page Reload, and Mixed. AJAX can be useful when you want the results to update without completely reloading the page.
You can also customize the search button and other visual settings to match your website design.
Step 5: Connect the Filter with the Correct Results Grid
If your page contains only one results grid, the provider connection is usually straightforward.
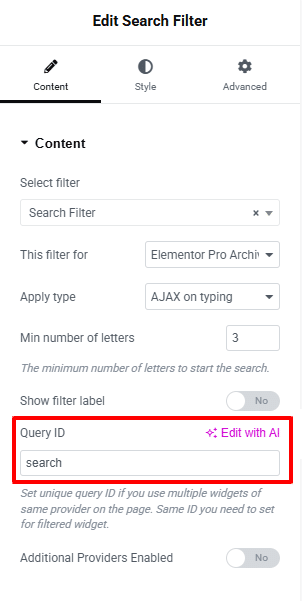
However, if your page contains multiple grids, you may need to use a Query ID.
For example, you could have:
- A product grid
- A related-posts grid
- A featured-content grid
If the search filter should only affect the product grid, assign a unique CSS ID to that provider and use the same value as the Query ID in the filter settings.
This ensures that the filter targets the correct results container instead of affecting every provider on the page.
Step 6: Add Additional Filters
The Search Filter doesn’t have to work alone.
You can combine it with other JetSmartFilters options to create a more advanced search experience.
For example, a WooCommerce search results page could include:
- Search Filter – search for a specific keyword
- Checkbox Filter – select product categories
- Select Filter – choose a brand or product type
- Range Filter – define a price range
- Sorting Filter – change the order of results
This combination allows visitors to progressively narrow down the results.
For example, a visitor could search for “shoes,” select a specific category, choose a color, and set a maximum price. Each filter works together to make the results more relevant.
Step 7: Choose the Appropriate Apply Type
JetSmartFilters gives you control over how filtering is applied.
Depending on your requirements, you can use:
AJAX:
Updates the results without reloading the entire page.
AJAX on typing:
Starts filtering after the visitor enters the required number of characters.
Page Reload:
Reloads the page when the search is submitted.
Mixed:
Updates the URL while avoiding a traditional page reload.
For a modern search experience, AJAX can be a good option because visitors can see updated results without waiting for the entire page to reload.
Step 8: Style the Search Results Page
Once the functionality is working, customize the appearance of your search results page.
You can adjust:
- Search field width
- Search button design
- Filter spacing
- Typography
- Colors
- Product or post cards
- Grid columns
- Mobile layout
Make sure the filter area remains easy to use on smaller screens. If you have several filters, consider organizing them into a sidebar or responsive filter panel.
Step 9: Test the Search Filtering
Before publishing the changes, test the complete search experience from the front end.
Try several scenarios:
- Enter a keyword into the search field.
- Confirm that relevant results are displayed.
- Apply another filter.
- Check whether the results update correctly.
- Combine multiple filters.
- Clear the filters and perform another search.
- Test the layout on mobile and desktop.
- Check pagination if the results span multiple pages.
If you are using multiple result providers, verify that the Query ID is correctly configured so each filter affects only the intended grid.
Improve WordPress Search with JetSmartFilters
A basic search results page can quickly become difficult to navigate when a website contains a large amount of content. Adding search filtering gives visitors a more structured way to explore those results.
With JetSmartFilters, you can combine a Search Filter with category, attribute, range, and sorting filters to create a more precise search experience. The plugin also supports AJAX filtering, helping users refine results without repeatedly reloading the page.
Whether you’re building a WooCommerce store, blog, directory, or custom WordPress website, adding search filtering can make it significantly easier for visitors to find the content or products they’re looking for.
Conclusion
Adding search filtering to your WordPress search results page can make a significant difference to the user experience. Instead of presenting visitors with a long list of potentially unrelated results, you can give them tools to narrow the content down quickly.
With JetSmartFilters and Elementor, you can create a flexible search results page with keyword search, category filters, price ranges, sorting options, and AJAX-powered results.
The result is a more organized and user-friendly search experience that helps visitors find relevant content faster.