Table of Contents
- What Is a Horizontal Blog Loop?
- Why Use Divi 5’s Loop Builder for a Blog?
- What We’ll Create
- Step 1: Create the Blog Section
- Step 2: Create the Loop Row
- Step 3: Build the Blog Card
- Step 4: Style the Horizontal Blog Card
- Step 5: Connect the Dynamic Post Content
- Step 6: Add Pagination
- Step 7: Make the Blog Loop Responsive
- Tips for a Better Horizontal Blog Loop
- Keep Your Blog Loop Easy to Maintain
- Final Thoughts
Creating an attractive blog layout can make it easier for visitors to browse your latest content. While Divi provides built-in options for displaying blog posts, you may want more control over how each post appears on the page.
With Divi 5’s Loop Builder, you can create a custom blog card and connect its elements to dynamic WordPress content. This allows you to build a horizontal blog loop where each post can display its featured image, title, publication date, excerpt, and a link to the full article.
In this guide, you’ll learn how to create a horizontal blog loop in Divi 5 step by step without relying on custom theme files.
What Is a Horizontal Blog Loop?
A horizontal blog loop displays individual blog posts in a row-style layout instead of placing multiple posts side by side in a traditional grid.
Typically, the featured image appears on one side while the post information appears on the other. You can include elements such as:
- Featured image
- Post title
- Publication date
- Post excerpt
- Read More link or icon
Because the layout is created with Divi’s Loop Builder, the same design is automatically repeated for each post returned by your query.
This approach gives you more control over the appearance of your blog archive while keeping the content dynamic.
Why Use Divi 5’s Loop Builder for a Blog?
The standard Blog module can be useful when you need a basic post listing. However, a custom loop gives you greater flexibility over the structure and styling of each post card.
With the Loop Builder, you can:
- Create a custom post-card layout
- Choose which post information to display
- Connect Divi elements to dynamic post data
- Control image and content placement
- Customize typography and spacing
- Add your own links and icons
- Configure the number and order of posts
- Add pagination
- Create responsive layouts for different screen sizes
This makes the Loop Builder particularly useful when you want your blog listing to match the rest of your website design.
What We’ll Create
In this tutorial, we’ll create a horizontal blog layout where each post appears as a separate card.
The featured image will be displayed on the left, while the post title, publication date, excerpt, and arrow link will appear on the right. Multiple posts will be displayed vertically, creating a clean editorial-style blog listing.
Before getting started, make sure your WordPress posts have featured images. Adding excerpts to your posts can also help you control the amount of text displayed in each card.
Step 1: Create the Blog Section
First, open the page where you want to display your blog loop and launch the Divi Builder.
Add a new Regular Section to the page.
Inside the section, create a single-column row. This row can be used for the main heading of your blog section.
Add a Heading module and enter a heading such as:
Latest Blog Posts
Open the Heading module settings and adjust the typography to match your website. You can increase the font size, change the font weight, and adjust the spacing below the heading.
Once the heading is ready, you’ll create another row underneath it for the actual blog loop.
Step 2: Create the Loop Row
Add a new two-column row below the heading.
This row will become the template for each blog post.
Use the first column for the featured image and the second column for the post content.
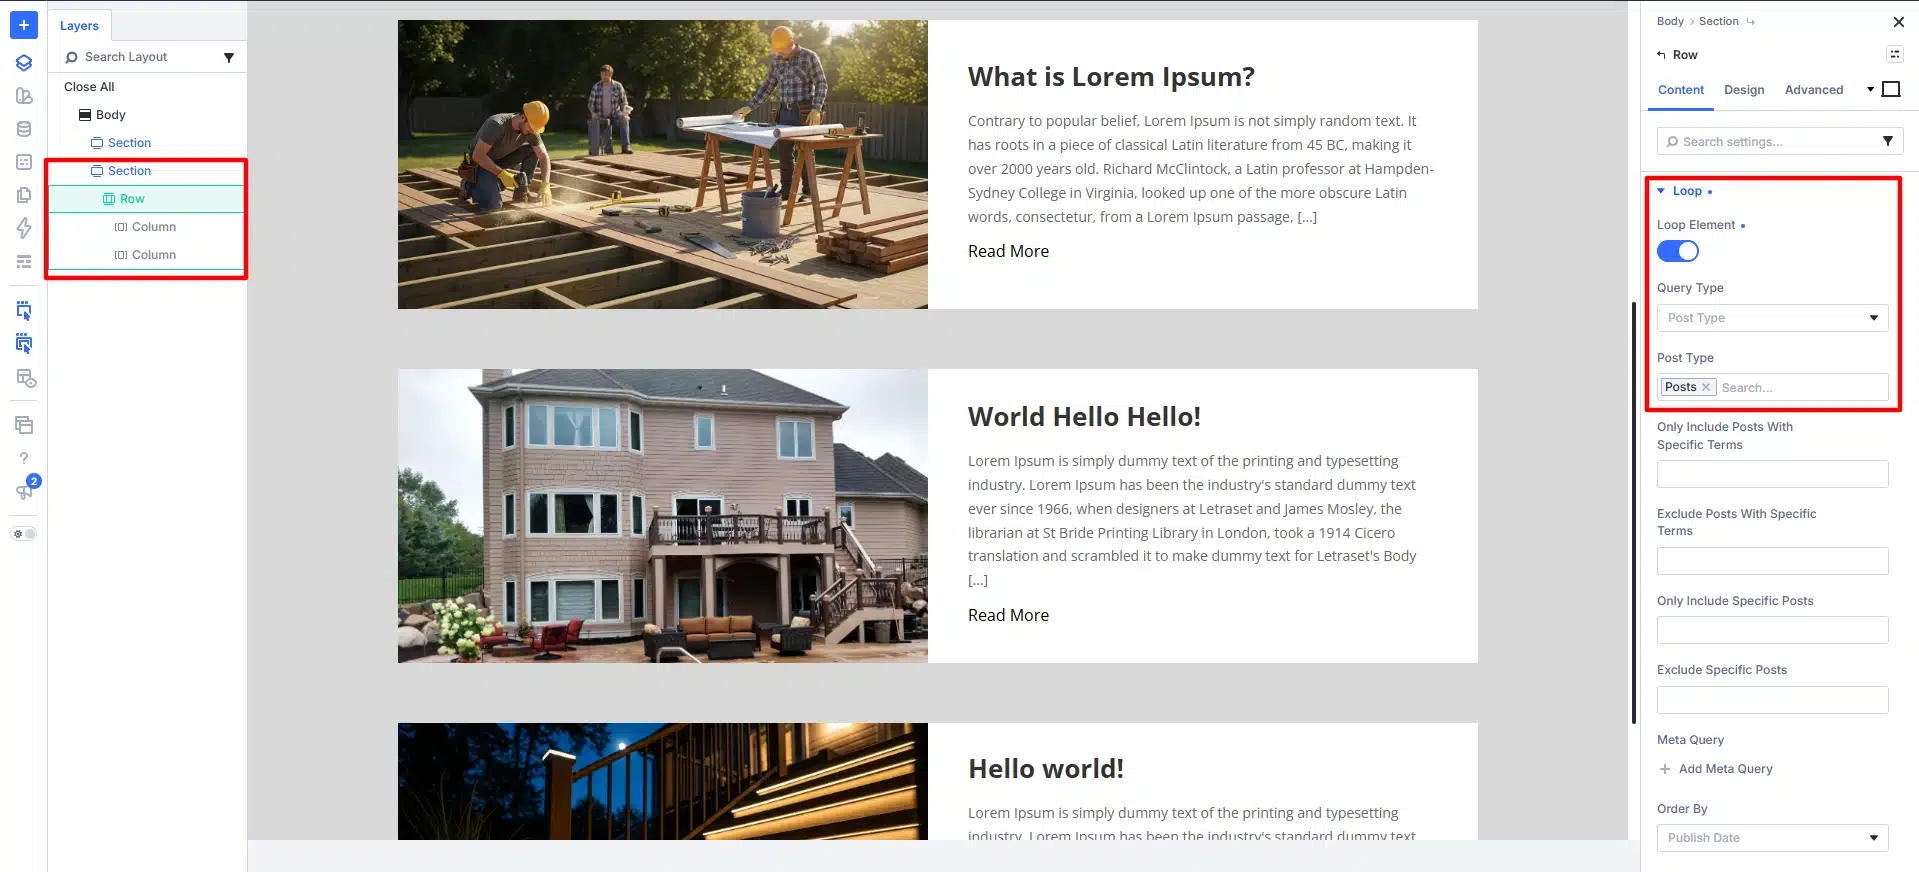
Open the Row settings and give the row an easy-to-identify admin label, such as Blog Loop. This is useful later when connecting pagination to the loop.
Next, open:
Content → Loop
Enable the Loop Element option.
Once the loop is enabled, the row becomes the repeating container for your blog posts.
Configure the Post Query
After enabling the loop, configure the query that determines which posts appear.
Set the query to use your WordPress posts and choose the number of posts you want to display per page.
For example:
- Query Type: Post Type
- Post Type: Posts
- Posts Per Page: 3
- Order By: Date
- Order: Descending
Using descending date order places the newest posts first.
If your website uses sticky posts and you don’t want them to change the normal ordering, you can also enable the option to ignore sticky posts.
Step 3: Build the Blog Card
Now that the loop is configured, you can build the design that will be repeated for every post.
Add the Featured Image Area
Start with the left column.
You can use a Divi element as the image container and assign the post’s featured image to its background dynamically.
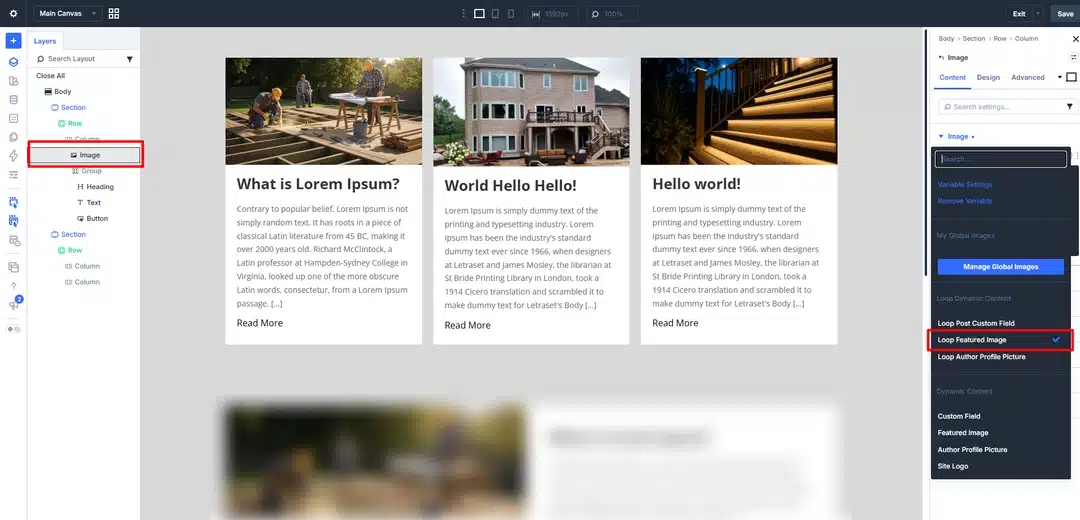
This gives you control over the size and appearance of the image while allowing each post to display its own featured image automatically.
Add the Post Title
Move to the right column and add a Heading module.
This heading will eventually display the title of the current post dynamically.
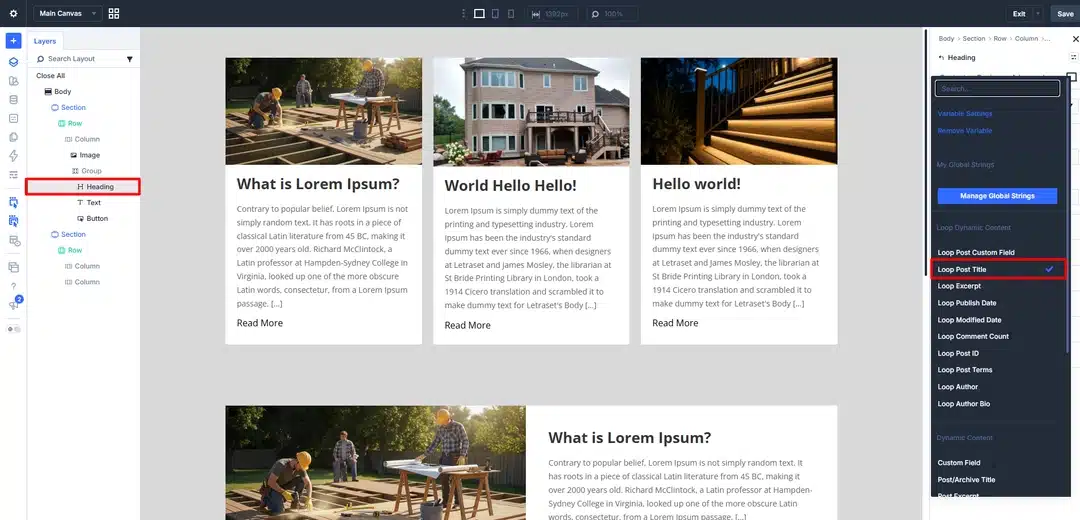
For now, you can add temporary text while designing the layout.
Add Post Meta Information
Under the title, add a Group or similar container for your post metadata.
Inside it, you can add text such as:
Published on
Then add another Text module that will later display the dynamic publication date.
You can also include other information, such as the author, depending on what you want to show in your blog cards.
Add the Post Excerpt
Add another Text module underneath the metadata.
This area will display a short excerpt from the current blog post.
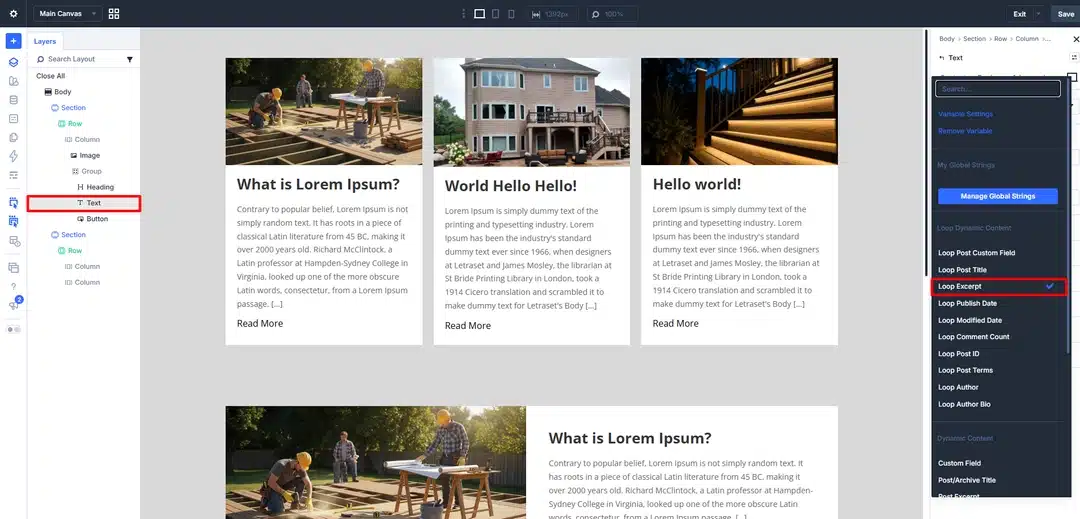
Using excerpts gives visitors a quick idea of what each article is about before they click through to read it.
Add a Read More Link
Finally, add an Icon or link element to the bottom of the content area.
An arrow icon can work well for a minimalist blog layout.
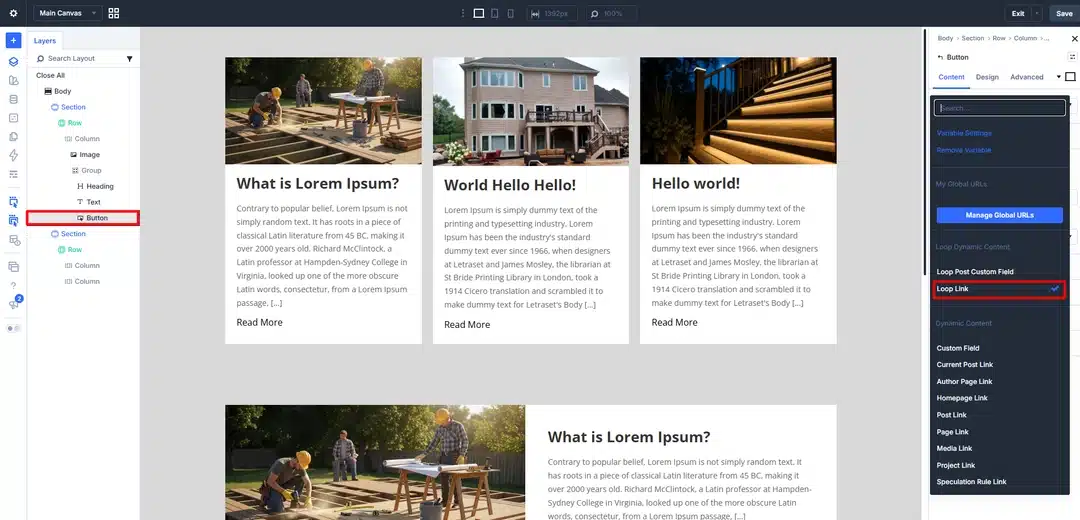
This element will later be connected to the current post’s URL so visitors can click it to open the complete article.
Step 4: Style the Horizontal Blog Card
Once the basic structure is in place, you can start styling the card.
Open the Row settings and add a subtle border around the card. A thin border can help separate each post without making the design feel too heavy.
You can also remove or reduce the gap between the two columns so the image and content area feel like one connected card.
Style the Content Column
Open the right column settings and add a subtle background color if desired.
Then add padding around the content so the title, metadata, excerpt, and link have enough breathing room.
A consistent spacing system will help keep every repeated card aligned.
Style the Post Title
Open the Heading module and adjust:
- Font family
- Font size
- Font weight
- Line height
- Text color
- Spacing
Choose a title size that remains readable without taking up too much vertical space.
Style the Metadata
The publication date should generally be smaller than the main heading.
Use a consistent font size and weight for the metadata elements. If you’re using a Group module, adjust its horizontal spacing so the label and date remain neatly aligned.
Style the Excerpt
Keep the excerpt readable with a comfortable line height.
Avoid making the preview text too large, especially if you want several blog cards visible on the page at once.
Style the Arrow
Finally, customize the arrow or read-more icon.
You can match its color to your website’s accent color and adjust its size and alignment to fit the design.
Step 5: Connect the Dynamic Post Content
The next step is what makes the layout a true blog loop.
Instead of manually entering information for every post, connect each element to the appropriate dynamic loop field.
Connect the Featured Image
Open the image container and locate its background image settings.
Select the dynamic content option and choose the loop’s featured image field.
Now, each repeated card can automatically display the featured image belonging to that post.
Connect the Post Title
Open the Heading module and select its dynamic content option.
Choose the loop post title field.
The heading will now automatically display the title of the current post.
You should also connect the Heading module’s URL to the loop post URL so visitors can click the title to open the corresponding article.
Connect the Publication Date
Open the Text module used for the date.
Select dynamic content and choose the loop post date.
Each card will now display the correct publication date automatically.
Connect the Excerpt
Open the excerpt Text module and connect it to the loop excerpt field.
This allows every post to display its own excerpt without requiring you to manually edit each card.
If the excerpts are too long, adjust the available dynamic content options or shorten the excerpts within your WordPress posts.
Connect the Read More Link
Finally, open the arrow or read-more element.
Set its link dynamically to the loop post URL.
Now the arrow will take visitors to the specific post represented by that card.
Step 6: Add Pagination
If you have more posts than the number displayed per page, pagination makes it easier for visitors to browse older content.
Add a new single-column row underneath your loop.
Make sure this row remains outside the repeating loop row.
Then add the Pagination module.
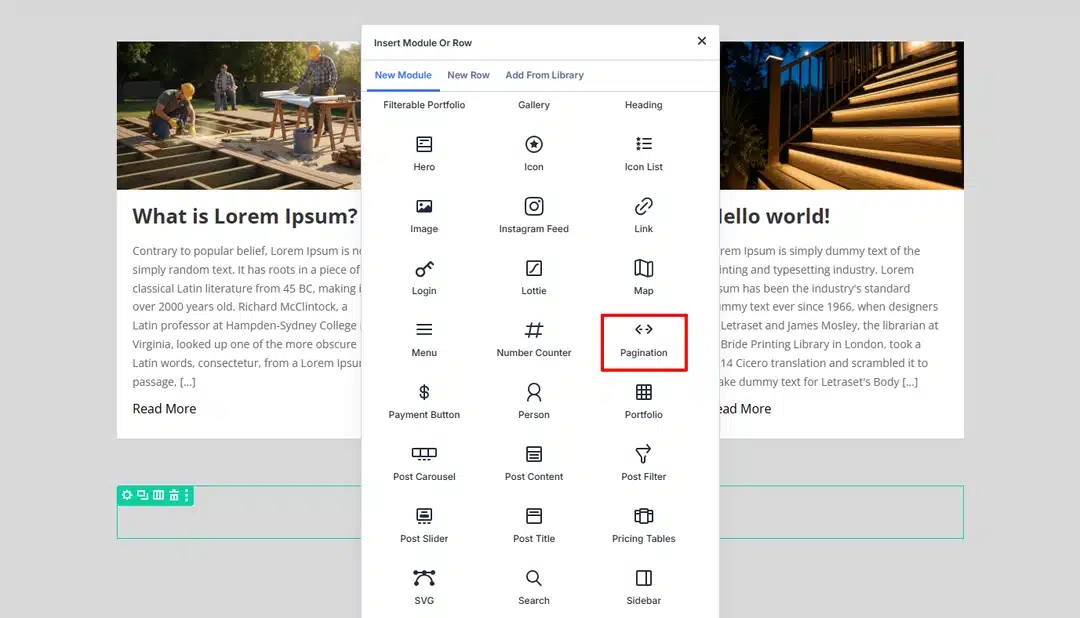
Inside the Pagination settings, select the loop you created earlier as the target loop.
For example, if your loop row was labeled Blog Loop, select that loop as the pagination target.
You can customize the pagination labels to fit your website. Simple options such as Previous and Next can keep the navigation clean and easy to understand.
After saving the page, visitors will be able to move between different sets of blog posts when additional posts are available.
Step 7: Make the Blog Loop Responsive
A horizontal layout that looks good on desktop may need some adjustments for smaller screens.
Use Divi’s responsive controls to check the layout on:
- Desktop
- Tablet
- Mobile
On smaller screens, consider stacking the two columns so the featured image appears above the post content.
You may also want to:
- Reduce the post title size
- Reduce image height
- Adjust content padding
- Reduce spacing between elements
- Adjust excerpt length
- Check arrow alignment
- Make sure text does not overflow
The goal is to make each post easy to read and navigate regardless of the device being used.
Tips for a Better Horizontal Blog Loop
Here are a few things to keep in mind when designing your loop.
Use Consistent Featured Images
Different image dimensions can make your cards look uneven. Using a consistent featured-image ratio helps create a cleaner layout.
Keep Excerpts Short
Long excerpts can make some cards significantly taller than others. Keep your excerpts concise for a more consistent design.
Maintain Clear Visual Hierarchy
The post title should be the most prominent text element, followed by the metadata and excerpt.
Use Clear Links
Make sure visitors can easily understand which areas of the card are clickable.
Test Every Breakpoint
Always check the finished loop on desktop, tablet, and mobile. A layout that looks perfect in the Divi desktop builder may need spacing or typography adjustments on smaller screens.
Keep Your Blog Loop Easy to Maintain
One of the biggest benefits of a dynamic loop is that you only need to maintain the design in one place.
If you decide to change the title font, image size, spacing, or link style, you can update the loop design instead of editing every blog post listing individually.
New posts can then follow the same layout automatically.
Final Thoughts
A horizontal blog loop is a simple way to move beyond the traditional blog grid and create a more informative post-listing layout.
With Divi 5, you can create one reusable design, connect its elements to dynamic WordPress content, and let the loop automatically populate the page with your posts.
By combining a featured image, post information, excerpt, and clear link, you can create a blog layout that is easy to browse and customize while keeping the content management process simple.