Table of Contents
- What Is a Product Quick View?
- Why Create a Quick View with Crocoblock?
- What You Need
- Step 1: Create the Quick View Popup
- Step 2: Enable Ajax Loading
- Step 3: Create the Single Product Template
- Step 4: Design the Product Quick View Layout
- Step 5: Create an Archive Template
- Step 6: Add a Quick View Button
- Step 7: Select the Popup
- Step 8: Connect the Single Product Template
- Step 9: Add the Archive Template to Your Shop
- Step 10: Use Quick View with Products Grid
- Step 11: Configure the Products Grid Trigger
- Step 12: Enable JetWooBuilder Quick View
- Step 13: Style the Quick View Popup
- Conclusion
A product quick view feature allows shoppers to preview important product information without leaving the current shop or archive page. Instead of opening a separate product page every time, customers can click a Quick View button and see details such as the product image, title, price, description, and Add to Cart option in a popup.
With Crocoblock, you can create this type of WooCommerce experience using JetWooBuilder and JetPopup. JetWooBuilder provides the WooCommerce templates and product widgets, while JetPopup handles the popup functionality.
In this guide, you’ll learn how to create a Product Quick View popup and connect it to your WooCommerce product listings.
What Is a Product Quick View?
Product Quick View is an eCommerce feature that displays selected product information in a popup without requiring the customer to open the full product page.
For example, a shopper browsing a product grid can click Quick View and immediately see:
- Product image
- Product title
- Product price
- Product description
- Product SKU
- Product categories
- Product attributes
- Add to Cart button
This makes product browsing faster and can reduce the number of page transitions required during shopping.
Why Create a Quick View with Crocoblock?
Crocoblock provides tools that allow you to build the Quick View experience without manually coding the popup functionality.
JetWooBuilder can be used to create custom WooCommerce product templates and product listing layouts, while JetPopup provides the popup functionality and trigger settings.
A Quick View setup can be useful for:
- WooCommerce shops with many products
- Product catalogs
- Fashion stores
- Electronics stores
- Furniture websites
- Product comparison layouts
- Category and archive pages
What You Need
Before getting started, make sure your website has:
- WordPress
- WooCommerce
- Elementor
- JetWooBuilder
- JetPopup
- Products added to WooCommerce
JetWooBuilder is designed for creating custom WooCommerce layouts with Elementor, while JetPopup can create and display popup templates.
Step 1: Create the Quick View Popup
First, create the popup that will be used as the container for your product information.
From the WordPress dashboard, go to:
JetPopup → Add New Popup
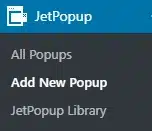
Give the popup a descriptive name, such as:
Product Quick View
Click Publish, then select Edit with Elementor.
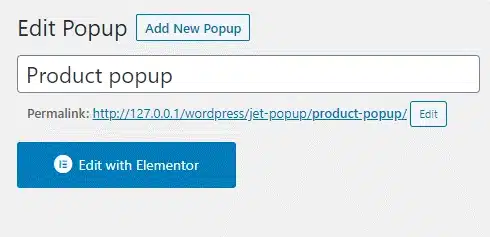
For this setup, you don’t need to place the product content directly inside the popup itself. Instead, the popup will act as the container that loads the product template.
Step 2: Enable Ajax Loading
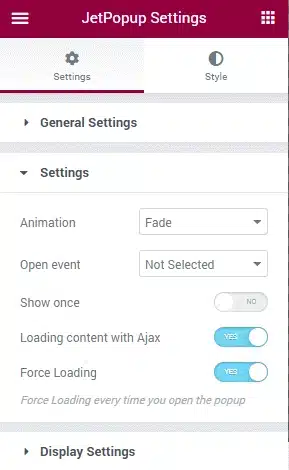
Open the JetPopup settings by clicking the settings icon at the bottom-left of the Elementor panel.
Enable: Loading content with Ajax
Also enable: Force Loading
These settings allow the popup to load the appropriate product content dynamically when a visitor opens the Quick View.
After configuring the popup settings, click Update.
Step 3: Create the Single Product Template
The next step is to create the product layout that visitors will see inside the Quick View popup.
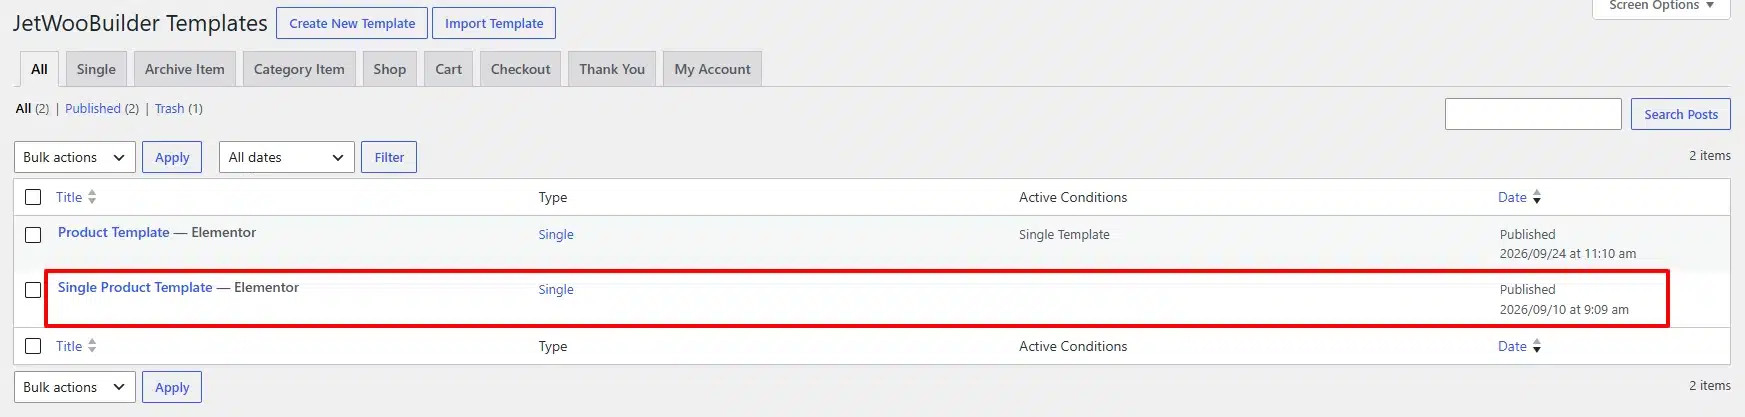
Go to: JetPlugins → JetWooTemplates
Click: Add New Template
In the template settings, select: Single
Enter a template name, such as: Product Quick View Template
Then create the template.
Step 4: Design the Product Quick View Layout
Open the template in Elementor and build the product information layout.
JetWooBuilder provides WooCommerce widgets that can be used to display product data dynamically.
For example, you can add:
- Single Image
- Single Title
- Single Price
- Single Rating
- Single Meta
- Single Add to Cart
- Single Excerpt
- Single Content
You can also include product categories, SKU information, attributes, or other relevant WooCommerce data.
A simple Quick View layout could contain:
Left side:
- Product image
Right side:
- Product title
- Rating
- Price
- Short description
- Product variations
- Quantity
- Add to Cart button
The goal is to provide enough information for the customer to make a quick decision without overwhelming the popup.
When you’re satisfied with the design, click Publish.
Step 5: Create an Archive Template
Now you need to create the product archive layout where the Quick View button will appear.
Go back to: JetPlugins → JetWooTemplates
Click: Add New Template
Select: Archive
Choose a suitable layout and create the template.
This template will control how your WooCommerce products are displayed on the archive or shop page.
Step 6: Add a Quick View Button
Open the archive template with Elementor.
Add a Button widget to the product layout.
You can use text such as: Quick View or View Product
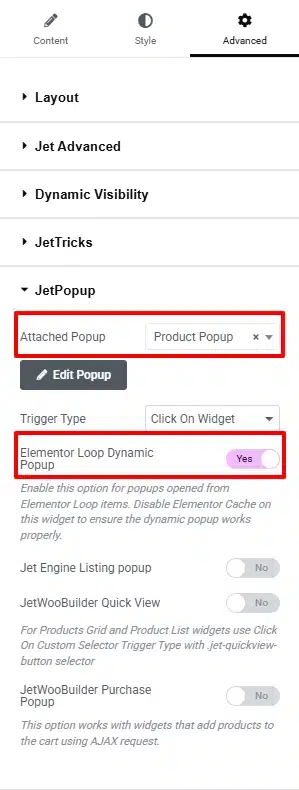
Select the button and open: Advanced → JetPopup
Enable: Jet Woo Builder Quick View
This activates the Quick View functionality for the selected widget.
Step 7: Select the Popup
Within the JetPopup settings, find the Attached Popup option.
Select the popup you created earlier.
For example: Product Quick View
Next, configure the trigger.
Set: Trigger Type → Click on Widget
This tells JetPopup to open the attached popup when the visitor clicks the Quick View button.
Step 8: Connect the Single Product Template
Now find the Template option in the Quick View settings.
Select the Single Product template you created earlier.
For example:
Product Quick View Template
The connection now works like this:
Quick View Button → JetPopup → Single Product Template
When a customer clicks the button, the popup opens and displays the appropriate product information.
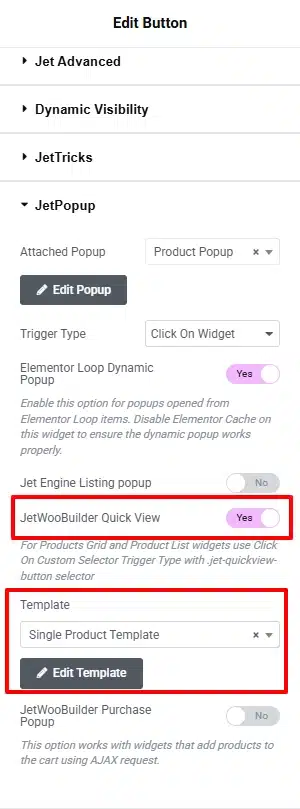
Click Update to save the archive template.
Step 9: Add the Archive Template to Your Shop
Next, you need to make sure WooCommerce uses the custom archive template.
Go to: JetPlugins → JetWooTemplates
Create or open your Shop Page template.
Make sure the template contains a Products Loop widget.
The Products Loop is responsible for displaying the product items using the archive layout you created.
Then go to your WooCommerce settings and configure the custom product archive.
Enable the Custom Product Archive option and select your newly created archive template.
Save the changes.
The Crocoblock reference uses this approach to connect the custom archive layout containing the Quick View button to the WooCommerce shop page.
Step 10: Use Quick View with Products Grid
There is another way to add Quick View functionality: the Products Grid widget.
This can be useful if your shop page already uses Products Grid instead of a Products Loop.
Open your Shop Page template in Elementor and add the:
Products Grid
widget.
In the widget’s General settings, enable:
Show Quick View
This adds the Quick View functionality to the product grid.
Step 11: Configure the Products Grid Trigger
Select the Products Grid widget and open:
Advanced → JetPopup
Choose the popup you created previously.
Then set the Trigger Type to:
Click on Custom Selector
Enter:
.jet-quickview-button
This selector connects the popup trigger with the Quick View button generated by the Products Grid widget.
Step 12: Enable JetWooBuilder Quick View
Within the same JetPopup settings, enable:
JetWooBuilder Quick View
Then select the Single Product template you created for the Quick View content.
The Products Grid will now use the selected product template when a visitor opens Quick View.
Step 13: Style the Quick View Popup
Once the functionality is working, you can customize the popup’s appearance.
Consider adjusting:
- Popup width
- Product image size
- Content spacing
- Typography
- Button styling
- Background
- Border radius
- Close button
- Mobile layout
- Product information spacing
Keep the design simple because the purpose of Quick View is to help customers access product information quickly.
Conclusion
Building a Product Quick View feature with Crocoblock is a practical way to improve the WooCommerce browsing experience. By combining JetWooBuilder with JetPopup, you can create a custom product template, place it inside a popup, and connect it to Quick View buttons throughout your shop.
The basic workflow is:
Create Popup → Enable Ajax Loading → Create Single Product Template → Create Archive/Product Grid → Enable Quick View → Select Popup → Select Product Template → Test
Whether you’re using a Products Loop or Products Grid, this setup allows shoppers to view important product details without leaving the shop page.