Table of Contents
- What Is a Dynamic Timeline?
- Why Use JetElements for a Timeline?
- How to Create a Dynamic Timeline in Elementor
- Step 1: Install and Enable JetElements
- Step 2: Prepare Your Dynamic Content
- Step 3: Create a Query for Your Timeline Content
- Step 4: Add the Timeline Widget in Elementor
- Step 5: Map Dynamic Fields to the Timeline
- Step 6: Configure the Timeline Layout
- Step 7: Style the Timeline
- Dynamic Timeline Use Cases
- Work Experience Timeline
- Project Timeline
- Event Timeline
- Course or Learning Timeline
- Company Milestones
- Product Development Timeline
- Related Content Timeline
- Vertical vs. Horizontal Timeline
- Final Thoughts
A timeline is a great way to present information in a clear, visual, and engaging format. Whether you want to display company milestones, work experience, project phases, events, courses, or other sequential content, a timeline can make complex information easier to understand.
If you are using Elementor, JetElements makes it possible to create both vertical and horizontal timelines without building the entire layout from scratch. You can also combine JetElements with JetEngine to populate timeline items dynamically using custom fields, queries, and related content.
In this guide, we will walk through how to create a dynamic timeline in Elementor using JetElements.
What Is a Dynamic Timeline?
A dynamic timeline displays a series of content items in a structured sequence, while allowing the content to be pulled automatically from your WordPress data.
Instead of manually creating every timeline card, you can store information in custom post types, custom fields, or related content and then use JetEngine to retrieve that information. JetElements can display the retrieved data inside its timeline widgets.
This approach is especially useful when your timeline contains content that needs to be updated regularly.
Why Use JetElements for a Timeline?
JetElements includes dedicated Vertical Timeline and Horizontal Timeline widgets. Both widgets provide options for displaying titles, dates or other meta information, descriptions, images, icons, and links.
Some of the benefits include:
- Create vertical or horizontal timelines.
- Display images, icons, titles, descriptions, and links.
- Use dynamic content.
- Connect timeline content with JetEngine queries.
- Customize alignment, spacing, typography, and other design settings.
- Create timelines for different types of structured content.
- Avoid creating every timeline item manually.
How to Create a Dynamic Timeline in Elementor
Step 1: Install and Enable JetElements
First, make sure the JetElements plugin is installed and activated on your WordPress website.
Once activated, go to the JetElements settings and make sure the timeline widget you want to use is enabled.
You can choose between:
- Vertical Timeline
- Horizontal Timeline
The Vertical Timeline works well when each item contains more detailed information, while the Horizontal Timeline is better suited to short steps, milestones, or compact processes.
Step 2: Prepare Your Dynamic Content
Before adding the timeline to Elementor, decide what information you want to display.
For example, if you are creating a work experience timeline, you could create a custom post type with fields such as:
- Company Name
- Job Title
- Start Date
- End Date
- Description
- Company Logo
Similarly, for a project timeline, you could create fields such as:
- Project Name
- Project Date
- Project Description
- Project Image
- Project Link
Using structured data allows you to update the timeline content from WordPress without editing the Elementor page every time.
If you are using JetEngine, you can create Custom Post Types, Custom Content Types, meta fields, and relationships to organize this information.
Step 3: Create a Query for Your Timeline Content
If your timeline needs to display multiple dynamic items, JetEngine’s Query Builder can be used to determine which content should appear.
Create a query based on the content you want to display and configure options such as:
- Post type
- Taxonomy
- Meta fields
- Sorting
- Filtering
- Related content
For example, if you are creating a course timeline, you could sort courses according to a difficulty-level field. If you are creating an event timeline, you could sort events according to their event date. JetEngine queries allow you to control which items are retrieved and how they are ordered.
Step 4: Add the Timeline Widget in Elementor
Now open the page or template where you want to display the timeline and select Edit with Elementor.
Search for the appropriate JetElements widget and drag it onto the page.
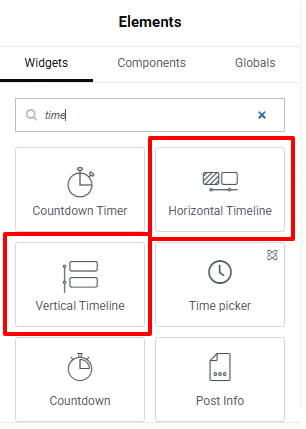
Choose either:
Vertical Timeline
or
Horizontal Timeline
The widget will provide timeline cards where you can configure the content and appearance of each item.
For a dynamic setup, select the appropriate dynamic data or JetEngine query option as the content source, depending on your configuration.
JetElements’ timeline widgets support dynamic tags and can work with JetEngine queries to retrieve specific content dynamically.
Step 5: Map Dynamic Fields to the Timeline
Once the dynamic source is connected, map your WordPress fields to the corresponding timeline elements.
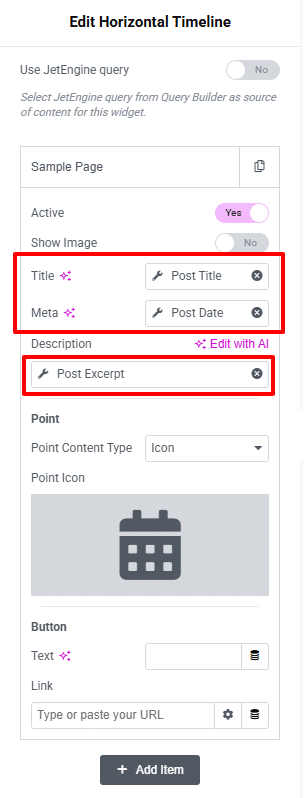
For example:
| Timeline Element | Dynamic Field |
| Title | Company Name |
| Meta | Start/End Date |
| Description | Job Description |
| Image | Company Logo |
Instead of entering the information manually, the timeline will retrieve the values from your WordPress data.
When using a JetEngine query, you can configure the first timeline card with the required dynamic fields, and the remaining items can be generated from the query results.
Step 6: Configure the Timeline Layout
After connecting your dynamic data, customize the timeline layout to match your website design.
For a Vertical Timeline, you can adjust:
- Card alignment
- Spacing between items
- Timeline marker position
- Content width
- Timeline line
- Entrance animations
For a Horizontal Timeline, you can configure options such as:
- Number of visible columns
- Card alignment
- Navigation
- Scrolling behavior
- Responsive settings
The Horizontal Timeline widget is particularly useful for processes, project phases, onboarding steps, and milestones that need to be viewed at a glance.
Step 7: Style the Timeline
Finally, use Elementor’s styling options to make the timeline fit your website’s design.
You can customize elements such as:
- Typography
- Colors
- Backgrounds
- Spacing
- Timeline markers
- Icons
- Images
- Buttons
- Borders
- Animations
Make sure the timeline remains easy to read on smaller screens. For horizontal timelines especially, check the mobile layout and adjust the number of visible items and navigation settings where necessary.
Dynamic Timeline Use Cases
A dynamic timeline can be used for much more than an About Us page.
Work Experience Timeline
Display a user’s professional history with company names, job positions, dates, descriptions, and logos.
Project Timeline
Show project phases, development stages, deadlines, and completed milestones.
Event Timeline
Display upcoming and previous events based on dynamically stored event dates.
Course or Learning Timeline
Organize courses or lessons according to difficulty, duration, or another custom field.
Company Milestones
Create a visual history of important company achievements and milestones.
Product Development Timeline
Display product releases, feature updates, improvements, or future development stages.
Related Content Timeline
With JetEngine Relations and custom queries, you can also display content related to the current post. For example, you could show reviews, submissions, related projects, or other connected content inside a timeline.
Vertical vs. Horizontal Timeline
Choosing the right timeline layout depends on the amount and type of information you want to display.
Use a Vertical Timeline when:
- Each item contains a detailed description.
- You have several content fields to display.
- Users need to read each entry.
- You are displaying work history, events, or detailed milestones.
Use a Horizontal Timeline when:
- Timeline entries are short.
- You want to show a process or sequence.
- You are displaying project phases or milestones.
- You want users to navigate through stages horizontally.
Final Thoughts
Creating a dynamic timeline in Elementor with JetElements is an effective way to transform structured WordPress content into an engaging visual experience.
By combining Elementor, JetElements, and JetEngine, you can create timelines that automatically display content from custom fields, custom post types, queries, and related content. This means you can update the underlying WordPress data without manually rebuilding the timeline layout.
Whether you are building a work experience section, project roadmap, event history, course progression, or product development timeline, JetElements provides a flexible way to present sequential information while keeping the content dynamic and easy to manage.