Table of Contents
- What Is a Dynamic Slider in WordPress?
- Why Use JetElements for Dynamic Sliders?
- What You Need
- How to Create a Dynamic Slider in WordPress
- Step 1: Create Your Content
- Step 2: Create a Query in JetEngine
- Step 3: Add the JetElements Slider
- Step 4: Connect the Query
- Step 5: Add a Dynamic Image
- Step 6: Add Dynamic Titles and Descriptions
- Step 7: Configure the Slider Design
- Step 8: Preview the Dynamic Slider
- How to Create a Dynamic Advanced Carousel
- Practical Ways to Use Dynamic Sliders
- Dynamic Slider vs. Static Slider
- Best Practices for Dynamic Sliders
- Keep the Content Relevant
- Optimize Images
- Avoid Too Much Text
- Check Mobile Layouts
- Use Queries Strategically
- Conclusion
Dynamic content can make a WordPress website easier to manage while keeping the frontend fresh and engaging. Instead of manually creating every slide and updating its content whenever something changes, you can connect a slider to your WordPress data and let it update automatically.
With JetElements and JetEngine, you can create dynamic sliders that display posts, Custom Post Types, images, titles, descriptions, and other content directly from your website’s database. JetElements provides the visual slider and carousel widgets, while JetEngine can be used to query and manage the content displayed inside them.
In this guide, you’ll learn how to create a dynamic slider in WordPress using JetElements and JetEngine, map dynamic content to your slides, and explore practical ways to use dynamic sliders on a website.
What Is a Dynamic Slider in WordPress?
A dynamic slider is a slider that automatically retrieves its content from a data source instead of requiring you to manually create each slide.
For example, imagine you have a “Case Studies” Custom Post Type containing:
- Featured images
- Case study titles
- Descriptions
- Categories
- Custom fields
- Links
Rather than manually adding each case study to a slider, you can create a query that determines which case studies should appear. The slider then uses that query to populate its slides.
When you add, remove, or update content, the slider can reflect those changes automatically.
This makes dynamic sliders particularly useful for websites with frequently changing content.
Why Use JetElements for Dynamic Sliders?
JetElements provides Elementor widgets that can be used to create visually engaging sliders and carousels without writing custom code.
The Slider widget is useful when you want to highlight one piece of content at a time. It works well for hero sections, promotional banners, feature highlights, and storytelling sections.
The Advanced Carousel widget is better suited to displaying multiple items in a compact horizontal layout, such as blog posts, products, testimonials, team members, or portfolio items.
When combined with JetEngine, these widgets can use dynamic data and queries to populate their content.
What You Need
Before creating the slider, make sure you have:
- WordPress installed and configured;
- Elementor installed;
- JetElements installed and activated;
- JetEngine installed if you want to use Query Builder and Custom Post Types;
- Dynamic content prepared for your slider.
JetElements also supports dynamic settings for retrieving information from sources such as post meta, options, and taxonomies.
How to Create a Dynamic Slider in WordPress
Let’s create a practical example using a Custom Post Type.
Suppose you have a Case Studies CPT and want to display selected Case Studies in a dynamic slider.
Step 1: Create Your Content
First, create the content that you want to display.
If you’re using JetEngine, create a Custom Post Type such as Case Studies and add the required fields.
For example, each Case Studies could contain:
- Case Studies title
- Featured image
- Short description
- Case Studies category
- Case Studies URL
Make sure the content is populated before creating the slider.
Step 2: Create a Query in JetEngine
Next, create a query that determines which content should appear in the slider.
Go to the JetEngine Query Builder and create a new Posts Query.
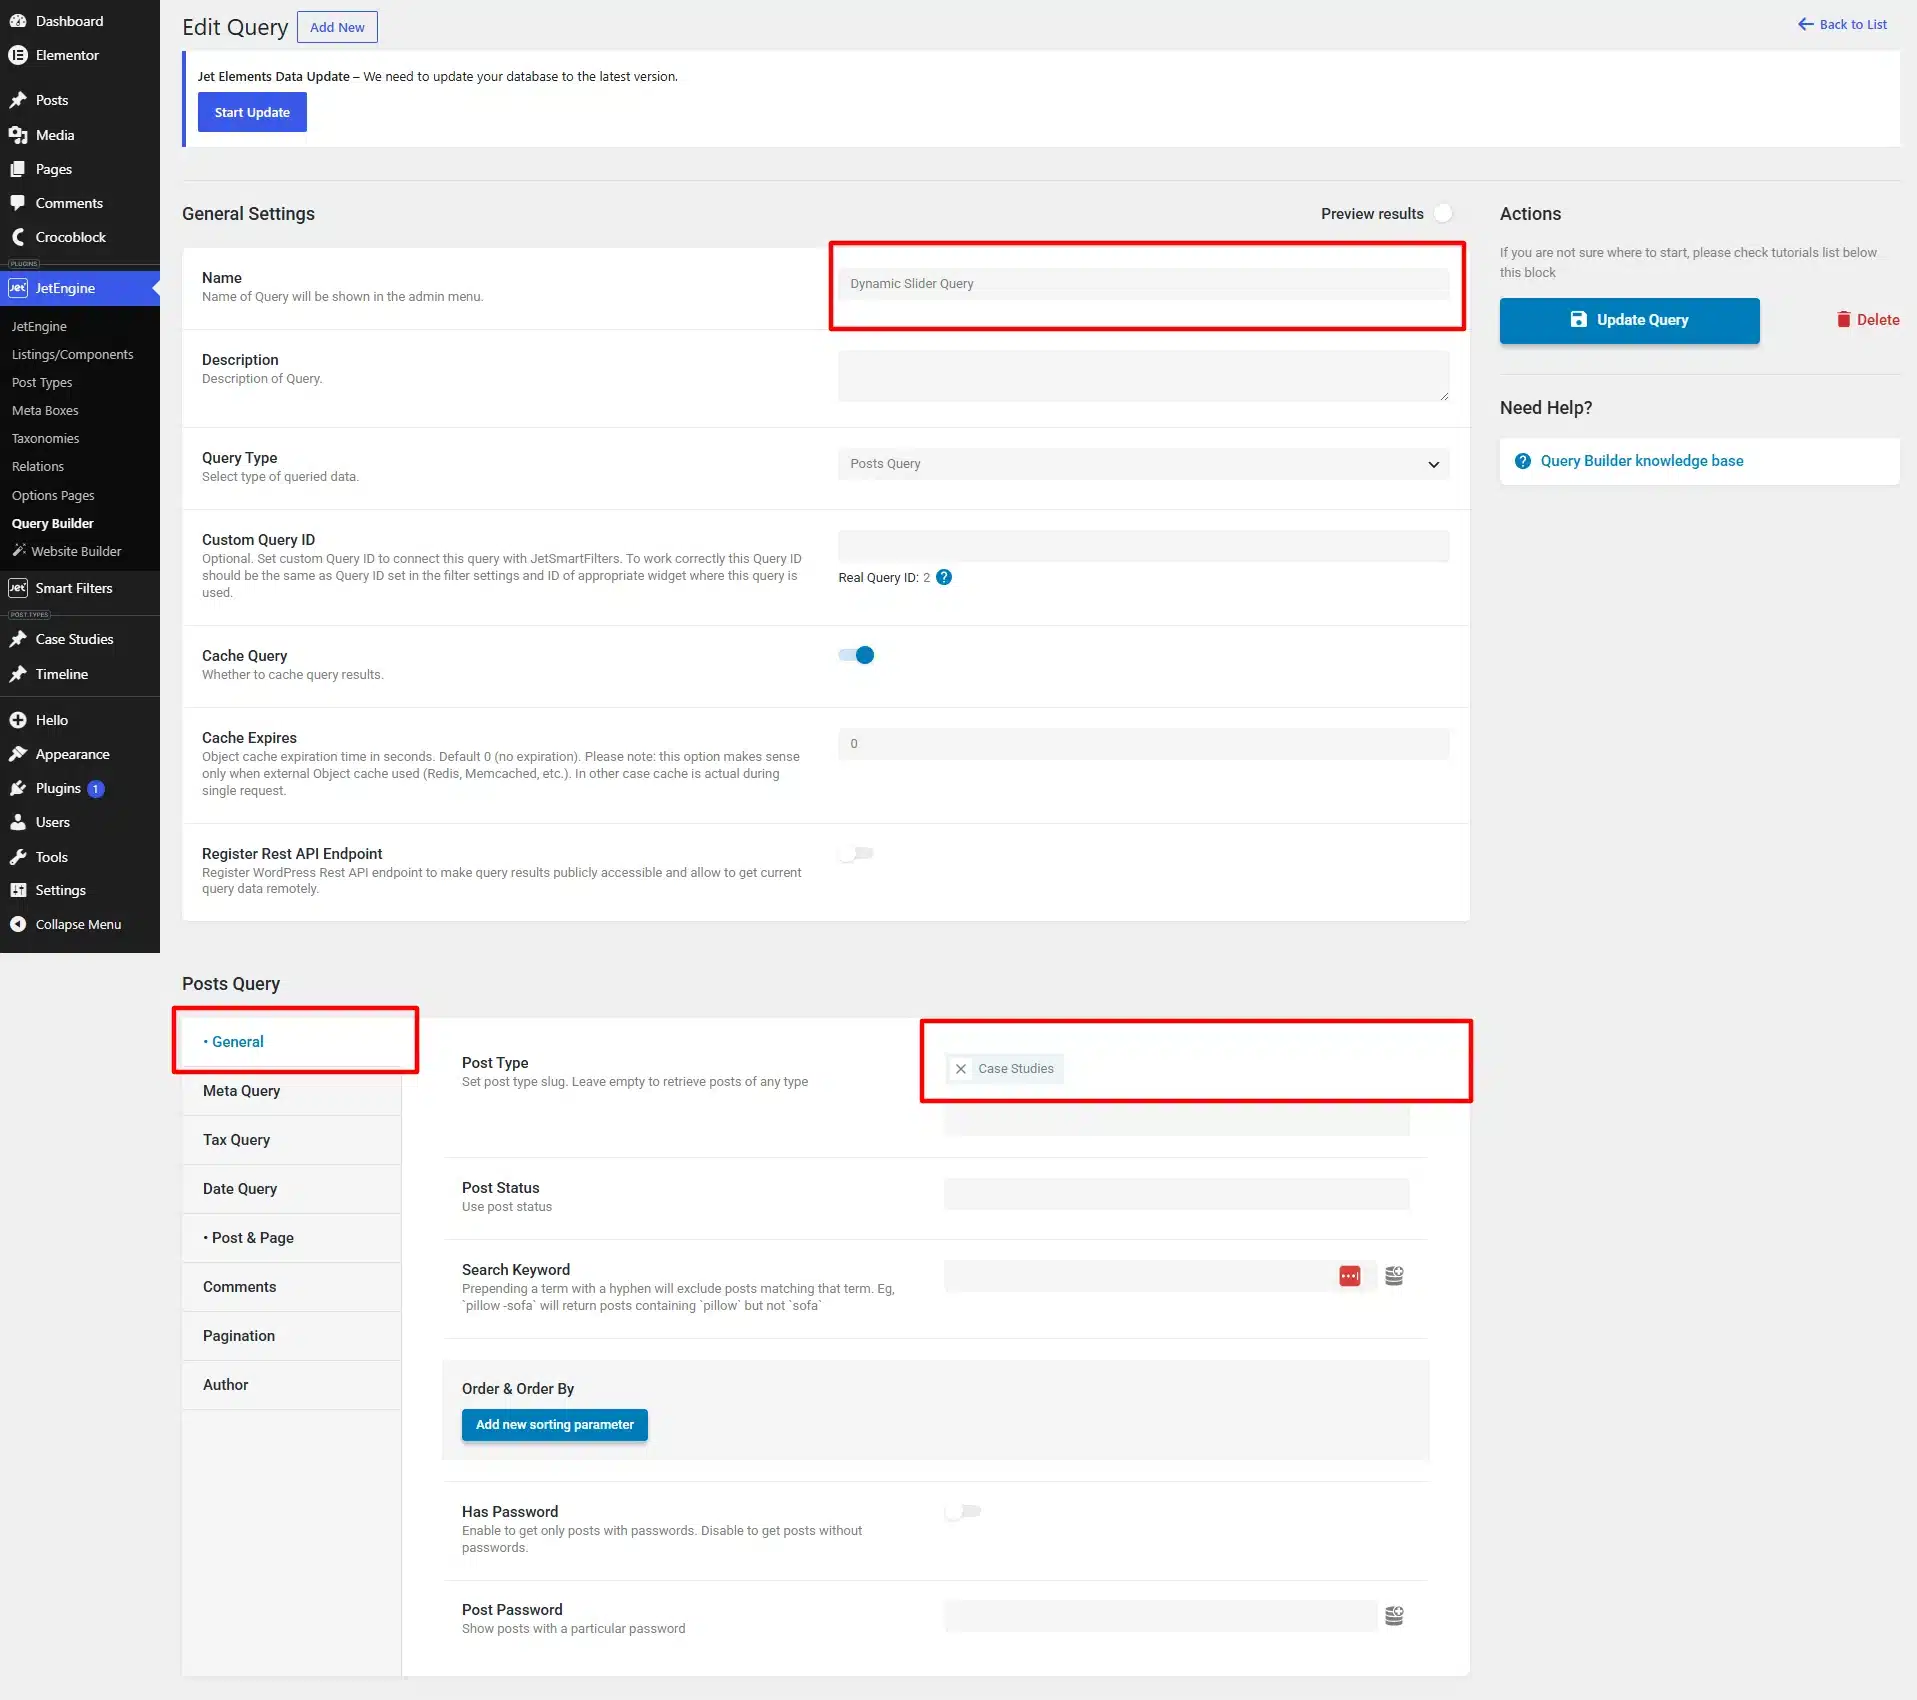
Depending on your requirements, you can configure the query to retrieve posts based on different parameters, such as:
- Specific post IDs
- Taxonomies
- Post types
- Meta field values
- Other query conditions
For example, if you only want six selected Case Studies to appear, you can configure the query to return those specific Case Studies posts.
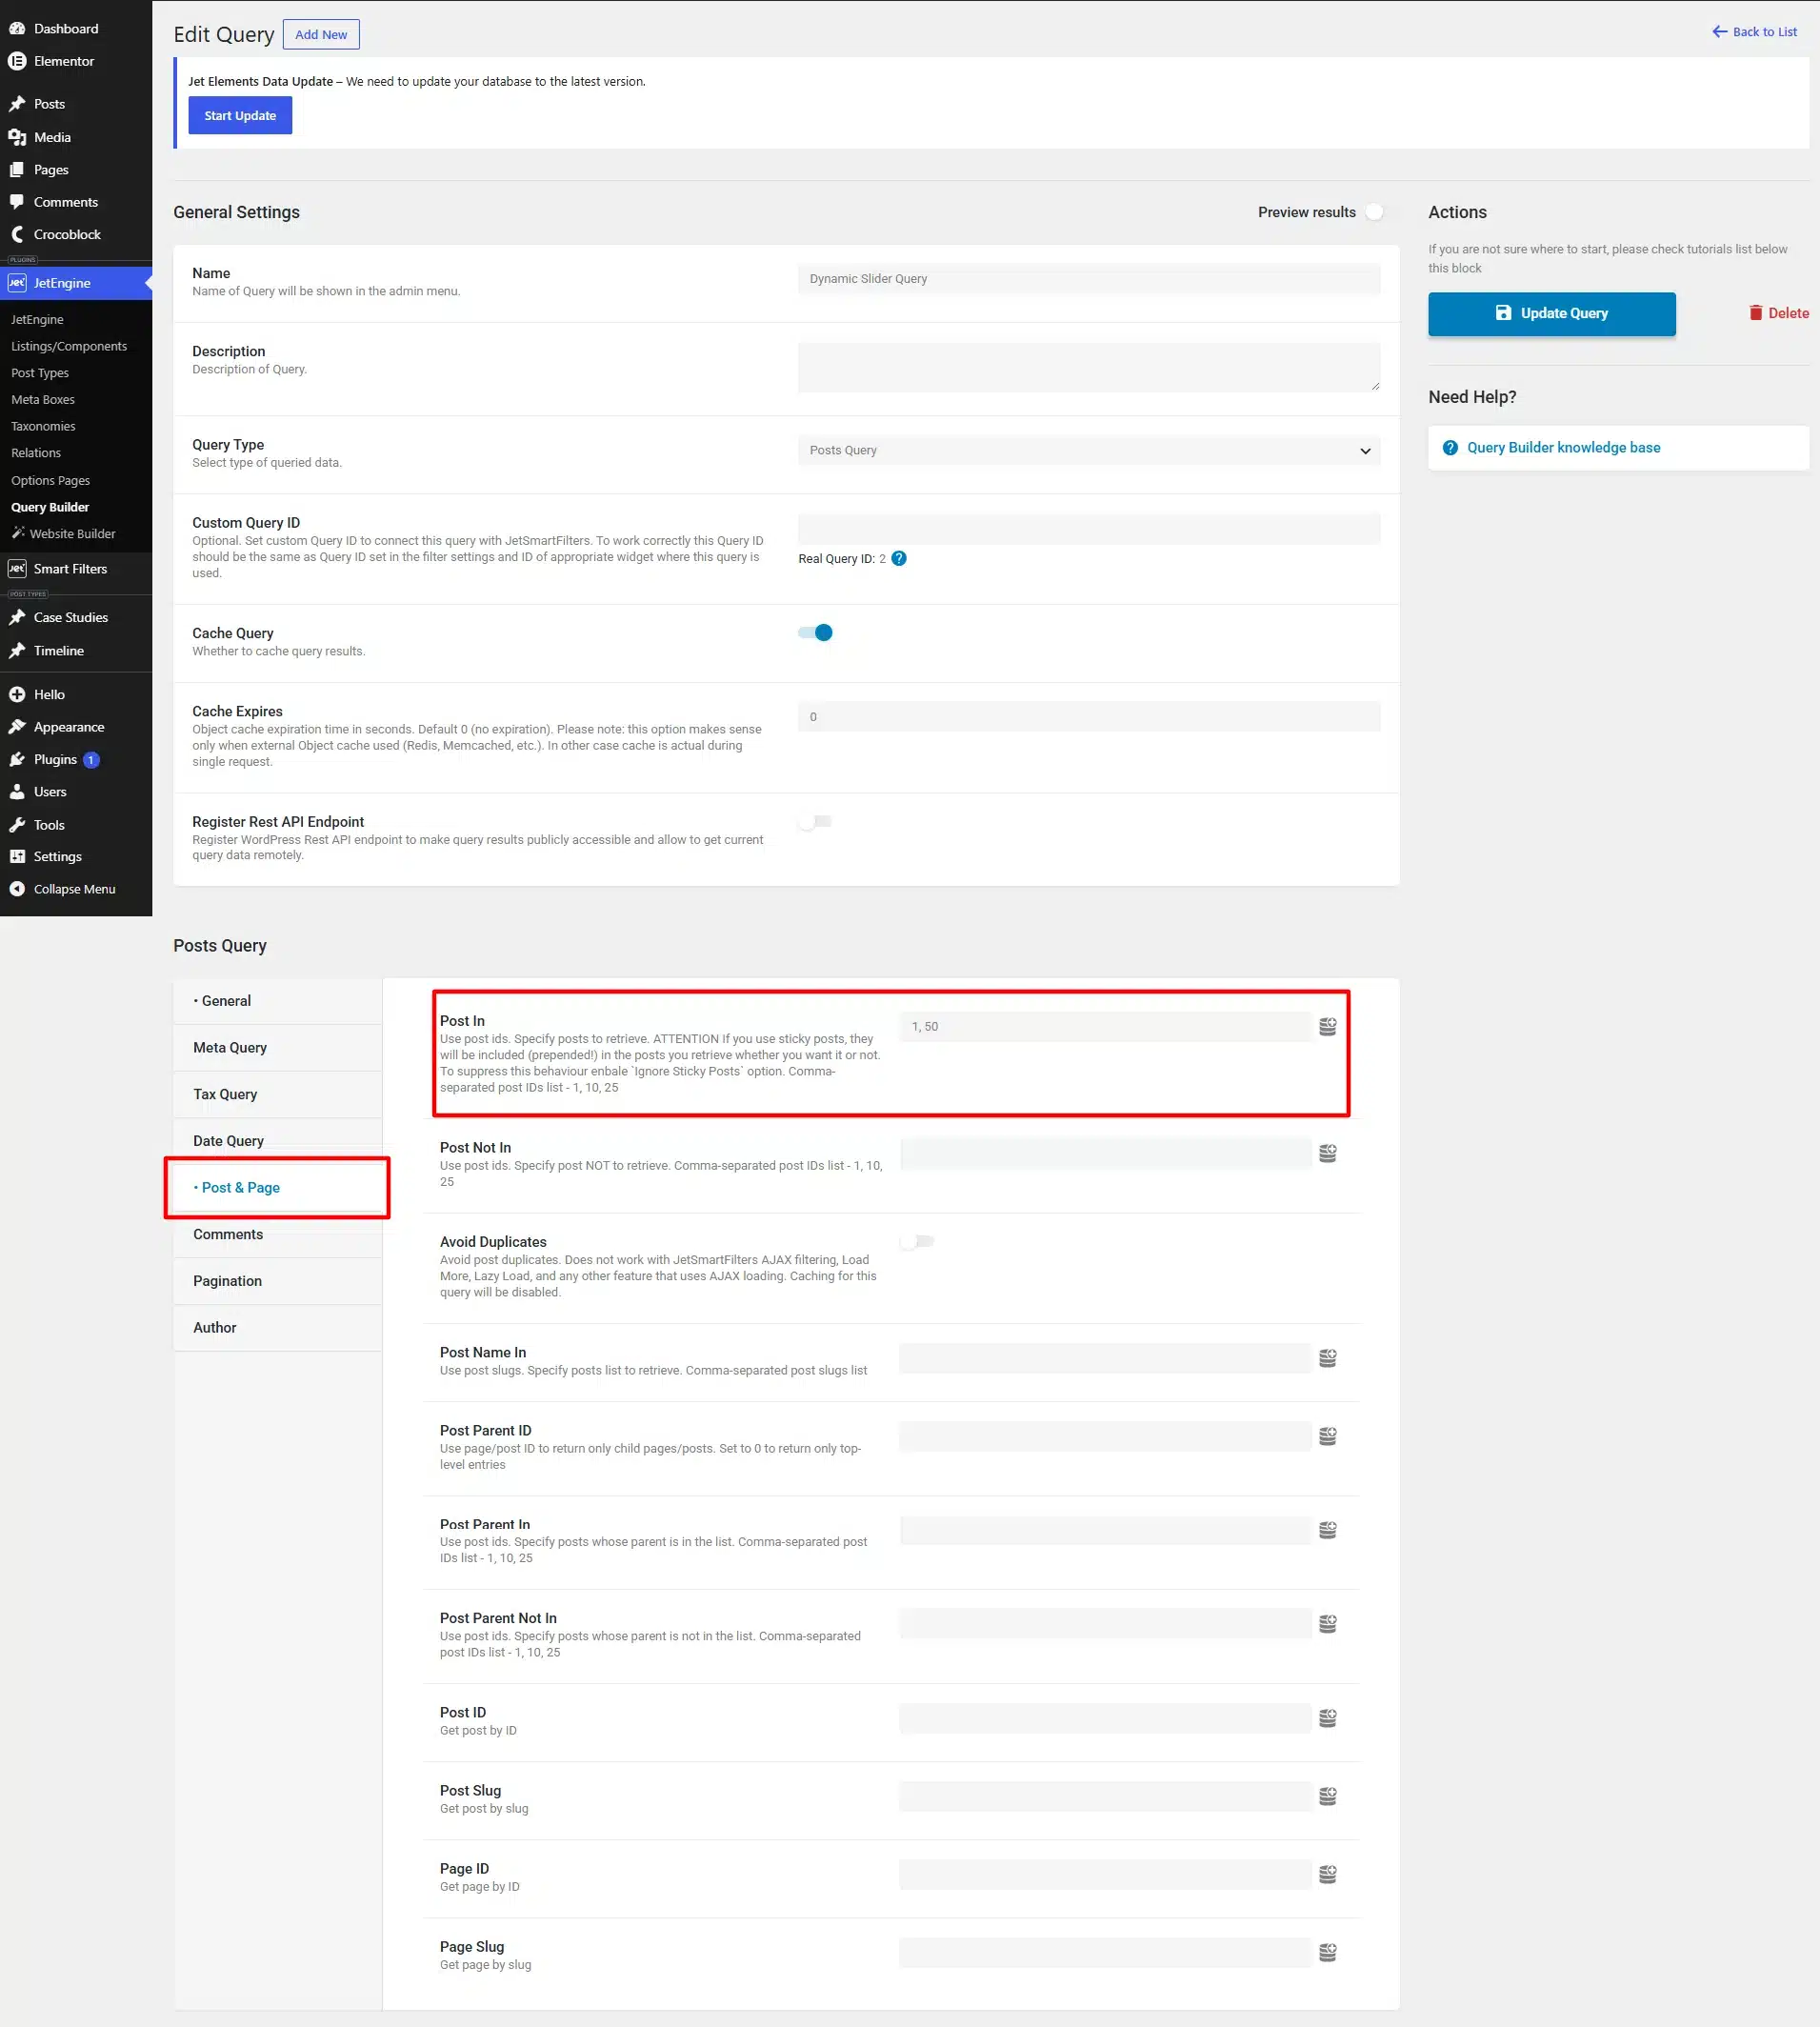
Save the query when you’re finished. JetEngine’s Query Builder allows you to control which posts are returned to the dynamic widget.
Step 3: Add the JetElements Slider
Now open the Elementor page where you want to display the slider.
Search for the Slider widget from JetElements and drag it into your page.
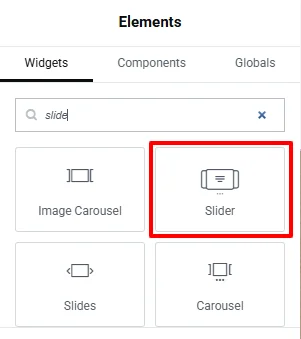
The Slider widget provides options for adding images, titles, descriptions, buttons, links, navigation, autoplay, animations, and other visual settings.
At this stage, you only need to create the basic structure of one slide.
Step 4: Connect the Query
Open the Slider widget settings and look for the JetEngine query option.
Enable Use JetEngine query and select the query you created earlier.
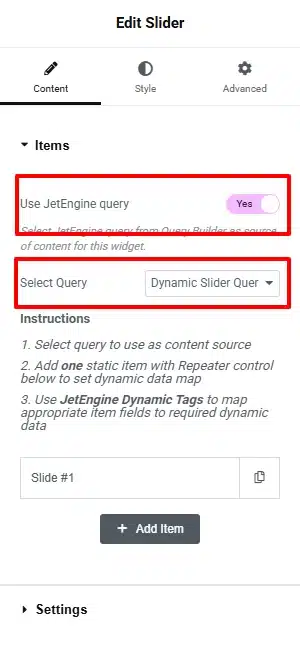
The query now becomes the source for the slider content.
Instead of manually creating several slides, the widget can use the returned posts to generate the slider items dynamically.
Step 5: Add a Dynamic Image
Next, connect the slide image to your post data.
For the image field, select the Dynamic Tags option and choose the appropriate dynamic image source.
For example, you can use the post’s Featured Image/Post Thumbnail as the slide background.
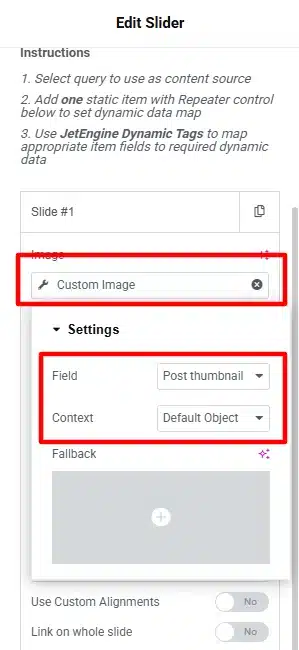
This means that when you change a Case Studies featured image, the slider can automatically display the updated image.
Step 6: Add Dynamic Titles and Descriptions
You can also connect the text elements to your post fields.
For the title, use a Dynamic Tag and select the appropriate Current Object Field.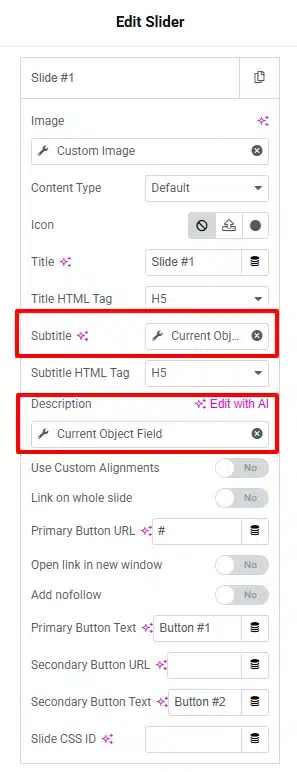
You can use the post title as the slide title.
The same approach can be used for:
- Subtitle
- Description
- Custom fields
- Links
- Other available dynamic values
Only one slide template needs to be configured. The remaining slides can be generated from the query results.
Step 7: Configure the Slider Design
Once the dynamic data is connected, customize the appearance of the slider.
You can adjust settings such as:
- Slide height and width
- Image position
- Content alignment
- Navigation arrows
- Pagination
- Autoplay
- Animation effects
- Slide transition speed
- Responsive behavior
The goal is to make sure the slider remains easy to use on desktop, tablet, and mobile devices.
Step 8: Preview the Dynamic Slider
Save or update the page and open the frontend.

Your selected posts should now appear as individual slides.
The important difference is that the slider isn’t dependent on manually entered slide content. If the query changes or the content connected to the posts is updated, the information displayed in the slider can update accordingly.
How to Create a Dynamic Advanced Carousel
The same concept can be used with the JetElements Advanced Carousel widget.
Instead of displaying one large slide at a time, the Advanced Carousel is designed to display multiple items horizontally. This makes it useful for content collections where visitors need to browse several items at once.
For example, you could create a carousel for:
- Blog posts
- Products
- Testimonials
- Team members
- Portfolio projects
- Partner logos
- Courses
To create one, add the Advanced Carousel widget to your Elementor page and enable the JetEngine query option.
Select the query you created and then map the dynamic fields.
For example:
Image → Post Thumbnail
Title → Current Object Field → Title
Description → Current Object Field → Content/Custom Field
After configuring the fields, customize the number of visible items, spacing, navigation, autoplay, and responsive settings.
Practical Ways to Use Dynamic Sliders
Dynamic sliders aren’t limited to homepage banners. They can be useful anywhere you need to present frequently changing or related content.
Related Content
Display related posts, courses, properties, or products based on the current page.
For example, a property website could display Similar Properties underneath every property listing.
Case Studies
A digital agency could create a Case Studies CPT and automatically display selected Case Studies in a slider.
When a new case study is added, it can become available to the slider without rebuilding the entire layout.
Testimonials
Store testimonials as individual posts or custom content and display them through an Advanced Carousel.
This makes it easier to maintain a growing collection of customer reviews.
Team Members
Create a Team Members CPT and use dynamic fields for:
- Name
- Photo
- Job title
- Biography
- Social links
The carousel can then present team members using a consistent design.
Products and Services
Dynamic sliders can also highlight products, services, pricing plans, or other structured content.
This is especially useful when the content is managed from the WordPress dashboard and changes regularly.
Dynamic Slider vs. Static Slider
A static slider requires you to manually create and maintain each slide.
A dynamic slider uses a connected data source to populate its content.
| Static Slider | Dynamic Slider |
| Content is added manually | Content comes from a data source |
| Updates require editing slides | Content can update automatically |
| Suitable for small fixed campaigns | Ideal for frequently changing content |
| More manual maintenance | Easier content management |
| Limited connection to WordPress data | Can use posts, CPTs, meta fields, and queries |
For websites with regularly updated content, the dynamic approach can significantly reduce repetitive editing.
Best Practices for Dynamic Sliders
Keep the Content Relevant
Don’t add every available post to a slider. Use queries and filters to show content relevant to the page or user.
Optimize Images
Large images can make sliders slow, especially when several slides contain high-resolution backgrounds. Compress images and use appropriate dimensions for the design.
Avoid Too Much Text
Sliders work best when the content is easy to scan. Keep titles and descriptions concise and make the primary action clear.
Check Mobile Layouts
Always test the slider on smaller screens. Adjust the number of visible items, font sizes, spacing, and navigation for mobile devices.
Use Queries Strategically
A well-configured query gives you greater control over what appears in the slider. Instead of manually selecting every item, use taxonomies, IDs, meta values, or other query parameters to create a repeatable content system.
Conclusion
Creating a dynamic slider in WordPress doesn’t have to involve custom development. With JetElements, JetEngine, Elementor, and dynamic data, you can build sliders that are connected directly to your WordPress content.
The basic workflow is straightforward: create your content, build a query, connect the query to the JetElements Slider or Advanced Carousel, and map your dynamic fields.
Once configured, you can use the same approach for case studies, blog posts, products, testimonials, team members, courses, and many other types of content.
The result is a more flexible WordPress website where your slider can grow and change along with your content instead of requiring constant manual updates.