Table of Contents
- What Are Interactions in Divi 5?
- How to Add a Mouse Movement Effect in Divi 5
- Step 1: Open Your Element Settings
- Step 2: Choose the Trigger
- Step 3: Select Mirror Mouse Movement
- Step 4: Choose a Movement Type
- Step 5: Adjust the Sensitivity
- 1. Create a Moving Hero Image
- 2. Make Cards Respond to the Mouse
- 3. Add a Tilt Effect to Images
- 4. Combine Multiple Effects
- 5. Add a Rotating Image Effect
- 6. Use Opacity to Highlight Content
- Use Presets With Mouse Interactions
- Tips for Better Mouse Movement Effects
- Final Result
Want to make your Divi 5 website feel more interactive without adding custom JavaScript or complicated code?
Divi 5’s Interactions feature lets you make elements respond to user actions. One of the most interesting options is Mirror Mouse Movement, which allows elements to move, scale, tilt, rotate, or change opacity as visitors move their mouse.
In this guide, we’ll show you how to set up mouse movement effects in Divi 5 and explain the most useful settings with simple examples.
What Are Interactions in Divi 5?
Divi 5 Interactions connect a user action with a visual response.
An interaction has three main parts:
- Trigger – What starts the interaction.
- Effect – What happens after the trigger.
- Target – Which element receives the effect.
For mouse-based effects, we will mainly use the Mouse Enter trigger and Mirror Mouse Movement effect.
You can find Interactions in the settings of sections, rows, columns, and modules:
Advanced → Interactions → Add Interaction
How to Add a Mouse Movement Effect in Divi 5
Let’s start with a simple example.
Suppose you have an image and want it to slightly move when the visitor moves their mouse over it.
Step 1: Open Your Element Settings
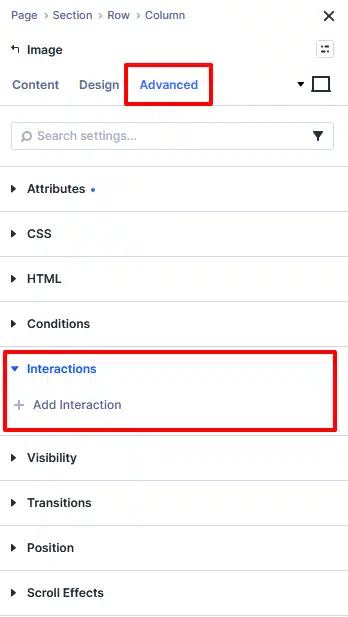
Open the settings of the element you want to animate.
For example:
Image Settings → Advanced
Then find: Interactions
Click Add Interaction.
Step 2: Choose the Trigger
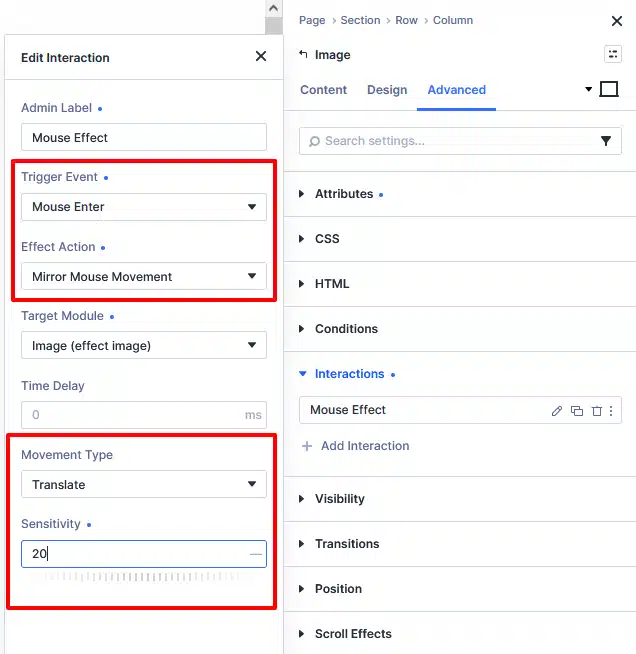
Under Trigger Event,
Select: Mouse Enter
This starts the interaction when the visitor moves their mouse into the element.
Divi 5 also provides other triggers such as Click, Mouse Exit, Viewport Enter, Viewport Exit, and Load, but Mouse Enter is useful for mouse-based interactions.
Step 3: Select Mirror Mouse Movement
For Effect Action, select:
Mirror Mouse Movement
This is the option that allows the element to respond to the visitor’s cursor movement.
Step 4: Choose a Movement Type
Now select how you want the element to react.
Depending on the effect you want, you can use options such as:
- Translate – Moves the element.
- Scale – Makes the element grow or shrink.
- Tilt – Tilts the element based on mouse movement.
- Rotate – Adds rotation.
- Opacity – Changes how visible the element is.
Step 5: Adjust the Sensitivity
The Sensitivity setting controls how strongly the element responds to the mouse.
A lower value creates a subtle movement, while a higher value makes the effect more noticeable.
For example:
Sensitivity: 5 → subtle movement
Sensitivity: 20 → stronger movement
Sensitivity: 50 → dramatic movement
Start with a lower value and increase it until the effect feels right for your design.
1. Create a Moving Hero Image
A hero section is a great place to use mouse movement.
For example, you can make an image gently move as the visitor moves their cursor.
Use these settings:
Trigger Event: Mouse Enter
Effect Action: Mirror Mouse Movement
Target: Image
Movement Type: Translate
Sensitivity: 5–10
This creates a subtle movement without making the hero section feel too busy.
Create More Depth With Multiple Images
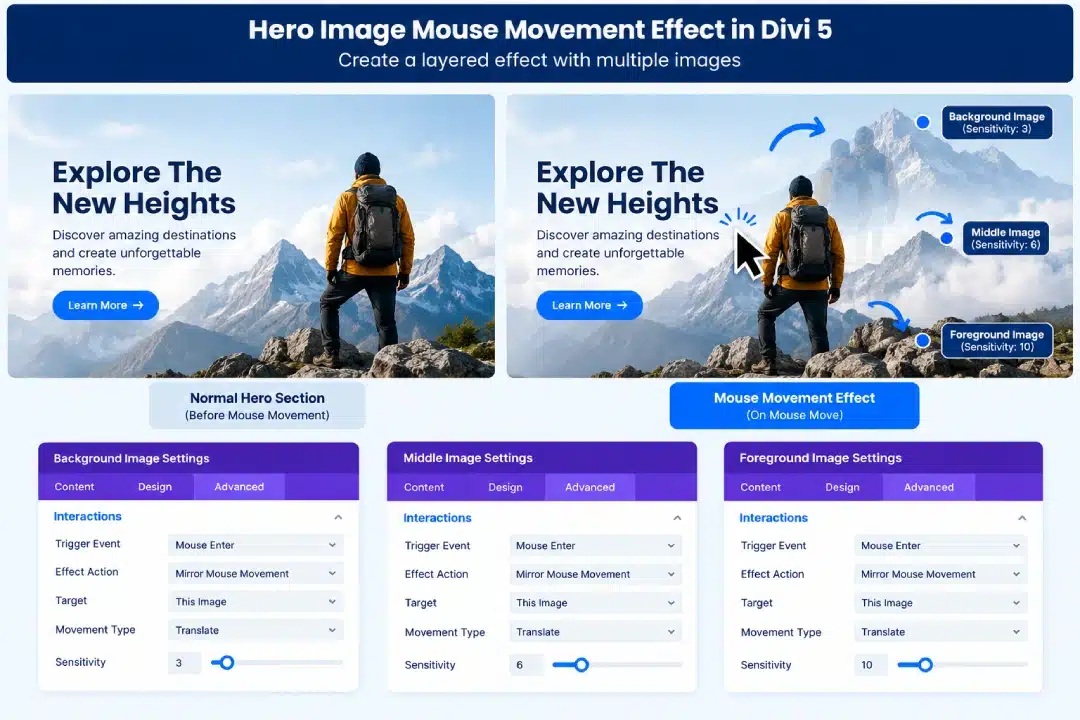
You can also use multiple images in the same hero section.
For example:
- Background image → Sensitivity 3
- Middle image → Sensitivity 6
- Foreground image → Sensitivity 10
Because each image responds differently, the elements can appear to move at different speeds.
This creates a simple layered or depth effect.
2. Make Cards Respond to the Mouse
You can also use mouse movement on cards for:
- Services
- Products
- Portfolio items
- Blog posts
- Team members
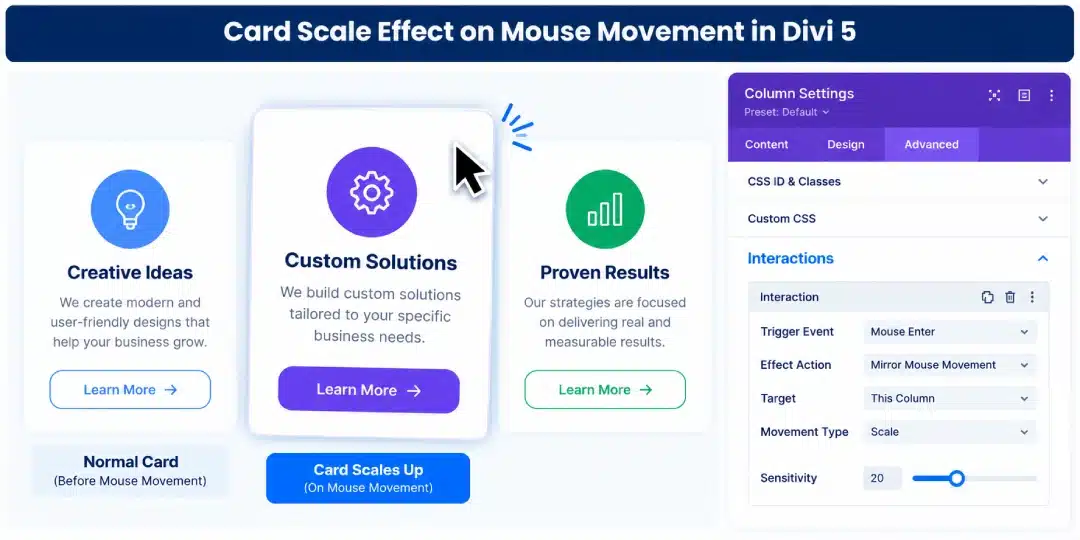
For example, use Scale to make a card slightly grow as the visitor moves their mouse over it.
Settings
Trigger Event: Mouse Enter
Effect Action: Mirror Mouse Movement
Target: Your Card/Column
Movement Type: Scale
Sensitivity: 15–25
Keep the movement subtle so the card remains easy to read and doesn’t feel like it’s jumping around.
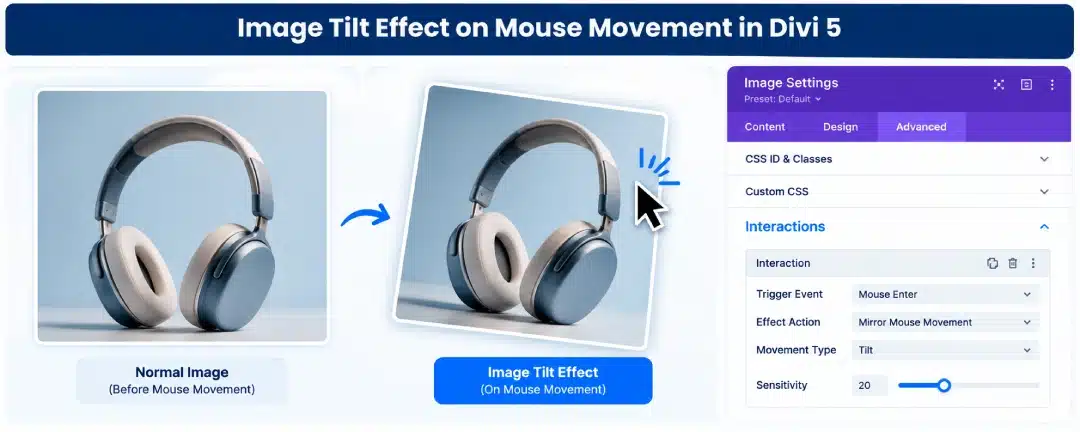
3. Add a Tilt Effect to Images
Want to make an image or product card feel more interactive?
Try the Tilt movement type.
Open your Image module and go to:
Advanced → Interactions → Add Interaction
Then use:
Effect Action: Mirror Mouse Movement
Movement Type: Tilt
Sensitivity: 15–25
As the visitor moves their mouse, the image will tilt according to the cursor position.
This works particularly well for:
- Product images
- Book covers
- Portfolio images
- Promotional graphics
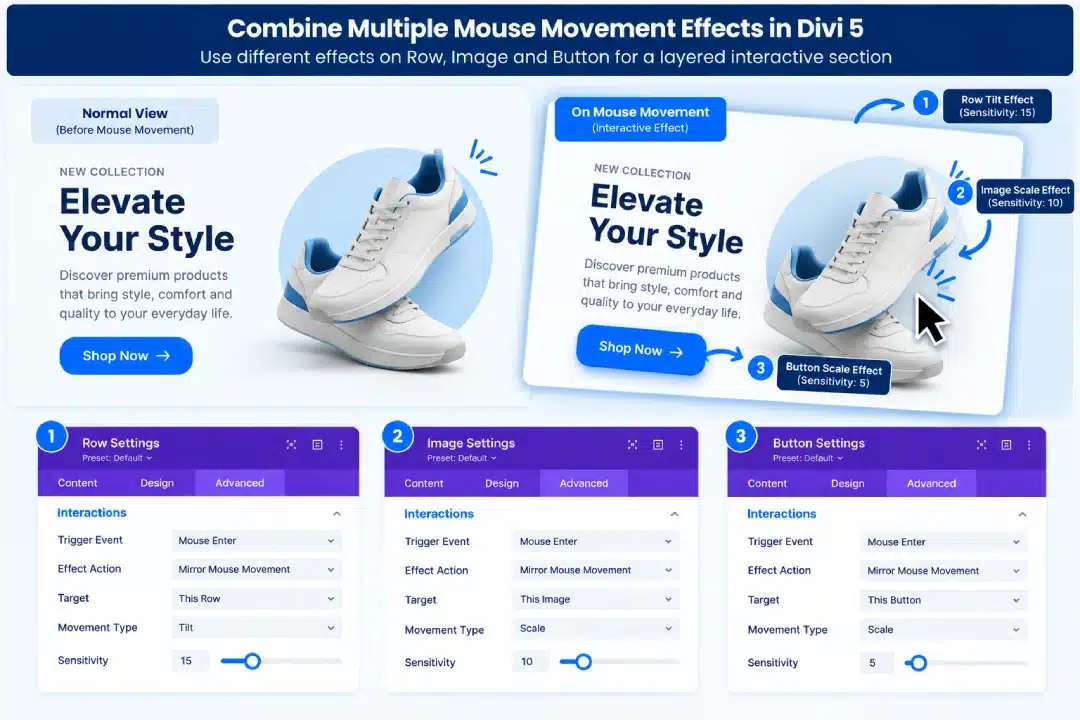
4. Combine Multiple Effects
You don’t have to use only one interaction.
You can combine effects on different elements to create a more dynamic section.
For example:
Row
Movement Type: Tilt
Sensitivity: 15
Image
Movement Type: Scale
Sensitivity: 10
Button
Movement Type: Scale
Sensitivity: 5
The row can create the overall movement while the image and button add smaller movements within it.
This creates a layered interaction without requiring custom code.
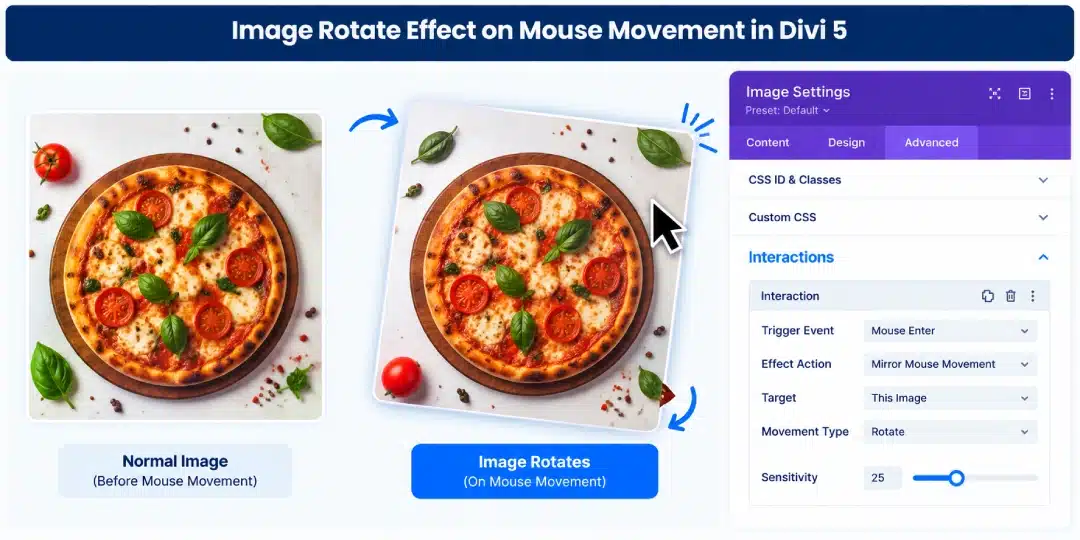
5. Add a Rotating Image Effect
You can also use mouse movement to rotate an image.
For example, imagine a food website with product or dish images. A small amount of rotation can make the section feel more playful.
Open your Image module:
Advanced → Interactions → Add Interaction
Use:
Trigger Event: Mouse Enter
Effect Action: Mirror Mouse Movement
Target: Image
Movement Type: Rotate
Sensitivity: 20–30
Try to keep the sensitivity under control. A small rotation usually works better than a large movement.
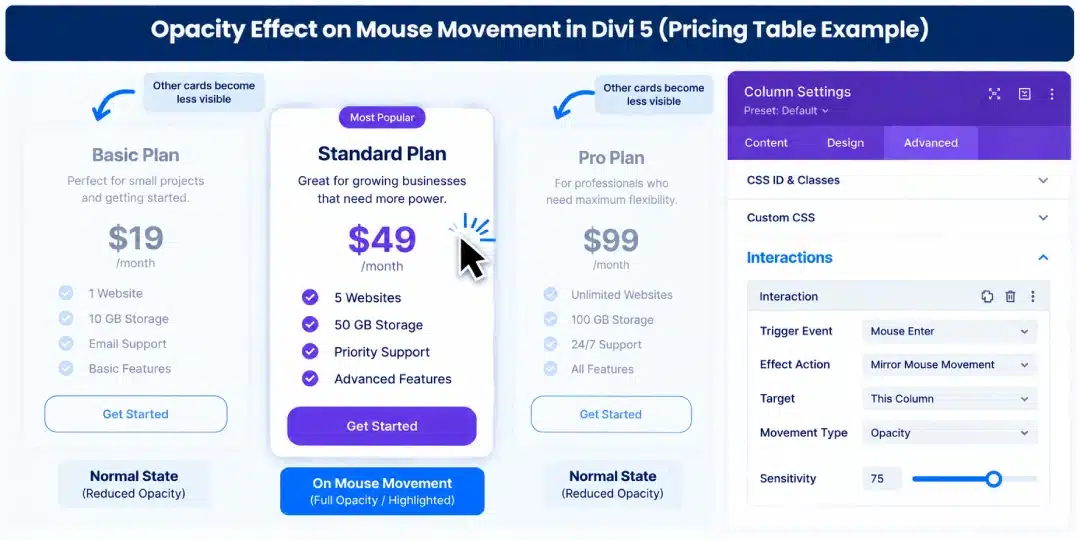
6. Use Opacity to Highlight Content
Mouse movement can also be used to control opacity.
This is useful when you have multiple items and want to make one area stand out while the others become slightly less prominent.
For example, you could use this idea with pricing tables.
When a visitor interacts with one pricing option, the other options can become slightly transparent.
Use:
Effect Action: Mirror Mouse Movement
Movement Type: Opacity
Sensitivity: Around 70–80%
Keeping the opacity relatively high helps the other content remain visible while still creating a visual focus.
Use Presets With Mouse Interactions
Divi 5 Interactions can also work with Design Presets.
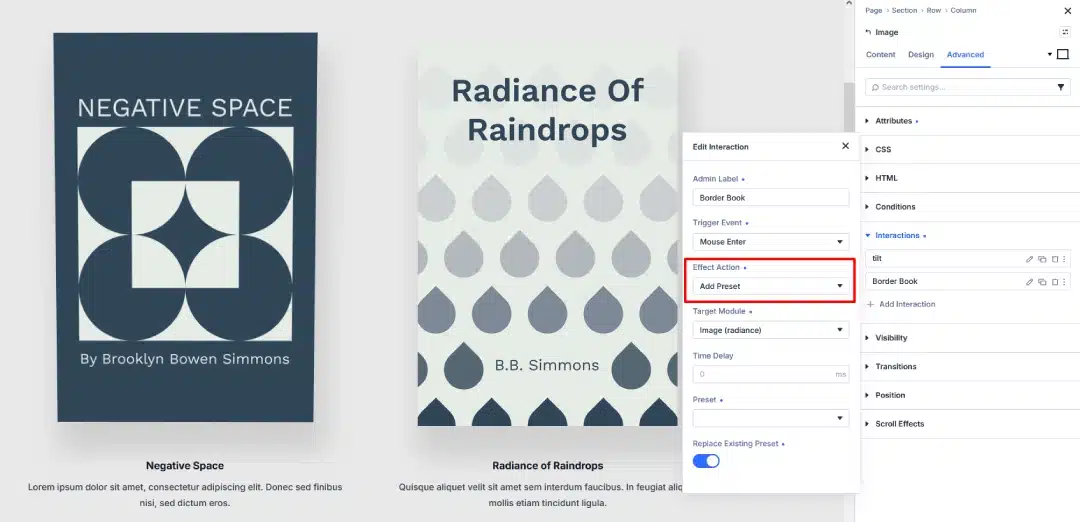
For example, you could create a preset containing a border style and then use an interaction to apply that preset when the visitor interacts with an image.
A setup could look like:
Effect Action: Add Preset
Preset: Your Custom Border Preset
Replace Existing Preset: Enabled
This allows you to combine movement with other design changes.
For example: Mouse Movement → Image Tilts + Border Appears
Tips for Better Mouse Movement Effects
Mouse effects can look great, but they work best when they are subtle.
Keep the movement small
Start with a low sensitivity and increase it gradually.
Don’t animate everything
You don’t need every element on the page to move. Choose important elements such as:
- Hero images
- Product cards
- Buttons
- Promotional graphics
Use different sensitivities
When working with multiple elements, different sensitivity values can create a layered effect.
Keep content readable
Avoid excessive rotation, scaling, or movement around important text.
Test on different screen sizes
Mouse interactions are primarily useful for desktop users. Make sure your layout still works properly on tablet and mobile devices.
Final Result
Divi 5’s Interactions give you an easy way to add movement to your designs without writing custom code.
The basic process is simple:
Open Element → Advanced → Interactions → Add Interaction → Mouse Enter → Mirror Mouse Movement → Choose Movement Type → Adjust Sensitivity
From there, you can experiment with Translate, Scale, Tilt, Rotate, and Opacity to create different interactive effects.
Whether you want a subtle hero animation, an interactive product card, a tilted image, or a layered section, Divi 5 gives you the controls directly inside the Visual Builder.
Start with a simple effect, keep the movement subtle, and build from there.