Table of Contents
- What You’ll Build
- Step 1: Create an ACF Field Group
- Step 2: Add the PDF to Each Post
- Step 3: Create Your Gravity Form
- Step 4: Configure the Hidden Field
- Step 5: Populate the Hidden Field Automatically
- Step 6: Configure the Email Notification
- Step 7: Add the Form to Your Template
- Final Result
- Why This Approach Is Better
- Conclusion
- Ready to Enhance Your WordPress Website?
Have you ever wanted to gate a PDF, brochure, price list, or downloadable resource behind a form without creating a separate Gravity Form for every page or post?
With Gravity Forms and Advanced Custom Fields (ACF), you can create one reusable form that works across your entire WordPress website. Simply assign a different PDF to each post, page, product, or custom post type, and Gravity Forms will automatically email the correct download link after the user submits the form.
In this tutorial, I’ll show you exactly how to build this system.
What You’ll Build
By the end of this guide you’ll have:
- One reusable Gravity Form
- One ACF PDF field
- Dynamic PDF download links
- Automatic email delivery after form submission
- Works with:
- Posts
- Pages
- WooCommerce Products
- Custom Post Types
- Any WordPress content type
No duplicate forms are required.
Step 1: Create an ACF Field Group
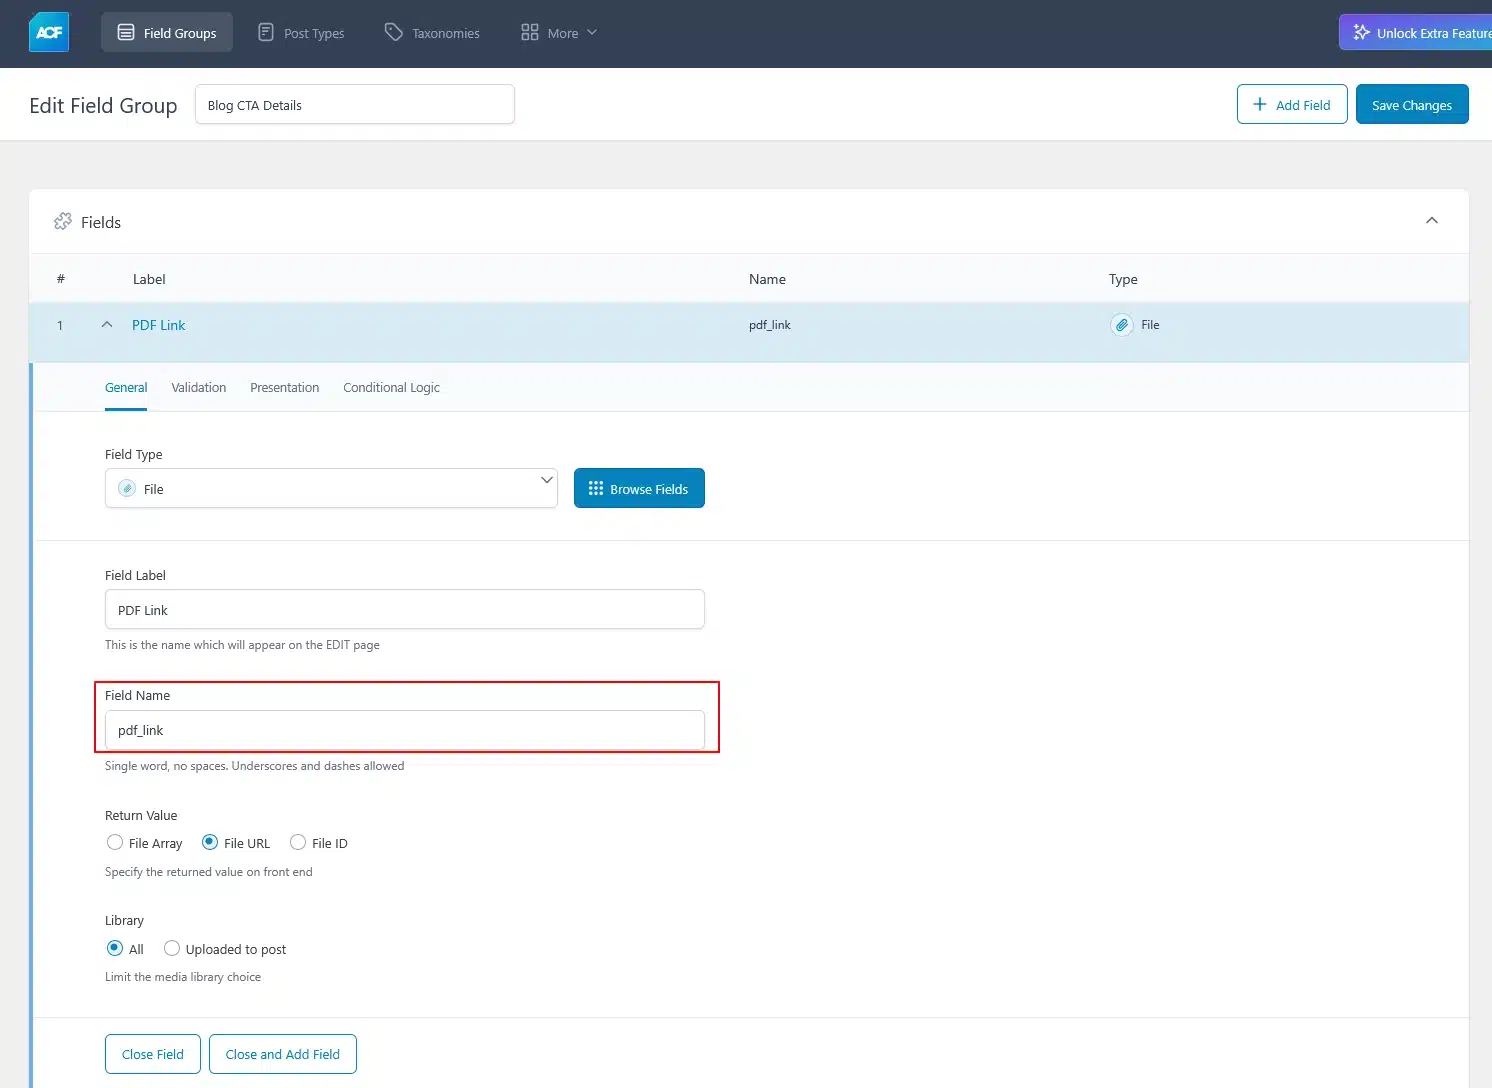
Create a new Field Group in Advanced Custom Fields.
Add a field:
| Setting | Value |
|---|---|
| Field Label | PDF Link |
| Field Name | pdf_link |
| Field Type | File |
| Return Value | File URL |
Assign this field group wherever you need it.
For example:
- Posts
- Pages
- Products
- Any Custom Post Type
Step 2: Add the PDF to Each Post
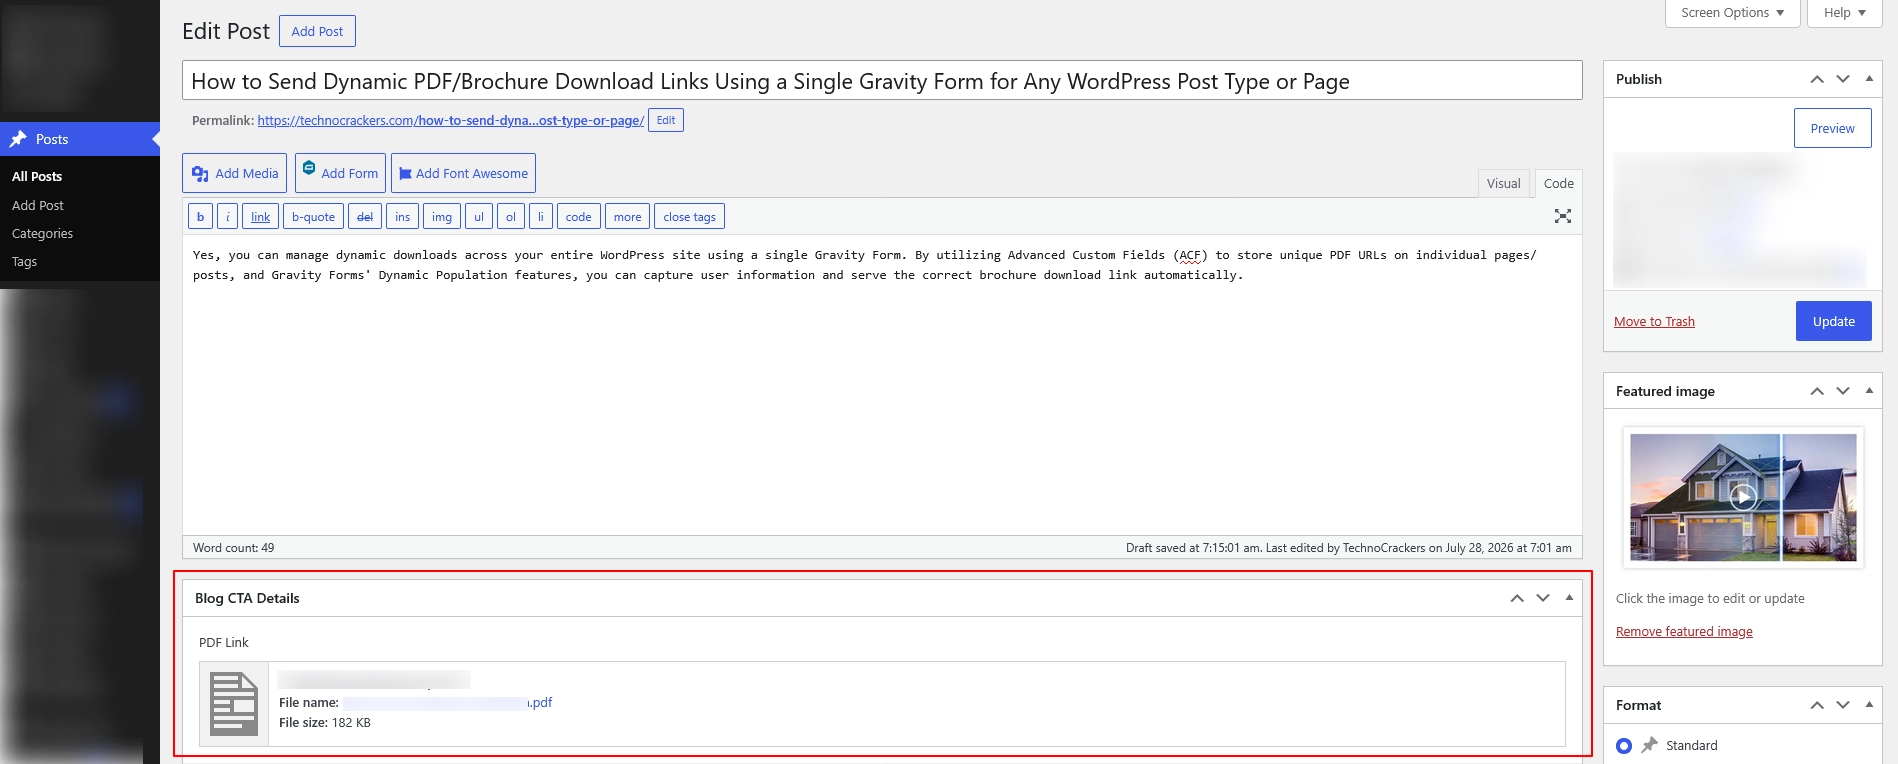
Open any post (or page/product).
You’ll now see your new PDF Link field.
Simply upload or select the PDF from the Media Library.
That’s all you need to do for each post.
Step 3: Create Your Gravity Form
Create a new Gravity Form.
Example fields:
- Name
- Hidden Field (PDF)
The hidden field will automatically receive the PDF URL from the current page.
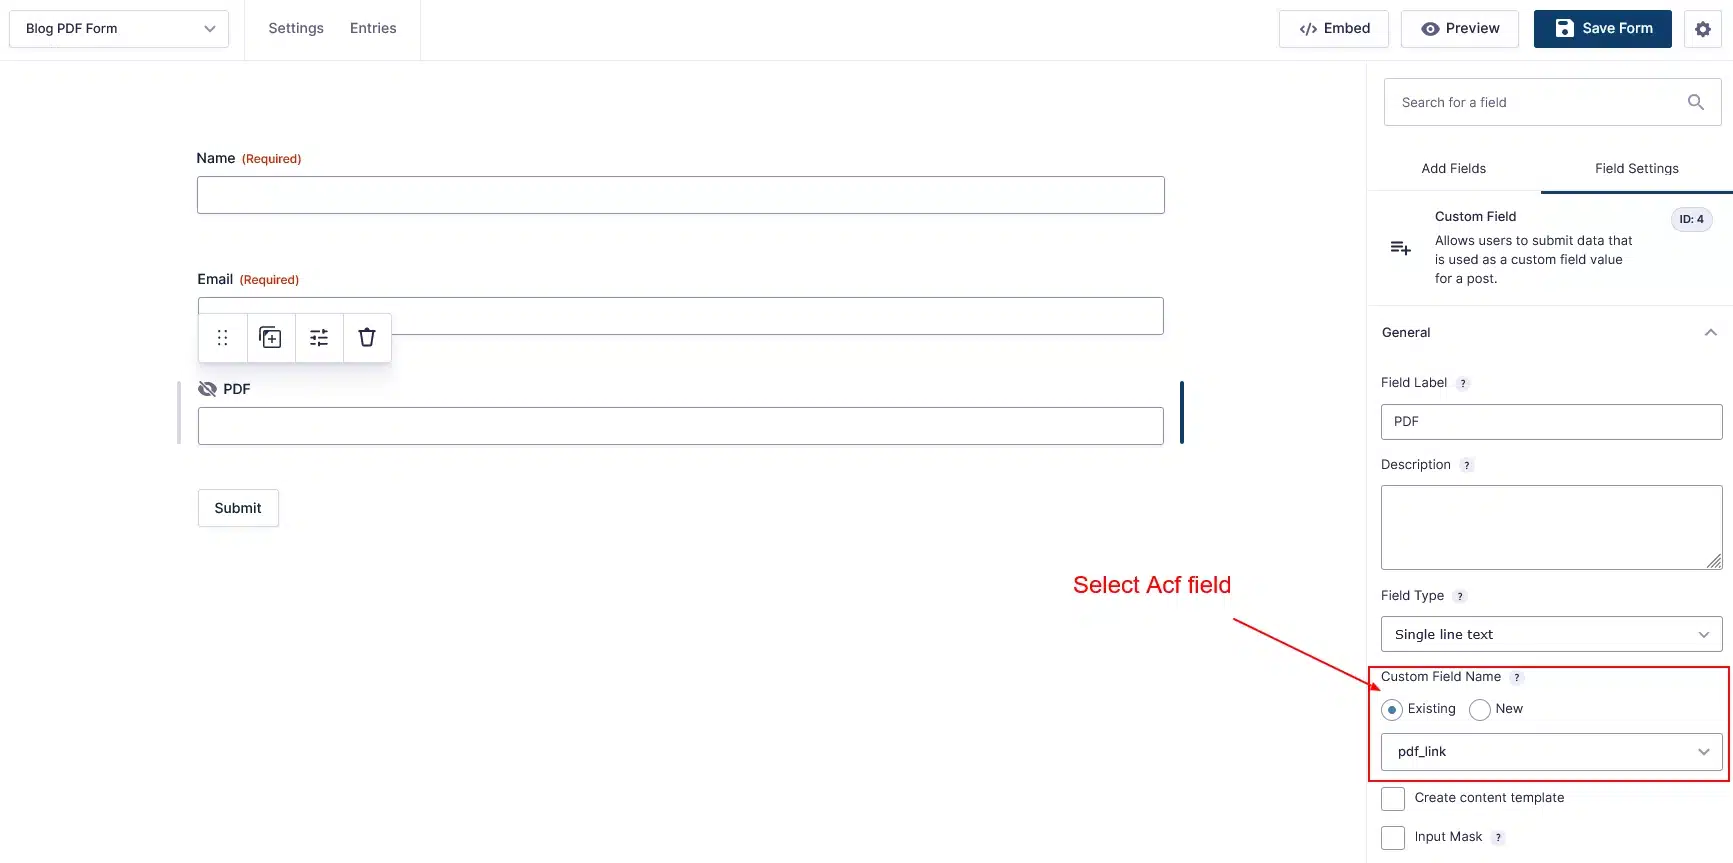
Step 4: Configure the Hidden Field
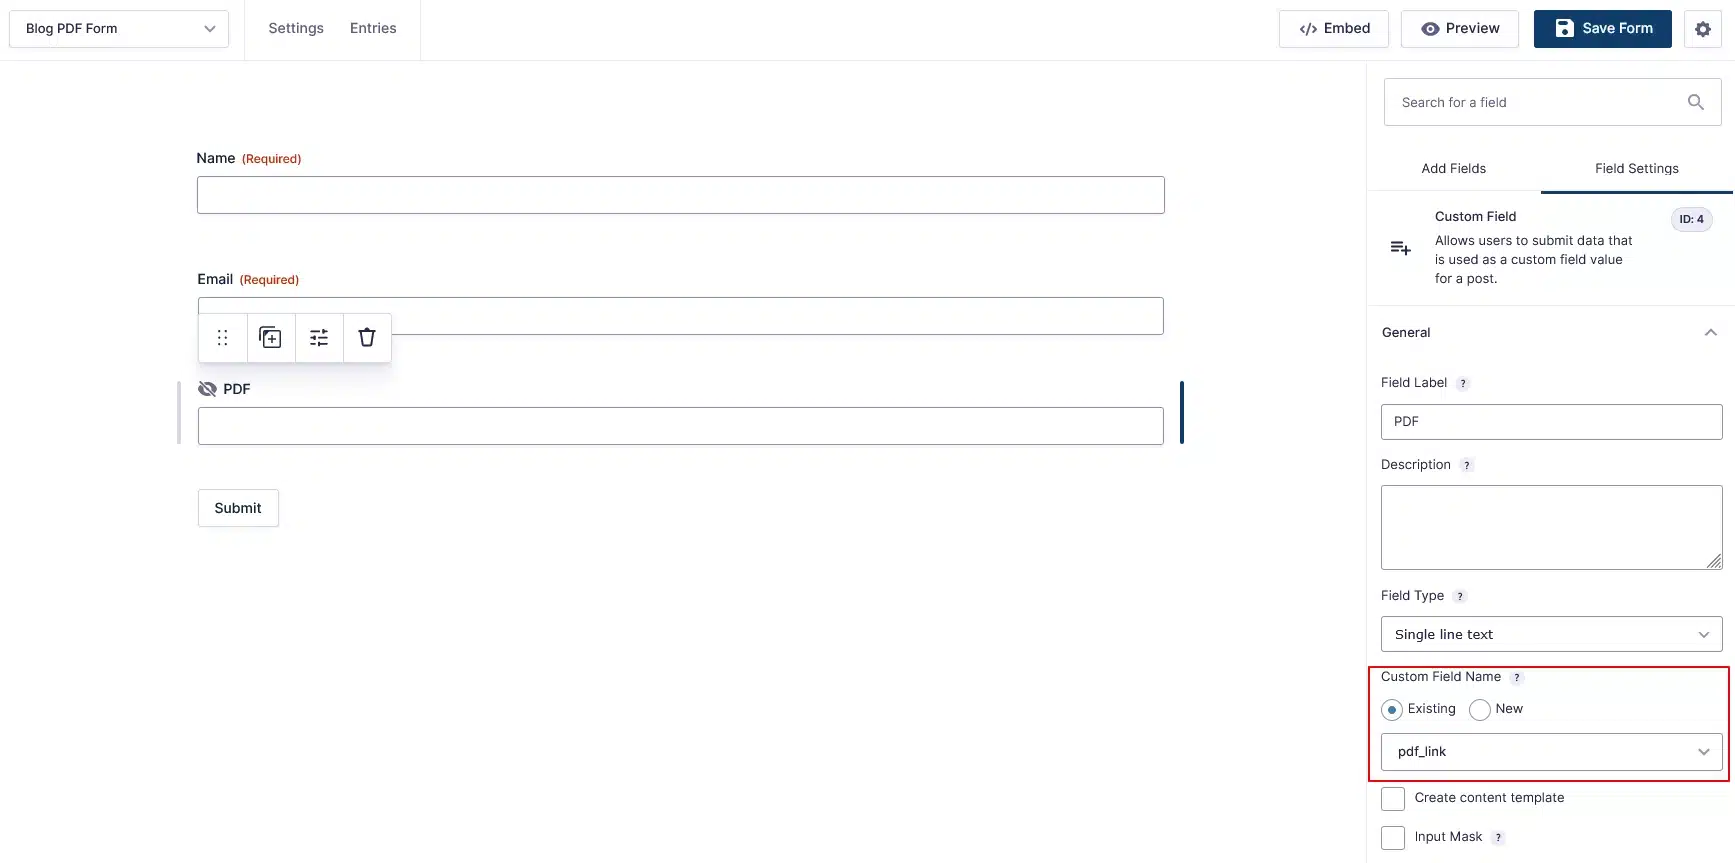
Select the Hidden Field.
Enable Custom Field.
Choose the existing custom field:
pdf_link
This field stores the dynamic PDF URL that will later be used inside the email notification.
Step 5: Populate the Hidden Field Automatically
Add the following code to your active theme’s functions.php file.
add_filter( 'gform_pre_render_24', 'populate_pdf_hidden_field' );
add_filter( 'gform_pre_validation_24', 'populate_pdf_hidden_field' );
add_filter( 'gform_pre_submission_filter_24', 'populate_pdf_hidden_field' );

function populate_pdf_hidden_field( $form ) {

    global $post;

    if ( ! isset( $post->ID ) ) {
        return $form;
    }

    $pdf_link = get_field( 'pdf_link', $post->ID );

    // If ACF field is File field
    if ( is_array( $pdf_link ) && isset( $pdf_link['url'] ) ) {
        $pdf_link = $pdf_link['url'];
    }

    foreach ( $form['fields'] as &$field ) {

        // Hidden Field ID = 4
        if ( $field->id == 4 ) {

            $field->defaultValue = $pdf_link;
        }
    }

    return $form;
}

add_shortcode('acf_field', 'dynamic_acf_field_shortcode');
Important
Update these values to match your setup.
- Replace 24 with your Gravity Form ID.
- Replace 4 with your Hidden Field ID.
- Replace pdf_link if your ACF field name is different.
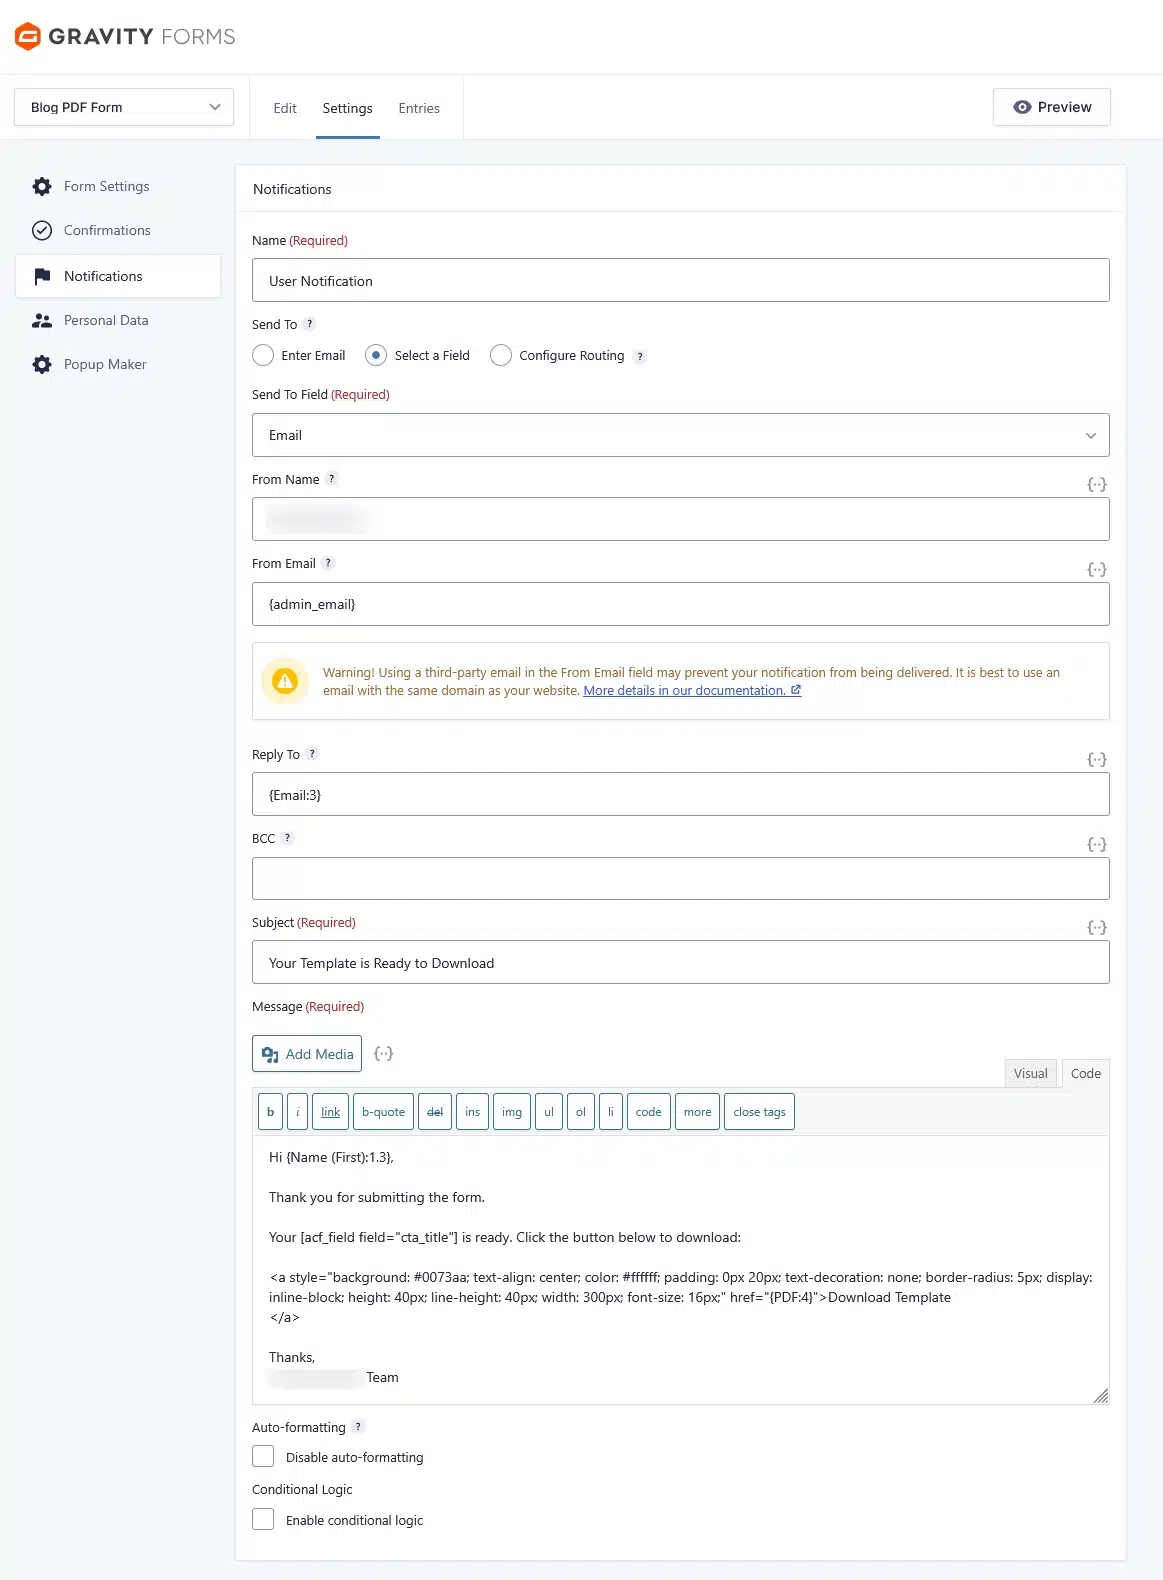
Step 6: Configure the Email Notification
Go to:
Gravity Forms → Settings → Notifications
Create a User Notification.
Use the Email field as the recipient.
Then use a message like this:
	Hi {Name (First):1.3},

	Thank you for submitting the form.

	Your  is ready. Click the button below to download.

	<a  href="{PDF:4}">
	Download Template
	</a>

	Thanks,

	Technocrackers Team
Here:
- {PDF:4} outputs the hidden field value.
- The hidden field already contains the PDF URL from the current page.
- displays the page title (using your shortcode).
Step 7: Add the Form to Your Template
Instead of inserting the form into every individual post, place it directly inside your:
- Single Post Template
- Single Product Template
- Single Custom Post Type Template
Now the same form will automatically appear everywhere.
Final Result
Now the workflow is incredibly simple.
Administrator
- Creates a new blog post
- Uploads a PDF in the ACF field
- Publishes the post
No Gravity Form changes are needed.
Visitor
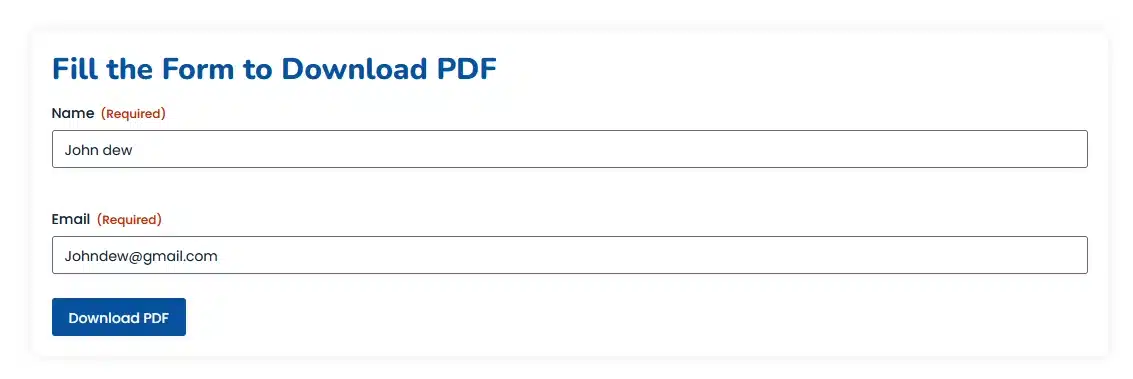
- Opens the post
- Fills out the form
- Clicks Submit
- Receives an email with the correct PDF download link
Every post automatically sends its own brochure or PDF without creating additional forms.
Why This Approach Is Better
Instead of creating separate Gravity Forms for every downloadable resource, this solution uses a single reusable form.
Benefits
- One Gravity Form for the entire website
- Works with Posts, Pages, Products, and Custom Post Types
- Easy to maintain
- No duplicate forms
- Dynamic PDF download links
- Automatic email delivery
- Great for lead generation
- Scalable for hundreds of downloadable resources
Use Cases
This solution is perfect for:
- PDF downloads
- Brochures
- Product catalogs
- Pricing guides
- Whitepapers
- eBooks
- Case studies
- Checklists
- Templates
- Technical documents
- Marketing resources
Conclusion
Using Gravity Forms together with Advanced Custom Fields, you can create a flexible gated download system that works across your entire WordPress website.
Instead of managing dozens of forms, you only need one Gravity Form and one ACF field. Every page, post, product, or custom post type can have its own downloadable file, while users automatically receive the correct download link via email after submitting the form.
This approach saves time, keeps your site easier to maintain, and provides a better experience for both administrators and visitors.
Ready to Enhance Your WordPress Website?
Whether you need custom Gravity Forms, ACF development, WooCommerce functionality, or a complete WordPress solution,Technocrackers, is here to help.
today for a free consultation and let’s build something exceptional together.