Table of Contents
- Why Blacklist Email Addresses?
- Method 1: Using the Gravity Forms Email Blacklist Plugin
- Step 1: Install and Activate the Plugin
- Step 2: Open Your Form Settings
- Step 3: Add Email Addresses to the Blacklist
- Step 4: Save Changes
- Benefits of Using the Plugin
- Method 2: Using Custom Code in functions.php
- Blocking Entire Email Domains
- Which Method Should You Choose?
- Conclusion
- Need Professional WordPress Development Services?
Spam submissions and unwanted form entries can waste time, clutter your database, and reduce the quality of the information collected through your forms. If you’re using Gravity Forms, there are two effective ways to block specific email addresses from submitting forms:
- Using the Gravity Forms Email Blacklist plugin
- Using custom code in your theme’s functions.php file
In this guide, we’ll walk through both methods so you can choose the approach that best fits your website.
Why Blacklist Email Addresses?
Blacklisting email addresses helps:
- Prevent spam submissions
- Block abusive or unwanted users
- Reduce fake registrations
- Improve lead quality
- Protect your forms from repeat offenders
Whether you need to block a single email address or multiple domains, Gravity Forms offers flexible solutions.
Method 1: Using the Gravity Forms Email Blacklist Plugin
The easiest way to manage blocked email addresses is with the Gravity Forms Email Blacklist plugin.
Step 1: Install and Activate the Plugin
Install and activate the Gravity Forms Email Blacklist plugin on your WordPress website.
Step 2: Open Your Form Settings
Navigate to:
Forms → Select Your Form
Open the settings panel for the form you want to protect.
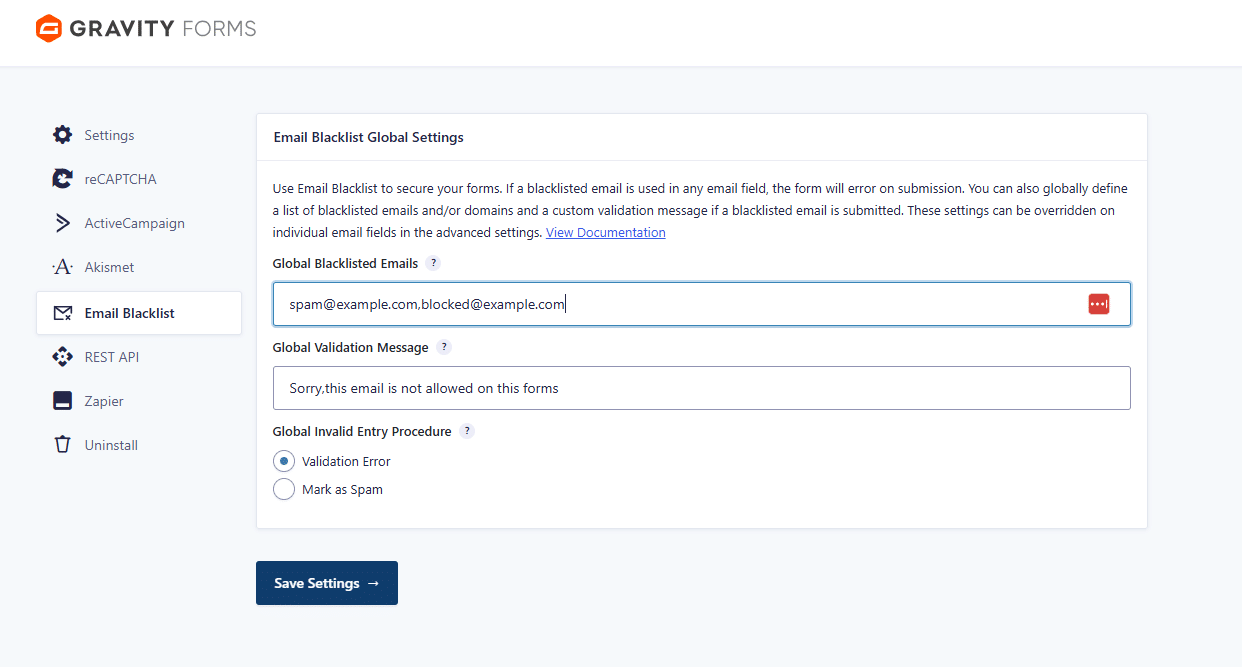
Step 3: Add Email Addresses to the Blacklist
Enter the email addresses you want to block.
Example:
[email protected][email protected][email protected]Each email address should be placed on its own line.
Step 4: Save Changes
Save the settings and test the form.
When a user attempts to submit the form using a blacklisted email address, the submission will be rejected automatically.
Benefits of Using the Plugin
- No coding required
- Easy to manage and update
- Supports multiple email addresses
- User-friendly interface
- Ideal for non-technical website owners
Method 2: Using Custom Code in functions.php
If you prefer not to use an additional plugin, you can create your own email blacklist using Gravity Forms validation hooks.
Add the following code to your theme’s functions.php file or a custom functionality plugin:
add_filter( 'gform_field_validation', 'custom_email_blacklist_validation', 10, 4 );
function custom_email_blacklist_validation( $result, $value, $form, $field ) {
  if ( $field->type === 'email' ) {
  $blocked_emails = array(
    '[email protected]',
    '[email protected]',
    '[email protected]'
  );
  if ( in_array( strtolower( $value ), $blocked_emails ) ) {
    $result['is_valid'] = false;
    $result['message'] = 'This email address is not allowed.';
  }
 }
 return $result;
}
How It Works
The code checks every email field submission against a predefined list of blocked email addresses. If a match is found, Gravity Forms prevents the submission and displays a custom validation message.
Blocking Entire Email Domains
You can also block entire domains using custom code.
Example:
add_filter( 'gform_field_validation', 'custom_domain_blacklist_validation', 10, 4 );
function custom_domain_blacklist_validation( $result, $value, $form, $field ) {
   if ( $field->type === 'email' ) {
      $blocked_domains = array(
        'mailinator.com',
        'tempmail.com',
        'disposablemail.com'
     );
    $domain = substr(strrchr($value, "@"), 1);
    if ( in_array( strtolower( $domain ), $blocked_domains ) ) {
       $result['is_valid'] = false;
       $result['message'] = 'Email addresses from this domain are not permitted.';
     }
   }
 return $result;
}
This approach is particularly useful for blocking temporary or disposable email providers.
Plugin vs Custom Code
| Feature | Email Blacklist Plugin | Custom Code |
|---|---|---|
| Easy Setup | ✓ | ✗ |
| No Coding Required | ✓ | ✗ |
| Flexible Customization | Limited | ✓ |
| Maintenance | Easy | Requires Developer |
| Domain Blocking | Depends on Plugin | ✓ |
| Performance | Good | Excellent |
Which Method Should You Choose?
The Gravity Forms Email Blacklist plugin is the best choice for users who want a quick and easy solution without touching code.
Custom code is ideal for developers who need advanced control, custom validation logic, or want to avoid installing additional plugins.
Conclusion
Blacklisting email addresses in Gravity Forms is an effective way to reduce spam and improve the quality of your form submissions. Whether you choose the Gravity Forms Email Blacklist plugin for simplicity or implement a custom solution using functions.php for greater flexibility, both methods can help protect your forms from unwanted users.
By regularly reviewing blocked email addresses and combining blacklisting with other anti-spam measures such as CAPTCHA, you can keep your Gravity Forms secure and your data clean.
Need Professional WordPress Development Services?
Managing forms is just one part of building a successful WordPress website. Whether you need a custom website, custom WordPress plugin development, WooCommerce solutions, performance optimization, security improvements, or ongoing WordPress maintenance, our experienced developers can help you build a fast, secure, and scalable website tailored to your business needs.
If you’re a digital agency, our White Label WordPress Development Services allow you to deliver high-quality WordPress projects to your clients under your own brand.
Looking for a reliable WordPress development partner? Explore our WordPress Development Services and let’s build your next project together.