Table of Contents
- What Are Alternative Listing Template Injections?
- Why Use Alternative Listing Templates?
- Requirements
- Step 1: Enable Listing Grid Injections
- Step 2: Create Your Main Listing Template
- Step 3: Create an Alternative Listing Template
- Step 4: Open the Listing Grid
- Step 5: Select the Alternative Listing
- Option 1: Inject on Each Nth Item
- Option 2: Inject Based on a Meta Field Value
- Option 3: Inject If the Post Has Specific Terms
- Option 4: Inject Based on Post Type
- Option 5: Inject Based on a Taxonomy Listing
- Step 6: Add Multiple Injection Rules
- Step 7: Customize the Grid Layout
- Step 8: Preview the Listing Grid
- Practical Example: Creating a Featured Blog Post
- Alternative Listing Templates vs. Separate Listing Grids
- Tips for Using Listing Template Injections
- Conclusion
When building a dynamic WordPress website, you may want to display different types of content or designs within the same grid. Normally, a Listing Grid uses one listing template for all of its items. However, JetEngine by Crocoblock provides an Alternative Listing Template Injections feature that allows you to insert different listing templates into selected positions in the same grid.
This makes it possible to highlight specific posts, create featured cards, display different layouts, or change the appearance of particular listing items without creating separate grids.
In this guide, we’ll explain how to enable Listing Grid injections, create an alternative listing template, configure injection rules, and check the final result.
What Are Alternative Listing Template Injections?
Alternative Listing Template Injections allow you to replace selected items in a Listing Grid with another listing template.
For example, imagine you have a grid displaying blog posts. Most posts could use a standard card design, while every third post could use a larger featured design. Instead of creating two separate grids, you can create an alternative listing template and inject it into the existing Listing Grid.
You can control where the alternative template appears based on several conditions, including:
- A specific item number or interval
- A custom meta field value
- A taxonomy term
- A post type
- A taxonomy term listing
The feature is available after enabling the Listing Grid injections module in JetEngine.
Why Use Alternative Listing Templates?
This feature can be useful when you want to create more flexible and visually varied layouts.
Some common examples include:
- Highlighting featured blog posts
- Displaying promotional content inside a post grid
- Giving selected products a different card design
- Highlighting posts from a particular category
- Creating a larger card at a specific grid position
- Displaying different layouts for different Custom Post Types
- Creating a featured taxonomy item
- Adding static content between dynamic listing items
Instead of managing multiple Listing Grid widgets, you can keep everything inside one grid and control which template appears at specific positions.
Requirements
Before setting up alternative listing injections, make sure you have:
- WordPress installed and configured
- Elementor or Gutenberg
- JetEngine installed and activated
- A listing source, such as posts, Custom Post Types, or taxonomy terms
- At least one Listing Template
- The Listing Grid injections module enabled
JetEngine supports Listing Templates for different types of dynamic data, including posts, Custom Post Types, Custom Content Types, taxonomies, and more.
Step 1: Enable Listing Grid Injections
First, you need to activate the module responsible for alternative listing injections.
From your WordPress dashboard, go to:
JetEngine → JetEngine Dashboard → Modules
Find the Listing Grid injections option and enable it.
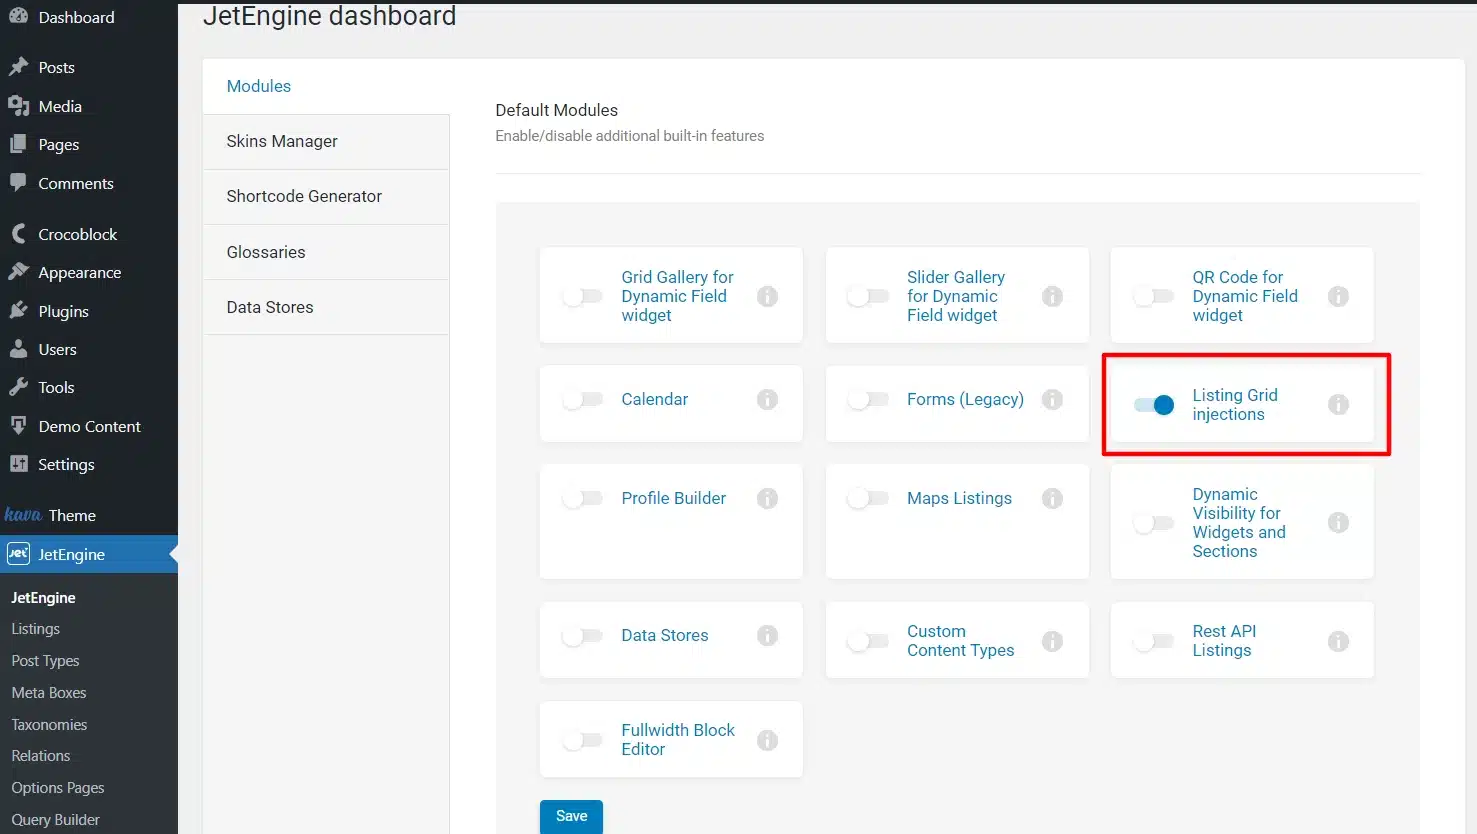
Then click Save.
Once enabled, the Listing Grid widget will provide the Inject alternative listing items option in its settings.
Step 2: Create Your Main Listing Template
Next, create the listing template that will be used for the standard items in your grid.
Go to:
WordPress Dashboard → JetEngine → Listings → Add New
Choose the appropriate listing source and post type, then select your preferred editor, such as Elementor.
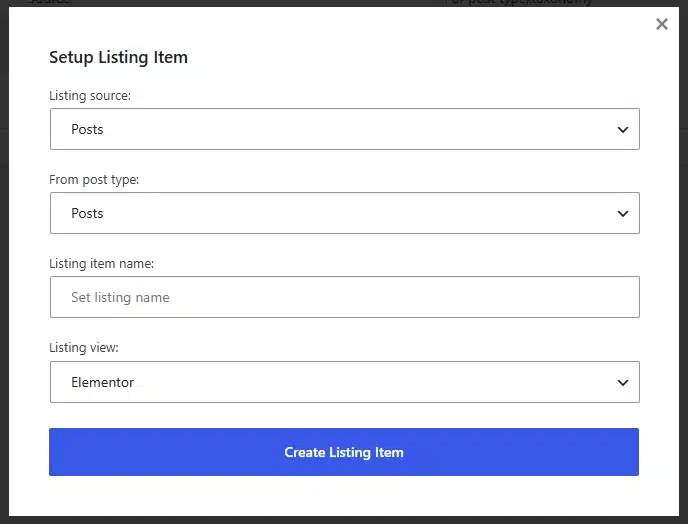
You can build the listing card using JetEngine dynamic widgets such as:
- Dynamic Image
- Dynamic Field
- Dynamic Meta
- Dynamic Terms
- Dynamic Link
For example, a blog post listing could contain:
- Featured image
- Post title
- Publication date
- Category
- Excerpt
- Read More link
Save or publish the listing template when the design is ready.
Step 3: Create an Alternative Listing Template
Now create another listing template that will be injected into the grid.
Go to:
JetEngine → Listings → Add New
Use the same listing source as your primary listing and create a different design.
For example, your standard listing might display a compact blog card, while the alternative template could contain:
- A larger featured image
- A larger title
- Additional metadata
- A different background
- A CTA button
The alternative template can use the same dynamic data as the original listing while having a completely different visual structure.
Once finished, click Publish/Update.
Step 4: Open the Listing Grid
Now open the page or template containing your Listing Grid.
If you’re using Elementor, edit the page with Elementor and select the Listing Grid widget.
The Listing Grid normally uses one selected listing template for its items. The widget also provides an option for injecting alternative listing items when the corresponding JetEngine module is active.
In the General settings, enable:
Inject alternative listing items
Click Add Item to create an injection rule.
Step 5: Select the Alternative Listing
After clicking Add Item, you’ll see settings for configuring the injected listing.
In the Listing template field, select the alternative listing template you created earlier.
The next important setting is Inject on. This determines when and where the alternative template should appear.
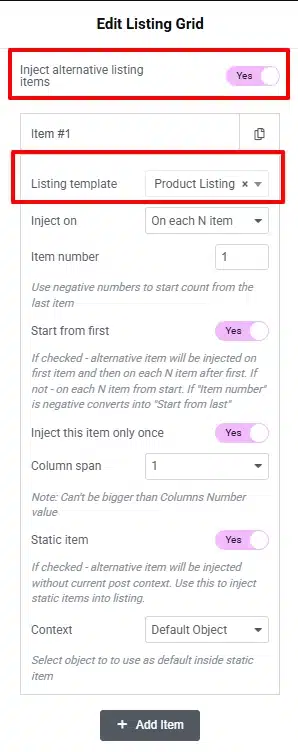
JetEngine provides several injection conditions.
Option 1: Inject on Each Nth Item
The On each N item option allows you to insert the alternative listing at a specific interval.
For example, suppose your Listing Grid contains 12 posts and you set the injection number to 3.
The alternative listing can then appear at every third position.
This is useful for creating repeating visual patterns throughout a grid.
You can also use options such as:
Inject Number: Specify the item position or interval where the alternative listing should be inserted.
Start From First: Enable this option when you want the alternative template to begin with the first grid item and then repeat according to the specified interval.
Inject This Item Only Once: Use this when you want the alternative listing to appear in only one position instead of repeating throughout the grid.
Column Span: You can use the column span setting to make the injected item occupy more space in the grid.
For example, if your grid contains four columns, an alternative listing could span two columns to create a featured-card effect.
Static Item: The static item option can be used when you want to insert a static element into the Listing Grid rather than treating it like a regular dynamic listing item.
Option 2: Inject Based on a Meta Field Value
You can also inject an alternative listing depending on the value stored in a custom meta field.
For example, suppose your posts have a custom field called Status.
You could use:
Key: Status
Operator: Equals
Value: Top
When a post has the value Top, the alternative listing template can be displayed for that item.
This approach is particularly useful for highlighting manually selected content.
For example, you could create custom fields such as:
- Featured
- Top
- Sponsored
- Premium
- Editor’s Pick
Then use their values to determine which items should receive the alternative design.
Option 3: Inject If the Post Has Specific Terms
Another useful method is to inject an alternative listing based on taxonomy terms.
For example, imagine your blog has a category called Editor’s Picks.
You can configure the injection to check whether a post belongs to that category.
When a matching post is found, the alternative listing template can be displayed instead of the standard listing design.
This is useful when you want to automatically highlight posts belonging to a particular:
- Category
- Tag
- Custom taxonomy
In the injection settings, select the appropriate taxonomy and specify the relevant term IDs or slugs.
Option 4: Inject Based on Post Type
If your Listing Grid displays multiple Custom Post Types, you can use the post type as the injection condition.
First, enable Use Custom Post Types in the Listing Grid and select the post types you want to display.
For example, your grid could contain:
- Blog Posts
- Services
- Case Studies
You could then configure an alternative listing to appear whenever the item belongs to the Services post type.
This allows different types of content to have different visual presentations while remaining inside the same Listing Grid.
Option 5: Inject Based on a Taxonomy Listing
Alternative templates can also be used with taxonomy listings.
For example, you may have a grid displaying categories or other taxonomy terms. You can configure an alternative template to be displayed when a specific taxonomy is detected.
If you only want the alternative design to appear once, enable Inject this item only once and specify the desired position.
This can be useful for creating a featured taxonomy card at the beginning of a taxonomy grid.
Step 6: Add Multiple Injection Rules
You don’t have to limit your Listing Grid to one alternative template.
You can create multiple injection items with different conditions.
For example:
- First item → Featured layout
- Every fourth item → Promotional layout
- Posts with “Editor’s Pick” → Highlighted layout
- Services post type → Service layout
This gives you greater control over how different types of content are presented within one dynamic grid.
However, when using multiple rules, test the final grid carefully to make sure the conditions don’t conflict with each other.
Step 7: Customize the Grid Layout
After configuring the injection rules, adjust the Listing Grid’s layout settings.
You can control options such as:
- Number of columns
- Equal column height
- Masonry layout
- Lazy loading
- Load More
- Custom post types
- Slider settings
The Listing Grid widget is designed to display dynamic content such as posts, CPTs, taxonomies, products, and other supported data sources.
When using a larger alternative template, pay particular attention to the Column Span and the number of columns in the grid so that the layout remains consistent.
Step 8: Preview the Listing Grid
Save or update the page and open it on the front end.
Check that:
- The standard listing template displays correctly.
- The alternative listing appears in the expected position.
- Meta-field conditions work correctly.
- Taxonomy conditions display the correct design.
- Post-type conditions are working as expected.
- Column spans don’t break the grid.
- The layout remains responsive on tablet and mobile devices.
Try different combinations of posts and taxonomy terms if your injection rules depend on dynamic conditions.
Practical Example: Creating a Featured Blog Post
Let’s look at a simple example.
Suppose you have a blog Listing Grid with a standard card design.
You want posts marked as Featured to have a larger and more noticeable card.
Main Listing
Create a standard blog listing containing:
- Featured image
- Title
- Excerpt
- Date
- Read More link
Alternative Listing
Create another listing with:
- Larger featured image
- Larger title
- Featured badge
- Short description
- Read More button
Injection Rule
In the Listing Grid:
Inject alternative listing items → Add Item
Then select your alternative listing and set the injection condition based on your custom Featured meta field.
Now, posts that meet the condition can use the featured design while the remaining posts continue using the standard listing.
This creates a more dynamic grid without requiring separate Listing Grid widgets.
Alternative Listing Templates vs. Separate Listing Grids
Using injections can be more convenient than creating multiple Listing Grid widgets when the content needs to remain part of the same result set.
With separate grids, you may need to manage:
- Multiple queries
- Different pagination settings
- Additional layouts
- Extra spacing
- Separate responsive settings
With alternative listing injections, the different designs can remain inside one Listing Grid while the injection rules determine which template is displayed.
Tips for Using Listing Template Injections
Keep the data structure consistent: If the main and alternative templates use the same post type, make sure the dynamic fields required by both templates are available.
Test every condition: Meta fields and taxonomy conditions can produce unexpected results if their values don’t exactly match the configured criteria.
Use column spans carefully: A large alternative card can affect the overall grid structure. Make sure the column span doesn’t exceed the number of available columns.
Use meaningful template names: If you create several alternative listings, use descriptive names such as:
- Blog – Standard
- Blog – Featured
- Blog – Sponsored
- Services – Highlighted
This makes the templates easier to identify later.
Check responsive layouts: A layout that looks good on desktop may need different spacing, column behavior, or sizing on smaller screens.
Conclusion
Alternative Listing Template Injections in the Crocoblock Listing Grid Widget provide a flexible way to combine multiple listing designs within one dynamic grid. By creating a primary listing template and adding alternative templates based on position, meta values, taxonomy terms, or post types, you can create more engaging and personalized layouts.
The feature is especially useful for highlighting important content, creating featured cards, mixing Custom Post Types, and adding promotional or static elements without having to build multiple separate grids.
Once the Listing Grid injections module is enabled, the Inject alternative listing items option gives you the controls needed to determine exactly when and where alternative listing templates should appear.