Table of Contents
- What Is a Divi 5 Workspace?
- How to Open Workspace Settings
- Customize Your Workspace
- Create Your Custom Workspace
- Step 1: Open Workspace Settings
- Step 2: Choose a Workspace
- Step 3: Customize Your Settings
- Step 4: Save Your Workspace
- Managing and Updating Workspaces
- Delete a Workspace
- Reset a Workspace
- Set a Workspace as Default
- Workspace Settings Explained
- Additional Workspace Options
- Create Different Workspaces for Different Tasks
- Final Thoughts
Divi 5 Workspaces let you customize the Visual Builder to match the way you work.
You can choose which tools appear in the builder, change the interface style, customize the Page Bar, choose your default view, and save your preferred setup as a workspace.
Once you create your workspace, you can switch to it whenever you need it instead of setting up the builder again and again.
What Is a Divi 5 Workspace?
A Divi 5 Workspace is a personalized Visual Builder setup.
It saves your builder preferences, including:
- Which tools are visible
- Which Page Bar icons are available
- Your preferred builder view
- Interface mode and color scheme
- Panel size and position
- Other Visual Builder settings
You can also create multiple workspaces for different tasks, such as development, design, or content editing.
How to Open Workspace Settings
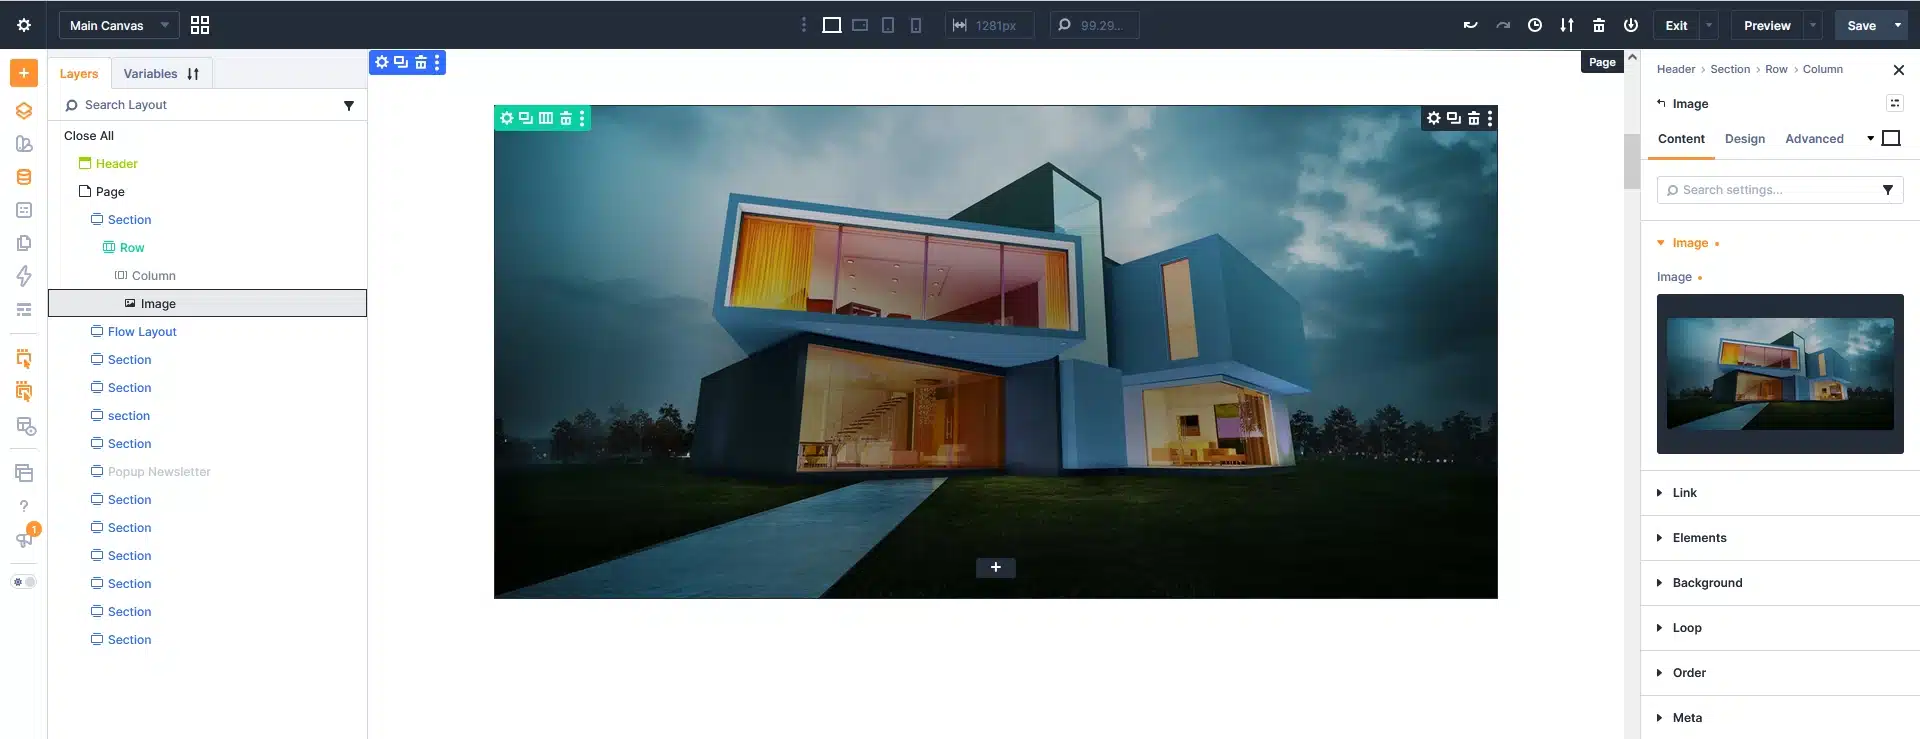
Open the Divi 5 Visual Builder on any page.
On the left side of the builder, you will see several icons. Look for the Workspace icon.
Click the Workspace icon to open Workspace Settings.
At the top of Workspace Settings, you will see Active Workspace.
By default, it is set to Global.
Click the dropdown to see the available workspaces.
Divi also provides premade workspaces such as Minimalist and Power User. You can select one and try it before creating your own.

Customize Your Workspace
Now let’s create a workspace that matches your own workflow.
Create Your Custom Workspace
Follow these simple steps:
Step 1: Open Workspace Settings
Click the Workspace icon from the left side of the Divi Visual Builder.
Step 2: Choose a Workspace
Click the Active Workspace dropdown.
You can select one of Divi’s premade workspaces, such as Minimalist or Power User, and use it as a starting point.
Step 3: Customize Your Settings
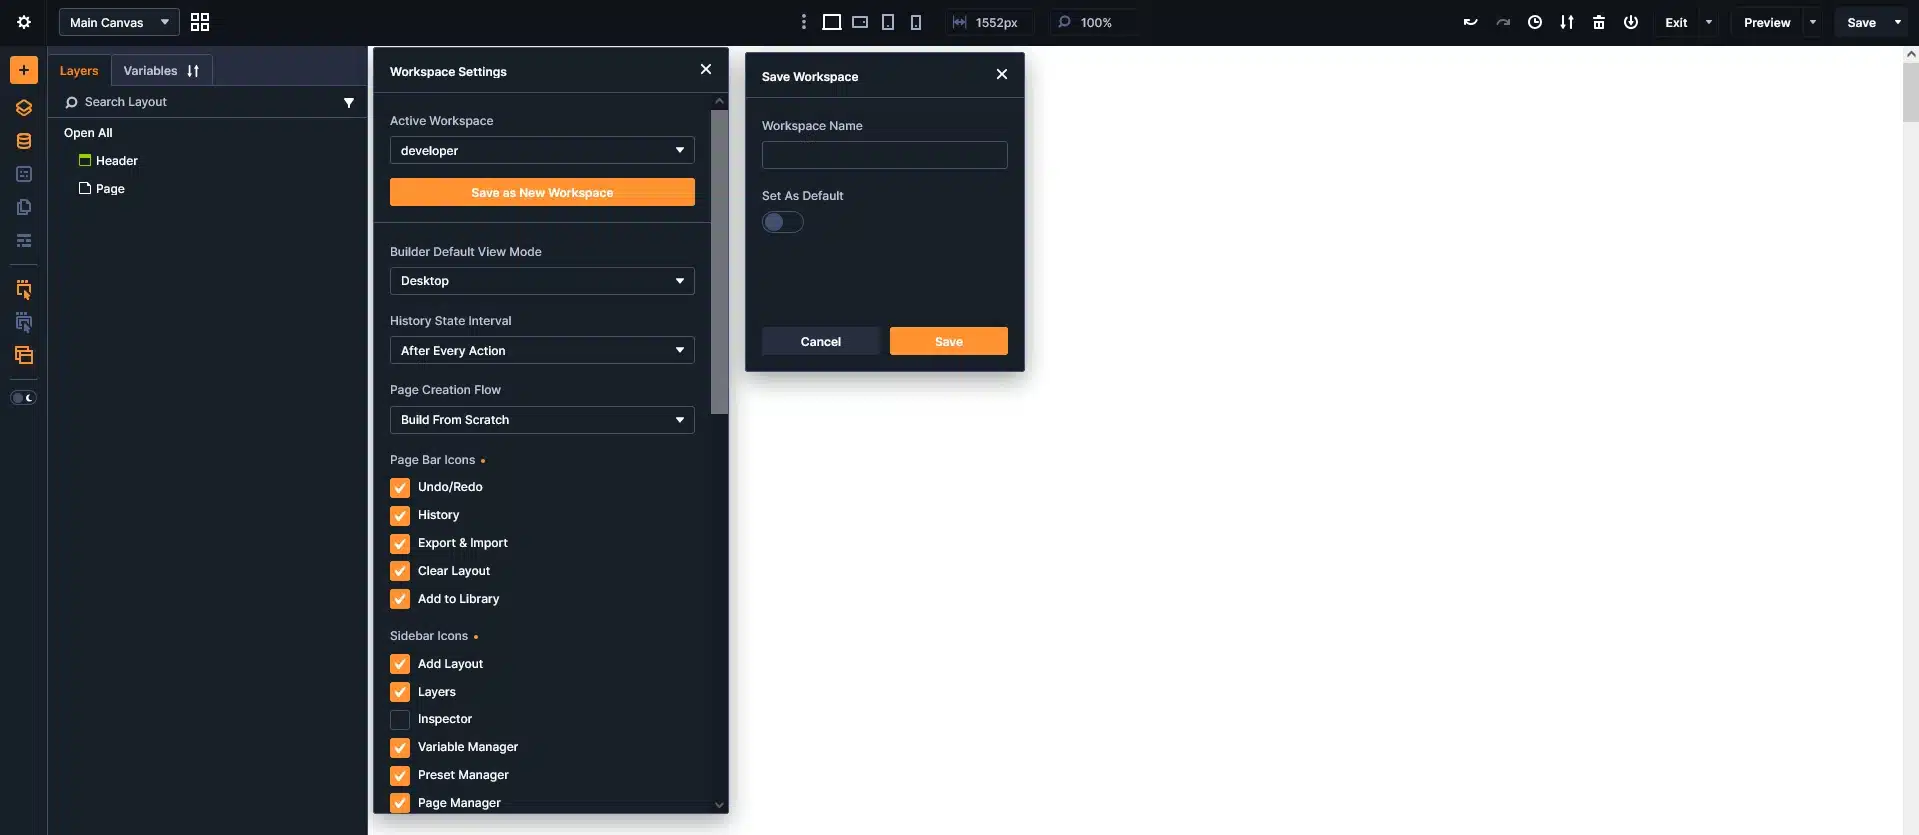
Adjust the Workspace Settings according to your needs.
You can:
- Enable or disable Page Bar icons
- Enable or disable Sidebar icons
- Change the default builder view
- Change the History State Interval
- Change the Page Creation Flow
- Change the Interface Mode
- Change the Color Scheme
- Enable or disable additional builder options
You can also arrange your builder panels the way you prefer.
Step 4: Save Your Workspace
Once you are happy with your setup:
- Open the Active Workspace
- Click Save as New Workspace.
- Enter a name for your workspace.
- For example, you can use Developer, Designer, or any name you want.
- Click Save.
Your custom workspace is now ready to use.
Managing and Updating Workspaces
You can change your workspace whenever your workflow changes.
First, select your custom workspace from the Active Workspace dropdown.
Make the necessary changes to your builder settings.
Then:
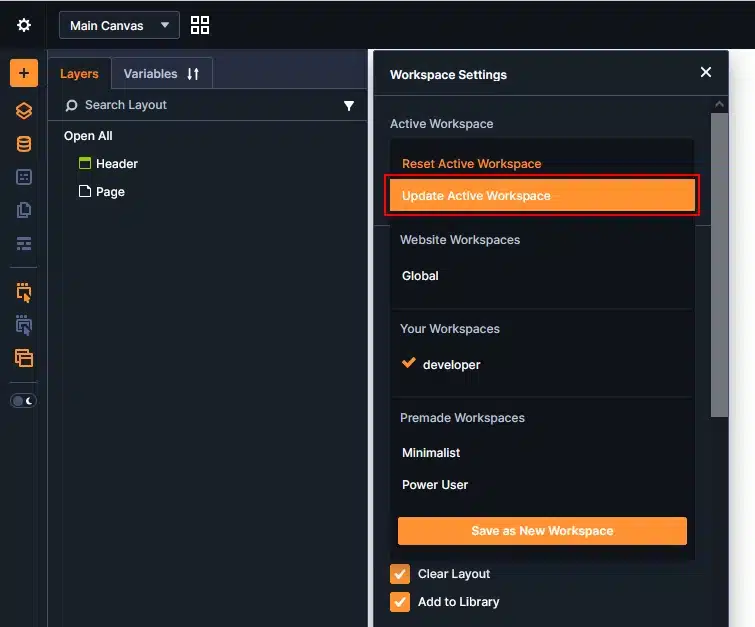
- Open the Active Workspace
- Click Update Active Workspace.
Your latest changes will now be saved to that workspace.
You can also use the workspace controls to manage your saved workspaces, including switching between them and performing available workspace actions.
Delete a Workspace
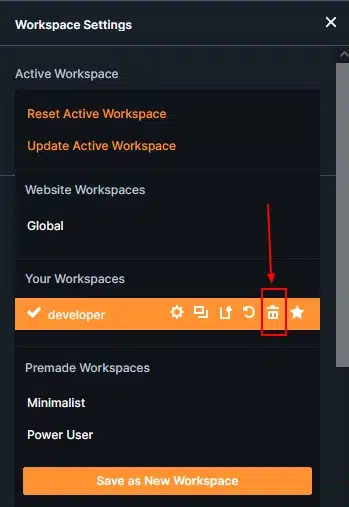
If you no longer need a custom workspace, you can delete it.
- Click the Workspace
- Open the workspace dropdown.
- Hover over the workspace you want to delete.
- Click the Delete
Make sure you select the correct workspace before deleting it.
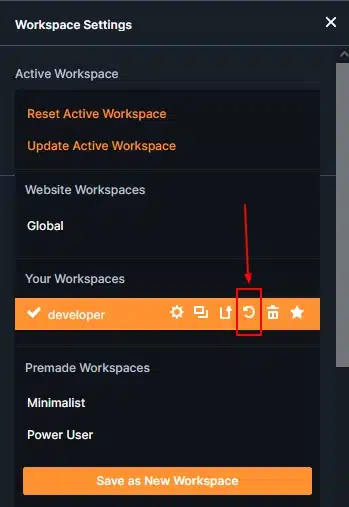
Reset a Workspace
If you want to reset a workspace to its original saved setup:
- Click the Workspace
- Open the workspace dropdown.
- Hover over the workspace you want to reset.
- Click the Reset
You can also use the Reset Active Workspace option from Workspace Settings.
Set a Workspace as Default
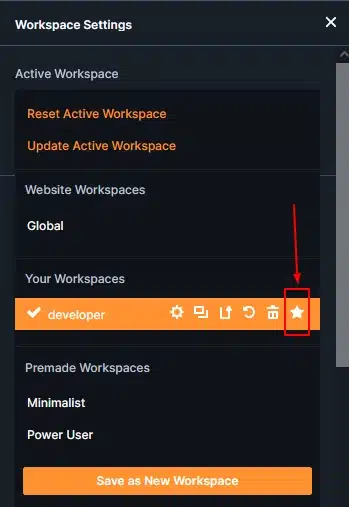
You can make your custom workspace the default workspace.
Open the Workspace dropdown and hover over your workspace.
Click Set as Default Workspace.
Now your preferred workspace will be used as the default when working with the Divi Visual Builder.
This is useful if you have created a workspace specifically for your everyday website-building workflow.
Workspace Settings Explained
Divi 5 provides several options that let you customize the Visual Builder.
Let’s quickly understand what each option does.
Builder Default View Mode
This setting controls the default view that opens when you use the Visual Builder.
You can choose the view that best matches your workflow, such as:
- Desktop
- Tablet
- Phone
- Wireframe
If you mostly build desktop layouts, Desktop is a good choice.
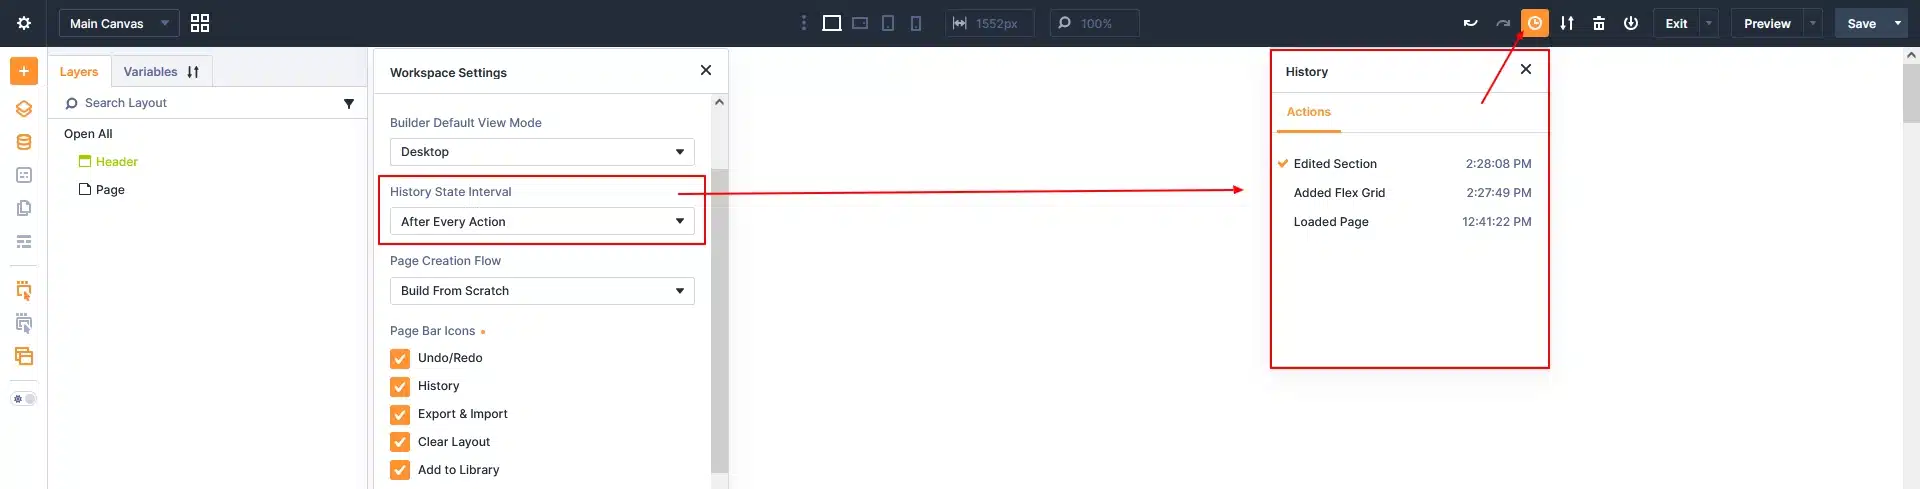
History State Interval
This setting controls how often Divi saves a History state while you are working.
The available options include:
- After Every Action
- After Every 10th Action
- After Every 20th Action
- After Every 30th Action
- After Every 40th Action
If you want more detailed undo/redo history, choose After Every Action.
If you want to reduce how frequently history states are created, you can choose one of the other options.
Page Creation Flow
This option controls what happens when you create a new page.
Divi 5 provides these choices:
- Give Me A Choice
- Build From Scratch
- Load Premade Layout
- Build With AI
For example, if you normally start your pages from scratch, select Build From Scratch.
Page Bar Icons
The Page Bar is the toolbar at the top of the Visual Builder.
From Workspace Settings, you can choose which icons appear there.
Available options include:
- Undo/Redo – Quickly undo or redo your changes.
- History – View previous builder states.
- Export & Import – Export or import layouts and builder data.
- Clear Layout – Clear the current page layout.
- Add to Library – Save layouts or elements to the Divi Library.
Simply check or uncheck the options based on the tools you use most often.

Sidebar Icons
The Sidebar Icons section controls which tools are displayed in the left side of the Visual Builder.
Depending on your setup, you can enable or disable options such as:
- Add Layout
- Layers
- Inspector
- Variable Manager
- Preset Manager
- Page Manager
- Command Center
- Wireframe View
- Action Icons On Hover
- Parent Action Icons On Hover
If you do not use a particular tool regularly, you can disable it to keep your builder cleaner.

Interface Mode
Choose how the Visual Builder interface should look.
You can select:
- Light
- Dark
Choose the mode that is most comfortable for you when working in Divi.
Color Scheme
The Color Scheme option lets you change the accent color used throughout the Divi Builder interface.
Choose the color that you prefer for your workspace.
Additional Workspace Options
Divi 5 also includes several toggle options that can further customize your building experience.
Show Disabled Modules At 50% Opacity
When a module is disabled for a particular device, this option can display it at reduced opacity.
This makes disabled modules easier to identify while building responsive layouts.
Group Settings Into Closed Toggles
When enabled, settings groups are collapsed by default.
This keeps the settings panel cleaner and lets you open only the section you need.
Add Placeholder Content To New Modules
This option adds placeholder content when you create new modules.
It can be useful when you want to quickly see how a module looks before adding your final content.
Speed Up The Builder With Prerendering
This option enables Divi’s prerendering feature to help make the Visual Builder feel faster while navigating and working.
Show Theme Builder Layouts
This controls whether Theme Builder layouts are shown while working in the Visual Builder.
Theme Builder Template Editing
This option controls access to editing Theme Builder templates from the builder.
Enable it if you regularly work with Theme Builder templates.
Enable Admin Bar
This option lets you show or hide the WordPress Admin Bar while working in the Visual Builder.
Create Different Workspaces for Different Tasks
One of the best things about Divi 5 Workspaces is that you can create multiple workspaces.
For example, you could create:
Developer Workspace: Keep tools like Layers, Inspector, Variables, Preset Manager, and Page Manager easily available.
Design Workspace : Keep the builder clean and focus mainly on visual design, responsive views, and layout editing.
Content Workspace : Hide unnecessary development tools and keep only the options needed for editing text, images, and content.
You can switch between these workspaces whenever your task changes.
Final Thoughts
Divi 5 Workspaces make the Visual Builder much more flexible.
Instead of repeatedly changing the same settings, you can create a workspace that matches your workflow and save it for later.
Whether you are a developer, designer, or content editor, creating your own Divi 5 Workspace can help you keep the builder organized and make website building faster and more comfortable.
Start with a premade workspace, customize the settings you use most, and save it as your own workspace.