Table of Contents
- What Is JetPopup?
- What Are Dynamic Popups?
- What You Need
- Step 1: Create Your Popup Template
- Step 2: Add Dynamic Content
- Step 3: Add Dynamic Content from Custom Fields
- Step 4: Design the Popup
- Step 5: Configure Popup Display Conditions
- Step 6: Connect the Popup to a Button
- Step 7: Use the Current Post Context
- Step 8: Test the Dynamic Popup
- Common Mistakes to Avoid
- Conclusion
Popups are a practical way to display additional information, promote offers, collect leads, or guide visitors toward a specific action without creating separate pages for every interaction. However, a popup becomes much more useful when its content can change dynamically based on the page, post, or other WordPress data.
With JetPopup, you can create popup templates and display dynamic content inside them using Elementor. This makes it possible to build reusable popups instead of creating a separate popup for every piece of content.
In this tutorial, we’ll explore how to create a dynamic popup in WordPress using JetPopup and display different content depending on the current page or post.
What Is JetPopup?
JetPopup is a WordPress popup builder from Crocoblock that works with Elementor. It allows you to create custom popup layouts and control when and where they appear on your website.
You can use JetPopup to create:
- Newsletter subscription popups;
- Contact and lead-generation forms;
- Promotional popups;
- Image and video popups;
- Login and registration popups;
- Product-related popups;
- Dynamic content popups;
- Custom notification windows.
One of the main advantages of using JetPopup is that you can design a popup once and reuse it across different pages.
What Are Dynamic Popups?
A dynamic popup uses one reusable layout while automatically pulling information from the current WordPress context.
For example, imagine you have a Team Members custom post type. Instead of creating a separate popup for every team member, you can create one popup template containing dynamic fields such as:
- Name;
- Position;
- Photo;
- Biography;
- Email;
- Phone number.
When a visitor clicks a button for a particular team member, the same popup template can display that person’s information.
This approach keeps your website easier to manage and prevents you from having to duplicate popup designs.
What You Need
Before creating the popup, make sure you have:
- WordPress installed;
- Elementor installed and activated;
- JetPopup installed and activated;
- Content that can be used as the dynamic source.
For this example, we’ll use WordPress posts and Elementor dynamic tags. The same approach can be adapted for custom post types and other dynamic content.
Step 1: Create Your Popup Template
First, create the popup that will contain your dynamic content.
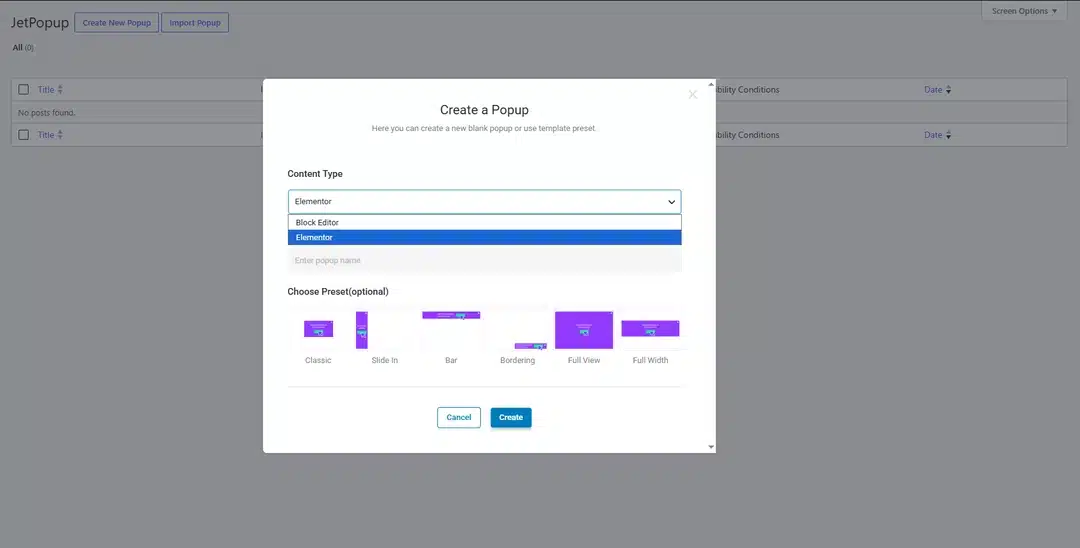
From your WordPress dashboard, go to:
Crocoblock → JetPlugins → JetPopup
Depending on your JetPopup setup, open the popup management area and create a new popup.
Give the popup a descriptive name, such as:
Dynamic Post Details Popup
Then open the popup in Elementor.
You can now build the popup layout using Elementor widgets.
For example, you could create a structure like:
- Popup title;
- Featured image;
- Description;
- Additional information;
- Call-to-action button;
- Close button.
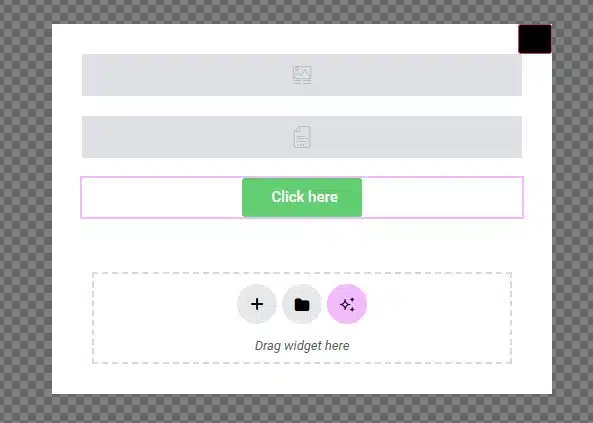
At this stage, focus on creating the layout rather than adding static content.
Step 2: Add Dynamic Content
Now it’s time to make the popup dynamic.
Add an Elementor widget that supports dynamic content, such as the Heading, Text Editor, or Image widget.
For example, add a Heading widget for the post title.
Instead of manually entering a title, click the Dynamic Tags option and select the appropriate dynamic source, such as Post Title.
The popup will now retrieve the title from the current post.
You can repeat the same process for other content.
For example:
| Popup Element | Dynamic Source |
|---|---|
| Title | Post Title |
| Featured Image | Featured Image |
| Description | Post Content or Excerpt |
| Author | Post Author |
| Date | Post Date |
The exact available dynamic sources can vary depending on your Elementor and Crocoblock setup.
Step 3: Add Dynamic Content from Custom Fields
Dynamic popups become even more useful when your content is stored in custom fields.
For example, suppose you have a custom post type called Team Members with these fields:
- Position;
- Department;
- Phone;
- Email;
- Biography.
You can create one popup template and connect each Elementor widget to the corresponding dynamic field.
For example:
Heading → Team Member Name
Text → Position
Image → Profile Image
Text → Biography
Button → Email
This means you don’t need to create individual popup templates for every team member.
Once the popup is connected to the current item, the appropriate information can be displayed automatically.
Step 4: Design the Popup
After adding your dynamic fields, customize the popup appearance.
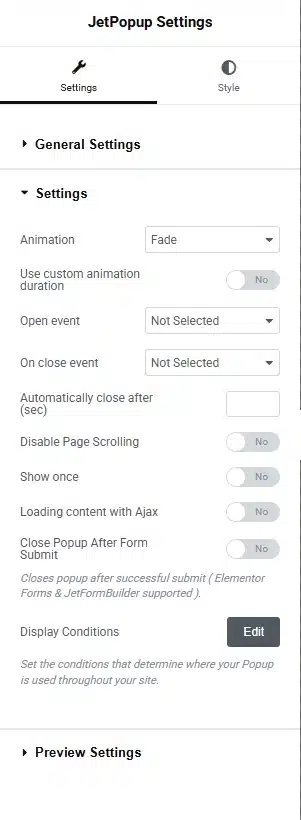
You can control:
- Popup width and height;
- Position;
- Background;
- Border;
- Border radius;
- Box shadow;
- Typography;
- Spacing;
- Close button;
- Entrance animation.
For example, for a team-member popup, you could create a two-column layout with the profile image on one side and the person’s information on the other.
Make sure the design also works well on mobile devices.
Step 5: Configure Popup Display Conditions
Next, configure where the popup should appear.
JetPopup provides options for controlling popup visibility and activation conditions.
Depending on your use case, you might want the popup to appear:
- On specific pages;
- On posts;
- On custom post types;
- Across the entire website;
- When a specific element is clicked.
For a dynamic content popup, it is generally useful to configure the popup so that it can be triggered from the relevant content rather than automatically appearing when the page loads.
Step 6: Connect the Popup to a Button
Now you need a way for visitors to open the popup.
For example, suppose you have a list of team members with a View Profile button.
Edit the button with Elementor and configure it to trigger the JetPopup you created.
The button becomes the trigger for your reusable popup.
When the visitor clicks the button, the popup opens instead of taking them to another page.
This is especially useful for:
- Team member profiles;
- Product information;
- Service details;
- Portfolio projects;
- Event information;
- Property listings.
Step 7: Use the Current Post Context
The most important part of a dynamic popup is ensuring that the popup receives the correct content context.
For example, imagine a page displays three team members:
John Smith
Sarah Williams
David Brown
All three use the same popup template.
When the visitor clicks View Profile for John, the popup should display John’s information.
When the visitor clicks Sarah’s button, the same popup should display Sarah’s information.
This is the advantage of using a reusable dynamic template rather than creating three separate popups.
The exact configuration for passing the current post or object context depends on how your Elementor and Crocoblock listing/template is built.
Step 8: Test the Dynamic Popup
Before publishing the popup, test it thoroughly.
Open the frontend and check each trigger.
Make sure:
- The popup opens correctly;
- The correct content is displayed;
- Images load properly;
- Dynamic fields are populated;
- Buttons and links work;
- The close button works;
- The popup is responsive;
- The correct popup appears for each item.
If the popup displays the same content for every item, check whether the correct post/object context is being passed to the popup.
Common Mistakes to Avoid
When creating dynamic popups, keep a few things in mind.
Using Static Content
If you manually enter the content into the popup, every instance will display the same information.
Use dynamic fields wherever the content needs to change.
Creating Too Many Popup Templates
If several popups have the same layout but different content, consider creating one reusable dynamic template instead.
Forgetting the Dynamic Context
The popup needs access to the correct post or content item. If the context isn’t passed correctly, dynamic fields may remain empty or display unexpected information.
Ignoring Mobile Design
A popup that looks good on desktop may not work well on smaller screens. Always test the popup on mobile and tablet layouts.
Conclusion
Creating dynamic popups with JetPopup allows you to combine Elementor’s visual design capabilities with dynamic WordPress content. Instead of creating individual popups for every item, you can build one reusable popup template and populate it with the appropriate content dynamically.
Whether you’re displaying team members, services, products, portfolio projects, or custom post types, dynamic popups can help reduce repetitive work while creating a more interactive website experience.
With JetPopup and Elementor, you can create a flexible popup system that is easier to design, maintain, and scale as your website grows.