
Table of Contents
- What Are ACF Custom Fields?
- Do ACF Fields Work With the WordPress Block Editor?
- Step 1: Create an ACF Field Group
- Step 2: Configure the Location Rules
- Step 3: Add Values to Your ACF Fields
- Step 4: Enable the Native Custom Fields Panel
- Why Can’t I See the Custom Fields Option?
- How to Display ACF Values Inside the Block Editor
- What Are the Limitations of Block Bindings?
- When Should You Use ACF Blocks?
- ACF Fields vs. Block Bindings vs. ACF Blocks
- Tips for Setting Up ACF Fields
- Conclusion
The WordPress Block Editor makes it easy to create content with headings, paragraphs, images, buttons, and other blocks. But when your content requires additional structured information, standard blocks may not be enough.
This is where Advanced Custom Fields (ACF) becomes useful. ACF lets you create custom fields for storing additional information and use that data alongside the WordPress Block Editor.
The good news is that ACF fields work with the Block Editor because both ACF and WordPress custom fields use the same WordPress metadata system. You can therefore manage structured information without building a completely custom editing experience.
In this guide, we’ll look at how to set up ACF fields, make custom field data accessible in the Block Editor, and display those values using no-code or low-code approaches.
What Are ACF Custom Fields?
ACF allows you to add additional fields to WordPress content.
Instead of putting every piece of information into the main content editor, you can create separate fields for specific types of data.
For example, a blog post could have:
- Author name
- Author biography
- Publication date
- External resource URL
- Reading time
A WooCommerce product could have:
- Manufacturer
- Material
- Product code
- Warranty
- Additional specifications
Each field stores a specific value associated with the WordPress post, page, or other supported content type.
Do ACF Fields Work With the WordPress Block Editor?
Yes. ACF fields are compatible with the WordPress Block Editor because ACF stores its field data as WordPress post metadata.
The important distinction is that creating an ACF field and displaying that field inside the Block Editor are two separate things.
You can create and edit ACF fields through their field groups, but if you want the value to appear directly inside the block editor canvas, you’ll need an appropriate method for displaying it.
There are several ways to work with this data, depending on what you want to achieve.
Step 1: Create an ACF Field Group
Start by creating the custom fields your content needs.
From your WordPress dashboard, go to:
ACF → Field Groups → Add New
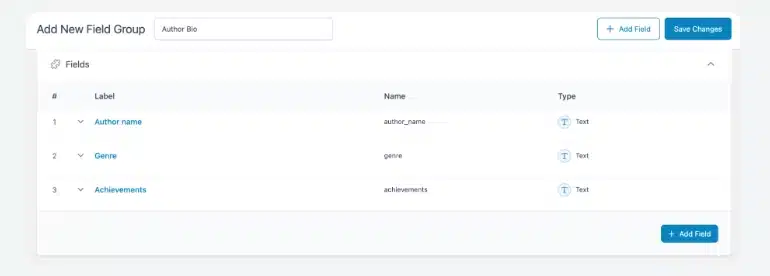
Give the field group a descriptive name.
For example:
Product Details
Then click Add Field and create the fields you need.
You might create fields such as:
- Product Material
- Manufacturer
- Product Code
- Warranty Period
Choose the appropriate field type for each piece of information.
For example, use a URL field for a link, a Date Picker for a date, or an Image field for an image.
ACF also provides more advanced field types when your content structure requires them.
Step 2: Configure the Location Rules
After creating your fields, decide where they should appear.
ACF uses Location Rules to determine which content types should have access to a field group.
For example, if you are creating fields for WooCommerce products, you could configure the rule as:
Post Type → is equal to → Product
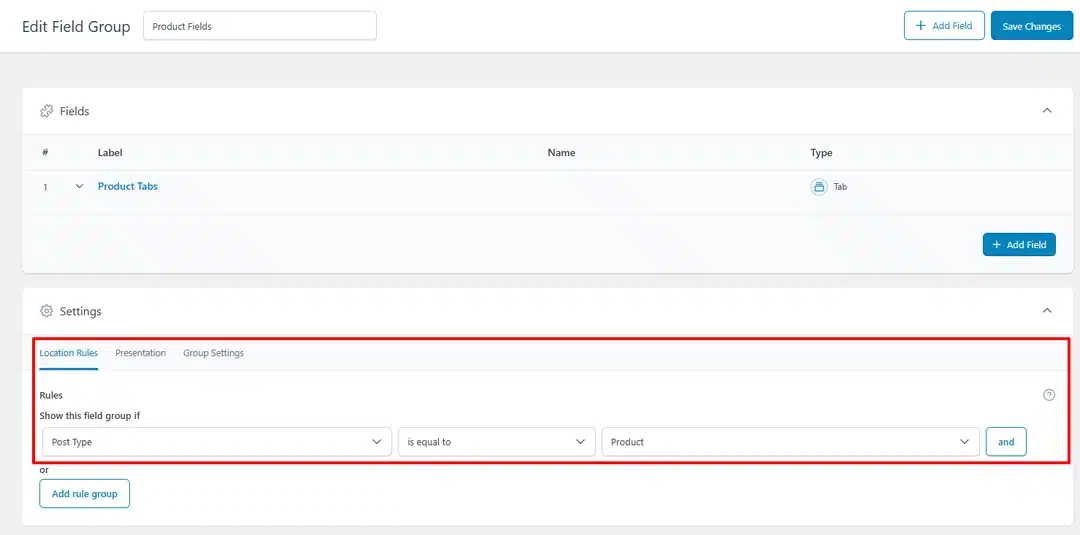
For a blog-specific field group, you could use:
Post Type → is equal to → Post
These rules prevent your custom fields from appearing in places where they aren’t needed.
If an ACF field isn’t appearing in the editor, checking the location rules is one of the first things you should verify.
Step 3: Add Values to Your ACF Fields
Open a post, page, or product that matches your location rules.
You should now see your ACF fields in the editing interface.
Enter the required values and update the content.
For example:
Product Material: Cotton
Manufacturer: Example Brand
Product Code: PRD-1025
The information is now stored as custom metadata for that piece of content.
Step 4: Enable the Native Custom Fields Panel
WordPress also has its own native Custom Fields panel. However, the panel is hidden in the Block Editor by default.
To enable it, open a post or page in the Block Editor.
Then:
- Click the three-dot menu in the top-right corner.
- Select Preferences.
- Open the Advanced section.
- Turn on Custom Fields.
- Click Show & Reload Page.
After the editor reloads, the native Custom Fields panel will appear below the main content area.
This panel lets you work directly with WordPress metadata.
However, this isn’t the same as displaying an ACF field visually inside your block layout.
Why Can’t I See the Custom Fields Option?
If you don’t see the Custom Fields option in the Block Editor preferences, ACF may be hiding WordPress’s native custom field panel.
ACF does this to avoid confusion between its structured field groups and WordPress’s basic metadata interface.
If you specifically need access to the native panel, ACF provides a filter that can restore it:
add_filter( 'acf/settings/remove_wp_meta_box', '__return_false' );
This approach is more useful for developers who need to inspect or troubleshoot raw metadata than for everyday content editing.
How to Display ACF Values Inside the Block Editor
If you want an ACF value to appear directly within your block layout, there are two useful approaches.
Option 1: Use an ACF Field Block Plugin
A dedicated block plugin can add an ACF-specific block to the Block Editor.
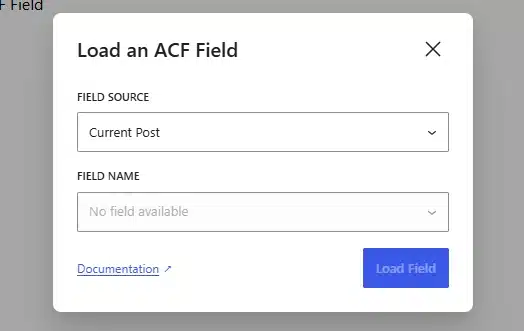
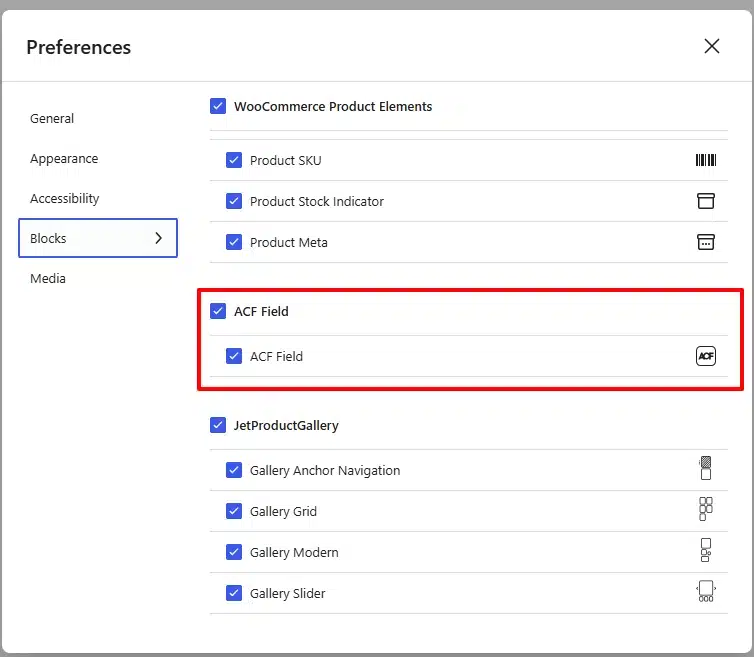
For example, Blocks for ACF Fields provides an ACF Field block that allows you to select an existing field and display its value inside your content layout. The reference article notes that this is a third-party plugin and isn’t affiliated with ACF.
The basic workflow is:
- Install and activate the ACF field block plugin.
- Open a post or page containing your ACF fields.
- Add a new block.
- Search for the ACF Field block.
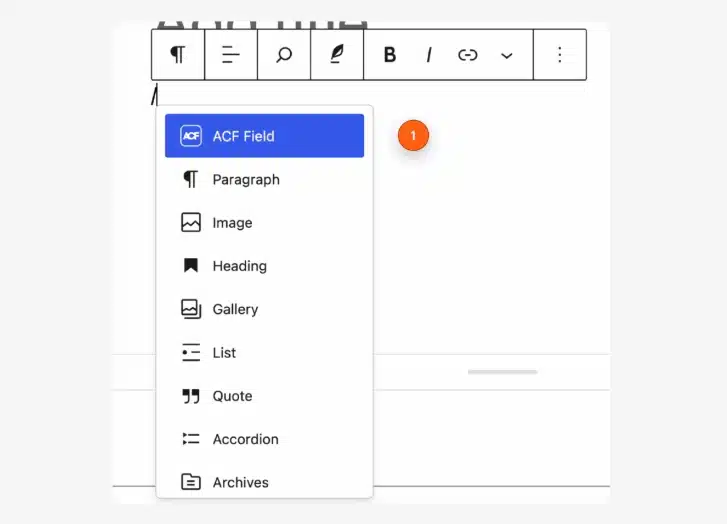
- Insert it into your layout.
- Select the ACF field you want to display.
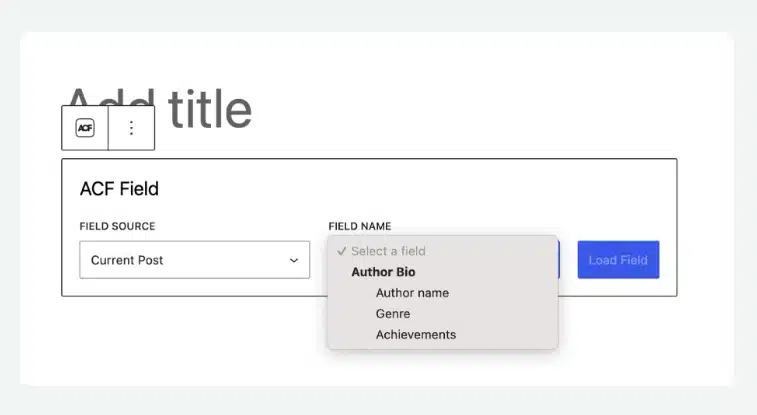
- Save the post.
This gives editors a more visual way to place custom field information alongside normal WordPress blocks.
Option 2: Use Native Block Bindings
WordPress also provides block bindings, which can connect supported core blocks to stored metadata.
Instead of adding a special ACF block, you can use a regular block such as a paragraph, heading, image, or button and connect its supported attribute to an ACF field.
For example, you could have an ACF field called: achievements
You could then bind a paragraph block to that field.
The binding can be added through the block’s code representation:
<!-- wp:paragraph
{"metadata":{"bindings":{"content":{"source":"acf/field","args":{"key":"achievements"}}}}} -->
<p></p>
<!-- /wp:paragraph -->
Once the binding is configured, the block retrieves its content from the ACF field rather than requiring the content to be entered manually.
What Are the Limitations of Block Bindings?
Block bindings are useful, but they aren’t suitable for every ACF field or layout.
Some limitations include:
- The editor may display a placeholder instead of the actual field value.
- Setting up bindings can require editing block metadata.
- Complex field types aren’t supported in the same way as simple fields.
- Troubleshooting a failed binding can be difficult because the editor may not provide a clear error.
For simple, single-value fields, block bindings can be useful. For more advanced layouts, another approach may be more appropriate.
When Should You Use ACF Blocks?
If your project requires more control over how custom field data is displayed, ACF Blocks can provide a more flexible solution.
ACF Blocks are available with ACF PRO and allow developers to create custom blocks using PHP rather than building everything with React.
This is particularly useful when you need:
- Custom HTML markup
- Conditional output
- Repeater fields
- Flexible Content fields
- Nested layouts
- Dynamic content inside Query Loops
- Custom wrapper elements or classes
With ACF Blocks, you can define the fields associated with the block and control how those values are rendered.
ACF Fields vs. Block Bindings vs. ACF Blocks
The right approach depends on how much control you need.
| Method | Best For |
|---|---|
| ACF Field Groups | Creating and managing structured content |
| Native Custom Fields | Accessing raw WordPress metadata |
| ACF Field Block Plugin | Displaying field values visually without custom development |
| Block Bindings | Connecting simple field values to supported core blocks |
| ACF Blocks | Building custom layouts and complex dynamic content |
For a simple website, you may only need regular ACF fields and a suitable block solution. More complex projects can benefit from ACF Blocks and their greater control over rendering.
Tips for Setting Up ACF Fields
Use Clear Field Names
Give each field a meaningful name, such as: product_material
instead of: field1
Clear names make fields easier to identify when they’re used in templates or dynamic content.
Choose the Right Field Type
Use field types that match the information being stored.
For example:
- URL for links
- Date Picker for dates
- Image for images
- Email for email addresses
- Select for predefined choices
This helps keep your content structured and consistent.
Keep Location Rules Specific
Avoid making every field group available everywhere.
Use appropriate post types, templates, taxonomies, or other location conditions so editors only see fields relevant to the content they’re editing.
Conclusion
ACF works well with the WordPress Block Editor because both systems use WordPress’s underlying post metadata structure.
You can create structured fields with ACF, manage their values from the editor, and choose different ways to display that information within your block layouts.
For simple requirements, a dedicated ACF field block or block bindings can help bring custom field data into the editor. When you need more advanced layouts, conditional output, or complex field structures, ACF Blocks provide greater control.
By choosing the right approach for your content structure, you can extend the Block Editor with custom data while keeping the editing experience organized and flexible.