Table of Contents
- What’s New in the Divi 5 Navigation System?
- 1. New Menu Modules in Divi 5
- 2. Menu Looping in Divi 5
- 3. Divi 5 Interactions
- How Interactions Work
- How to add interactions in Divi 5 in menu
- Step 1: Create the Mega Menu Layout
- Step 2: Add a Mega Menu Button
- Step 3: Open Interaction Settings
- Step 4: Set the Trigger
- Step 5: Set the Effect
- Step 6: Select the Target Element
- Examples of What You Can Build
- Benefits of Divi 5 Menu Features
- Final Thoughts
Divi 5 introduces several powerful new features that give designers and developers more flexibility when building navigation and interactive elements in WordPress websites.
Among the most exciting updates are Menu Modules, Menu Looping, and Interactions. These features allow you to build custom menus, dynamic navigation systems, and interactive user experiences directly inside the Divi Visual Builder.
In this guide, we will explain these features and show you how to use them step by step.
What’s New in the Divi 5 Navigation System?
Divi 5 expands the navigation system by introducing modular menu components and advanced interaction tools.
These improvements allow users to create highly customizable navigation layouts such as:
- Mega menus
- Multi-level dropdown menus
- Slide-in menus
- Interactive navigation bars
- Dynamic menus powered by content loops
Instead of relying on a single default menu module, Divi 5 allows you to combine different modules and interactions to create fully customized navigation structures.
The three main additions include:
- New Menu Modules
- Menu Looping
- Interaction Builder
Together, these features make navigation more flexible and powerful than ever before.
1. New Menu Modules in Divi 5
Divi 5 introduces modular menu components that allow you to design navigation menus more freely.
The two most important modules used for navigation are the Link Module and the Dropdown Module.
Link Module
The Link Module allows you to place individual navigation links anywhere in your layout.
This makes it possible to build custom navigation menus without depending entirely on the default WordPress menu module.
You can use the Link Module to:
- Add navigation links
- Create button-style menu items
- Build custom navigation layouts
- Create mega menus
- Design multi-level dropdown menus
Dropdown Module
The Dropdown Module allows you to create dropdown menus inside your navigation structure.
It can be used to:
- Create multi-level dropdown menus
- Organize navigation links
- Build complex menu structures
- Improve user navigation
By combining Link modules and Dropdown modules, you can build advanced navigation systems with multiple levels.
How to Use Divi 5 Menu Modules (Step-by-Step)
In this example, we will create a multi-level dropdown menu using Link and Dropdown modules.
Step 1: Open the Divi Builder
- Go to your WordPress Dashboard
- Open the page or header where you want to create the menu
- Click Enable Divi Builder
Step 2: Add a Section and Row
Add a new section and choose a row layout.
This row will act as the container for your navigation menu.
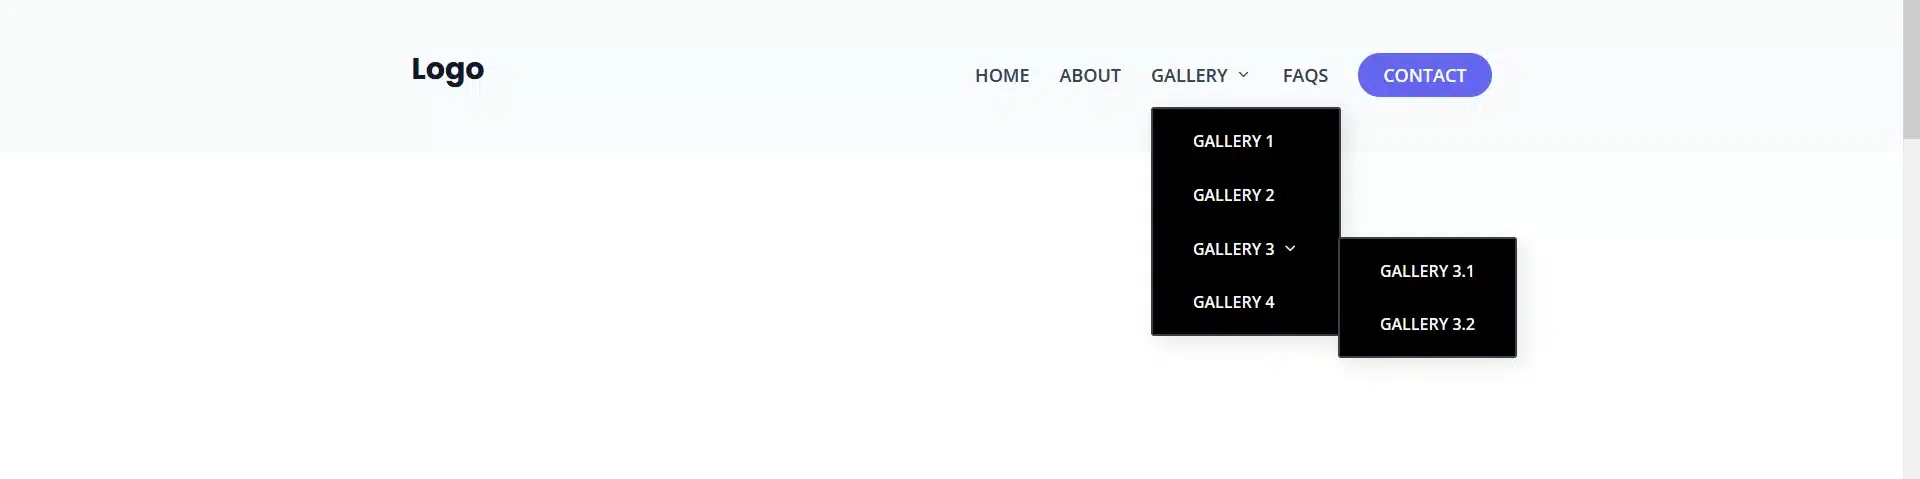
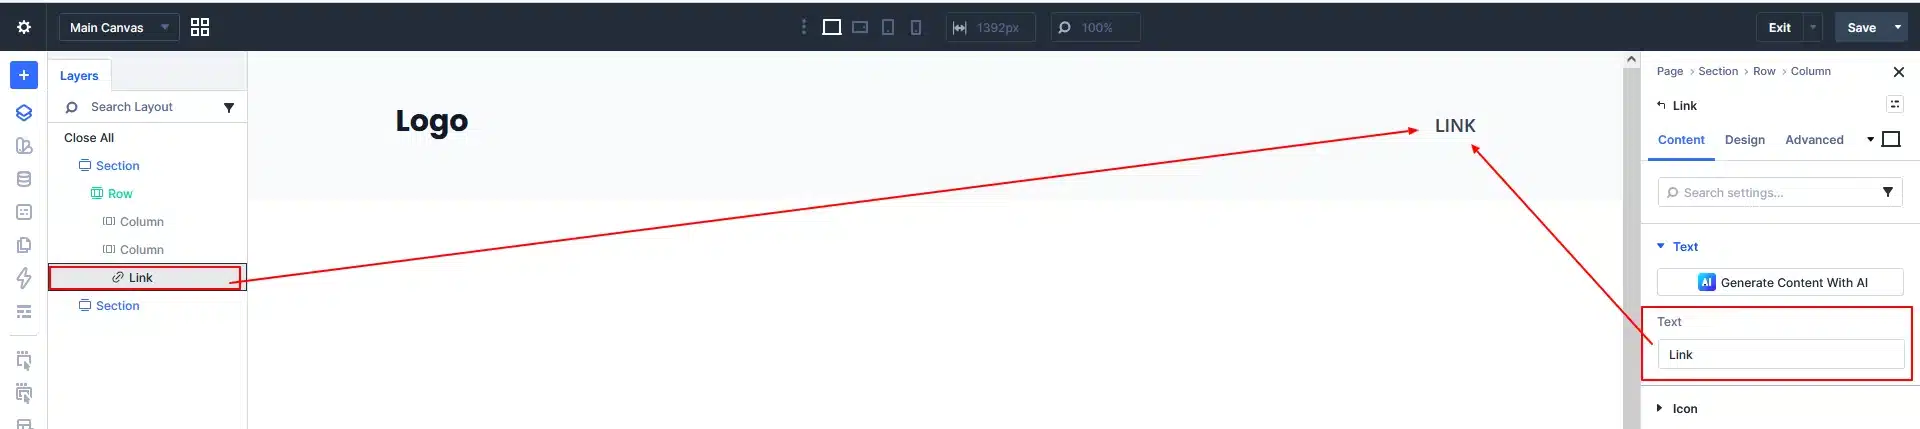
Step 3: Add Link Modules for Main Menu Items
Inside the row column, add Link modules for your main navigation items.
Example:
- Home
- About
- Gallery
- FAQs
- Contact
Each menu item is created using a Link module.
Step 4: Add a Dropdown Module
To create a dropdown menu:
- Add a Dropdown module below the parent Link module (for example under “Gallery”).
- Inside the Dropdown module, add multiple Link modules.
Example dropdown items:
- Gallery 1
- Gallery 2
- Gallery 3
- Gallery 4
These links will appear when the user hovers over the main menu item.
Step 5: Create a Nested Dropdown (Sub Menu)
You can also create a multi-level dropdown menu.
Inside the first dropdown, add another Dropdown module.
Example structure:
Gallery
    Gallery 1
    Gallery 2
    Gallery 3
           Gallery 3-1
           Gallery 3-2
    Gallery 4
This allows you to create deeper navigation structures.
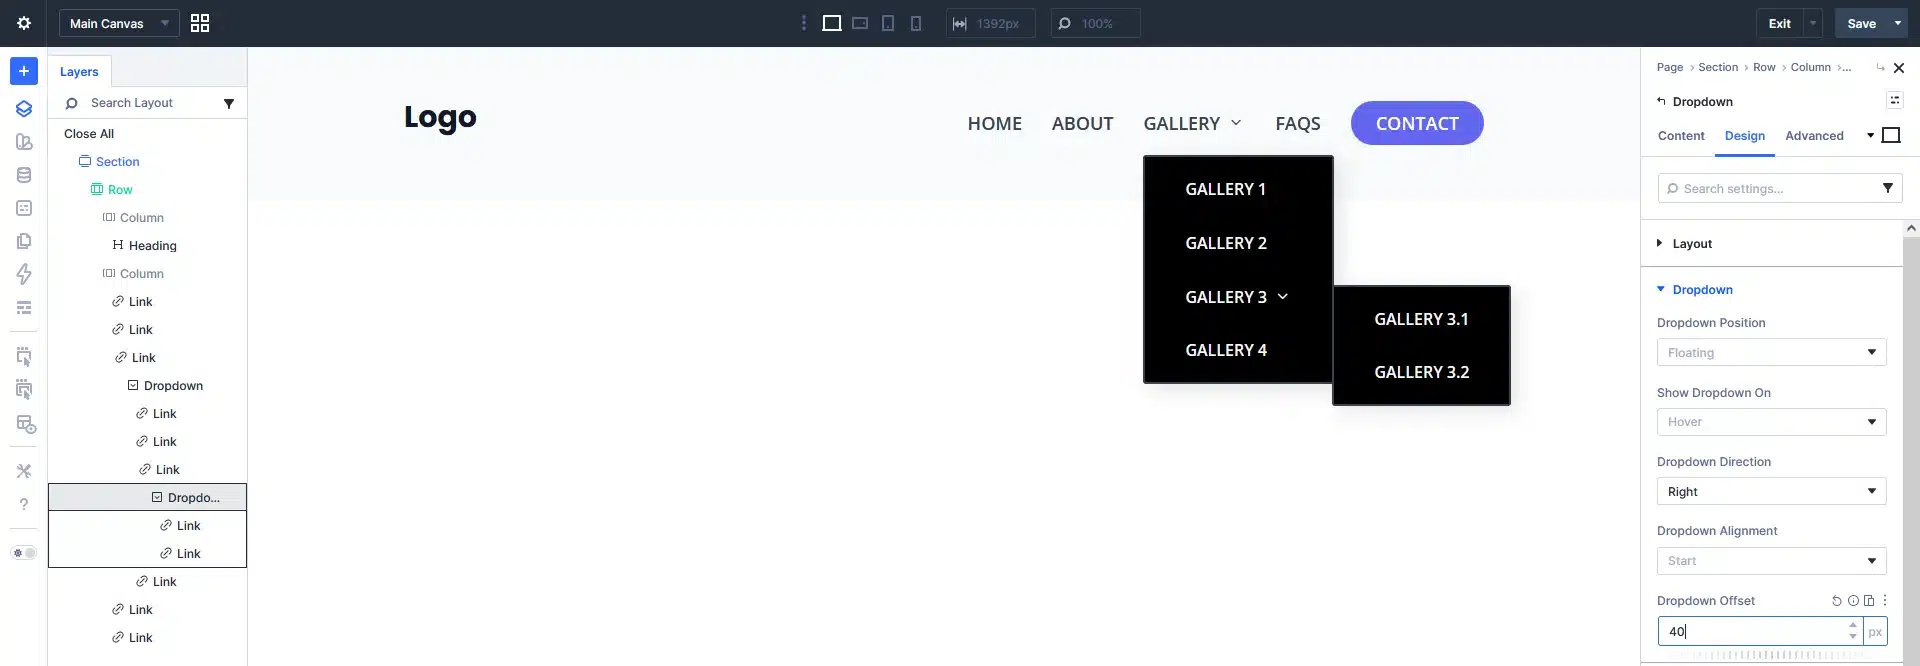
Step 6: Configure Dropdown Settings
Inside the Dropdown module settings, configure:
Dropdown Position: Floating
Show Dropdown On: Hover
For the first dropdown:
Dropdown Direction → Below
For the second dropdown:
Dropdown Direction → Right
This setup allows:
- First dropdown to open below the parent menu
- Second dropdown to open to the right side
This creates a professional multi-level dropdown navigation menu.
Step 7: Customize the Menu Design
Use the Design tab to style your navigation.
You can adjust:
- Typography
- Colors
- Background
- Spacing
- Hover effects
- Alignment
This allows your menu to match your website’s design.
2. Menu Looping in Divi 5
Menu Looping is another powerful feature introduced in Divi 5.
It allows you to dynamically generate menu items from your WordPress menu system or other content sources.
Instead of manually creating each navigation link, Divi can automatically display menu items using loop queries.
This is especially useful when building:
- Dynamic navigation menus
- Category-based menus
- Product menus
- Large website navigation systems
How to Create Dynamic Menus with Menu Looping
In this example, we will create a dynamic menu using the Link Module Loop feature.
Step 1: Add a Link Module
First, add a Link module inside your row or menu container.
This module will be used to display menu items dynamically.
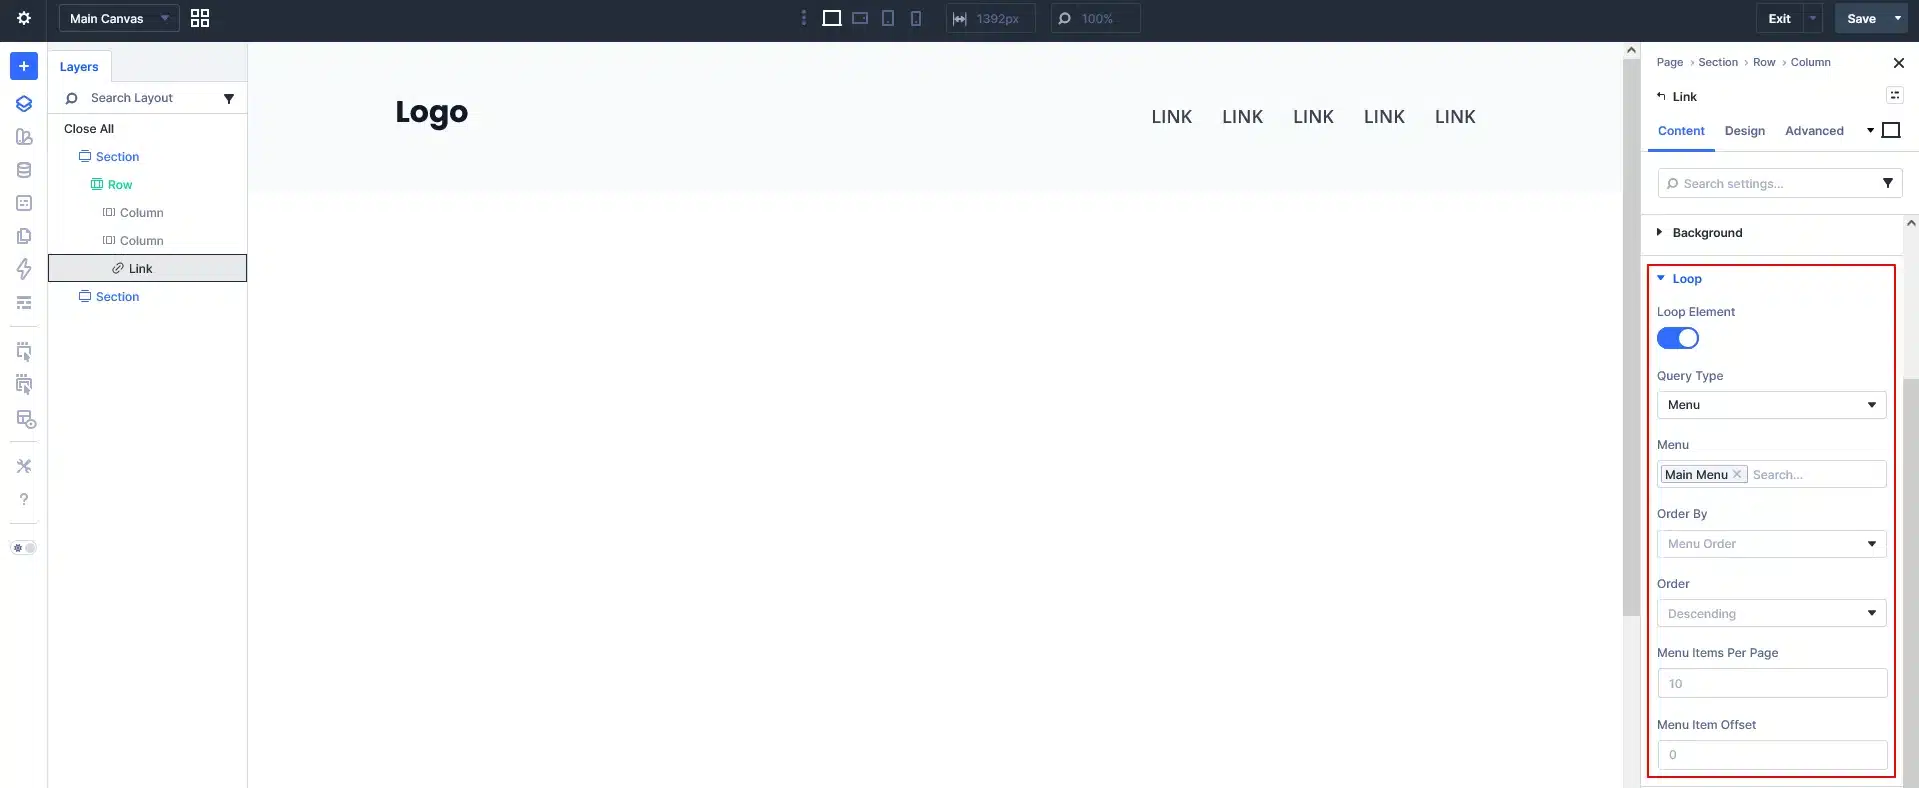
Step 2: Enable Loop Option and Select Menu as Query Type
Open the Link Module settings and go to:
Content → Loop
Enable: Loop Element → ON
This tells Divi that the module should repeat dynamically.
Inside the Loop settings:
Set: Query Type → Menu
Then select the menu you want to display.
Example: Menu → Main Menu
Divi will now fetch menu items from the selected WordPress menu.
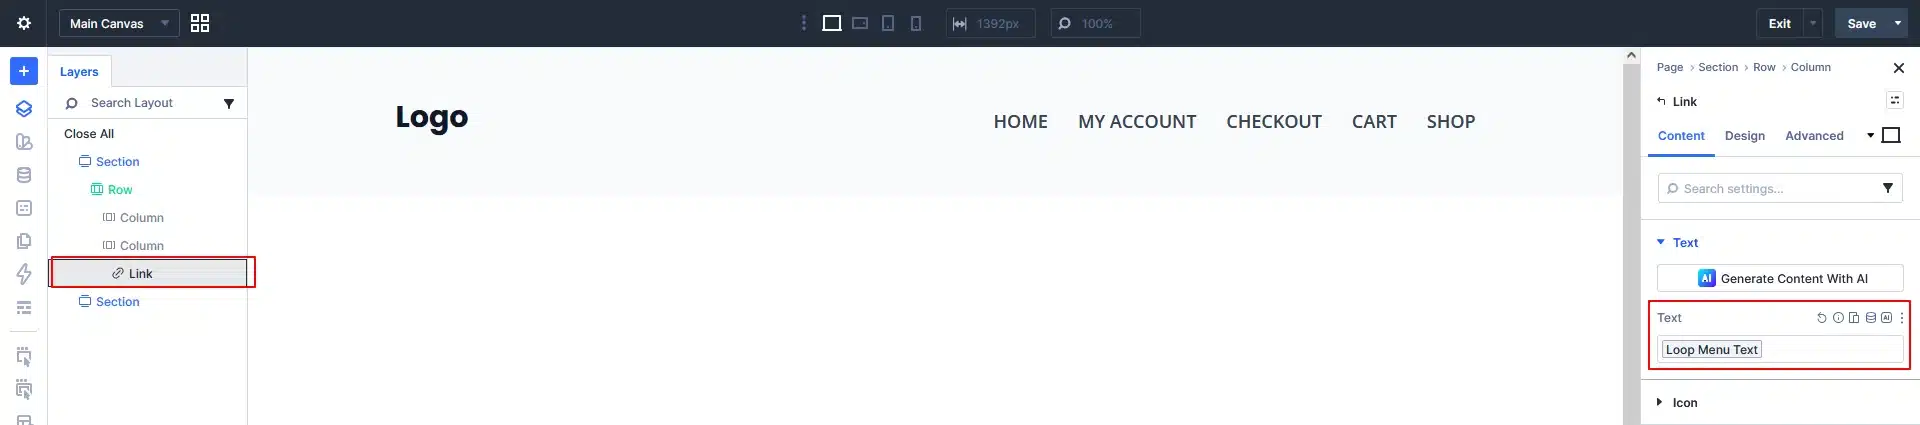
Step 3: Display Menu Text
In the Text field of the Link module:
Select the dynamic option: Loop Menu Text
This will automatically display the correct menu item name for each loop entry.
Now the Link module will automatically generate menu items such as:
- Home
- My Account
- Checkout
- Cart
- Shop
Each item is dynamically pulled from the WordPress menu.
Step 4: Style the Menu
Now you can style the Link module using the Design tab.
Customize:
- Font style
- Text color
- Hover effects
- Spacing
- Alignment
This allows you to create a fully dynamic navigation menu using Divi 5.

3. Divi 5 Interactions
Divi 5 also introduces a powerful Interactions system that allows you to create interactive website elements without writing any code.
With Interactions, you can create:
- Popup menus
- Toggle navigation
- Scroll animations
- Hover effects
- Dynamic element visibility
How Interactions Work
Divi interactions are based on three main components.
Trigger
A Trigger defines what action starts the interaction.
Examples:
- Click
- Hover
- Scroll
- Mouse movement
Effect
The Effect defines what happens when the interaction is triggered.
Examples:
- Show element
- Hide element
- Toggle visibility
- Scroll to section
Target
The Target defines which element will respond to the interaction.
This allows you to control different elements across the page.
How to add interactions in Divi 5 in menu
Divi 5 allows you to create a Mega Menu using Interactions without writing any code. In this method, we design the Mega Menu layout first and then use a button to show or hide it.
Step 1: Create the Mega Menu Layout
Add a Section or Row in the Divi Builder and design your Mega Menu (categories, products, links, etc.).
After designing it, hide the section by default.
Step 2: Add a Mega Menu Button
Add a Button or Link module in your header and name it Mega Menu.
This button will be used to open the Mega Menu.
Step 3: Open Interaction Settings
Open the Button/Link module settings and go to:
Advanced → Interactions → Add Interaction
Step 4: Set the Trigger
Set the Trigger Event to Click so the Mega Menu opens when the button is clicked.
Step 5: Set the Effect
Choose Toggle Visibility as the effect.
This will allow the Mega Menu to open and close on click.
Step 6: Select the Target Element
Select the Row or Section that contains the Mega Menu layout as the Target Module.
Now when users click the Mega Menu button, the hidden Mega Menu section will appear.

Examples of What You Can Build
Using these Divi 5 features, you can build:
- Mega menus
- Multi-level dropdown menus
- Dynamic navigation menus
- Interactive navigation bars
- Category-based menus
- Popup navigation
- Scroll-triggered navigation effects
These features significantly expand what you can create with Divi 5 navigation.
Benefits of Divi 5 Menu Features
More Flexibility
You are no longer limited to a single menu module.
Dynamic Content
Menu Looping automatically updates menus based on website content.
Interactive Experiences
Interactions help create engaging user experiences.
Better Customization
You can design navigation exactly the way you want.
Final Thoughts
The new Menu Modules, Menu Looping, and Interaction features in Divi 5 give designers more control than ever before.
With these tools, you can build advanced navigation systems, create dynamic menus, and add interactive elements without writing custom code.
If you want to build modern and flexible WordPress websites with Divi, these features will help you create powerful and engaging user experiences.
Need Help Building Advanced Divi or WordPress Features?
If you want to implement Divi 5 dynamic menus, loop builder features, custom interactions, or advanced WordPress functionality, the experts at TechnoCrackers can help you build powerful and scalable websites.
Book a Free Consultation and let’s discuss how we can bring your WordPress project to life.