Table of Contents
Gravity Forms is one of the most powerful form builders available for WordPress — but it has one limitation:
It does not offer a built-in Rich Text Editor (WYSIWYG) field.
For websites that rely on user-generated content—such as blogs, directories, reviews, job listings, or frontend post submissions—a basic textarea simply isn’t enough.
A proper Rich Text Editor allows users to format text with:
- Headings (H1–H6)
- Links & Media
- Bold, Italic, Underline
- Bullet and Numbered Lists
- Images
- Blockquotes
- Inline styles like alignment, colors, and spacing
So in this tutorial, you’ll learn how to add a fully functional Rich Text Editor field inside Gravity Forms using custom code — without installing an extra plugin.
What This Solution Supports
- Works on frontend
- Uses TinyMCE (WordPress default editor)
- Supports media uploads
- Outputs clean formatted HTML
- Works with Gravity Forms Post Creation Add-On
- Prevents raw HTML from showing in visual mode
Why You Need a Custom Rich Text Editor in Gravity Forms
A normal textarea field cannot store or render formatted content like:
- Titles and headings
- Styled paragraphs
- Embedded media or images
- Links and structured lists
If you’re building forms like:
- Blog submission form
- Directory or listing submission
- User reviews
- Job listing submission
- Knowledgebase article submission
- Community-generated content
…then users need a proper editor — not a plain text field.
Step-by-Step Guide
Step 1 — Add This Code to Your functions.php
Copy and paste the following entire code block into your theme’s functions.php or a custom plugin:
( Code already formatted, so no changes needed — paste exactly as provided.)
// Enable a fully functional Rich Text Editor field in Gravity Forms
// Works on frontend + shows formatted output (not HTML tags)
//Enqueue editor scripts (TinyMCE + Media)
add_action('gform_enqueue_scripts', function() {
wp_enqueue_editor();
wp_enqueue_media();
});
// 1. Add "Rich Text Editor" button to Form Builder
add_filter('gform_add_field_buttons', function($field_groups){
$field_groups[] = array(
'name' => 'custom_fields',
'label' => __('Custom Fields', 'gravityforms'),
'fields' => array(
array(
'class' => 'button',
'value' => __('Rich Text Editor', 'gravityforms'),
'data-type' => 'editor',
),
),
);
return $field_groups;
});
// 2. Register field type name
add_filter('gform_field_type_title', function($type){
return $type === 'editor' ? __('Rich Text Editor', 'gravityforms') : $type;
});
// 3. Add standard settings (optional)
add_action('gform_field_standard_settings', function($position, $form_id){
if($position == 25){ ?>
<li class="field_setting">
<label for="field_placeholder">
<?php esc_html_e("Placeholder", "gravityforms"); ?>
<?php gform_tooltip("form_field_placeholder"); ?>
</label>
<input type="text" id="field_placeholder" class="fieldwidth-3" size="35"
onkeyup="SetFieldProperty('placeholder', this.value);" />
</li>
<?php }
}, 10, 2);
// 4. Editor JS for Gravity Form Builder
add_action('gform_editor_js', function(){ ?>
<script type='text/javascript'>
fieldSettings.editor = '.label_setting, .description_setting, .css_class_setting, .placeholder_setting, .visibility_setting, .required_setting';
</script>
<?php });
// 5. Render the TinyMCE editor on frontend
add_filter('gform_field_input', function($input, $field, $value, $lead_id, $form_id){
if($field->type !== 'editor') return $input;
ob_start();
wp_editor(
$value,
'input_' . $form_id . '_' . $field->id,
array(
'textarea_name' => 'input_' . $field->id,
'media_buttons' => true,
'quicktags' => true,
'tinymce' => array(
'height' => 300,
'toolbar1' => 'formatselect bold italic underline | bullist numlist blockquote | alignleft aligncenter alignright link unlink | removeformat',
),
)
);
$editor_html = ob_get_clean();
return sprintf(
'<div class="ginput_container ginput_container_editor">%s</div>',
$editor_html
);
}, 10, 5);
// Safe rendering decode and render formatted HTML (not tags)
if ( ! function_exists( 'gf_rich_allowed_tags' ) ) {
function gf_rich_allowed_tags() {
return array(
'p' => array(),
'br' => array(),
'strong' => array(),
'b' => array(),
'em' => array(),
'i' => array(),
'u' => array(),
'span' => array( 'style' => true, 'class' => true ),
'div' => array( 'style' => true, 'class' => true ),
'a' => array( 'href' => true, 'title' => true, 'target' => true, 'rel' => true ),
'h1' => array(), 'h2' => array(), 'h3' => array(), 'h4' => array(), 'h5' => array(), 'h6' => array(),
'ul' => array(), 'ol' => array(), 'li' => array(),
'blockquote' => array(),
'img' => array( 'src' => true, 'alt' => true, 'width' => true, 'height' => true ),
'strong' => array(), 'em' => array()
);
}
}
/* ---------- Allow safe inline CSS properties ---------- */
add_filter( 'safe_style_css', function( $styles ) {
$custom = array(
'text-decoration',
'color',
'background-color',
'font-size',
'font-weight',
'font-style',
'text-align',
'line-height',
'font-family',
);
return array_unique( array_merge( $styles, $custom ) );
});
/* ---------- Helper to decode + sanitize editor HTML ---------- */
if ( ! function_exists( 'gf_render_editor_html_safe' ) ) {
function gf_render_editor_html_safe( $raw ) {
if ( $raw === null || $raw === '' ) {
return '';
}
// 1) Decode HTML entities (handles encoded "<" as <)
$decoded = html_entity_decode( (string) $raw, ENT_QUOTES | ENT_HTML5, 'UTF-8' );
// 2) Fix possible double-encoding like &lt;
if ( strpos( $decoded, '&lt;' ) !== false || strpos( $decoded, '&gt;' ) !== false ) {
$decoded = str_ireplace( array( '&lt;', '&gt;' ), array( '<', '>' ), $decoded );
$decoded = html_entity_decode( $decoded, ENT_QUOTES | ENT_HTML5, 'UTF-8' );
}
// 3) Sanitize with allowed tags (keeps <a href>, <span style>, etc.)
return wp_kses( $decoded, gf_rich_allowed_tags() );
}
}
/* ---------- Merge-tag replacement: decode + render editor fields (priority 5) ---------- */
add_filter( 'gform_replace_merge_tags', function( $text, $form, $entry, $url_encode, $esc_html, $nl2br ) {
if ( empty( $form ) || empty( $entry ) ) {
return $text;
}
// decode the container text early (handles already-encoded merge outputs)
$text = html_entity_decode( (string) $text, ENT_QUOTES | ENT_HTML5, 'UTF-8' );
foreach ( $form['fields'] as $field ) {
if ( isset( $field->type ) && $field->type === 'editor' ) {
$id = $field->id;
$raw = rgar( $entry, $id );
// render the raw field value safely (allows links, styles)
$rendered = gf_render_editor_html_safe( $raw );
// Replace merge tags: {ID} and {Label:ID} and {Label:ID:modifier}
$text = str_replace( '{' . $id . '}', $rendered, $text );
$pattern = '/\{[^}]*:' . preg_quote( $id, '/' ) . '(?::[^}]*)?\}/';
$text = preg_replace( $pattern, $rendered, $text );
}
}
// Final pass: ensure we haven't left encoded common tags; decode conservative patterns
if ( strpos( $text, '<' ) !== false || strpos( $text, '&lt;' ) !== false ) {
$search = array(
'<br />','<br>','<br/>',
'<p>','</p>',
'<h1>','</h1>','<h2>','</h2>','<h3>','</h3>',
'<h4>','</h4>','<h5>','</h5>','<h6>','</h6>',
'<strong>','</strong>','<b>','</b>',
'<em>','</em>','<i>','</i>','<u>','</u>',
'<span>','</span>','<div>','</div>',
'<a href="','</a>',
'&lt;','&gt;'
);
$replace = array(
'<br />','<br>','<br/>',
'<p>','</p>',
'<h1>','</h1>','<h2>','</h2>','<h3>','</h3>',
'<h4>','</h4>','<h5>','</h5>','<h6>','</h6>',
'<strong>','</strong>','<b>','</b>',
'<em>','</em>','<i>','</i>','<u>','</u>',
'<span>','</span>','<div>','</div>',
'<a href="','</a>',
'<', '>'
);
$text = str_ireplace( $search, $replace, $text );
}
// Finally sanitize entire result again with allowed tags (keeps a href + span style)
$text = wp_kses( $text, gf_rich_allowed_tags() );
return $text;
}, 5, 6 );
/**
* 3) Ensure gform_get_input_value returns safe rendered HTML for editor fields.
* Many templates/plugins call this directly to get the field value.
*/
add_filter( 'gform_get_input_value', function( $value, $entry, $field, $input_id ) {
if ( is_object( $field ) && isset( $field->type ) && $field->type === 'editor' ) {
return gf_render_editor_html_safe( $value );
}
return $value;
}, 10, 4 );
/**
* 4) Admin Entry Detail try to force rendered HTML on entry detail page
*/
add_filter( 'gform_entry_field_value', function( $value, $field, $entry ) {
if ( is_object( $field ) && isset( $field->type ) && $field->type === 'editor' ) {
return gf_render_editor_html_safe( $value );
}
return $value;
}, 10, 3 );
/**
* 5) Shortcode: [gf_editor entry="123" field="2"]
* Use this in templates/content to safely print the rendered editor field.
*/
if ( ! shortcode_exists( 'gf_editor' ) ) {
add_shortcode( 'gf_editor', function( $atts ) {
$atts = shortcode_atts( array(
'entry' => '',
'field' => '',
), $atts, 'gf_editor' );
$entry_id = intval( $atts['entry'] );
$field_id = intval( $atts['field'] );
if ( $entry_id <= 0 || $field_id <= 0 ) return '';
$entry = GFAPI::get_entry( $entry_id );
if ( is_wp_error( $entry ) ) return '';
$raw = rgar( $entry, $field_id );
return gf_render_editor_html_safe( $raw );
} );
}
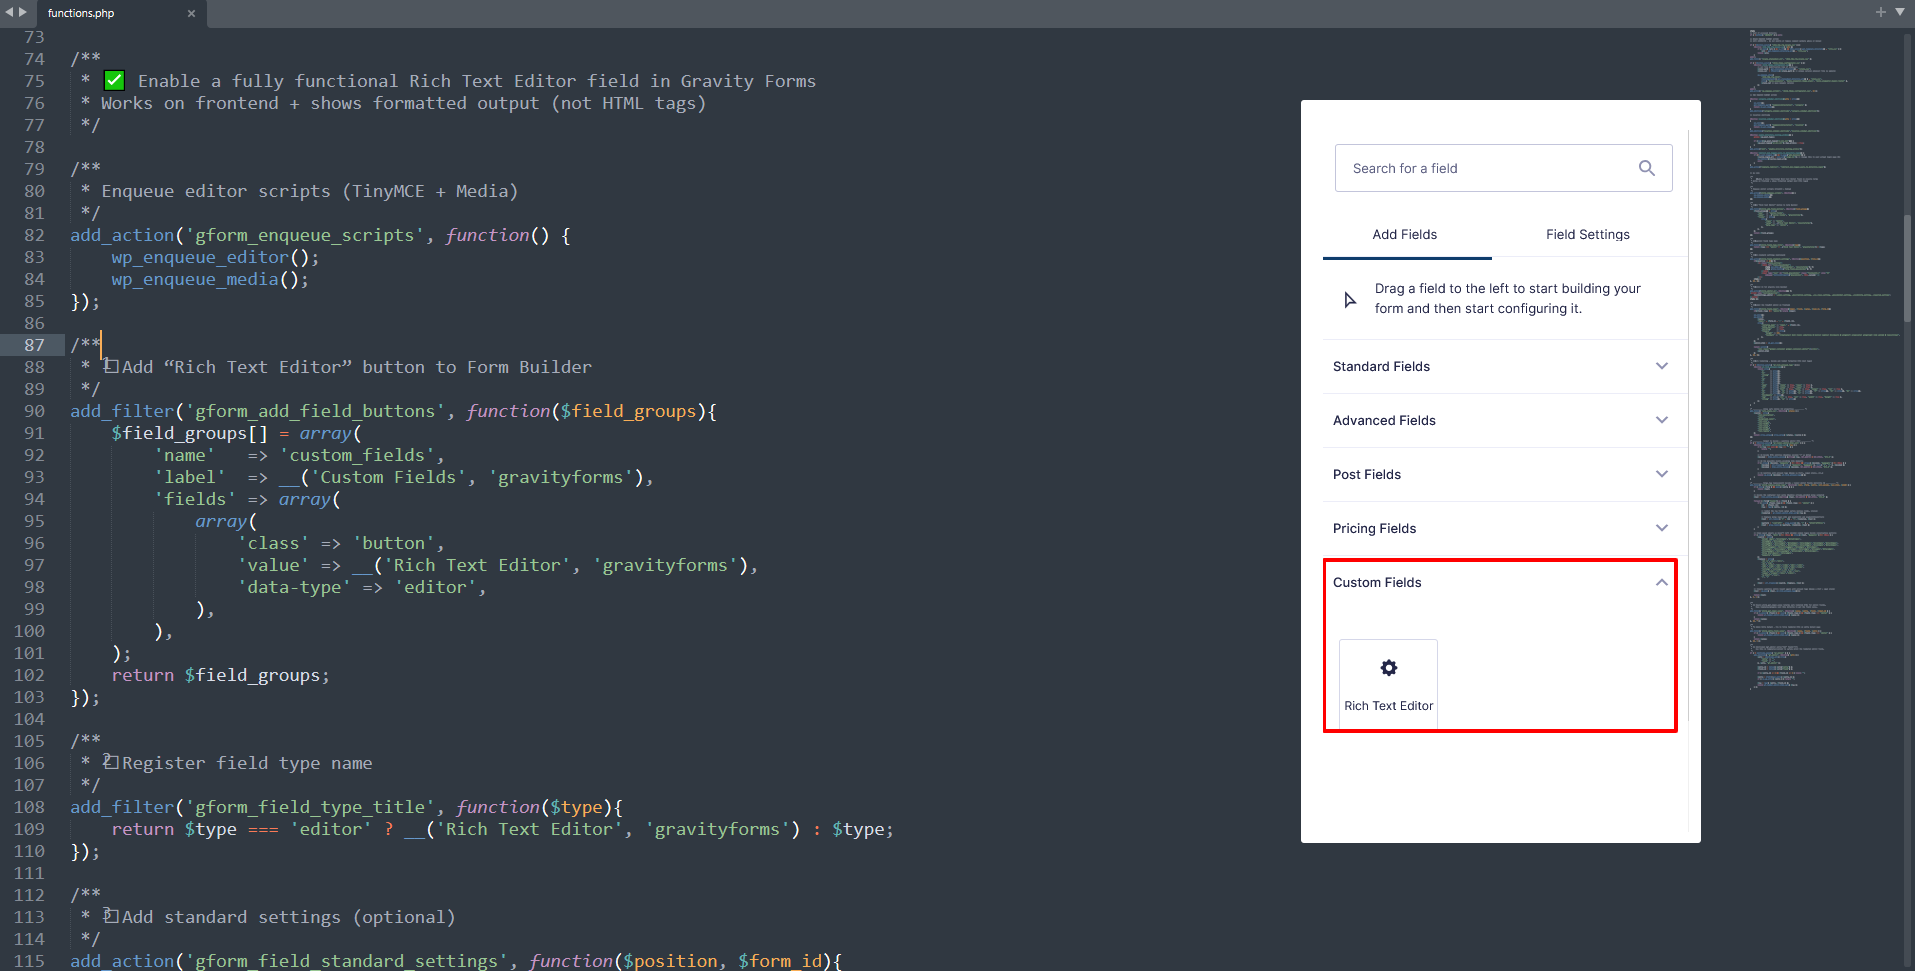
Once added, Gravity Forms will display a new field called: Rich Text Editor under the “Custom Fields” tab.
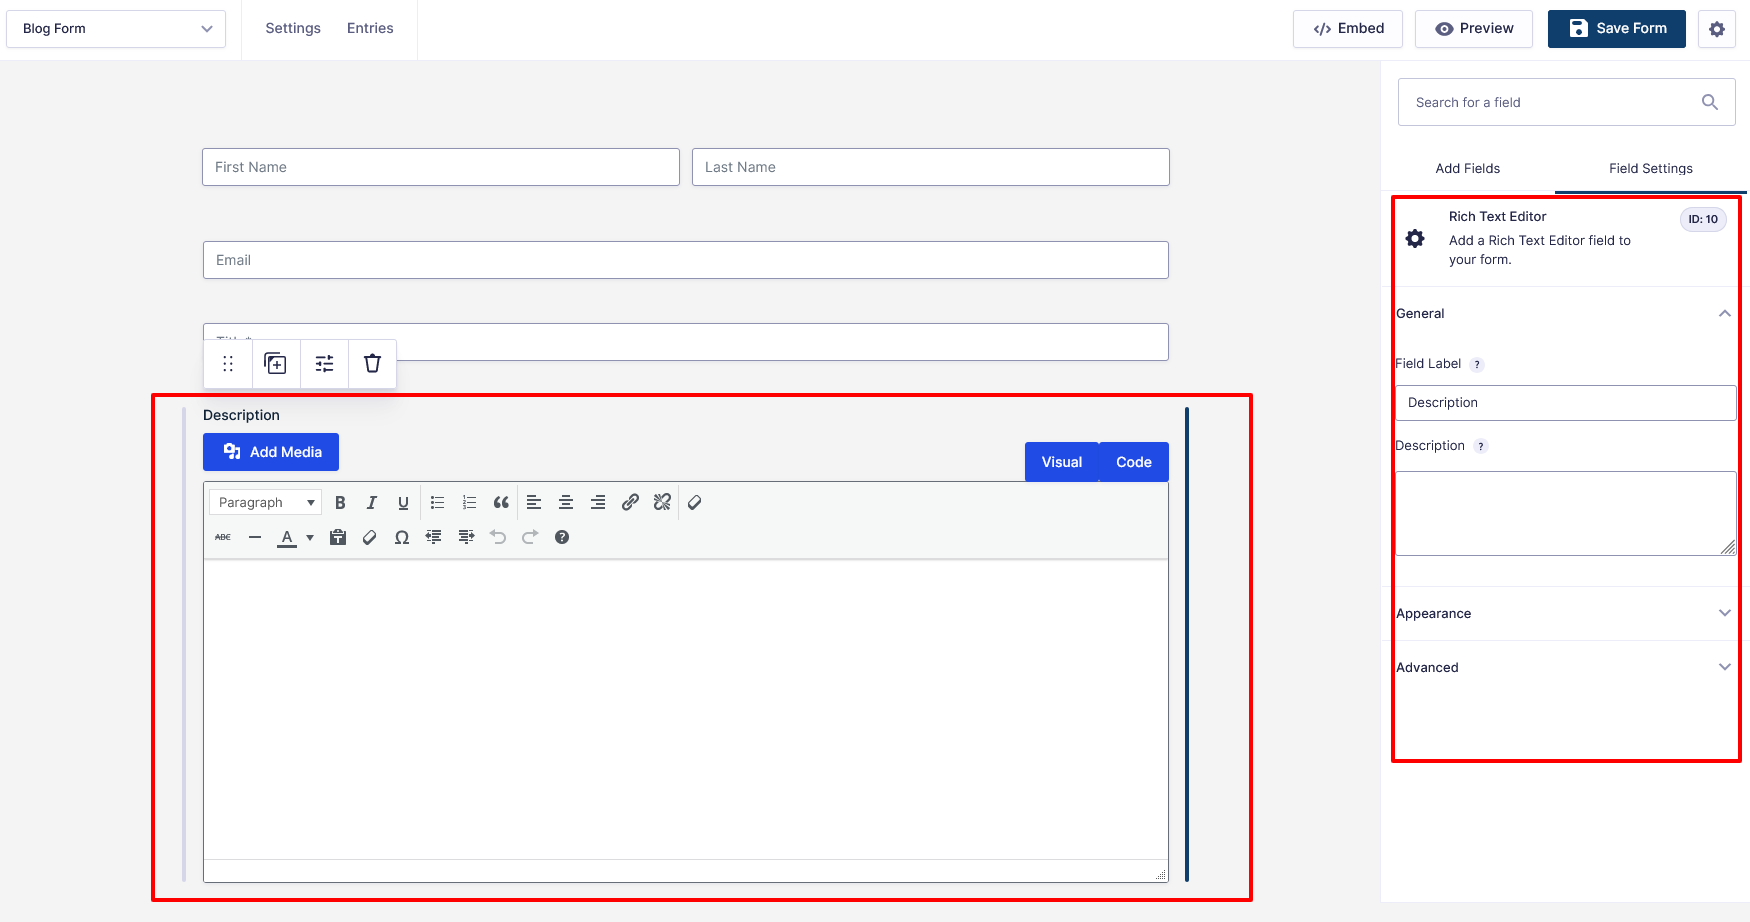
Step 2 — Create a New Gravity Form
- Go to Forms → New Form
- Give it a name (Example: Blog Submission Form)
- Add standard fields like:
- Name
- Post Title
- Add your new field: Rich Text Editor
- Save the form
Tip: Note the Field ID for later (Example: Field ID: 10).
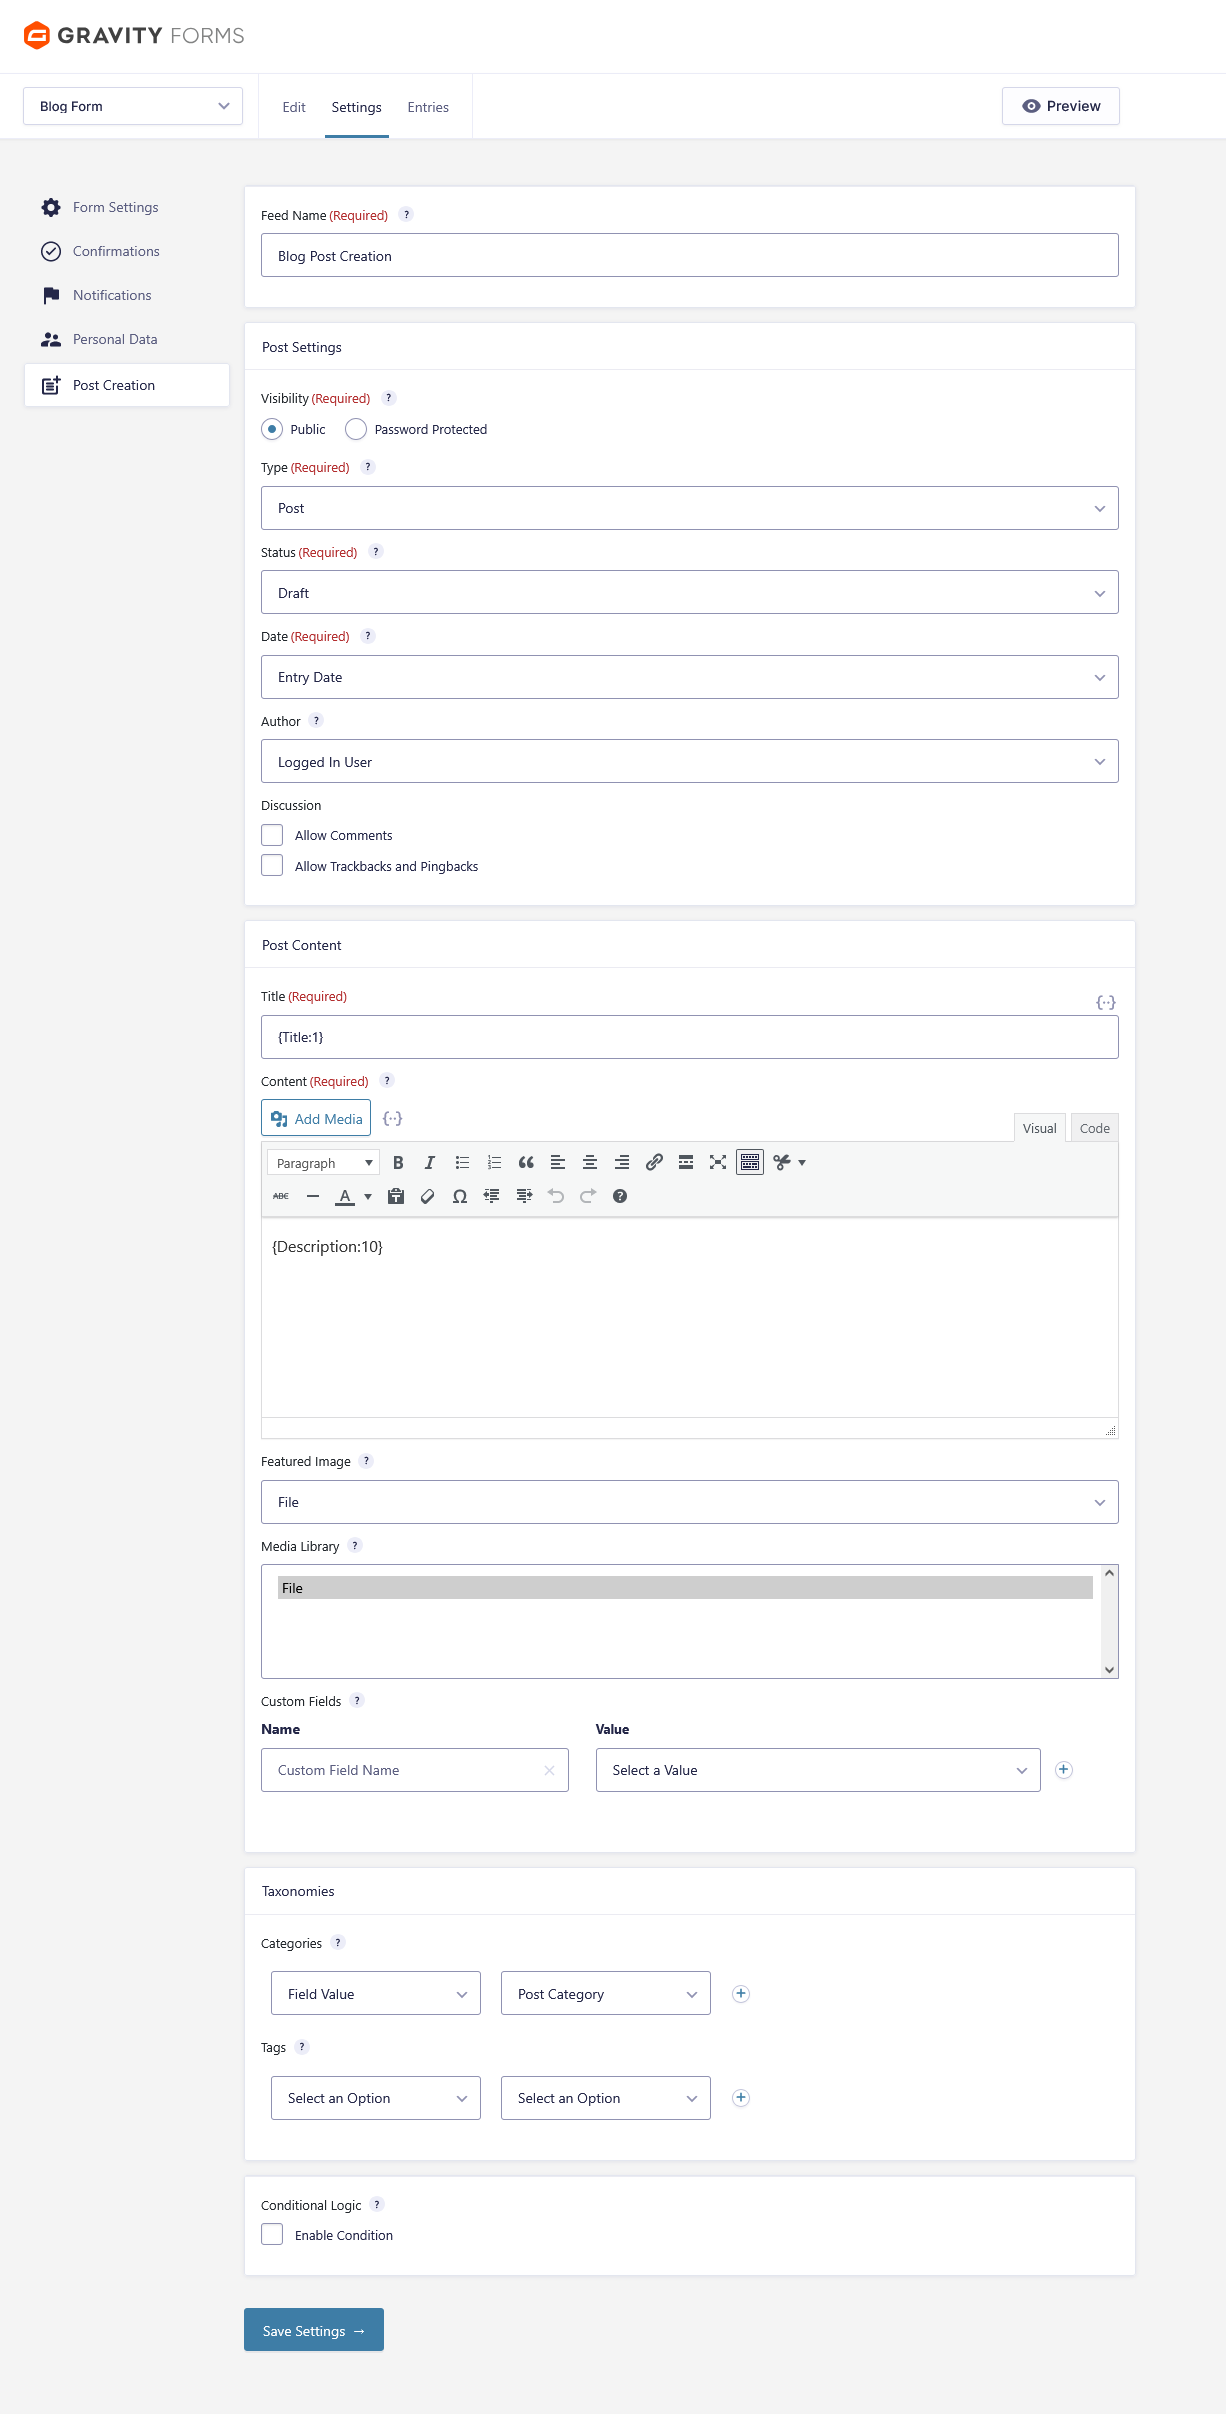
Step 3 — Configure Gravity Forms Post Creation Add-On
- Go to Form → Settings → Post Creation
- Create a new feed
- Settings example:
| Setting | Example |
|---|---|
| Post Type | Post (or Custom Post Type) |
| Status | Draft (recommended for testing) |
| Author | Logged-in User |
| Title | {Post Title:1} |
| Content | {Description:10} ← must match Rich Editor Field ID |
(Optional) Map:
- Categories
- Tags
- Featured Image
- Custom fields
Important: Ensure the content field uses the field ID of the Rich Text Editor.
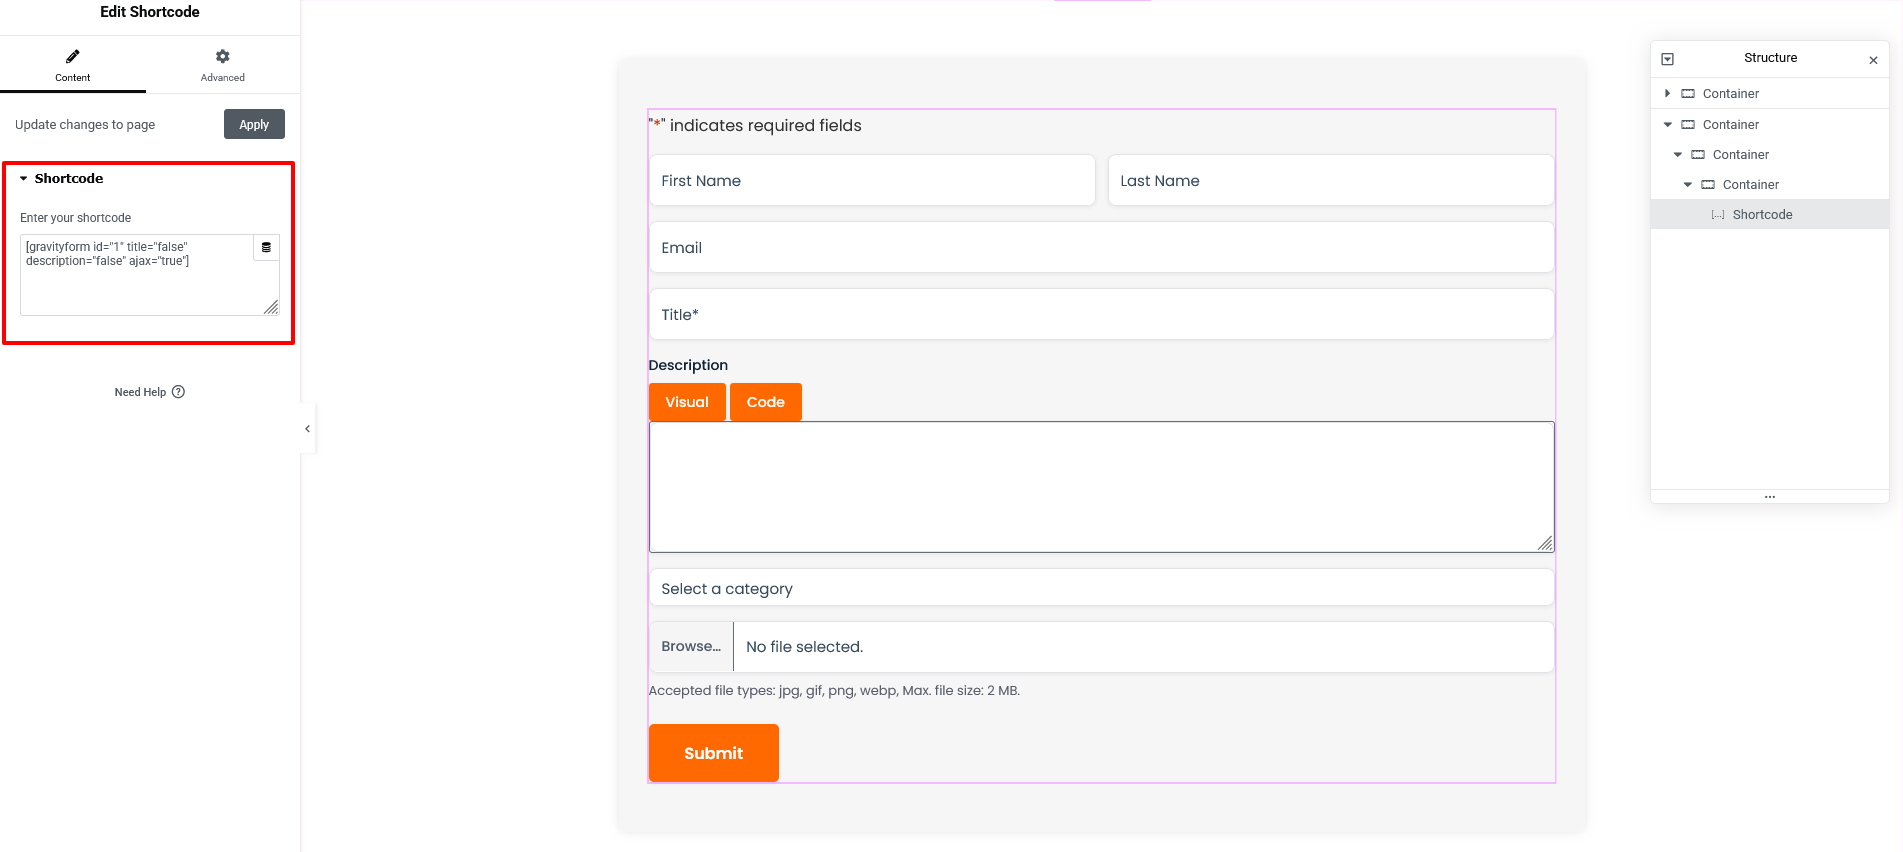
Step 4 — Add the Form to a Page
Use this shortcode anywhere:
[ gravityform id="123" title="true" description="false" ajax="true" ]
Replace 123 with your form ID.
Publish your page (example: Submit a Blog).
Step 5 — Test the Submission
- Open the form on the frontend
- Format content using the editor (bold, headings, images, lists, etc.)
- Submit the form
- Check:
Posts → All Posts
You should see a new post created — with formatting preserved.
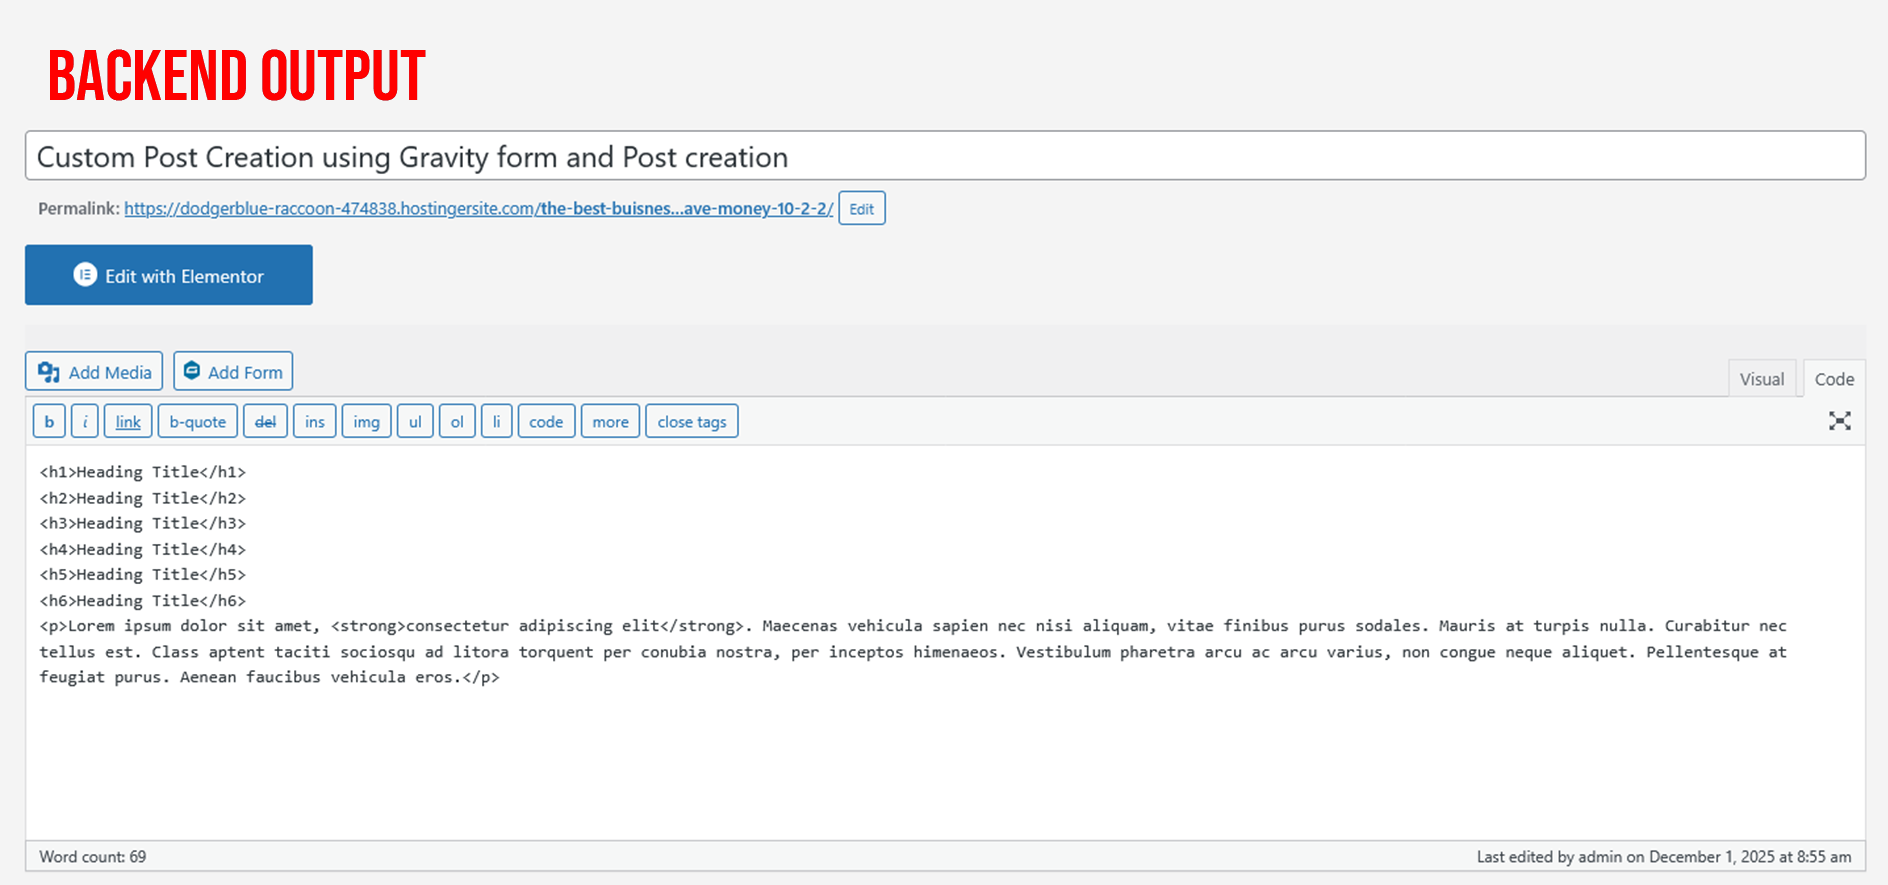
- In WP Admin go to Posts → All Posts and find the new post (status based on your feed setting).
- Click Edit on the post and check the Visual tab in the editor — the content should render as formatted HTML (not raw HTML tags).
- View the post on the frontend and confirm headings, lists, images and styling display correctly.
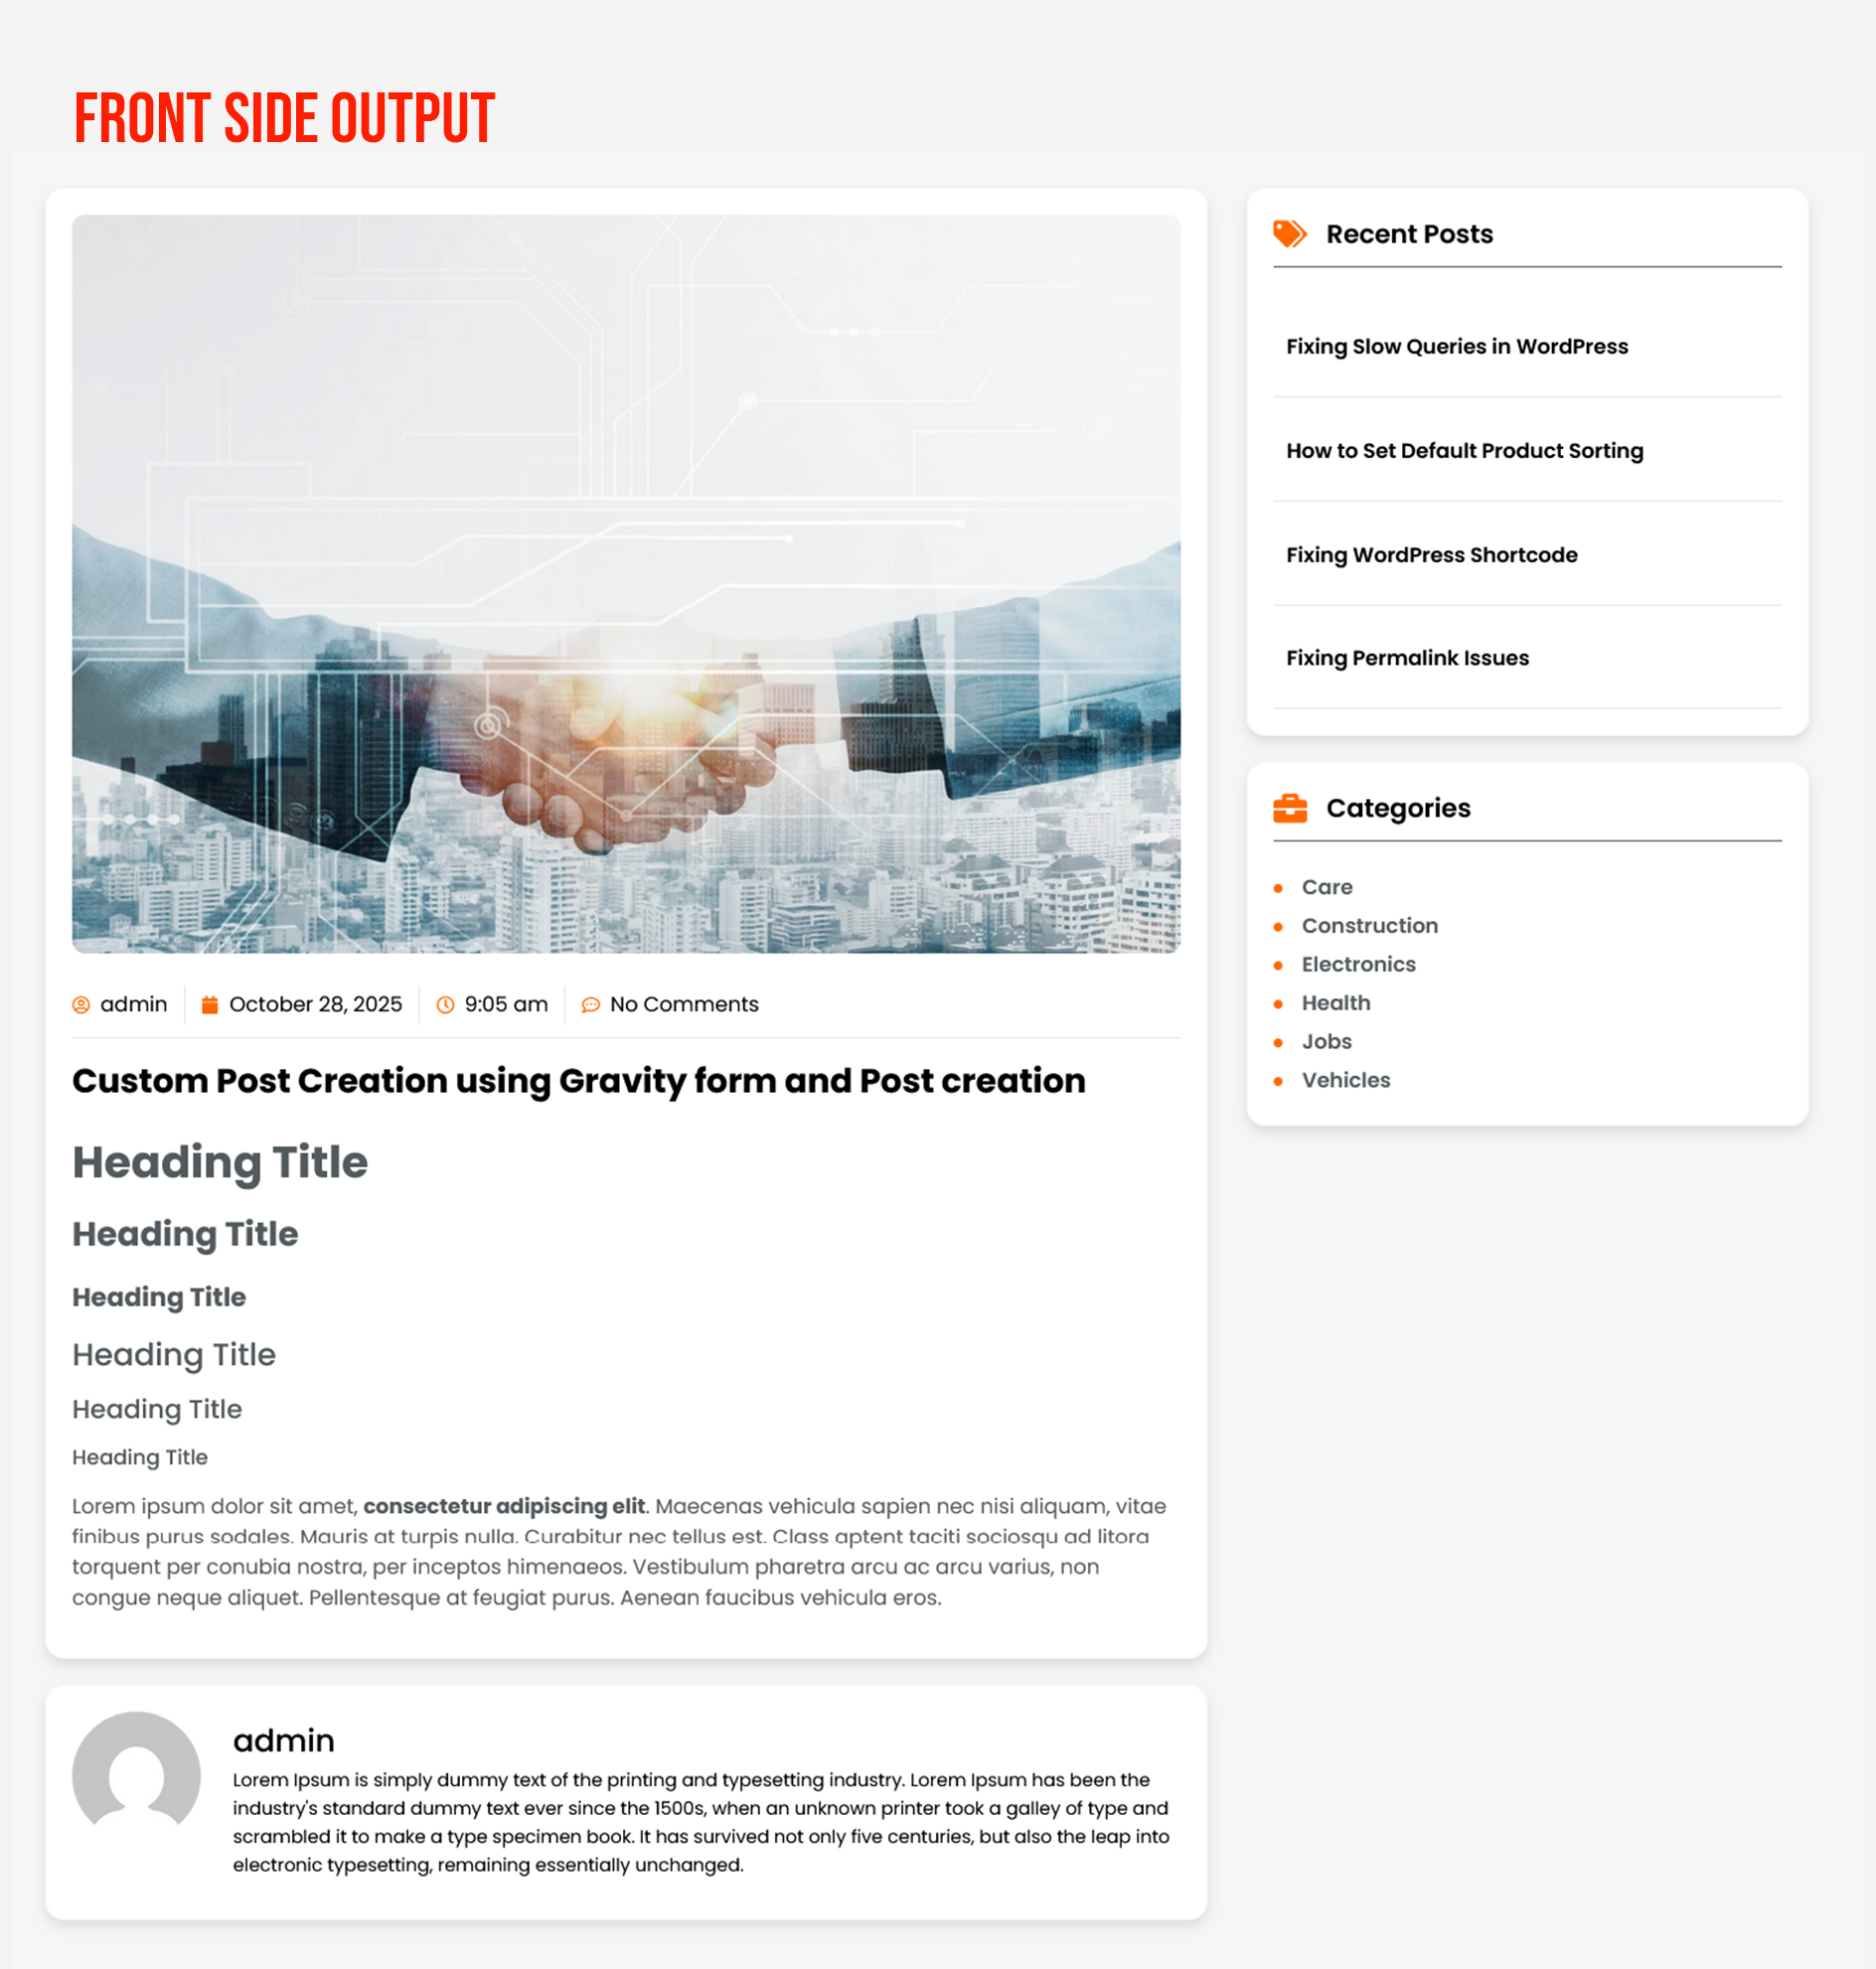
Final Result
You now have a fully working frontend content editor inside Gravity Forms — without additional plugins.
- Works with WordPress media uploader
- Supports formatting, links, images, headings
- Perfect for guest posting, user-generated content, and custom submission workflows
Conclusion
Adding a rich text editor to Gravity Forms dramatically improves the user experience for forms involving long-form content.
Whether you’re building a submission portal, directory, review system, or frontend publishing workflow — this upgrade makes Gravity Forms behave more like a real blogging platform.
If your project requires custom Gravity Forms functionality, enhanced user experience, or plugin-free custom editors, our team can handle the complete development—from planning and implementation to testing and launch.
You can Book a Free Project Consultation to discuss your requirements, timelines, and how we can deliver a scalable, high-quality solution for your website.