Running a WooCommerce store is exciting—but nothing kills momentum faster than bot attacks, fake user registrations, and spam orders. These automated threats don’t just clutter your dashboard; they waste server resources, slow down your site, inflate analytics, trigger payment gateway issues, and in worst cases, lead to security breaches.
If you’ve ever logged in to WordPress and seen hundreds of suspicious users, fake checkout attempts, or strange orders from random countries, you’re not alone. WooCommerce stores are prime targets for bots because of their open registration forms, checkout pages, and predictable endpoints.
In this guide, we’ll cover why bots attack WooCommerce, how to identify the warning signs, and step-by-step solutions to stop fake registrations and spam orders—permanently.
Why WooCommerce Stores Are a Major Bot Target
Bots target WooCommerce stores for several reasons:
- Open user registration (My Account page)
- Guest checkout forms
- Checkout endpoints exposed publicly
- Coupon abuse and card-testing attacks
- Weak form validation
Attackers use automated scripts to:
- Create fake user accounts
- Test stolen credit cards
- Abuse discount codes
- Overload your server
- Inject spam data into orders
Unlike a one-time hack, bot attacks are persistent. Once your site is discovered, it can be targeted repeatedly unless proper defenses are in place.
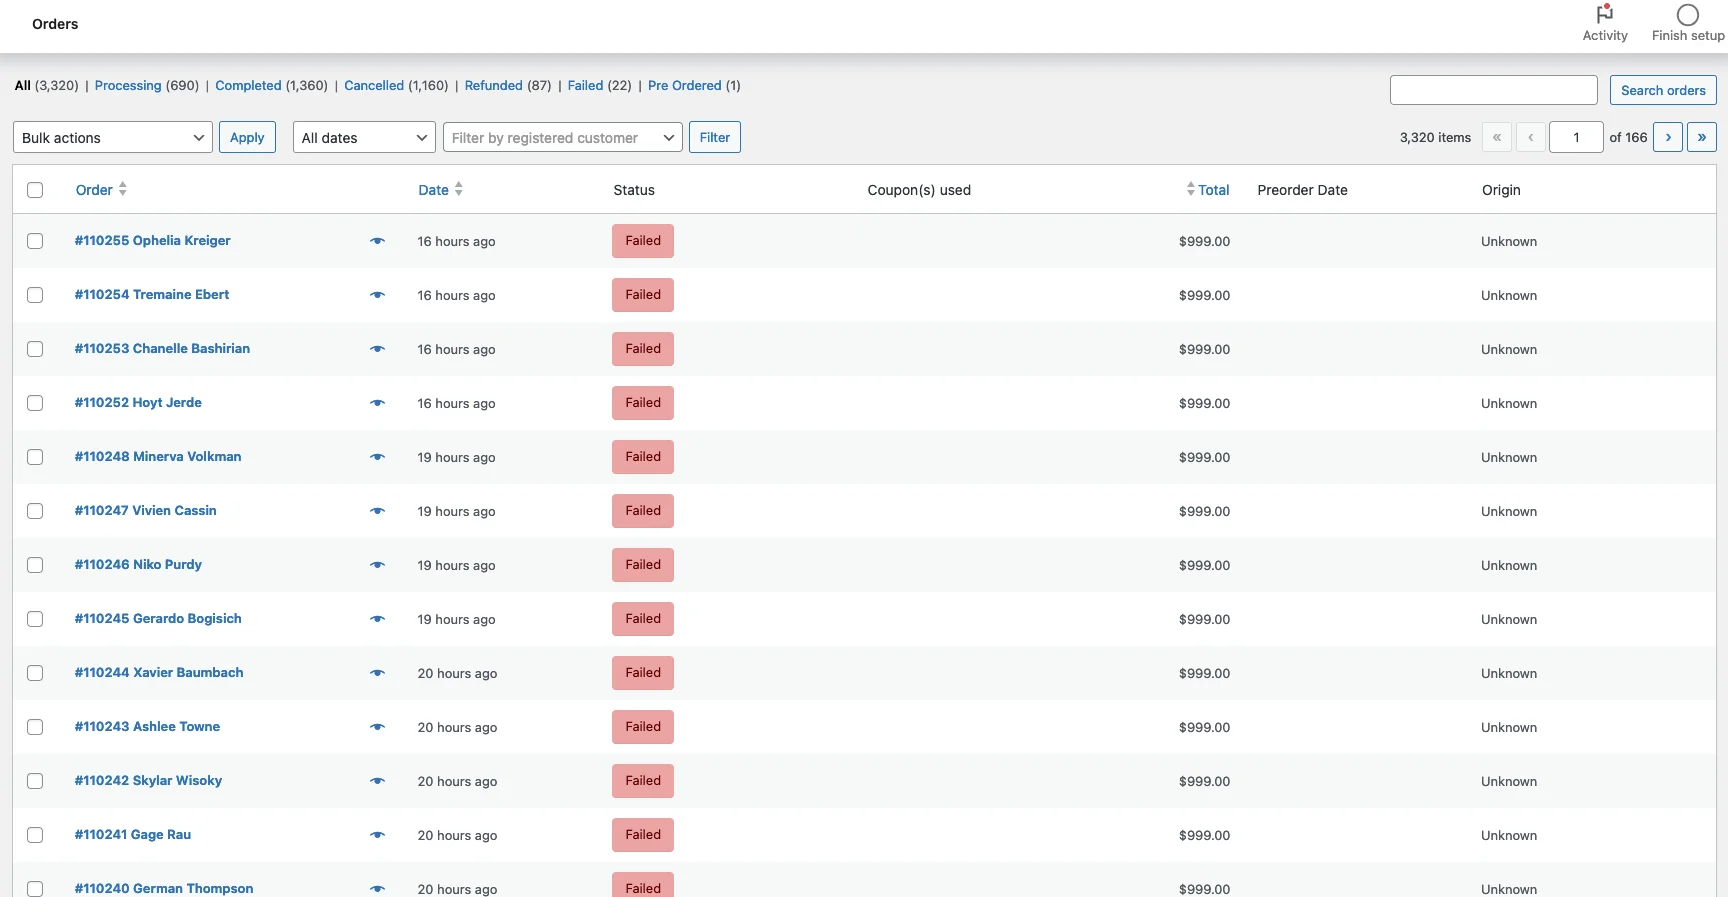
Common Signs of Bot Attacks and Fake Orders
Before fixing the problem, it helps to identify it clearly. Common red flags include:
- Sudden spike in user registrations
- Random usernames like user48293, testabc123
- Dozens of failed or pending orders
- Orders with fake addresses or gibberish names
- Checkout attempts from countries you don’t serve
- High server load with low real traffic
- reCAPTCHA appearing repeatedly for real users
If you notice two or more of these signs, bots are already active on your store.
Step 1: Disable Unnecessary User Registration
If your store does not require customer accounts, disabling registration is the simplest and most effective defense.
How to Disable Registration in WooCommerce
- Go to WooCommerce → Settings → Accounts & Privacy
- Uncheck:
- “Allow customers to create an account on the My Account page”
- “Allow customers to create an account during checkout”
- Save changes
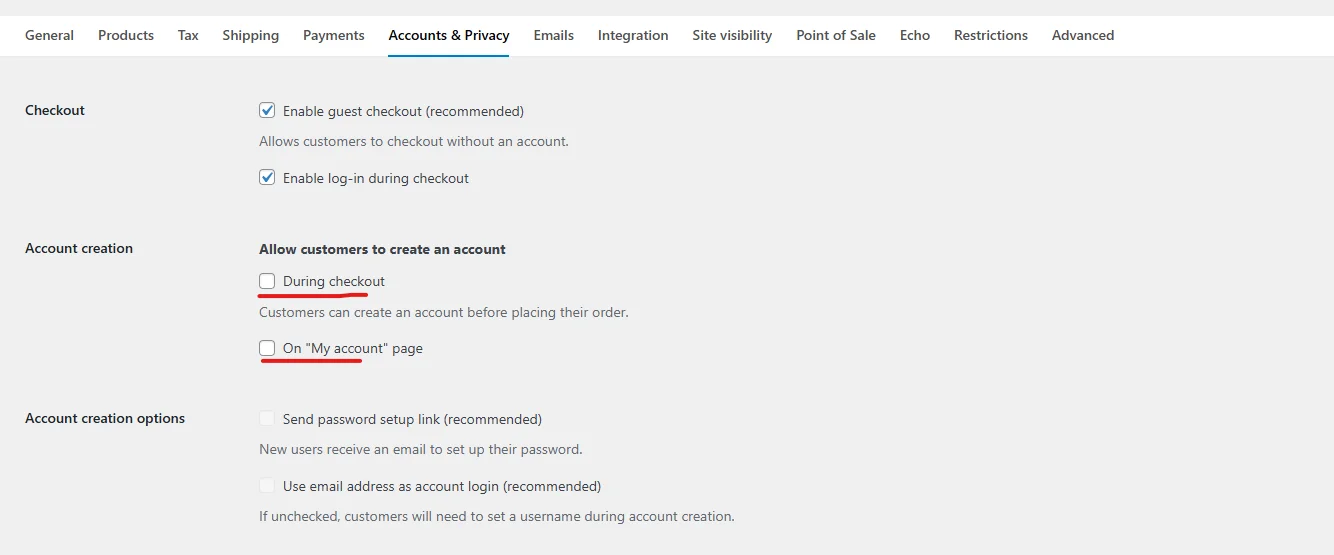
This instantly eliminates fake account creation attacks.
If you do need registrations, move to the next steps.
Step 2: Add Google reCAPTCHA to WooCommerce Forms
Google reCAPTCHA is one of the most effective ways to block automated bots.
Forms That Must Be Protected
- Login
- Registration
- Checkout
- Password reset
- Guest checkout
Recommended Option
Google reCAPTCHA v2 (“I’m not a robot”)
Why v2?
- More reliable for WooCommerce
- Visible challenge stops most bots
- Lower false positives than v3
Best Plugins for WooCommerce reCAPTCHA
- Advanced Google reCAPTCHA
- reCaptcha for WooCommerce
- WP Armour (honeypot-based)
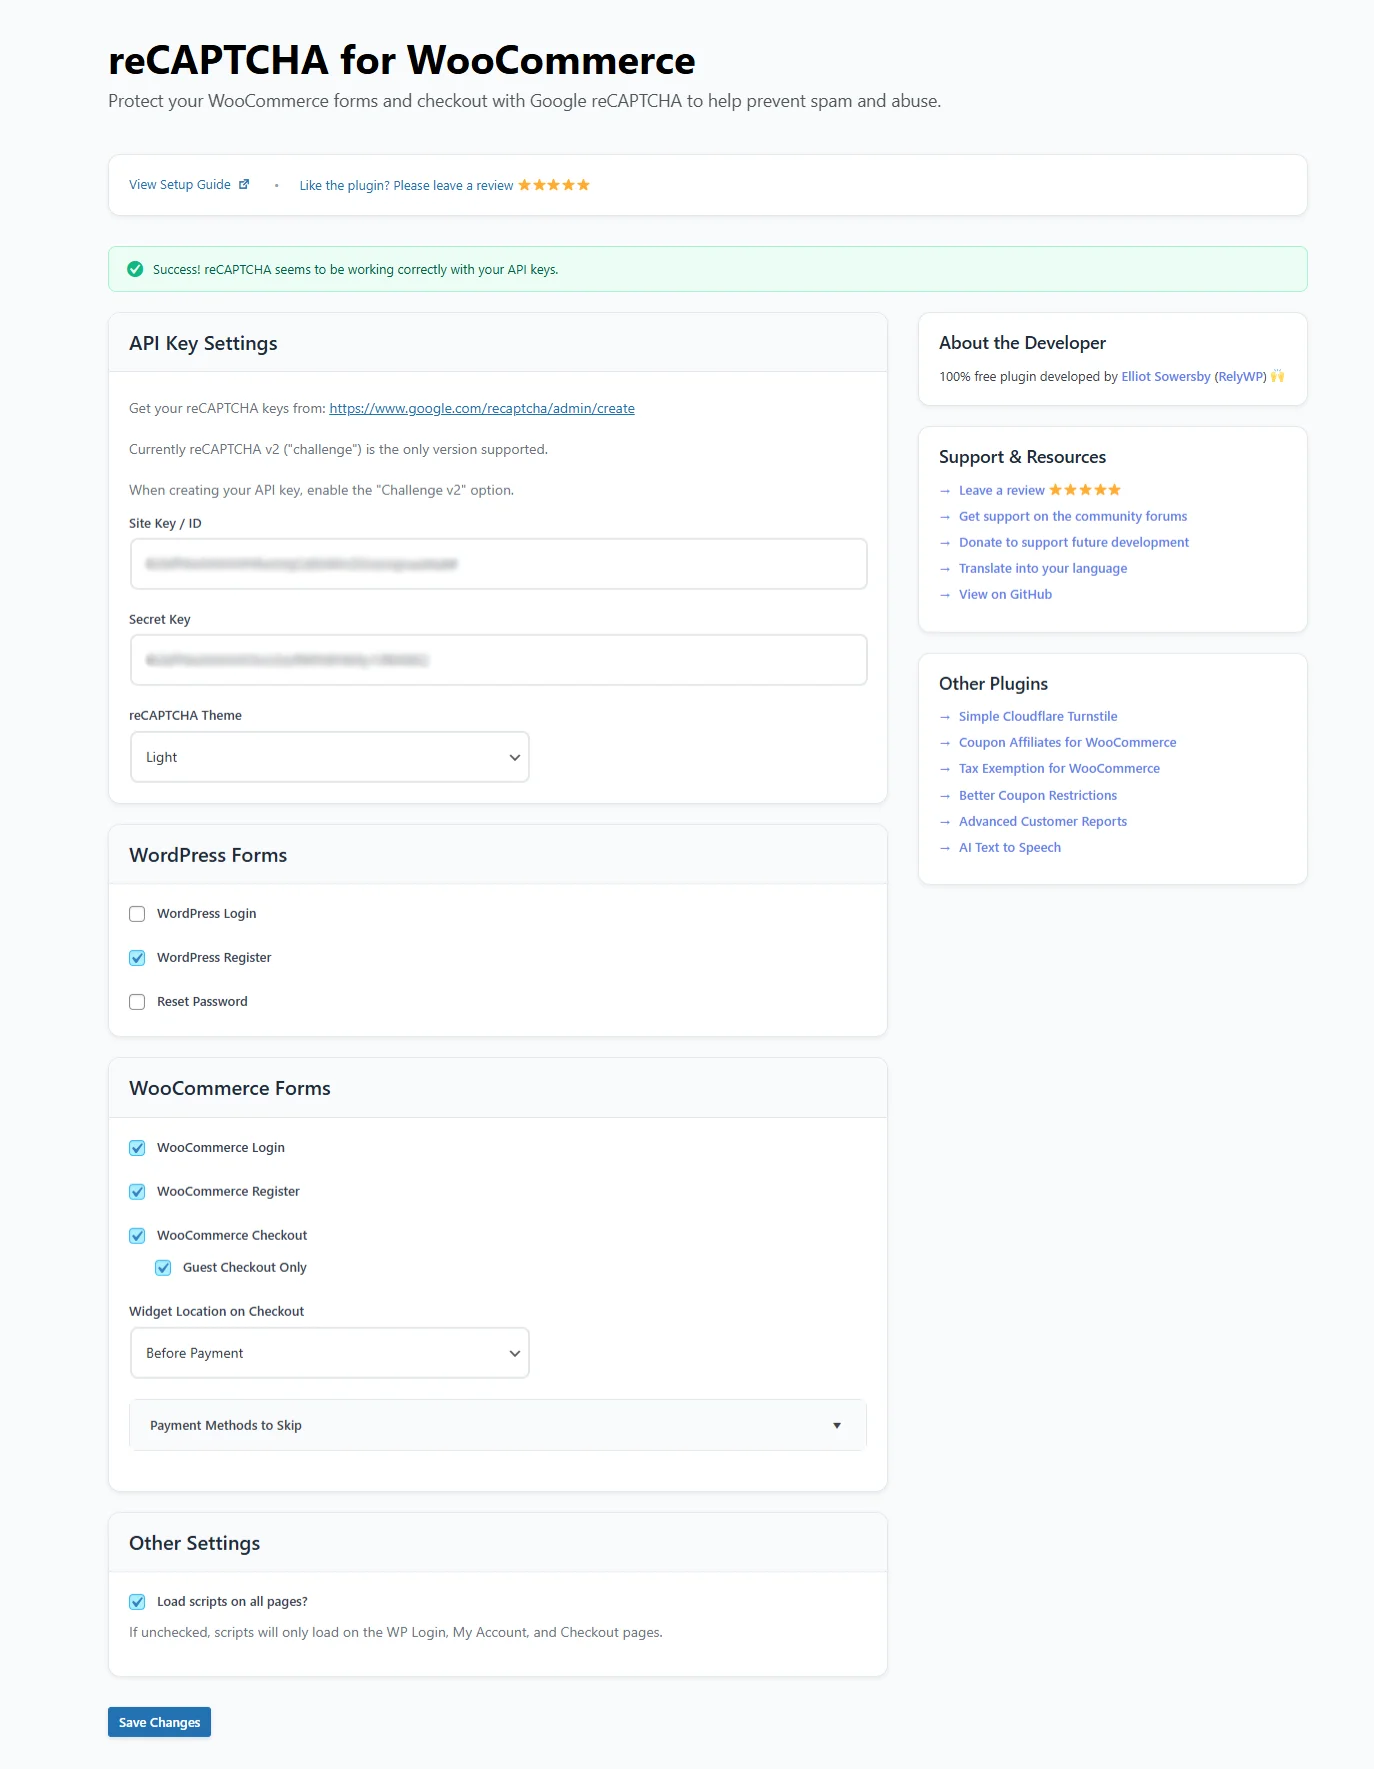
Make sure the CAPTCHA is visible and actually loading on the frontend. Many sites install it but forget to verify placement.
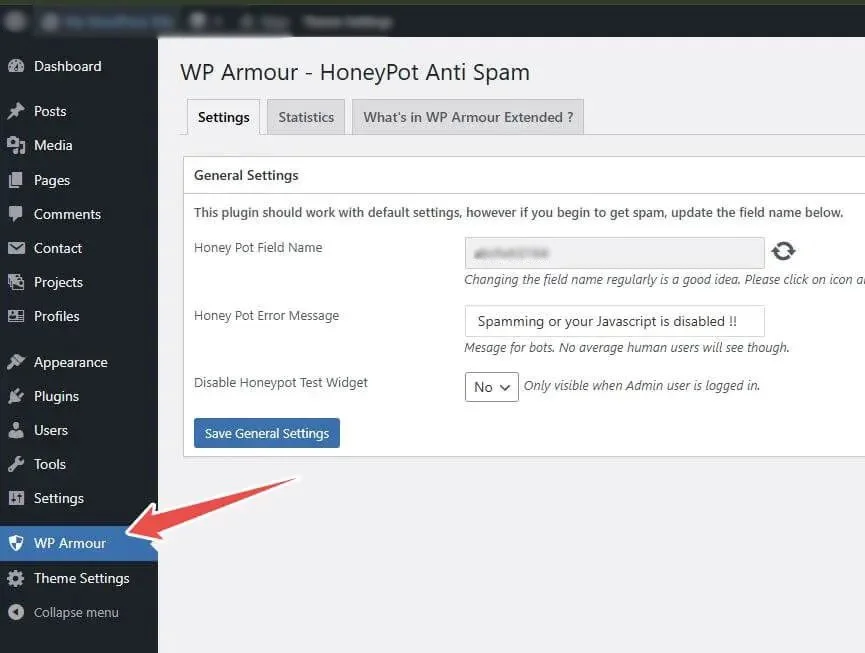
Step 3: Enable Honeypot Protection (Invisible but Powerful)
Honeypots work by adding hidden fields that real users never see—but bots automatically fill in.
If a hidden field is completed, the submission is instantly blocked.
Why Honeypots Are Effective
- Zero friction for real users
- No visual challenges
- Very low false positives
- Excellent backup to reCAPTCHA
Recommended Plugin
WP Armour – Honeypot Anti Spam
Works automatically on:
- WooCommerce login & register
- Checkout forms
- Contact forms
- Password reset forms
This is especially useful when bots start bypassing reCAPTCHA.
Step 4: Restrict Checkout by Country and Region
Many spam orders originate from countries you don’t even sell to.
How to Block High-Risk Countries
- Go to WooCommerce → Settings → General
- Set:
- “Sell to specific countries”
- Select only the countries you ship to
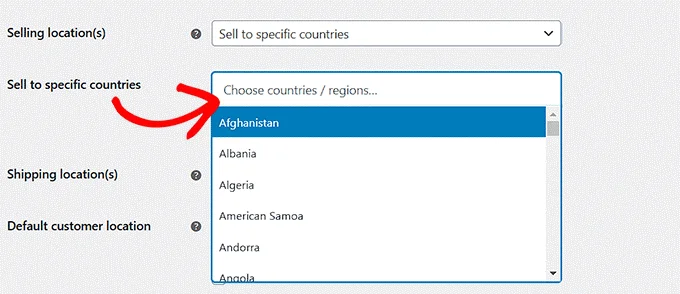
For advanced control:
- Use shipping zones wisely
- Do not create “Worldwide” zones unless necessary
This single step can reduce spam orders by 50–70%.
Step 5: Block Suspicious IPs and User Agents
Some bots repeatedly attack from the same IP ranges or cloud providers.
Server-Level Protection (Highly Recommended)
If you’re on managed hosting (like WPX, WP Engine, Kinsta):
- Enable firewall rules
- Block known bad IP ranges
- Rate-limit /wp-login.php and /checkout
WordPress Plugins for IP Blocking
- Wordfence
- iThemes Security
- All In One WP Security
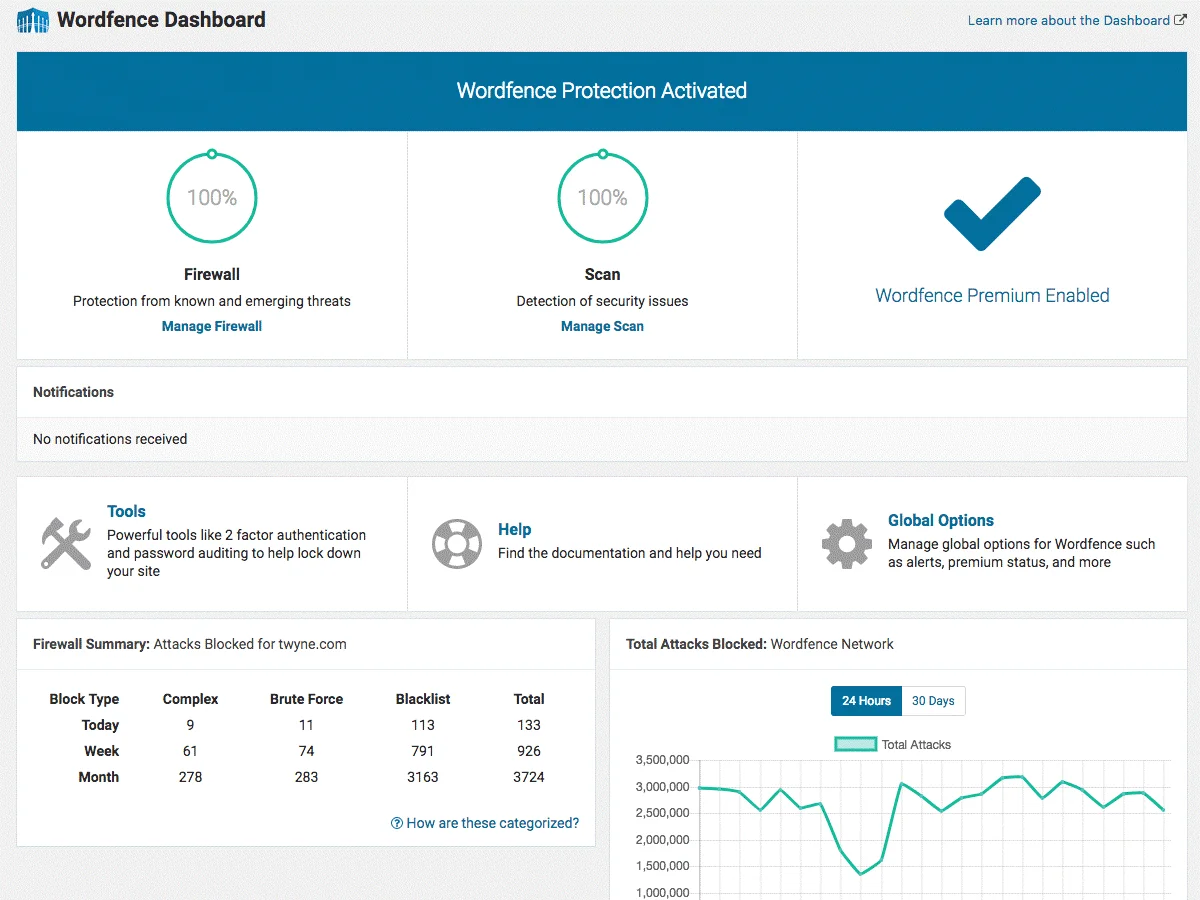
Set rules like:
- Block IP after 5 failed login attempts
- Temporarily lock checkout after multiple failures
Step 6: Protect WooCommerce Checkout from Card Testing
Card-testing bots attempt thousands of small transactions to validate stolen cards.
Signs of Card Testing
- Many failed payments
- Same IP, different cards
- Small order amounts
- Repeated checkout attempts
How to Stop It
- Enable CAPTCHA on checkout
- Set minimum order value
- Limit checkout attempts per IP
- Use payment gateways with fraud detection (Stripe Radar, PayPal Fraud Protection)
Step 7: Remove Existing Fake Users and Orders Safely
After stopping new bots, clean up the old data.
Removing Fake Users
- Filter users by registration date
- Check suspicious email domains
- Bulk delete users with no orders
Removing Spam Orders
- Filter orders by status (failed, pending)
- Identify repeated IPs
- Delete test or fake orders in bulk
Always take a backup before mass deletion.
Step 8: Monitor and “Watch & Wait”
Security is not a one-time task.
After implementing:
- reCAPTCHA
- Honeypot
- Country restrictions
- IP blocking
Monitor for 7–14 days
If:
- No new fake users appear
- Spam orders stop completely
You can safely:
- Remove old spam users
- Fine-tune CAPTCHA sensitivity
- Reduce friction for real customers
Final Thoughts
Bot attacks, fake registrations, and spam orders are not just annoying—they directly impact your store’s performance, data quality, and revenue.
The key takeaway is this:
Do not rely on one solution alone.
A combination of:
- CAPTCHA
- Honeypots
- Country restrictions
- IP blocking
- Server-level security
…is the only reliable way to protect a WooCommerce store long-term.
If you implement the steps above correctly, you’ll see an immediate drop in fake users and spam orders—and your store will run faster, cleaner, and more securely.
Tired of bot attacks, fake user registrations, or spam orders in your WooCommerce store?
Let TechnoCrackers secure your site with professional protection and optimization—Reach out today!