How To Create A Custom Mobile Menu In WordPress Using JetMenu

Custom Mobile Menu In WordPress Using JetMenu

Introduction

Mobile users expect fast, simple, and intuitive navigation. However, many websites still use the same desktop menu structure on mobile devices, which often creates a poor user experience. A large desktop mega menu may work well on wider screens, but on smartphones it can become cluttered and difficult to use.

With JetMenu, you can create a completely custom mobile menu in WordPress that is separate from your desktop navigation. This gives you better control over design, usability, and conversions.

In this guide, we’ll show you how to build a professional custom mobile menu using JetMenu step by step.

Plugins Required

Before starting, install and activate:

  • Elementor
  • JetMenu
  • (Optional) JetThemeCore for custom headers

Step 1: Edit The Header And Enable Mobile Menu Mode

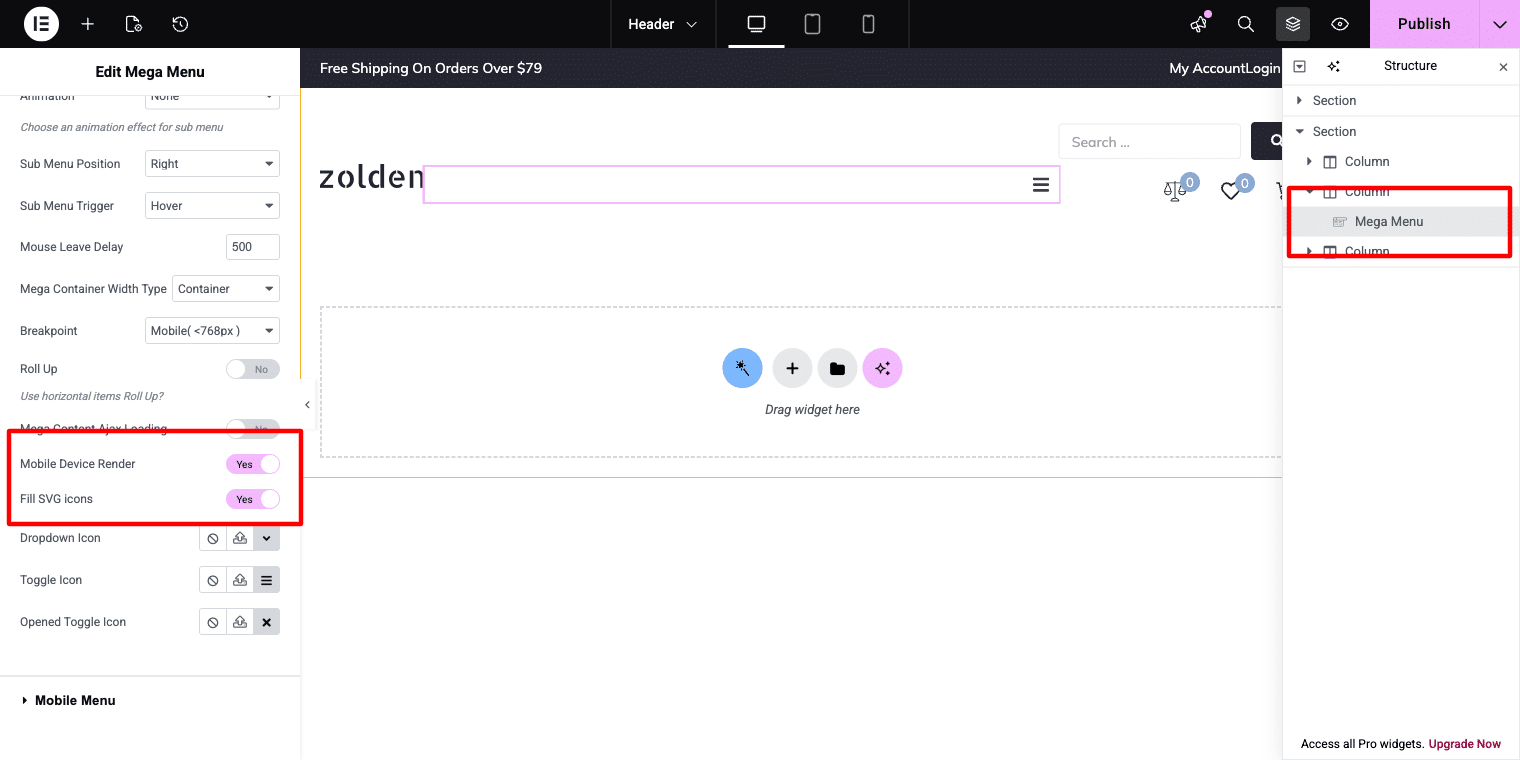
Open your website header template in Elementor and click on the Mega Menu widget added to the header. This will display the widget options in the left settings panel.

Scroll through the settings until you find the Mobile Device Render option. Turn this setting on to activate mobile-specific controls. After enabling it, a new Mobile Menu tab will be added, where you can create and customize a separate navigation menu for mobile users using JetMenu.

Enable Mobile Menu Mode

Step 2: Configure The Mobile Panel Settings

Go to the Mobile Menu tab inside the JetMenu widget settings. Here, you can customize how the mobile navigation panel appears on smaller devices.

Adjust options such as:

  • Panel width
  • Display style (slide-in panel or overlay)
  • Opening position (left side or right side)
  • Close when clicking outside the panel
  • Show or hide the close icon

If you plan to use the same navigation items from your desktop menu and simply optimize them for mobile screens, choose your existing main menu in the Menu for Mobile option. This allows the menu to stay consistent across devices while using a mobile-friendly layout.

Configure The Mobile Panel Settings

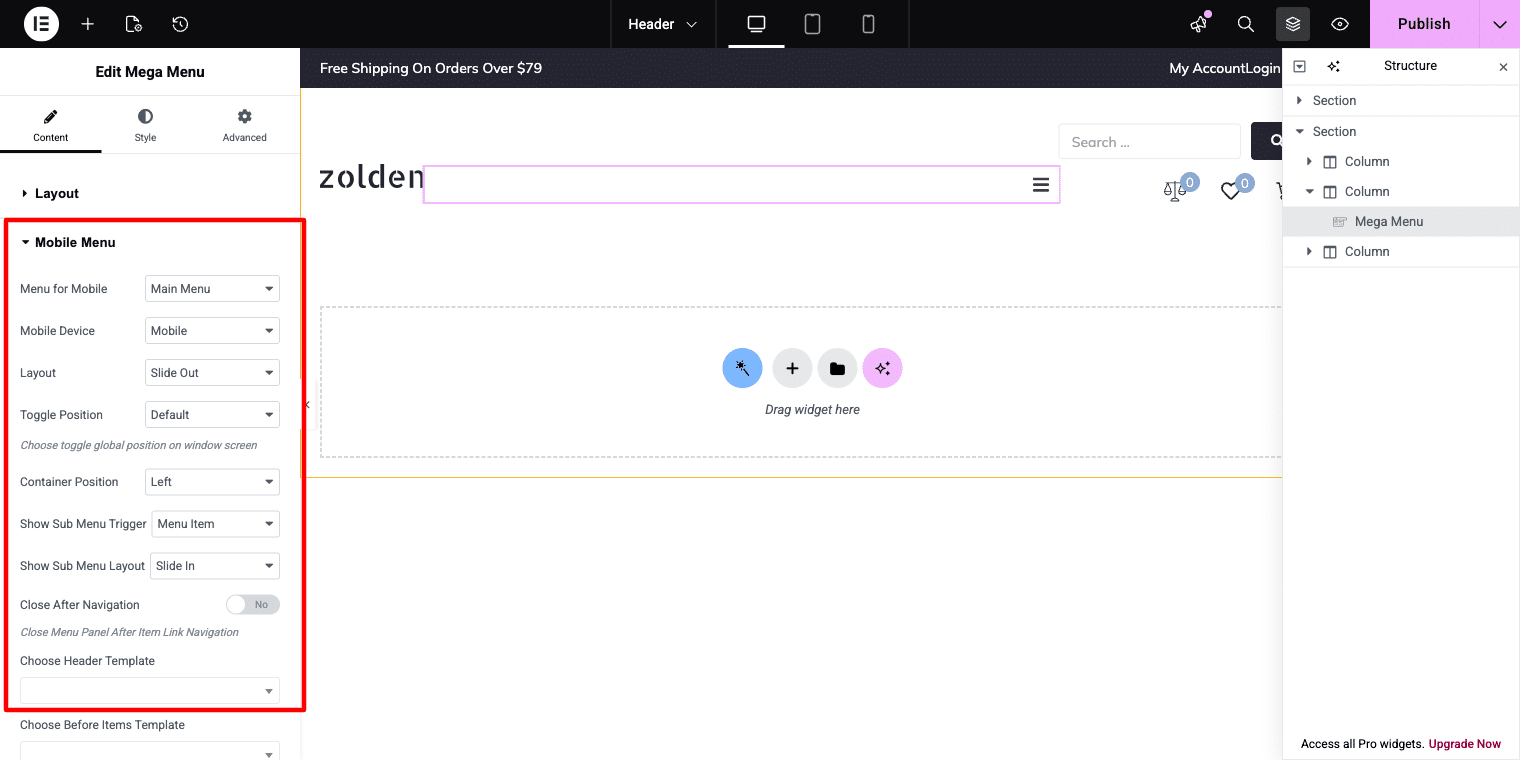
For the Zolden store example, using a right-side slide-in panel with a visible close icon creates a familiar and user-friendly mobile shopping experience. It feels natural for visitors browsing a fashion or eCommerce website on mobile devices.

Step 3: Optimize Mega Menu Content For Mobile Screens

If your desktop navigation includes a mega menu item, it may contain too much content for smaller screens. To keep the mobile menu clean and easy to use, simplify the mega menu layout by hiding non-essential sections.

Optimize Mega Menu Content For Mobile

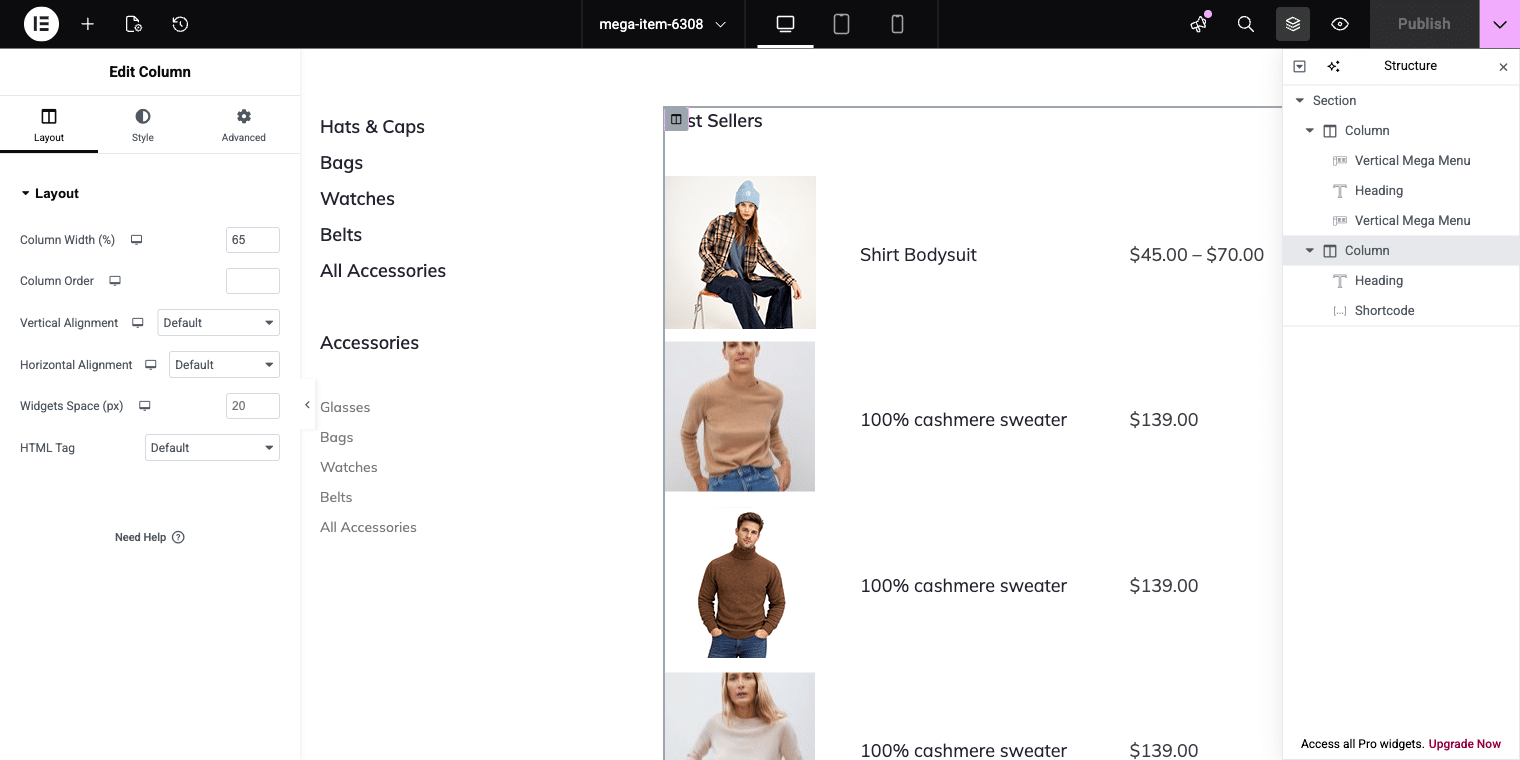
For example, if one column contains a Best Sellers table or promotional content, you can hide that section on mobile devices.

Open the mega menu layout in Elementor and select the column you want to remove. Then go to:

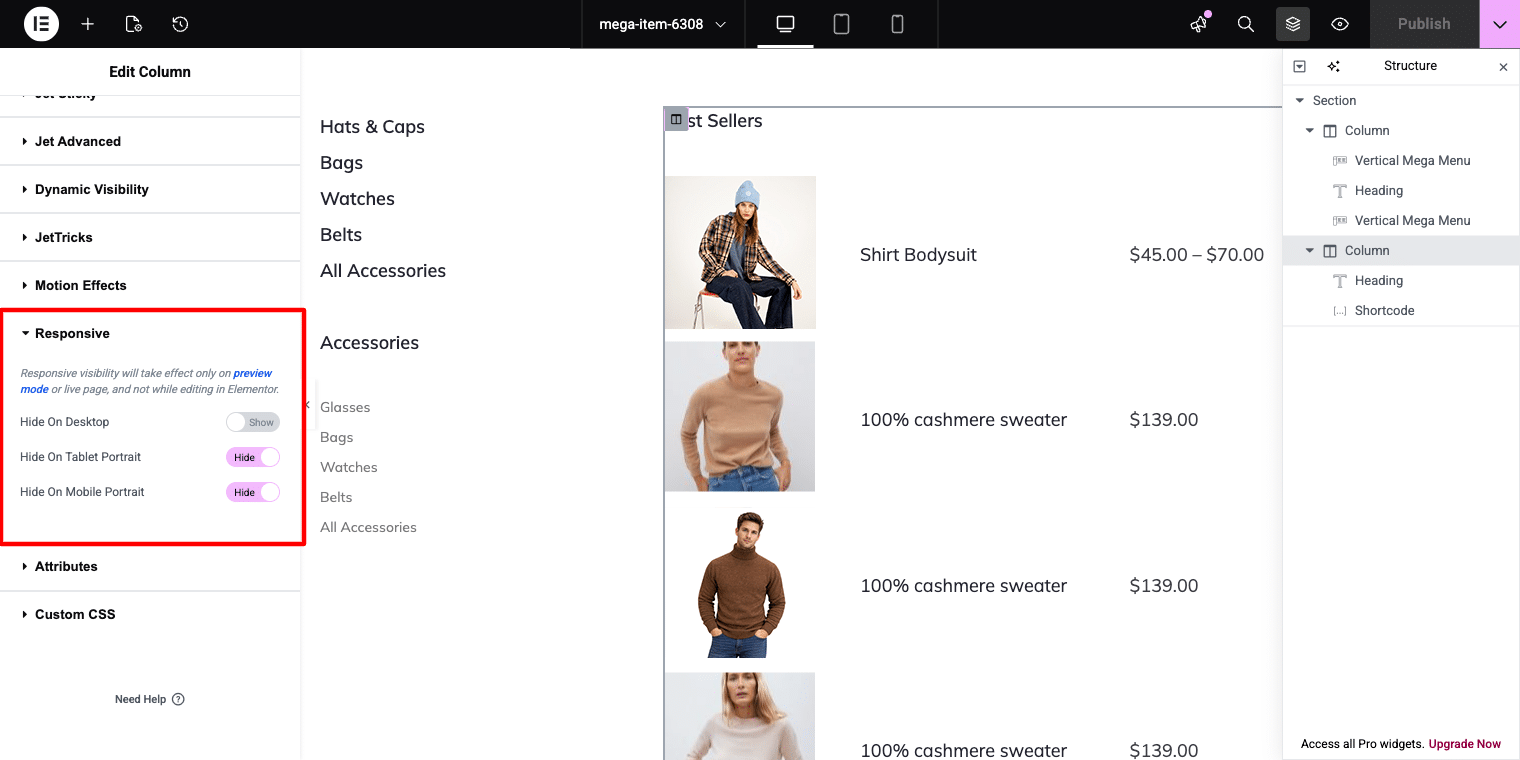
Column → Advanced → Responsive

Enable these options:

  • Hide on Tablet Portrait
  • Hide on Mobile Portrait

This will hide the selected column on smaller devices while keeping it visible on desktop screens.

Hide on Mobile Portrait

Step 4: Preview And Test The Mobile Menu

After finishing your mobile menu setup, use the responsive preview mode in Elementor to test how the menu looks on different screen sizes such as mobile phones and tablets.

Carefully check that:

  • All menu links are visible and easy to tap
  • Navigation items are fully accessible
  • The slide-in panel opens smoothly
  • The menu closes properly using the close button or outside click
  • Spacing and layout look clean on smaller screens

Testing the menu before publishing helps ensure a smooth user experience across all devices when using JetMenu.

Conclusion

Mobile navigation should be designed for smaller screens instead of simply copying the desktop menu layout.

For websites with large product catalogs, multiple categories, or complex navigation structures, a dedicated mobile menu often delivers a smoother and more user-friendly browsing experience.

With JetMenu, you can build separate mobile navigation directly inside WordPress, display it in stylish slide-out panels, and fully customize the design using Elementor.

The final result is a clean, responsive, and easy-to-use mobile menu while keeping your full desktop mega menu unchanged for larger screens.

How To Make An Image Slider With Thumbnails In Crocoblock

How To Make An Image Slider With Thumbnails In Crocoblock

Creating an image slider with thumbnails is a great way to showcase galleries, products, portfolios, testimonials, or featured content on your website. With Crocoblock, you can easily build a dynamic and professional-looking slider using Elementor and Jet plugins—without writing custom code.

In this guide, we’ll walk through the complete process of creating an image slider with thumbnails in Crocoblock step by step.

Step 1 — Install and Activate Required Plugins

Before starting, make sure you have the following plugins installed and activated:

  • Elementor Pro — required for theme builder & dynamic layouts
  • JetEngine — creates custom post types, custom fields & listings

After installing the plugin, you can create a meta box using JetEngine and add meta fields to any post type you want.
Based on the meta field ID from that meta box, we can then create a search query using the meta ID.

Step 2: Create a Custom Post Type

First, create a custom post type where you want to manage slider content.
For example:

  • Gallery
  • Portfolio
  • Projects
  • Testimonials

Go to:
JetEngine → Post Types → Add New
Create your custom post type and publish it.
Example:

  • Post Type Name: Projects
  • Slug: projects

Now you’ll have a dedicated section in your WordPress dashboard to manage slider items.

Step 3: Create a Repeater Meta Field for Images

Next, we need to add multiple images using a repeater field.
Go to:

JetEngine → Meta Boxes or Meta Fields

Create a new meta field group and assign it to your custom post type.

Add:

  • Field Type: Repeater
  • Field Name: projects_gallery_slide

Inside the repeater, add:

  • Field Type: Media
  • Field Name: projects_gallery_img

This allows you to upload multiple images for each post.

Create Meta Boxes or Meta Fields

Step 4: Add Images to Your Post

Now open any post from your custom post type and upload multiple images inside the repeater field.

Example:
Gallery → Add New

Add:

  • Title
  • Content
  • Multiple Slider Images

Publish the post.

Add images in post

Step 5: Create a Query Builder for Repeater Field

To display repeater images dynamically in the slider, create a query.

Go to:

JetEngine → Query Builder → Add New

Select:

  • Query Type: Repeater Query

Choose:

  • Repeater Field: projects_gallery_slide

Set the source as current post.

Save the query.

This query will pull all images from the repeater field dynamically.

Query Builder Make Query

Step 6: Build the Image Slider with Thumbnails

Now edit your page using Elementor.

Drag and drop the slider widget

Select Slider Widget

Then, enable the Use JetEngine Query option.

In the Select Query dropdown, choose the query that you have already created.

By default, 3 slides will be added. Keep 1 slide and remove the other 2.

After that, you need to set the image to fetch dynamic data:

  • Select the image source from JetEngine > Current Object Field.
  • In the settings, choose the image field that was created specifically for the repeater field.

Update widget Setting

Step 7: Customize the Design

Now style the slider based on your website design.

You can customize:

  • Slider height
  • Border radius
  • Arrows style
  • Thumbnail spacing
  • Hover effects
  • Active border color
  • Transition speed
  • Mobile responsiveness

Make the design clean and user-friendly.

Conclusion

Creating an image slider with thumbnails in Crocoblock is simple when using JetEngine and Elementor. By combining repeater fields, query builder, and slider widgets, you can create fully dynamic image galleries that look professional and improve user experience.

If you want advanced sliders without custom coding, Crocoblock is one of the best solutions for WordPress websites.

WordPress Plugin Hack 2026: 30+ Plugins Infected with Backdoor Malware

WordPress Plugin Hack 2026 30+ Plugins Infected with Backdoor Malware

In April 2026, over 30 trusted WordPress plugins were compromised after attackers secretly inserted backdoor malware into plugin updates. This allowed hackers to remotely control websites, inject SEO spam, and remain undetected for months, making it one of the largest WordPress supply chain attacks to date.

WordPress.org Shut Down 25+ Plugins in One Day

On April 7, 2026, the official WordPress plugin repository took urgent action and removed more than 25 plugins in a single day due to serious security concerns.

These plugins were linked to the same developer and were widely used across thousands of websites.

🧩 Some of the affected plugins include:

  • Countdown Timer Ultimate (countdown-timer-ultimate)
  • Popup Anything on Click (popup-anything-on-click)
  • WP Testimonial with Widget (wp-testimonial-with-widget)
  • WP Team Showcase and Slider (wp-team-showcase-and-slider)
  • WP FAQ (sp-faq)
  • SP News and Widget (sp-news-and-widget)
  • WP Blog and Widgets (wp-blog-and-widgets)
  • Album and Image Gallery Plus Lightbox (album-and-image-gallery-plus-lightbox)
  • Timeline and History Slider (timeline-and-history-slider)
  • Featured Post Creative (featured-post-creative)
  • Post Grid and Filter Ultimate (post-grid-and-filter-ultimate)
  • Footer Mega Grid Columns (footer-mega-grid-columns)
  • WP Responsive Recent Post Slider (wp-responsive-recent-post-slider)
  • WP Slick Slider and Image Carousel (wp-slick-slider-and-image-carousel)
  • WP Featured Content and Slider (wp-featured-content-and-slider)
  • Hero Banner Ultimate (hero-banner-ultimate)
  • Preloader for Website (preloader-for-website)
  • Accordion and Accordion Slider (accordion-and-accordion-slider)
  • Portfolio and Projects (portfolio-and-projects)
  • Ticker Ultimate (ticker-ultimate)
  • WP Trending Post Slider and Widget (wp-trending-post-slider-and-widget)
  • WooCommerce Product Slider and Carousel (woo-product-slider-and-carousel-with-category)
  • Audio Player with Playlist Ultimate (audio-player-with-playlist-ultimate)
  • Meta Slider and Carousel with Lightbox (meta-slider-and-carousel-with-lightbox)
  • Post Category Image with Grid and Slider (post-category-image-with-grid-and-slider)
  • Product Categories Designs for WooCommerce (product-categories-designs-for-woocommerce)

WordPress.org Shut Down 25+ Plugins in One Day

These plugins were installed on thousands of websites, making the impact widespread.

The pattern across these plugins suggests a shared codebase modified after ownership transfer, indicating a coordinated attack.

What Is a WordPress Supply Chain Attack?

A supply chain attack occurs when attackers compromise trusted software to infect users indirectly.

In this case:

  • Hackers acquired plugin ownership
  • Inserted malicious code into updates
  • Distributed malware through official channels

Users installed updates normally, unknowingly infecting their websites.

Technical Breakdown of the Backdoor

The attack involved sophisticated code injection designed for remote execution and persistence.

Key malicious functions introduced:

fetch_ven_info()
file_get_contents()
unserialize()

What these functions do:

  • file_get_contents() → Fetches remote data from attacker-controlled servers
  • unserialize() → Executes that data as PHP code
  • Combined → Enables remote code execution (RCE)

Additional Backdoor Behavior

  1. Dynamic Function Execution
    • Attackers control which functions run remotely
  2. Unauthenticated REST API Access

permission_callback => __return_true

  • Allows access without login authentication
  1. Core File Injection
    • Malware embedded into files like wp-config.php

This creates persistent access even after plugin removal

The 8-Month Delayed Attack Strategy

One of the most dangerous aspects was the delayed activation.

Timeline:

  • Plugin active since: 2019
  • Malicious update released: August 2025
  • Attack triggered: April 2026

The malware remained dormant for 8 months, avoiding detection and spreading widely.

How the Malware Attacks Your Website

Once activated, the malware performs multiple harmful actions:

🔹 SEO Spam Injection

  • Creates hidden pages with spam keywords
  • Targets search engines, not users

🔹 Cloaking

  • Normal content shown to visitors
  • Spam content shown to Google

🔹 Remote Control Access

  • Attackers execute code anytime
  • Modify website behavior

🔹 Persistence Mechanism

  • Survives plugin deletion
  • Reinstalls itself via core files

SEO Impact: Silent Ranking Killer

This attack was specifically designed to damage SEO.

Major consequences:

  • Spam pages indexed in Google
  • Sudden ranking drops
  • Loss of domain authority
  • Possible Google penalties or deindexing

Many website owners remained unaware until traffic dropped significantly.

How to Check If Your WordPress Site Is Infected

Quick Detection Checklist

  1. Review installed plugins for suspicious names
  2. Check recently updated plugins
  3. Inspect wp-config.php for unusual code
  4. Run a malware scan using security tools
  5. Search Google:

site:yourdomain.com

  1. Look for spam pages or irrelevant content

How to Protect Your Website from Plugin Malware

Best Practices for WordPress Security

How to Protect Your Website from Plugin Malware

1. Install Trusted Plugins Only

 Choose plugins with active maintenance and strong reputation

2. Monitor Plugin Ownership Changes

Ownership changes can introduce hidden risks

3. Limit Plugin Usage

Reduce attack surface by using fewer plugins

4. Use Security Tools

  • Wordfence
  • Sucuri
  • Real-time malware scanners

5. Perform Regular Security Audits

  • Weekly manual checks
  • Daily automated scans

6. Monitor SEO Performance

  • Track keyword rankings
  • Check indexed pages

Advanced: How Developers Can Patch Affected Plugins (Use with Caution)

For advanced users and developers, it is technically possible to remove the malicious module from affected plugins.

Important: This method is not recommended for beginners. Incorrect changes can break your website or leave it vulnerable.

Basic approach used by security researchers:

  1. Remove the malicious analytics module directory (commonly named wpos-analytics)
  2. Locate and delete loader functions in the main plugin file
  3. Update the plugin version to prevent conflicts
  4. Repackage and reinstall the plugin

 However, this approach requires:

  • Strong PHP knowledge
  • Understanding of WordPress plugin architecture
  • Manual code review

Recommended Safer Alternative

Instead of patching manually, we strongly recommend:

  • Remove affected plugins completely
  • Replace with trusted alternatives
  • Scan your website for malware
  • Restore from a clean backup if needed

Common Mistakes to Avoid

  • Installing nulled or pirated plugins
  • Ignoring plugin updates
  • Using abandoned plugins
  • Not scanning your website regularly

Why This Attack Changes WordPress Security Forever

This incident marks a shift in cybersecurity strategy:

Attackers now target trust instead of vulnerabilities.

This means:

  • Even trusted plugins can become threats
  • Continuous monitoring is essential
  • Security must include supply chain awareness

Key Takeaway

The 2026 WordPress plugin hack proves that even trusted plugins can be compromised through malicious updates, allowing attackers to control websites and damage SEO without detection.

FAQs

What is a WordPress plugin backdoor?

A backdoor is hidden code that allows hackers to access and control your website without permission.

Can plugin updates infect my website?

Yes. If a plugin is compromised, updates can include malware that infects your site.

How do I know if my website is hacked?

Look for spam pages, unusual code, redirects, or sudden SEO drops.

How often should I scan my WordPress site?

Daily automated scans and weekly manual checks are recommended.

Is WordPress safe in 2026?

Yes, if proper security practices and monitoring are followed.

Final Thoughts from TechnoCrackers

The WordPress plugin hack of 2026 is a wake-up call for website owners.

Security is no longer optional — it directly impacts:

At TechnoCrackers, we recommend combining security best practices with continuous monitoring to stay protected against evolving threats.

How to Create an Accordion in WordPress Without Using Any Scripts (Using Default Features)

How to Create an Accordion in WordPress Without Using Any Scripts

Creating an accordion in WordPress is a common requirement, especially for FAQs, product details, or content-heavy pages where you want to save space and improve user experience. While many users rely on plugins or JavaScript-based solutions, WordPress actually allows you to create a simple and effective accordion using only built-in features and standard HTML—no scripts required.

In this blog, we will walk you through a clean, lightweight, and fully functional way to create an accordion using default WordPress capabilities.

What is an Accordion?

An accordion is a user interface (UI) component that lets users expand and collapse sections of content. Each section has a heading, and when clicked, it reveals or hides the associated content. This helps keep pages organized and prevents users from being overwhelmed by too much information at once.

Accordions are commonly used for:

  • Frequently Asked Questions (FAQs)
  • Product descriptions
  • Service details
  • Tutorials and guides

Why Avoid Scripts or Plugins?

Using plugins or JavaScript for simple UI elements like an accordion can sometimes be unnecessary. Here are a few reasons why you might prefer a no-script solution:

  • Better Performance: Fewer scripts mean faster page load times
  • Improved Security: No dependency on third-party code
  • Simplicity: Easy to implement and maintain
  • Compatibility: Works across modern browsers without issues

By using native HTML elements, you can achieve the same functionality in a much cleaner way.

The Native HTML Solution: <details> and <summary>

HTML5 introduced two very useful elements: <details> and <summary>. These elements are specifically designed to create expandable and collapsible sections—exactly what an accordion does.

  • <details> acts as the container
  • <summary> is the clickable heading

When a user clicks on the summary, the content inside the details tag expands or collapses automatically—no JavaScript needed.

Step-by-Step Guide to Create an Accordion in WordPress

Follow these steps to create your accordion:

Step 1: Open the WordPress Editor

Go to your WordPress dashboard and open the page or post where you want to add the accordion.

Step 2: Add a Custom HTML Block

Click on the “+” (Add Block) button and search for Custom HTML. Select it to insert a block where you can write HTML code.

Step 3: Add Accordion Code

Paste the following code into the Custom HTML block:

<details>
   <summary>What is Lorem Ipsum?</summary>
   <p>Lorem Ipsum is simply dummy text of the printing and typesetting industry. Lorem Ipsum has been the industry's standard dummy text ever since the 1500s, when an unknown printer took a galley of type and scrambled it to make a type specimen book.</p> 
</details>

<details>
   <summary>What is Lorem Ipsum?</summary>
   <p>Lorem Ipsum is simply dummy text of the printing and typesetting industry. Lorem Ipsum has been the industry's standard dummy text ever since the 1500s, when an unknown printer took a galley of type and scrambled it to make a type specimen book.</p>  
</details>

<details>
   <summary>What is Lorem Ipsum?</summary> 
   <p>Lorem Ipsum is simply dummy text of the printing and typesetting industry. Lorem Ipsum has been the industry's standard dummy text ever since the 1500s, when an unknown printer took a galley of type and scrambled it to make a type specimen book.</p>
</details>

Step 4: Preview Your Accordion

Click on the Preview button to see how your accordion looks on the front end. You’ll notice that each section expands and collapses smoothly when clicked.

Preview Accordion

Enhancing the Accordion with CSS

While the default appearance is functional, you can improve the design using simple CSS. This step is optional but recommended for a better user experience.

Add Custom CSS

Go to Appearance → Customize → Additional CSS and add the following:

details {
  margin-bottom: 12px;
  border: 1px solid #ddd;
  border-radius: 6px;
  padding: 12px;
  background-color: #ffffff;
}
summary {
  font-weight: 600;
  font-size: 16px;
  cursor: pointer;
  outline: none;
}
details[open] {
  background-color: #f5f5f5;
}
summary::marker {
  color: #0073aa;
}

This will:

  • Add spacing and borders
  • Improve readability
  • Highlight open sections
  • Enhance the clickable area

Limitations of This Approach

While this method is powerful and simple, it does have a few limitations:

  • No Advanced Animation: You won’t get smooth sliding effects without additional CSS tricks
  • Limited Control: Behavior is browser-controlled
  • Basic Styling: Requires custom CSS for advanced design

However, for most use cases, these limitations are minor compared to the benefits.

Conclusion

Creating an accordion in WordPress without using scripts is not only possible but also highly efficient. By leveraging the native <details> and <summary> HTML elements, you can build a clean, functional, and user-friendly accordion with minimal effort.

This approach keeps your website lightweight, improves performance, and reduces dependency on external tools. Whether you’re building a blog, business site, or eCommerce store, this method is a practical solution for organizing content effectively.

Start using this technique today and simplify your WordPress design process without compromising functionality.

Scale Your WordPress Projects with White Label Support

If you’re building custom WordPress solutions and want to deliver faster without increasing your internal workload, partnering with a reliable white label WordPress development team can make all the difference. At Technocrackers, we help agencies and businesses handle everything from custom features to advanced WordPress implementations while you focus on growing your brand.

Schedule a free consultation to discuss how our white label WordPress development services can support your next project.

What is Elementor One? The Future of AI Website Building

What is Elementor One The Future of AI Website Building

Introduction

Building a website can be confusing, especially when you need many tools for design, speed, emails, and content.

Elementor One solves this problem by giving you everything in one place.

In this guide, you will learn:

  • What Elementor One is
  • Why it is useful
  • How to install it
  • How to create your website step by step

What is Elementor One?

Elementor One is an all-in-one website building platform created by Elementor.

It combines:

  • Website design
  • AI tools
  • Performance optimization
  • Email delivery
  • Site management

All inside one system.

You don’t need to install many plugins. Everything works together smoothly.

Elementor_One

Why Elementor One Matters

Before Elementor One, building a website required:

  • Page builder plugin
  • SEO plugin
  • Speed optimization tools
  • Email tools
  • AI tools

Now, Elementor One brings all of this together.

Benefits:

  • Saves time
  • Reduces cost
  • No plugin conflicts
  • Easy workflow
  • Better performance

It creates a simple and powerful website-building experience

Elementor One Matters

Key Features of Elementor One

AI Content & Design

  • Generate text, layout, and images using AI
  • Helps you build faster

Drag & Drop Editor (Pro)

  • Easy visual editing
  • No coding needed

Image Optimization

  • Automatically improves website speed

Email Delivery

  • Ensures emails reach inbox (orders, forms, etc.)

Accessibility Tools

  • Helps make your website user-friendly for everyone

Shared Credit System

  • Monthly credits used for:
    • AI content
    • Images
    • Emails
    • Optimization

You can use credits where you need most

Key Features of Elementor One

How Elementor One Works

Simple process:

  1. Enter your website idea
  2. AI generates design + content
  3. Customize using drag-and-drop
  4. Optimize automatically
  5. Manage everything in one dashboard

How to Install Elementor One

Follow these steps:

Step 1: Purchase Plan

  • Go to Elementor website
  • Buy Elementor One plan

Step 2: Download Plugin

  • You will get a .zip file of Elementor Pro

Step 3: Upload in WordPress

  • Go to:
    Dashboard → Plugins → Add New → Upload Plugin
  • Upload the zip file

Step 4: Activate & Connect

  • Activate plugin
  • Connect your Elementor account

After this, all tools will be available in your dashboard

Install_elementor_pro

How to Create Pages in Elementor One

Step 1: Create New Page

  • Go to Pages → Add New
  • Click Edit with Elementor

Step 2: Choose Layout

  • Use:
    • Templates (ready designs)
    • Or start from scratch

Step 3: Add Sections & Widgets

  • Drag and drop:
    • Text
    • Images
    • Buttons
    • Forms

Step 4: Customize Design

  • Change colors, fonts, spacing
  • Adjust for mobile view

Step 5: Publish Page

Click Publish

How to Create Pages in Elementor One

How to Use Elementor One Tools

Using AI

  • Generate:
    • Content
    • Code
    • Layouts
  • Saves time in writing and design

Using Optimization

  • Optimize images automatically
  • Improve website speed

Using Email Tools

  • Manage form emails
  • Ensure delivery

Using Dashboard

  • Manage all tools in one place
  • No need to switch between plugins

Using Elementor One tools and benefits

Benefits of Elementor One

Faster Website Creation

Build websites in minutes instead of hours.

Cost Saving

No need to buy multiple tools.

Everything in One Place

Design, AI, speed, and emails together.

Scalable for Business

Perfect for:

  • Freelancers
  • Agencies
  • Business owners

The Future of Website Building

Website creation is moving towards:

  • Automation
  • AI assistance
  • Simpler workflows

Elementor One is part of this shift, helping users focus more on ideas and less on technical setup.

The Future of Website Building

Final Conclusion

Elementor One is a modern solution for website building.

It simplifies everything by combining:

  • Design
  • AI
  • Performance
  • Management

If you want a faster and easier way to create websites, this is a great option.

Need White Label WordPress Support?

If you’re building websites for clients and want to scale faster without increasing your workload, our white label WordPress development services can help you deliver high-quality projects under your own brand.

Schedule a free consultation and start growing your agency with confidence.

FAQs

Is Elementor One beginner-friendly?

Yes, anyone can use it without coding knowledge.

Do I need other plugins?

In most cases, no. Elementor One replaces many tools.

How do credits work?

You get monthly credits and can use them for AI, images, and other features

Can I build client websites?

Yes, it is perfect for freelancers and agencies.

Explore Elementor’s New Features: Transitions, Transform & Size Variables Explained

Explore-Elementor’s-New-Features-Transitions,-Transform-&-Size-Variables-Explained

Elementor Editor V4 introduces a major upgrade in how styles and layouts are handled. Instead of relying heavily on scattered settings and custom CSS, V4 moves toward a more structured, CSS-based design system.

The most powerful additions in Elementor Editor V4 include:

  • Transitions
  • Transform Controls
  • Size Variables

Let’s explore what’s new and how you can use these features inside Elementor Editor V4.

Transitions – Smoother, More Professional Animations

What Are Transitions?

Transitions allow elements to smoothly change from one state to another — such as hover effects, color shifts, scaling, or movement.

Previously, adding advanced transitions often required custom CSS. Now, Elementor gives you direct control inside the editor.

What You Can Control:

  • Duration (speed of animation)
  • Timing functions (ease, linear, etc.)
  • Property-specific transitions
  • Add Multiple Transitions for any css properties

Why It Matters

  • Creates a more interactive user experience
  • Makes buttons and UI elements feel responsive
  • Reduces dependency on custom CSS
  • Improves consistency across the design

How to Use Transitions in Elementor

  1. Edit any widget (Button, Image, Container, Heading, etc.)
  2. Go to the Style Tab > Effects
  3. Click on Transition   
  4. Add Transition properties like:
    • Duration (e.g., 0.3s)
    • Transition type Specific CSS properties (background-color, transform, opacity, etc.)

You can even add multiple transitions for different CSS properties.

transitions

Transform – Advanced Visual Effects Without Code

What Is Transform?

The Transform feature allows you to visually manipulate elements by:

  • Scaling
  • Rotating
  • Skewing
  • Translating (moving on X and Y axis)

All without writing a single line of CSS.

Why This Is Powerful

Transform opens up modern design possibilities like:

  • Dynamic card hover effects
  • Tilted background elements
  • Floating image layouts
  • Creative hero sections

Previously, these effects required manual CSS transforms. Now, everything is accessible directly inside Elementor’s visual controls.

How to Use Transform in Elementor

  1. Select the widget or container
  2. Go to Style Tab > Effects
  3. Open Transform
  4. Choose:
    • Normal State or Hover State
  5. Adjust:
    • Rotate
    • Scale
    • Offset (X/Y movement)
    • Skew

You can apply different transform values for hover to create interactive effects.

transform_options

Size Variables – Smarter, Consistent Spacing & Layout Control

What Are Size Variables?

Size Variables allow you to define reusable spacing values (like padding, margin, gap sizes) globally and apply them across your website.

Instead of manually entering pixel values everywhere, you can define structured spacing rules.

Benefits:

  • Consistent design system
  • Faster development workflow
  • Easier future updates
  • Cleaner and scalable layouts

For example:

  • Small spacing = 8px
  • Medium spacing = 16px
  • Large spacing = 32px

Update once → changes reflect everywhere.

This brings Elementor closer to professional design systems used in large-scale web applications.

How to Use Size Variables in Elementor Editor V4

Elementor V4 makes it very easy to create and apply Size Variables directly from the editor. Follow these steps:

  1. Edit Any Page in Elementor
    Open the page using Elementor Editor V4.
  2. Select the Element
    Click on any widget or container where you want to adjust spacing or typography (padding, margin, gap, font-size, etc.).
  3. Hover Over a Size Field
    When you hover over a size-related field (such as padding, margin, or font-size), you’ll see a Variable icon next to the input field.
  4. Click the Variable Icon
    Click the icon to:

    • Select an existing Size Variable
    • Or create a new one
  5. Create Size Variables
    You can define structured spacing values such as:

    • XS → 4px
    • S → 8px
    • M → 16px
    • L → 32px
  6. Apply the Variable
    Instead of manually entering pixel values, select your created variable from the list.

Why This Is Powerful

If you later update the “M” variable from 16px to 20px, every element using that variable across the entire website will update automatically.

This ensures:

  • Consistent spacing
  • Faster global design updates
  • A scalable and maintainable design system

Size Variables in Elementor V4 help you build websites the way professional front-end systems work — structured, consistent, and future-ready.

variable-manager

Why These Features Matter for Businesses

These updates aren’t just visual improvements — they impact:

Performance

Less custom CSS and third-party animation plugins.

Maintainability

Structured variables mean easier updates later.

Modern UI/UX

Smooth transitions and transforms align with current design trends.

Faster Development

Developers can build advanced layouts directly within Elementor.

Real-World Impact on Client Websites

At our IT company, we focus on creating websites that are:

  • Visually engaging
  • Performance-optimized
  • Scalable
  • Easy to maintain

With these new Elementor capabilities, we can now deliver:

  • Cleaner animations
  • Better interactive experiences
  • Consistent design systems
  • Faster project turnaround

Final Thoughts

Elementor’s new Transitions, Transform, and Size Variables features represent a major step forward in visual design control and workflow optimization.

Whether you’re a business owner looking for a modern website or a developer aiming to streamline production, these tools help build better WordPress websites — without increasing complexity.

If you’re planning to upgrade your site or build a new one using Elementor, now is the perfect time to leverage these powerful improvements.

Take Your WordPress Website to the Next Level
At TechnoCrackers, we specialize in WordPress development, Elementor customization, performance optimization, and scalable website architecture for businesses and agencies.

Book a Free Consultation and let’s turn your website idea into a high-performing digital experience.

Elementor Editor V4 Beta Released – Explore Atomic Elements, Variables & Flexbox New Features

Elementor-Editor-V4-Beta-Released-–-Explore-Atomic-Elements,-Variables-&-Flexbox-New-Features

The much-anticipated Editor V4 Beta has officially arrived in Elementor — bringing a major architectural shift to how we design websites in WordPress.

With the introduction of Atomic Elements, Variables Manager, and improved Flexbox layouts, Elementor is moving toward a cleaner, faster, and more scalable design system.

In this article, we’ll explore what’s new in Elementor Editor V4 Beta, how it works, and whether you should start using it in your projects.

What Is Elementor Editor V4?

Elementor Editor V4 is a redesigned editing experience that replaces the traditional Section → Column → Widget structure with a more modern, CSS-driven architecture.

Instead of nested sections and columns, V4 focuses on:

  • Div-based structure
  • Native Flexbox layout
  • Atomic components
  • Design variables (like design tokens)

This makes Elementor more aligned with modern front-end development standards.

1. Atomic Elements – A Cleaner Structure

One of the biggest upgrades in Editor V4 is Atomic Elements.

Atomic_elements

Instead of heavy widget wrappers, you now get simplified elements like:

  • Div Block
  • Flexbox
  • Tabs
  • Heading
  • Paragraph
  • Button
  • Etc..

These are lightweight and modular — meaning:

  • Less DOM output
  • Cleaner HTML structure
  • Better performance
  • More control over styling

Why Atomic Elements Matter

Traditional Elementor layouts could become deeply nested, especially for complex pages. Atomic Elements reduce unnecessary markup, helping improve:

  • Page speed
  • Maintainability
  • Scalability

For developers and advanced designers, this is a huge win.

2. Variables Manager – Design Once, Use Everywhere

The new Variables Manager is one of the most powerful additions in V4.

You can now define reusable design values such as:

  • Colors
  • Typography sizes
  • Spacing
  • Custom values

Variable_manager

Example:

Instead of manually setting padding to 40px on multiple sections, you create a variable:

–section_padding: 40px;

Apply it everywhere.

Later, change the value once → update across the entire website.

Why This Is Powerful

  • Consistent design system
  • Faster global updates
  • Easier client revisions
  • Cleaner workflow

This brings Elementor closer to professional design systems used in modern web development.

3. Improved Flexbox Layout Control

Flexbox was introduced earlier, but in Editor V4 it becomes more refined and central.

You now get better control over:

  • Alignment
  • Direction
  • Gap
  • Wrapping
  • Justify content

This makes layout creation:

  • More responsive
  • More flexible
  • More developer-friendly

Compared to the old column system, Flexbox offers greater control with less complexity.

Flex_box

4. Cleaner Custom CSS Handling

Editor V4 improves how custom CSS works inside Elementor.

Benefits include:

  • More stable CSS application
  • Better element targeting
  • Improved performance

For users who frequently add custom styles, this makes development smoother and more predictable.

New Elementor CSS feature comparison

Performance & DOM Improvements

With Atomic Elements and reduced nesting, Elementor V4 aims to:

  • Decrease DOM size
  • Improve load speed
  • Enhance front-end output

This is especially important for SEO and Core Web Vitals.

Elementor V4 performance and DOM improvements

Should You Use Elementor V4 Beta Now?

Since this is still a Beta version, here’s what you should know:

Good For:

  • Testing on staging sites
  • New experimental projects
  • Learning new workflow

Not Recommended For:

  • High-traffic production websites
  • Critical client projects

Always test thoroughly before using it live.

Final Thoughts

Elementor Editor V4 Beta marks a significant step forward for the platform.

With:

  • Atomic Elements
  • Variables Manager
  • Improved Flexbox
  • Cleaner architecture

Elementor is clearly evolving toward a more professional and scalable page-building system.

If you’re a designer or developer working with WordPress, this update is definitely worth exploring — especially for future-proofing your workflow.

Want expert help implementing Elementor or building high-performance WordPress websites?

Partner with Technocrackers for professional white label website development, custom WordPress solutions, and performance optimization. Get a free consultation today and scale your digital projects faster.

FAQ

Is Elementor Editor V4 stable?

Currently, it is in Beta. Use it carefully on non-production environments.

Will Elementor V4 break existing websites?

No immediate changes apply to existing sites unless you enable V4 features, but testing is strongly recommended.

Is Atomic Elements better for performance?

Yes, because they reduce unnecessary markup and improve DOM structure.

How to Fix the WordPress max_execution_time Fatal Error After Updating to WordPress 6.9

How to Fix the WordPress max_execution_time Fatal Error After Updating to WordPress 6.9

Encountering a “Fatal Error: Maximum execution time exceeded” can be frustrating, especially after a major update like WordPress 6.9. This error occurs when a PHP script takes longer to process than the server allows.

Here are the proven methods to fix it, following the expert recommendations from Kinsta.

1. What the Error Looks Like

Before fixing it, you need to identify it. You will usually see a message in your WordPress dashboard or an email from WordPress.

Visual Guide:

max-execution-time

2. Increase Time Limit via wp-config.php (Recommended)

The wp-config.php file is the heart of your WordPress configuration. Adding a simple line of code here can solve the issue for most users.

Steps:

  1. Connect to your site via FTP or File Manager.
  2. Locate the wp-config.php file in your root folder.
  3. Add set_time_limit(300); before the line that says “/* That’s all, stop editing! Happy publishing. */”.

Visual Guide:

time-limit-wpconfig

3. Modify the .htaccess File

If your host uses Apache (most shared hosts do), the .htaccess file is a powerful way to override server defaults.

Steps:

  1. Find the .htaccess file in your /public folder via FTP.
  2. Add the following line to the top of the file: php_value max_execution_time 300

Visual Guide:

htaccess

4. Use the “WP Maximum Execution Time Exceeded” Plugin

If you are uncomfortable editing code files, Kinsta recommends using a dedicated plugin that automates the process for you.

WP-max-execution-time

Steps:

  1. Go to Plugins > Add New.
  2. Search for “WP Maximum Execution Time Exceeded.”
  3. Install and Activate. The plugin automatically increases the limit to 300 seconds.

Visual Guide:

just-install-it

5. Adjust via php.ini

For those on a VPS or with a host that allows custom PHP settings, editing the php.ini file is the most direct server-level fix.

Steps:

  1. Locate the ini file (often in the root or /etc/ folder).
  2. Find the line max_execution_time.
  3. Change the value to 300 (e.g., max_execution_time = 300).

Visual Guide:

Adjust via php.ini

6. Contact Your Hosting Provider

If none of the methods above work, your host may have hard-coded limits. Kinsta and other premium hosts can often adjust this for you via their support chat.

Final Thoughts

The maximum execution time error is one of the most common WordPress issues — but also one of the simplest to fix. Whether it’s a bad plugin, a low server limit, or heavy processes running after your update, you now have multiple ways to solve it.

By increasing the PHP execution limit and narrowing down problematic plugins, you can keep your site running smoothly and error-free on WordPress 6.9.

Still stuck with the WordPress max execution time fatal error after updating to 6.9?
Let TechnoCrackers fix it for you quickly and securely—Contact our WordPress experts today.

Contact us

Let's Unleash Your Digital Potential Together.

Address

C-605, Ganesh glory 11, Nr. BSNL Office, Jagatpur Road, S.G. Highway, Jagatpur, Ahmedabad, India - 382481.

Phone

INDIA : (091) 8200639242 USA : +1 (310) 868-6009

Limited Time Offer

X

Try a Free 2-Hour Test Task

Experience our quality, speed, and communication on any small WordPress task before you commit. No contract. No cost. No obligation.
[For New Agency Partners]

"*" indicates required fields

Name*