Grow your agency with a trusted white-label partner. From website development and technical support to SEO and eCommerce solutions, we provide the expertise you need to deliver more and scale confidently.
Empower your business with innovative digital marketing strategies designed for sustainable online growth. From technical SEO and eCommerce SEO to paid ads, social media, and email campaigns,
we create targeted solutions that boost visibility, engagement, and qualified customer leads.
If your WordPress emails stopped working after the 6.9 update and you’re struggling to understand why, you’re in the right place to fix this issue step by step. Many site owners noticed contact form emails, WooCommerce notifications, password resets, and admin alerts failing or going to spam.
This step‑by‑step guide shows exactly how to fix WordPress email issues using SMTP, the most reliable solution recommended for WordPress 6.9 and beyond.
Why SMTP Is Mandatory After WordPress 6.9
WordPress 6.9 introduced stricter handling of the email envelope sender. As a result:
PHP mail() is no longer reliable
Emails without authentication fail silently
Gmail, Outlook, and Yahoo block unauthenticated senders
SMTP fixes all of this by authenticating emails before sending.
Step 1: Choose a Reliable SMTP Plugin
For WordPress 6.9, these plugins work best:
WP Mail SMTP (Beginner‑friendly)
FluentSMTP (Free & powerful)
Post SMTP Mailer (Advanced logging)
Recommended for most sites: WP Mail SMTP
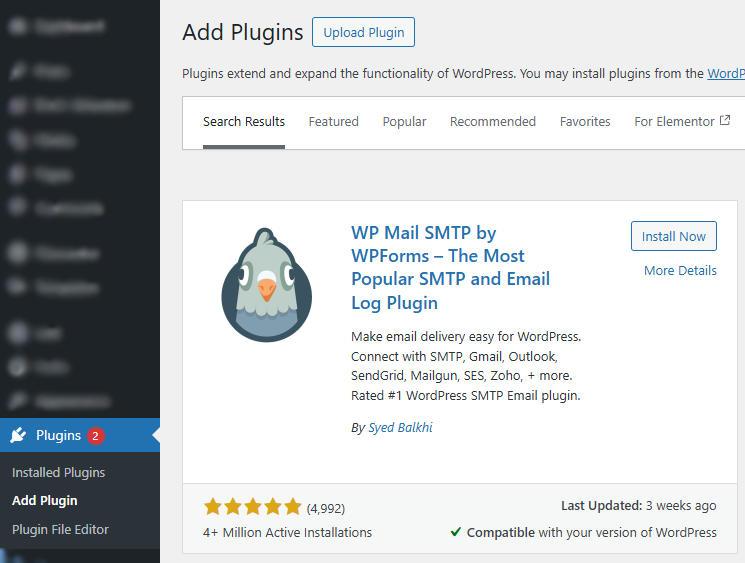
Step 2: Install WP Mail SMTP Plugin
Go to WordPress Dashboard → Plugins → Add New
Search for WP Mail SMTP
Click Install → Activate
Once activated, you’ll see the WP Mail SMTP Setup Wizard.
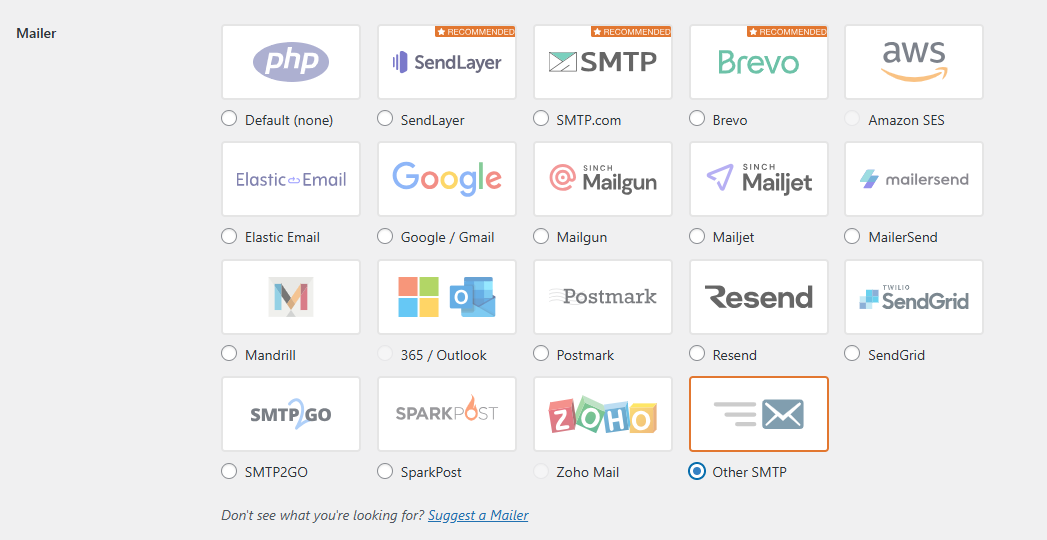
Step 3: Choose Your SMTP Mailer
WP Mail SMTP supports multiple mailers. Popular options:
Mailer
Best For
Gmail / Google Workspace
Small sites, blogs
Brevo (Sendinblue)
Marketing + transactional emails
SendLayer
WooCommerce & business sites
Amazon SES
High‑volume sending
Other SMTP
Custom hosting SMTP
For beginners, choose Gmail or Brevo.
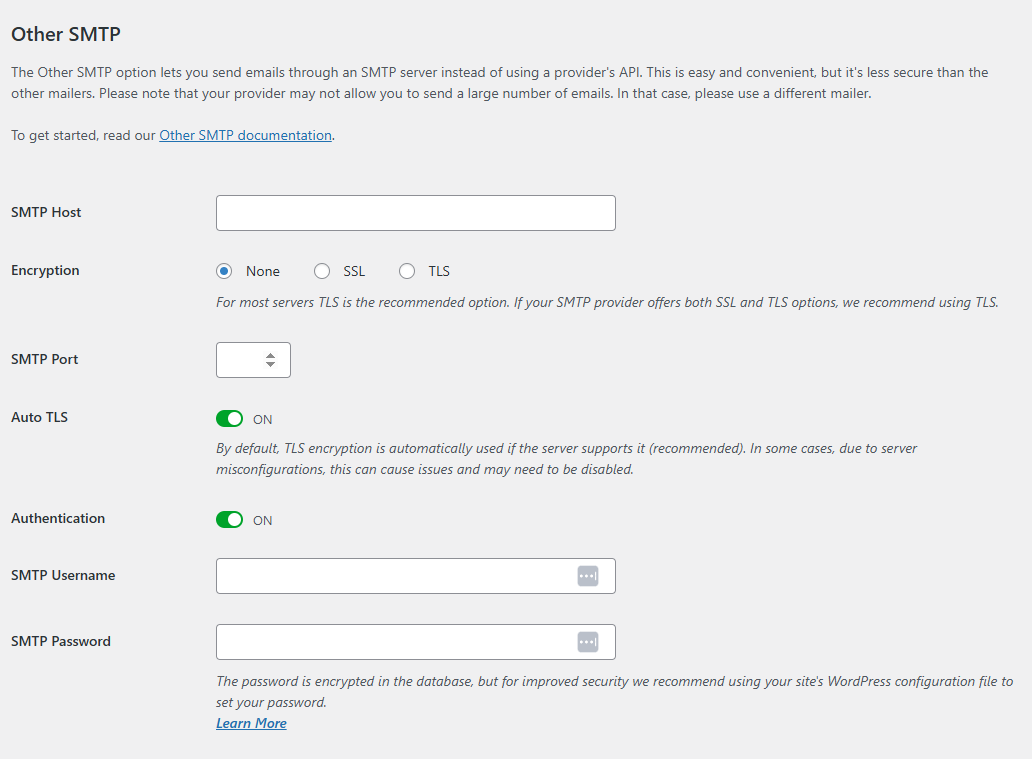
Step 4: Configure SMTP Settings (Example: Other SMTP)
If you select Other SMTP, enter:
SMTP Host: yourmailprovider.com
Encryption: TLS
SMTP Port: 587
Authentication: ON
Username: your email address
Password: email app password
Enable Force From Email Enable Force From Name
Step 5: Fix the “From Email Address” Issue (Very Important)
Introduction: The Scaling Dilemma Every Agency Faces
If you run a web or SEO agency, you’ve probably been here before — too many client projects, not enough developers, and an inbox full of “when will my site go live?” messages. We get it. Agencies grow fast, and web development capacity often struggles to keep up. But hiring full-time developers isn’t always the answer — it’s expensive, unpredictable, and hard to scale without sacrificing profit margins. That’s exactly where a white-label WordPress partner comes in — especially one who lives and breathes Elementor.
What’s Changing in 2026
2026 is shaping up to be the year of agency specialization. Most agencies are niching down, focusing on SEO, paid media, or design — not on the tech-heavy parts of WordPress builds. At the same time, client expectations are higher than ever:
“Can you deliver it by next week?”
“Can you make it faster on mobile?”
“Can you integrate this with our CRM and optimize for SEO?”
Agencies that can say yes confidently to those requests — without stretching their team — are the ones that’ll win.
Why White Label Partnerships Make Sense (Now More Than Ever)
Here’s the truth: agencies that scale sustainably all have one thing in common — they know what to keep in-house and what to delegate. When you partner with a white-label WordPress team like ours, you instantly:
Expand your team capacity without hiring.
We become your development wing — working behind the scenes, branded as you.
Deliver faster using Elementor workflows optimized for agencies.
We use pre-built kits, reusable widgets, and automation to cut build times.
Keep your margins healthy.
No surprise payroll costs. No office overhead. Just predictable, per-project pricing.
Protect your client relationships.
We work under strict NDAs — your clients will only ever see your brand.
Real-World Example
One of our agency partners in New York came to us after burning through three in-house developers in a year. They were great at SEO and client management — but every WordPress project slowed them down. We set up a white-label collaboration:
Shared Slack channel
Trello for project management
Standardized Elementor templates
In the first quarter, they delivered 12 websites instead of 5. Their profit margins grew by 38%, and client satisfaction scores hit a record high. That’s not a one-off. We see this story play out every month with agencies across the U.S.
The Hidden Advantage: Strategic Focus
Outsourcing your builds doesn’t just save time — it frees up focus. When your team isn’t bogged down in revisions and debugging, they can double down on client strategy, retention, and upselling — the real growth drivers. A white-label partner becomes your invisible engine — running smoothly in the background while you lead the brand forward.
Why Agencies Choose TechnoCrackers
We’ve built over 300+ WordPress and Elementor websites as a silent partner for agencies. Our secret sauce? Reliability + speed + communication.
Dedicated Slack channels for every agency
Elementor Pro expertise for rapid, high-quality builds
SEO-friendly site structures from day one
White-label reporting and project documentation
When we say we’re your team — we mean it.
Ready to Scale Without Hiring?
Let’s talk about how our white-label Elementor team can help your agency scale profitably in 2026.
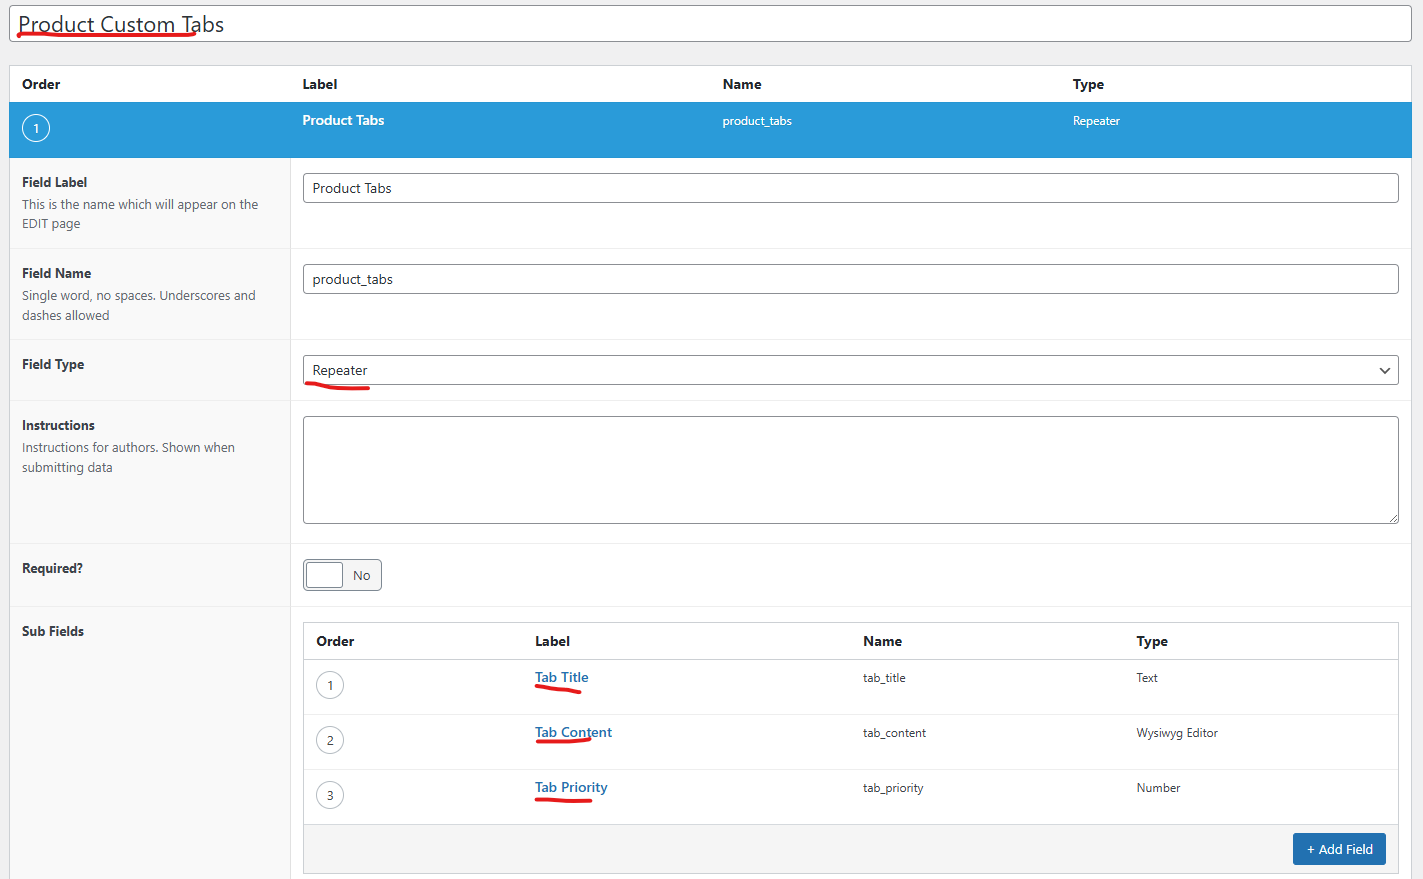
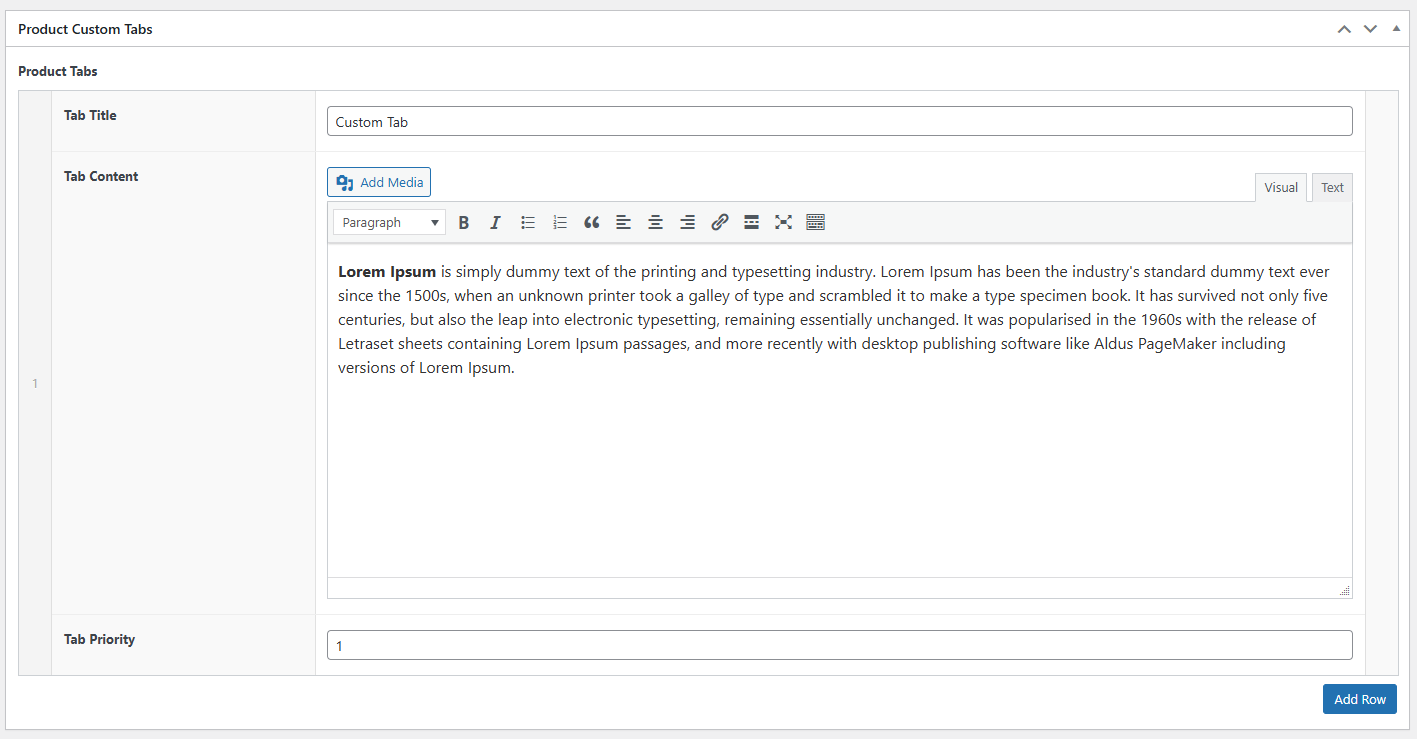
Creating custom product tabs in WooCommerce using Advanced Custom Fields (ACF) allows store owners to display additional product information in a clean, organized, and user-friendly way. Instead of hardcoding content, ACF enables you to manage tab titles, content, and order directly from the WordPress admin panel, making it easy to create unlimited, product-specific tabs without touching code repeatedly.
Creating custom product tabs in WooCommerce using Advanced Custom Fields (ACF) is a powerful and flexible way to manage detailed product information without hardcoding content. By leveraging ACF repeater fields and WooCommerce hooks, you can add unlimited, product-specific tabs that are easy to maintain directly from the WordPress admin panel.
This approach improves content organization, enhances the user experience, and allows non-technical users to update product details effortlessly. Whether you’re adding FAQs, specifications, warranty information, or size guides, ACF-based product tabs provide a scalable solution that works seamlessly with any WooCommerce theme or page builder.
By implementing this method, you gain full control over tab structure, content, and display logic—making it an ideal choice for modern, content-rich WooCommerce stores.
Want custom WooCommerce product tabs and advanced features built the right way?
Let TechnoCrackers handle your full WordPress development needs — from custom builds to seamless integrations, contact us today.
Elementor Tabs are great for organizing content, but by default they require users to click each tab manually. If you want a more dynamic experience—similar to a slider or carousel—you can make Elementor tabs auto-change at regular intervals. This approach improves engagement, highlights multiple pieces of content, and keeps your layout visually active.
In this article, we’ll explain what auto-changing tabs are, why they’re useful, and the different ways you can achieve this effect in Elementor.
What Does “Auto-Changing Tabs” Mean?
Auto-changing tabs behave like a slider:
Tabs switch automatically after a set time (for example, every 3–5 seconds)
Content rotates without user interaction
Users can still click tabs manually if they want
This creates a smooth, animated experience similar to testimonials sliders, feature showcases, or step-by-step presentations.
Plugins Required
Before creating auto-changing tabs in Elementor, make sure the following plugins are installed and activated on your WordPress website:
Elementor – Page builder plugin
Elementor Pro – Required for advanced features and better control
ElementsKit – Provides the Advanced Tabs widget with enhanced functionality
Step 1: Create the Tabs Layout
Follow these steps to create the tab structure using ElementsKit:
Open the page where you want to add the tabs.
Click Edit with Elementor.
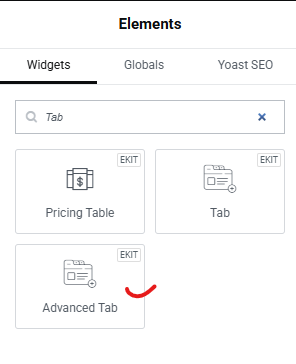
In the Elementor editor panel, search for ElementsKit
Drag and drop the Advanced Tab widget (from ElementsKit) onto your page.
Choose the tab layout based on your design needs — Vertical or Horizontal.
Add your tab titles and corresponding tab content for each tab.
Design the tabs to match your website layout by adjusting:
Colors
Typography
Spacing
Icons and alignment
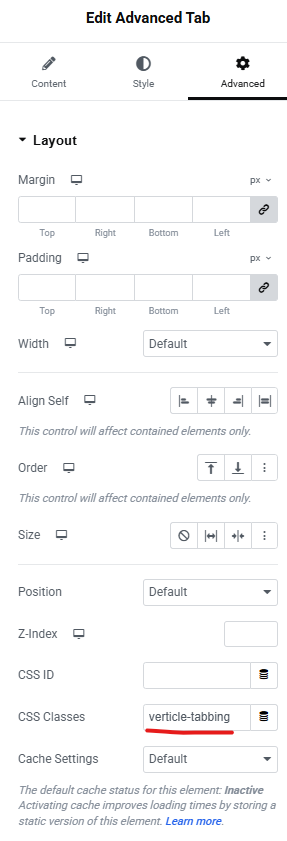
Open the Advanced settings of the widget.
Add a custom CSS class to the tab widget (this will be used later to enable auto-changing functionality).
Step 2: Convert Tabs to Auto-Change Like a Slider
Now that your tabs are created and styled, the next step is to make them auto-change automatically like a slider. This is done using a custom JavaScript script that switches tabs at a fixed time interval.
This method works smoothly with ElementsKit Advanced Tabs and uses Bootstrap’s native tab functionality for better compatibility.
What This Script Does
Automatically switches tabs every 3 seconds
Works with vertical or horizontal tabs
Stops auto-sliding when a user manually clicks a tab
Targets the widget using the custom CSS class you added earlier
How to Use the Script
Copy the script provided below.
Paste it into one of the following locations:
Your theme’s php file (before </body>)
A Custom Code plugin (recommended)
Elementor → Custom Code → Location: Footer
Save or publish the changes.
Refresh the page and check the front end — your tabs should now auto-slide like a slider.
<script>
document.addEventListener("DOMContentLoaded", function () {
  document.querySelectorAll('.verticle-tabbing').forEach(wrapper => {
    const tabs = wrapper.querySelectorAll('.elementkit-nav-link');
    if (tabs.length < 2) return;
    let currentIndex = 0;
    let interval = null;
    function showTab(tab) {
      // Bootstrap 5
      if (window.bootstrap && bootstrap.Tab) {
        bootstrap.Tab.getOrCreateInstance(tab).show();
      }
      // Bootstrap 4 fallback
      else if (window.jQuery && jQuery.fn.tab) {
        jQuery(tab).tab('show');
      }
    }
    function startAutoplay() {
      if (interval) return;
      interval = setInterval(() => {
        showTab(tabs[currentIndex]);
        currentIndex = (currentIndex + 1) % tabs.length;
      }, 3000);
    }
    function stopAutoplay() {
      if (!interval) return;
      clearInterval(interval);
      interval = null;
    }
    // Wait for ElementsKit & Bootstrap to load
    setTimeout(startAutoplay, 1200);
    // Stop autoplay on manual tab click
    tabs.forEach(tab => {
      tab.addEventListener('click', stopAutoplay);
    });
  });
});
</script>
Final Thoughts
Making Elementor tabs auto change like a slider is a powerful way to enhance interactivity and engagement on your website. Whether you use custom JavaScript, an Elementor add-on, or a slider-based alternative, this technique can help present more content in less space—while keeping your design modern and dynamic.
With the right timing and thoughtful UX, auto-changing tabs can turn static layouts into engaging visual experiences.
If you’re planning a custom WordPress website or need advanced Elementor functionality without relying on heavy plugins, getting expert guidance early can save time and rework later.
You can Book a Free WordPress Consultation with our team to discuss your requirements, explore the best technical approach, and ensure your site is built for performance and scalability.
If you’re looking to take full control of how your WooCommerce products appear on your store, Elementor Pro makes it incredibly easy. With custom templates, loop items, and dynamic WooCommerce elements, you can design a fully branded shop page — no coding required.
In this guide, you’ll learn how to:
Create a custom WooCommerce archive template
Build a custom product loop layout with images, pricing, meta info & add-to-cart
Enable pagination, column control, and product count
Add category-based sorting functionality for a better user experience
By the end of this tutorial, you’ll have a professional, flexible product layout that matches your brand perfectly.
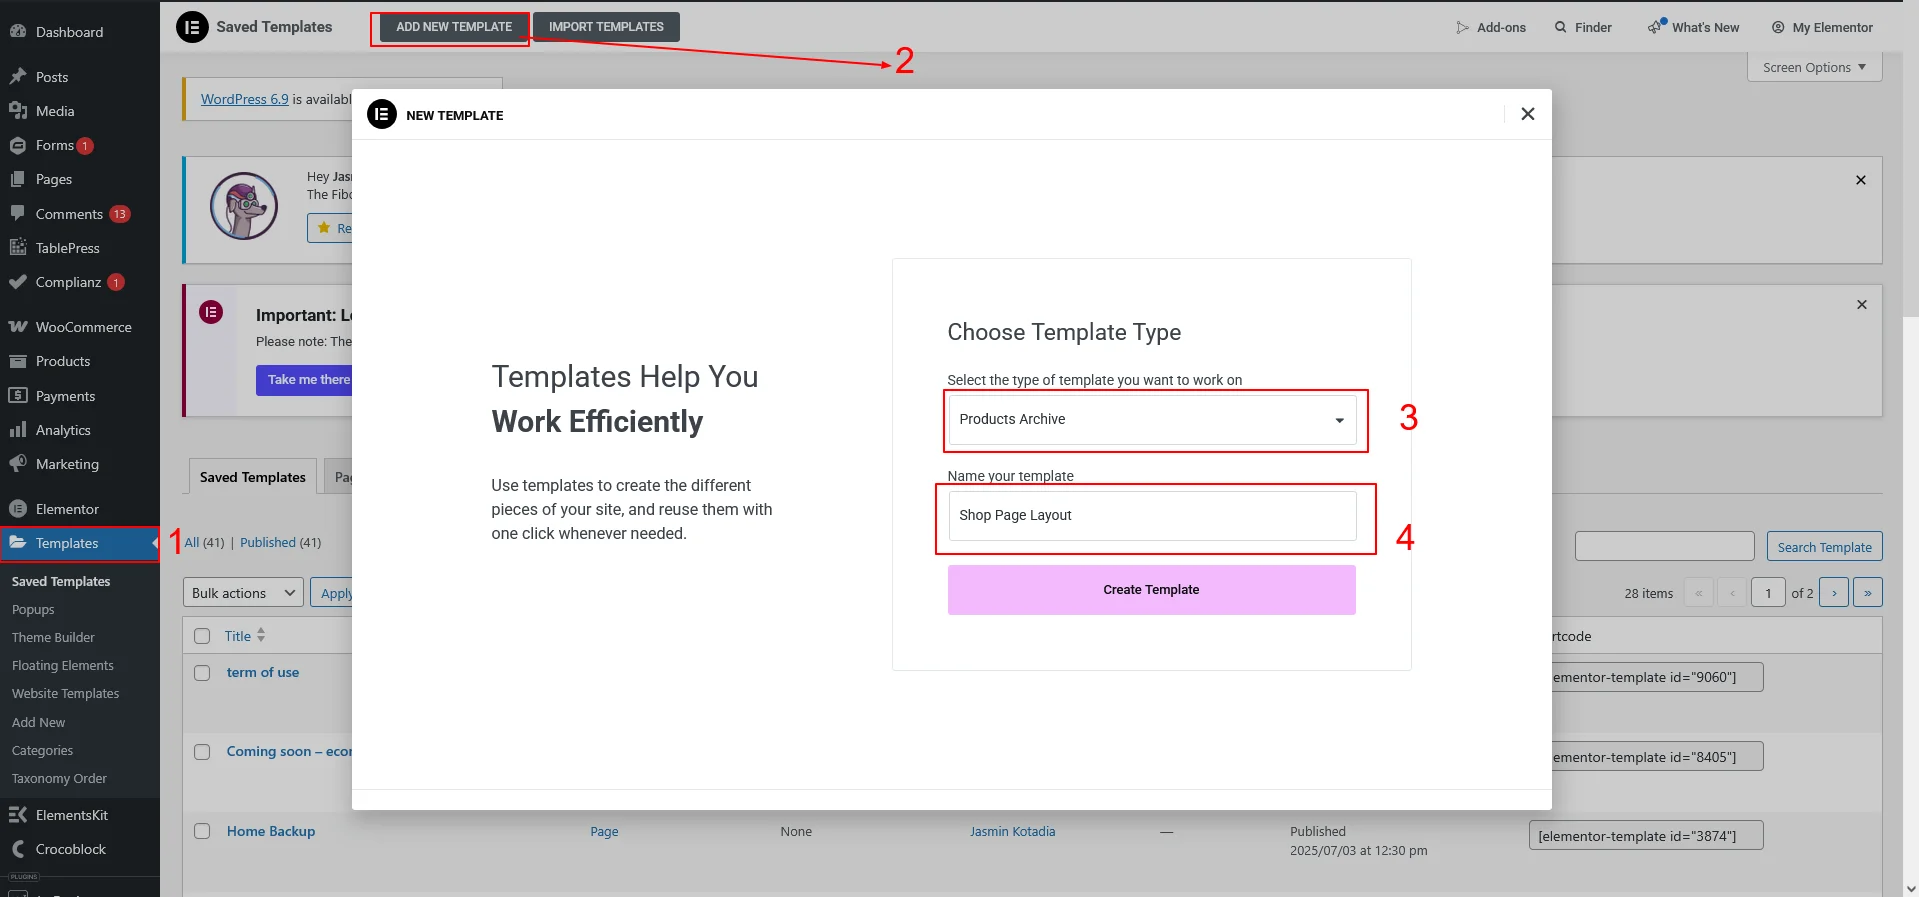
Step 1: Create a Custom Product Archive Template
To start customizing the default WooCommerce Shop and Category pages, follow these steps:
Go to WordPress Dashboard → Templates → Theme Builder
Click Add New → Archive Template
Choose Product Archive
Give the template a name (example: “Custom Shop Layout”)
Click Create Template
Once loaded, you’ll see Elementor’s default WooCommerce widgets.
Now customize the layout using:
Heading or Page Title
Breadcrumbs
Search Bar
Sorting & Filter Options (optional)
Step 2: Create a Custom Product Loop Item
Elementor Pro now offers Loop Grid and Loop Item builder — allowing full control over how each product card looks.
Add the Loop Grid widget to your archive page
Click Create Template
This opens a new “Loop Item” layout canvas
Now build your product card using Elementor widgets:
Include the following elements:
Element
Widget
Product Image
Product Image
Product Title
Product Title
Short Description
Product Short Description
SKU
Product SKU (Dynamic Tags → Woo Meta)
Categories
Product Terms
Price
Product Price
Add to Cart
Add to Cart Button
Style spacing, borders, typography and hover effects as needed.
Tip: You can make the product image & name clickable by enabling the Link to Product Page option.
Once done → Save & Publish.
Step 3: Set Columns, Layout & Pagination
Back in the Archive template:
Click on the Loop Grid widget
Set:
Columns (Desktop/Tablet/Mobile)
Number of Items per Page
Select Loop Template you created earlier
Enable Pagination
Pagination options include:
Numeric Pagination
Load More Button
Infinite Scroll (Pro)
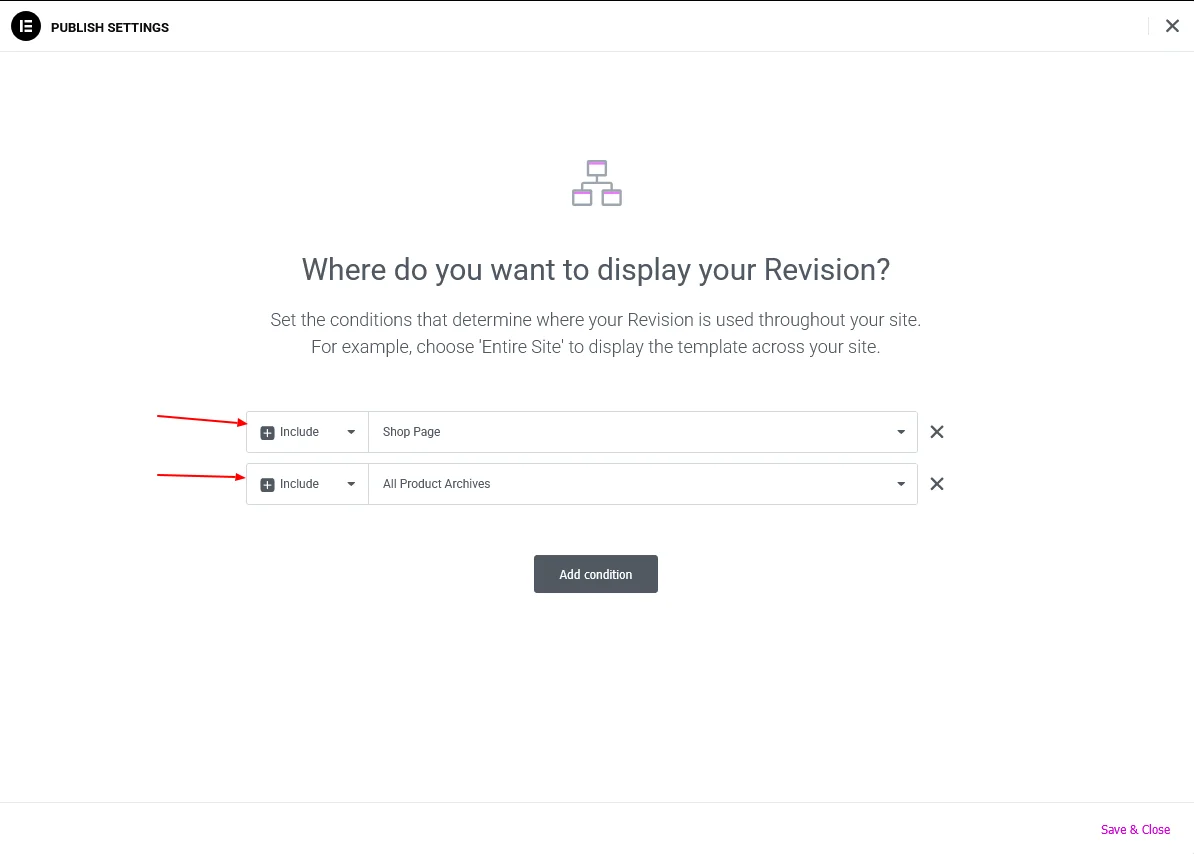
Step 4: Apply the Template to Shop & Category Pages
Before closing the editor:
Click Publish
Set Display Conditions:
✔ All Product Archives
✔ Shop Page
✔ Product Categories
Click Save.
Your custom layout is now live!
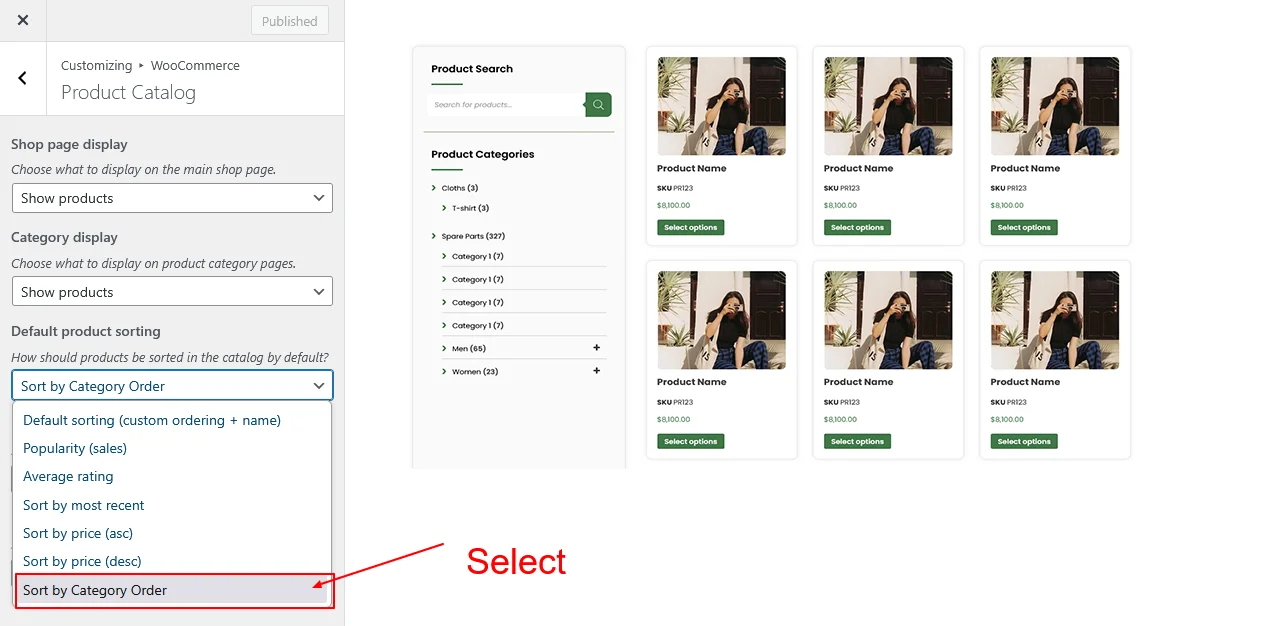
Step 5: Add Category-Based Sorting to Your WooCommerce Store
By default, WooCommerce lets customers sort products by price, popularity, rating or date — but not by the category order you set. To make browsing easier and more organized, we’ll add a Category-Based Sorting option to both:
The WooCommerce Sorting Dropdown
The Default Sorting Setting inside Appearance → Customize
This ensures your products appear in the exact order of their assigned categories — perfect for structured stores like machinery, spare parts, collections, or apparel.
Add Custom Sorting Code
Add the following code to your functions.php or a custom plugin (recommended if using a child theme):
This plugin allows you to reorder product categories visually, and the sorting function will respect that order automatically.
Step 7: Test Your Sorting & Ensure Everything Works
Now that your custom product template and category-based sorting are in place, it’s important to verify everything is functioning correctly.
Go to: YourSite.com/shop
Check the following:
Products display in the correct category-based sequence
The layout matches your Elementor loop template
Pagination works (example: clicking page 2 continues the ordered list)
Sorting dropdown shows “Sort by Category Order”
Try switching between sorting options:
Default Sorting
Price (asc/desc)
Category Order
Then return to Sort by Category Order to ensure your custom order re-applies correctly.
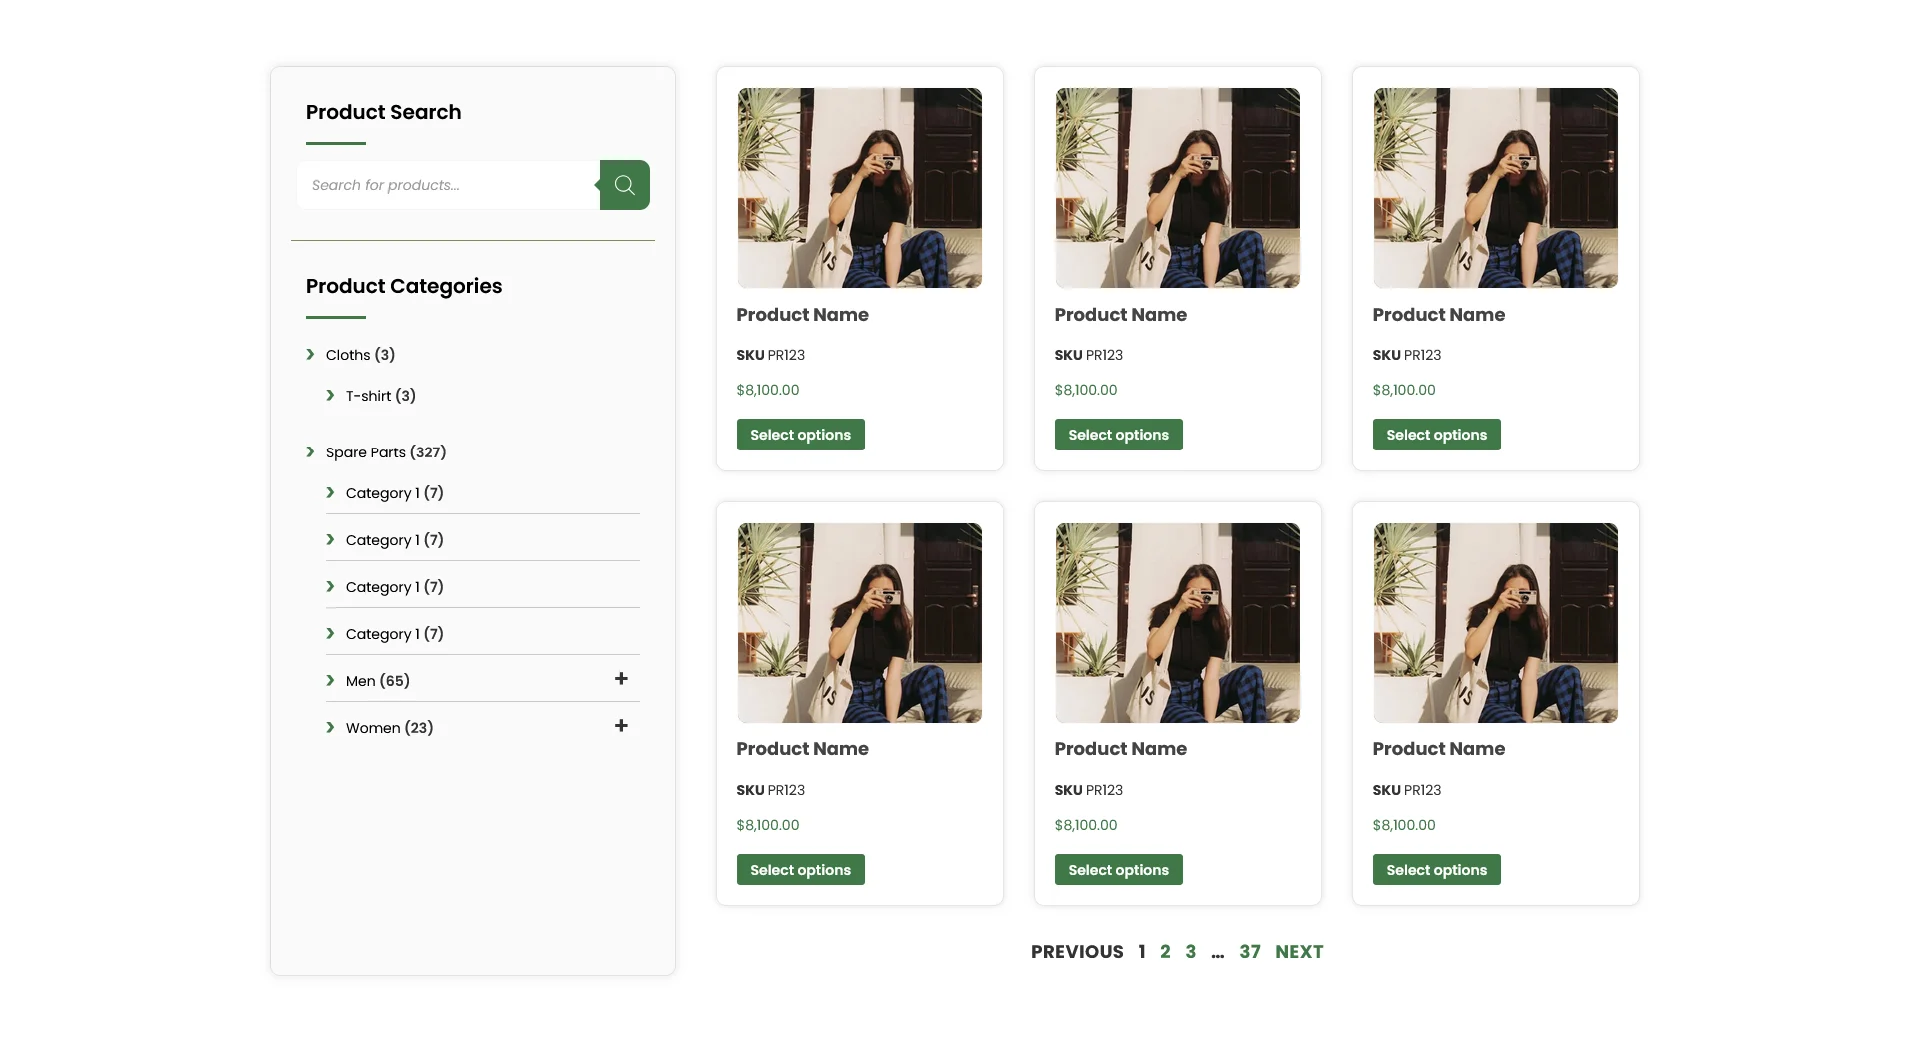
Final Result
If everything is configured correctly, your WooCommerce shop will now:
Display products grouped and ordered by category hierarchy
Use a fully custom Elementor loop layout
Support pagination, sorting, and filtering
Allow you to change category order easily without editing loops
Automatically update sorting whenever you rearrange categories
Conclusion
Congratulations — you now have a fully customized WooCommerce product archive with:
A unique Elementor product card design
Pagination and responsive layout control
Smart category-based sorting
Optional manual drag-and-drop category ordering
This setup gives your WooCommerce store a clean, organized, and intuitive structure — especially useful for businesses with large catalogs, product families, or grouped collections.
If you’re planning a WooCommerce store that requires custom product templates, category-based sorting, or advanced pagination in Elementor, our WordPress developers can build a fast, scalable solution tailored to your business needs.
You can Book a Free Project Consultation to discuss your store requirements, performance goals, and the best development approach.
When working on a WordPress website—whether you’re a developer, content creator, or agency—it’s common to share draft pages or posts with clients before publishing.
However, by default, WordPress requires users to be logged in to view draft content. This can be inconvenient when you simply want to share a preview link with a client or team member who doesn’t have WordPress access.
Most people install plugins to do this, but you can generate secure, shareable preview links without any plugin using a small custom code snippet.
In this guide, you’ll learn how to:
Allow non-logged-in users to view draft previews
Generate a shareable URL for any post type
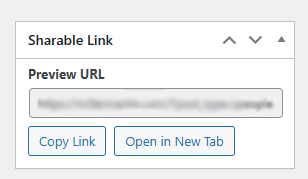
Automatically display a “Sharable Link” meta box in the WordPress editor
Add one-click buttons to copy or open the preview link
Support posts, pages, and unlimited custom post types (CPTs)
Why Do You Need Shareable Draft Links?
Here are common scenarios where this is extremely useful:
Sending preview links to clients
Allowing team members to review draft content
Sharing landing pages or funnels under development
Getting approval on blog posts, pages, or custom post types
Avoiding unnecessary WordPress accounts or login steps
How the Solution Works
We will:
Add a URL parameter key=guest
Modify the main query to allow draft preview when this key is present
Add a meta box that generates the shareable link
Automatically show the live URL for published posts
Allow preview URL for draft/unpublished posts
Add “Copy Link” and “Open Link” buttons
Full Code: Shareable Preview Link Generator
Place this code in your child theme’s functions.php File.
With just a few lines of code, you can easily generate shareable preview links for any WordPress post type—without plugins.
If you’re building a WordPress site that requires custom workflows, advanced CMS logic, or plugin-free solutions, our team can take complete ownership of the project—from planning and development to testing and launch.
You can Book a Free Project Consultation to discuss your requirements, timelines, and how we can deliver the entire solution for you.
Images play a major role in SEO. When your image file names and titles are optimized correctly, search engines can better understand your content — helping you rank higher in Google Image Search and improving overall keyword relevance.
But updating image file names manually can be risky. One wrong step and your pages may break, leaving broken image links across your website.
The good news? You can bulk update image file names and titles safely in WordPress using a powerful tool: Phoenix Media Rename.
In this guide, you’ll learn:
Why optimized image names help SEO
How to rename images safely without breaking pages
How Phoenix Media Rename automatically updates all internal links
Best practices for SEO-friendly file names
Tips for bulk renaming efficiently
Step 1: Install Phoenix Media Rename
Go to Plugins → Add New
Search “Phoenix Media Rename”
Install & activate
Step 2: Bulk Rename Images (Individually or in Groups)
Go to Media → Library → List View
You will see a new rename field next to each image
Update the file name and title
Then select Rename & Retitle
Then click on apply for update
Benefits of Phoenix Media Rename for SEO
Boosts image search visibility
Fixes messy media libraries
Prevents broken URLs
Keeps all page layouts intact
Helps search engines understand your content better
Speeds up images optimization
Conclusion
Renaming image file names is one of the simplest yet most powerful SEO improvements you can make — but it must be done safely.
With Phoenix Media Rename, you can bulk rename image files and update titles across your entire WordPress site without breaking a single link.
If you’re serious about improving SEO, cleaning up your media names is a highly effective step.
If you’re managing a WordPress site with hundreds (or thousands) of images and need bulk SEO-friendly updates without risking content or rankings, our team can handle the entire process—from planning and execution to validation and rollout.
You can Schedule a Free Consultation to discuss your site structure, SEO concerns, and how we can safely implement large-scale WordPress changes for you.
Gravity Forms is one of the most powerful form builders available for WordPress — but it has one limitation:
It does not offer a built-in Rich Text Editor (WYSIWYG) field.
For websites that rely on user-generated content—such as blogs, directories, reviews, job listings, or frontend post submissions—a basic textarea simply isn’t enough.
A proper Rich Text Editor allows users to format text with:
Headings (H1–H6)
Links & Media
Bold, Italic, Underline
Bullet and Numbered Lists
Images
Blockquotes
Inline styles like alignment, colors, and spacing
So in this tutorial, you’ll learn how to add a fully functional Rich Text Editor field inside Gravity Forms using custom code — without installing an extra plugin.
What This Solution Supports
Works on frontend
Uses TinyMCE (WordPress default editor)
Supports media uploads
Outputs clean formatted HTML
Works with Gravity Forms Post Creation Add-On
Prevents raw HTML from showing in visual mode
Why You Need a Custom Rich Text Editor in Gravity Forms
A normal textarea field cannot store or render formatted content like:
Titles and headings
Styled paragraphs
Embedded media or images
Links and structured lists
If you’re building forms like:
Blog submission form
Directory or listing submission
User reviews
Job listing submission
Knowledgebase article submission
Community-generated content
…then users need a proper editor — not a plain text field.
Step-by-Step Guide
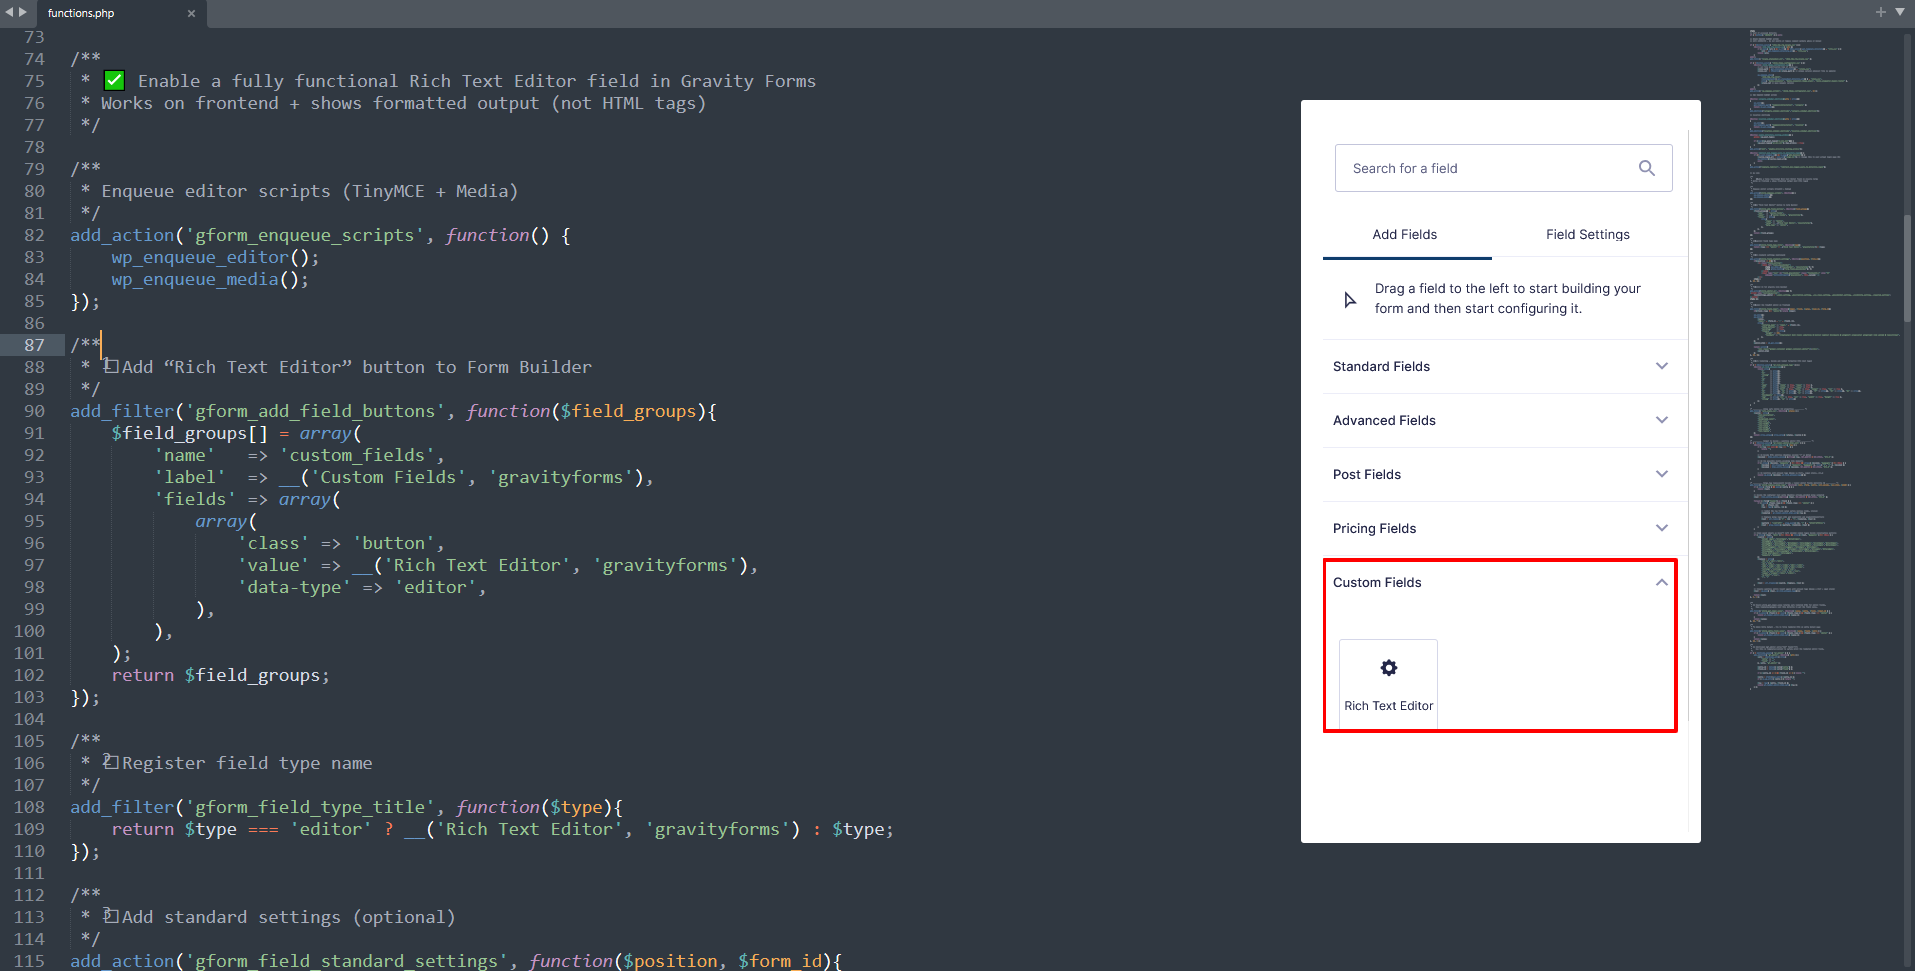
Step 1 — Add This Code to Your functions.php
Copy and paste the following entire code block into your theme’s functions.php or a custom plugin:
( Code already formatted, so no changes needed — paste exactly as provided.)
Once added, Gravity Forms will display a new field called: Rich Text Editor under the “Custom Fields” tab.
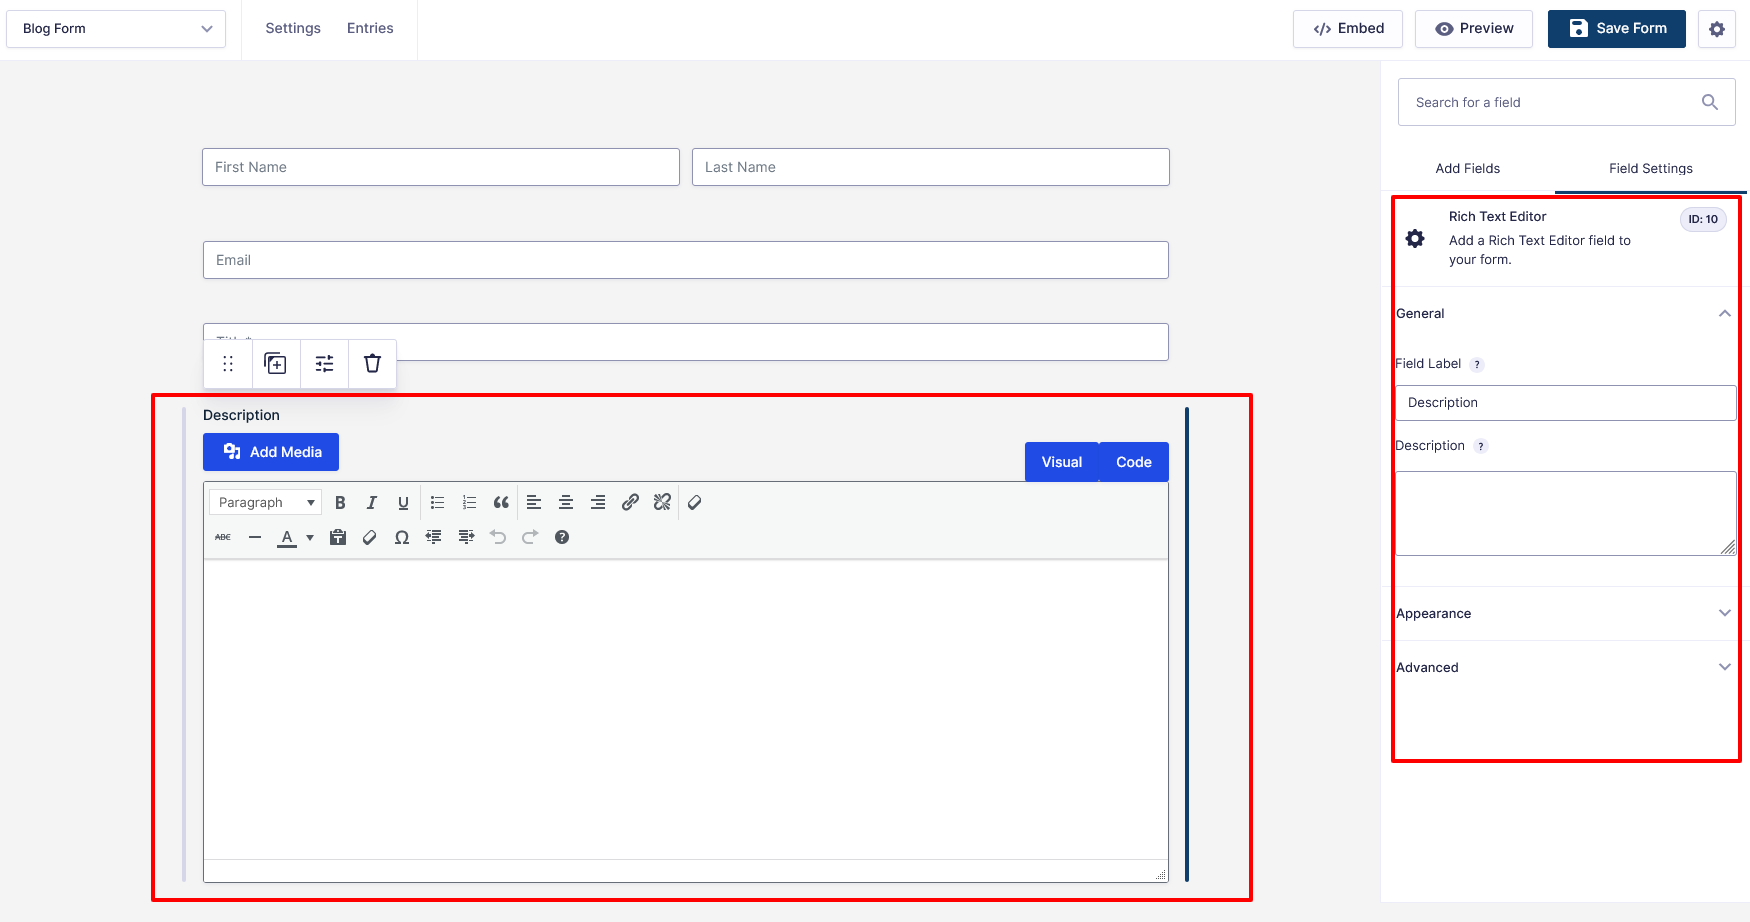
Step 2 — Create a New Gravity Form
Go to Forms → New Form
Give it a name (Example: Blog Submission Form)
Add standard fields like:
Name
Email
Post Title
Add your new field: Rich Text Editor
Save the form
Tip: Note the Field ID for later (Example: Field ID: 10).
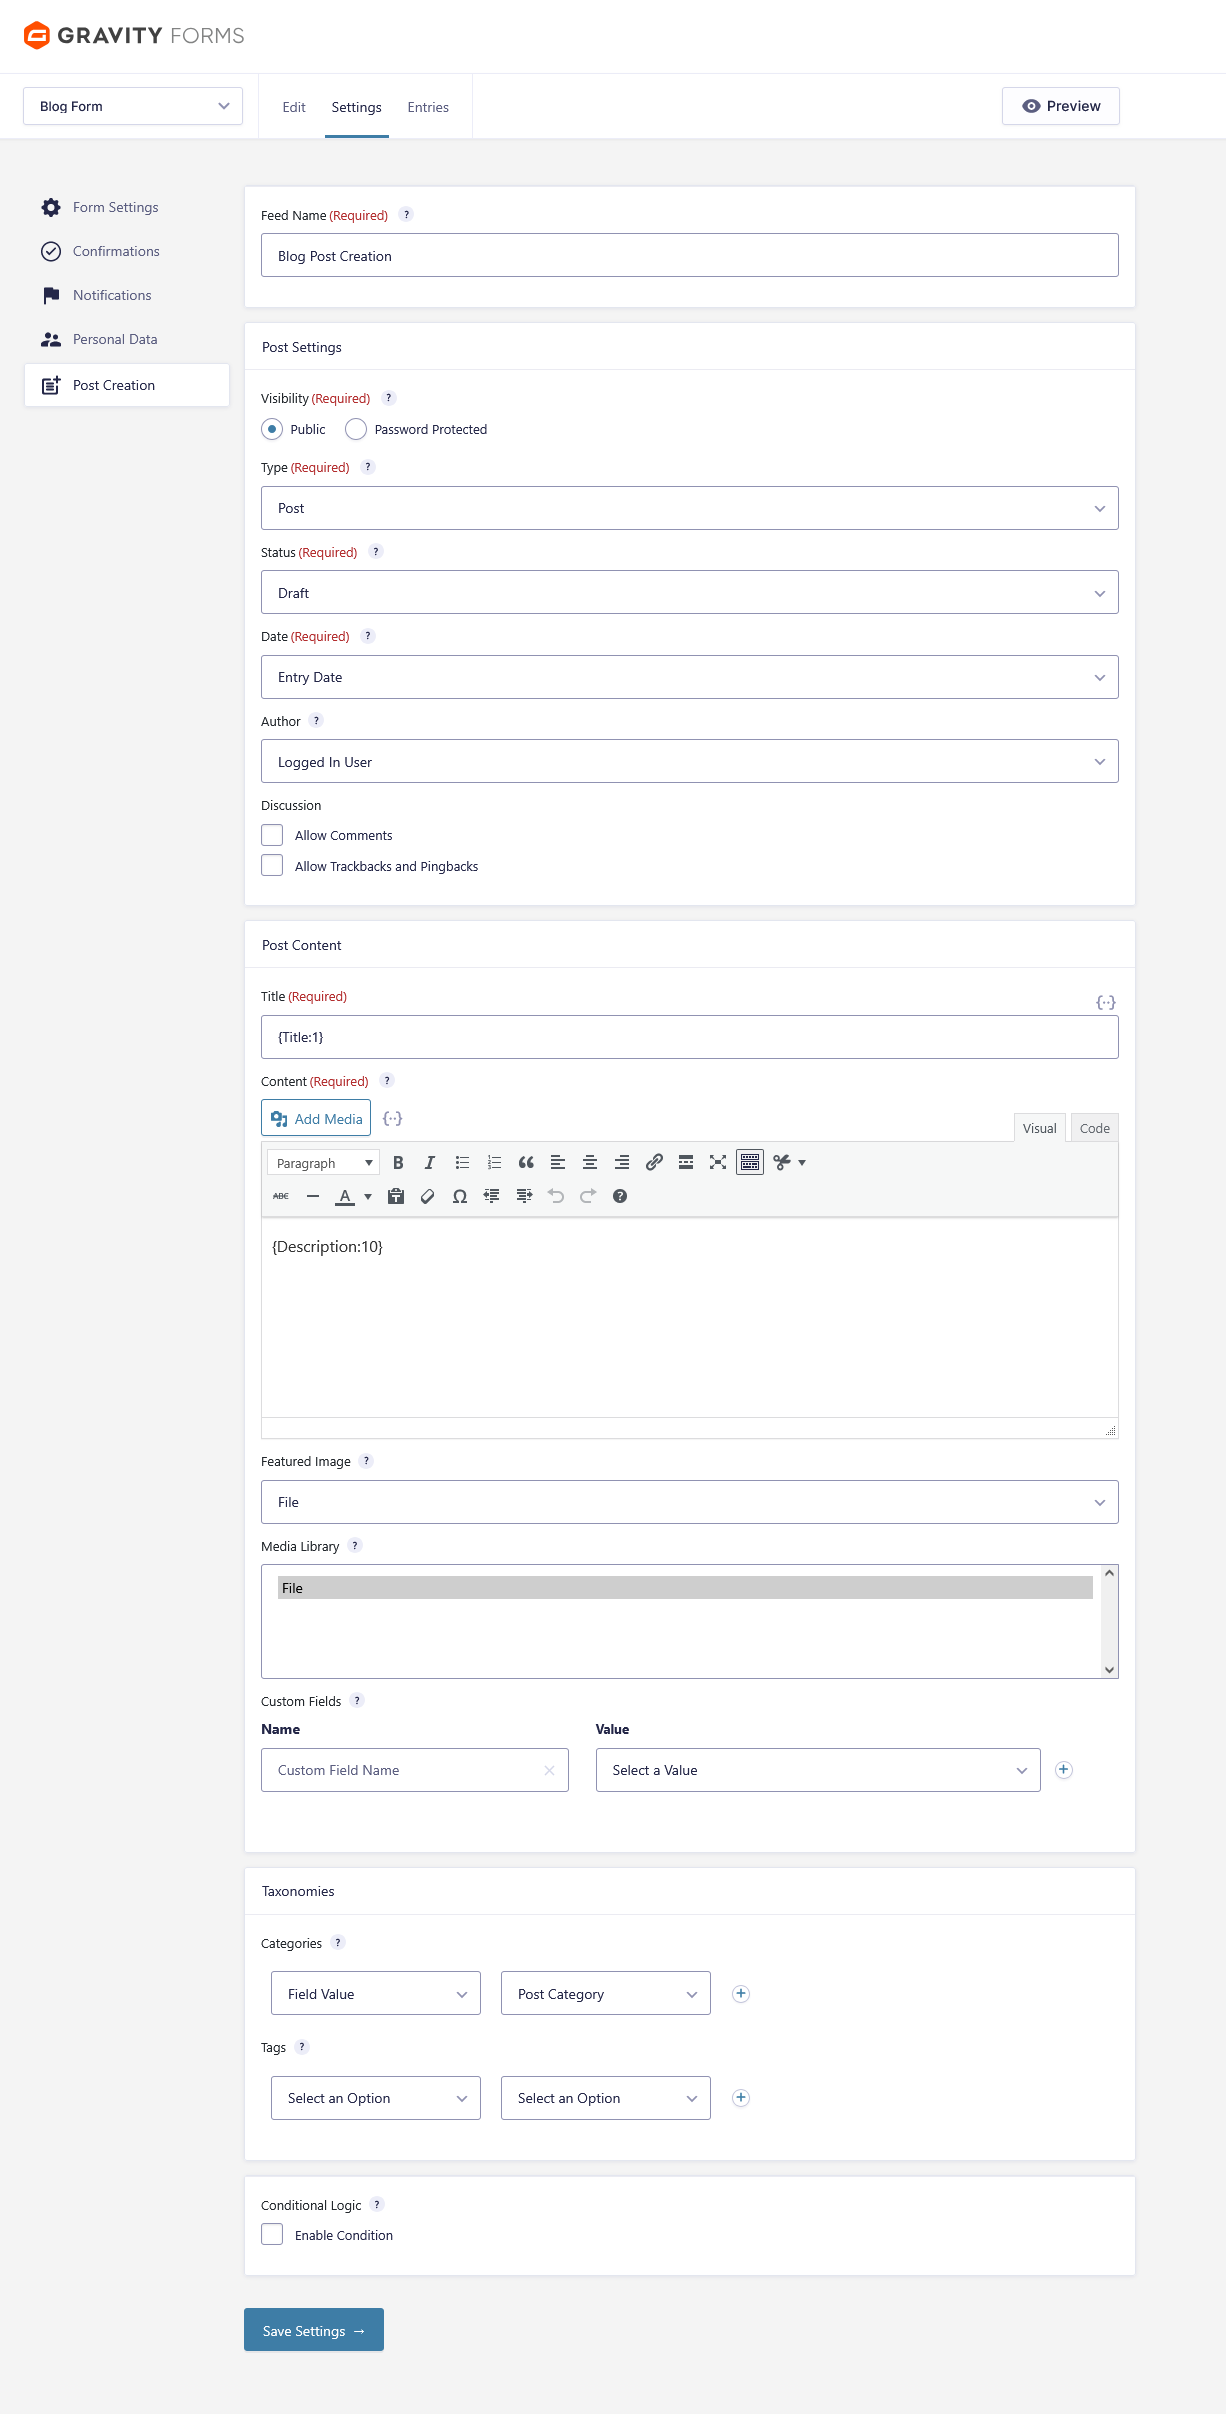
Step 3 — Configure Gravity Forms Post Creation Add-On
Go to Form → Settings → Post Creation
Create a new feed
Settings example:
Setting
Example
Post Type
Post (or Custom Post Type)
Status
Draft (recommended for testing)
Author
Logged-in User
Title
{Post Title:1}
Content
{Description:10} ← must match Rich Editor Field ID
(Optional) Map:
Categories
Tags
Featured Image
Custom fields
Important: Ensure the content field uses the field ID of the Rich Text Editor.
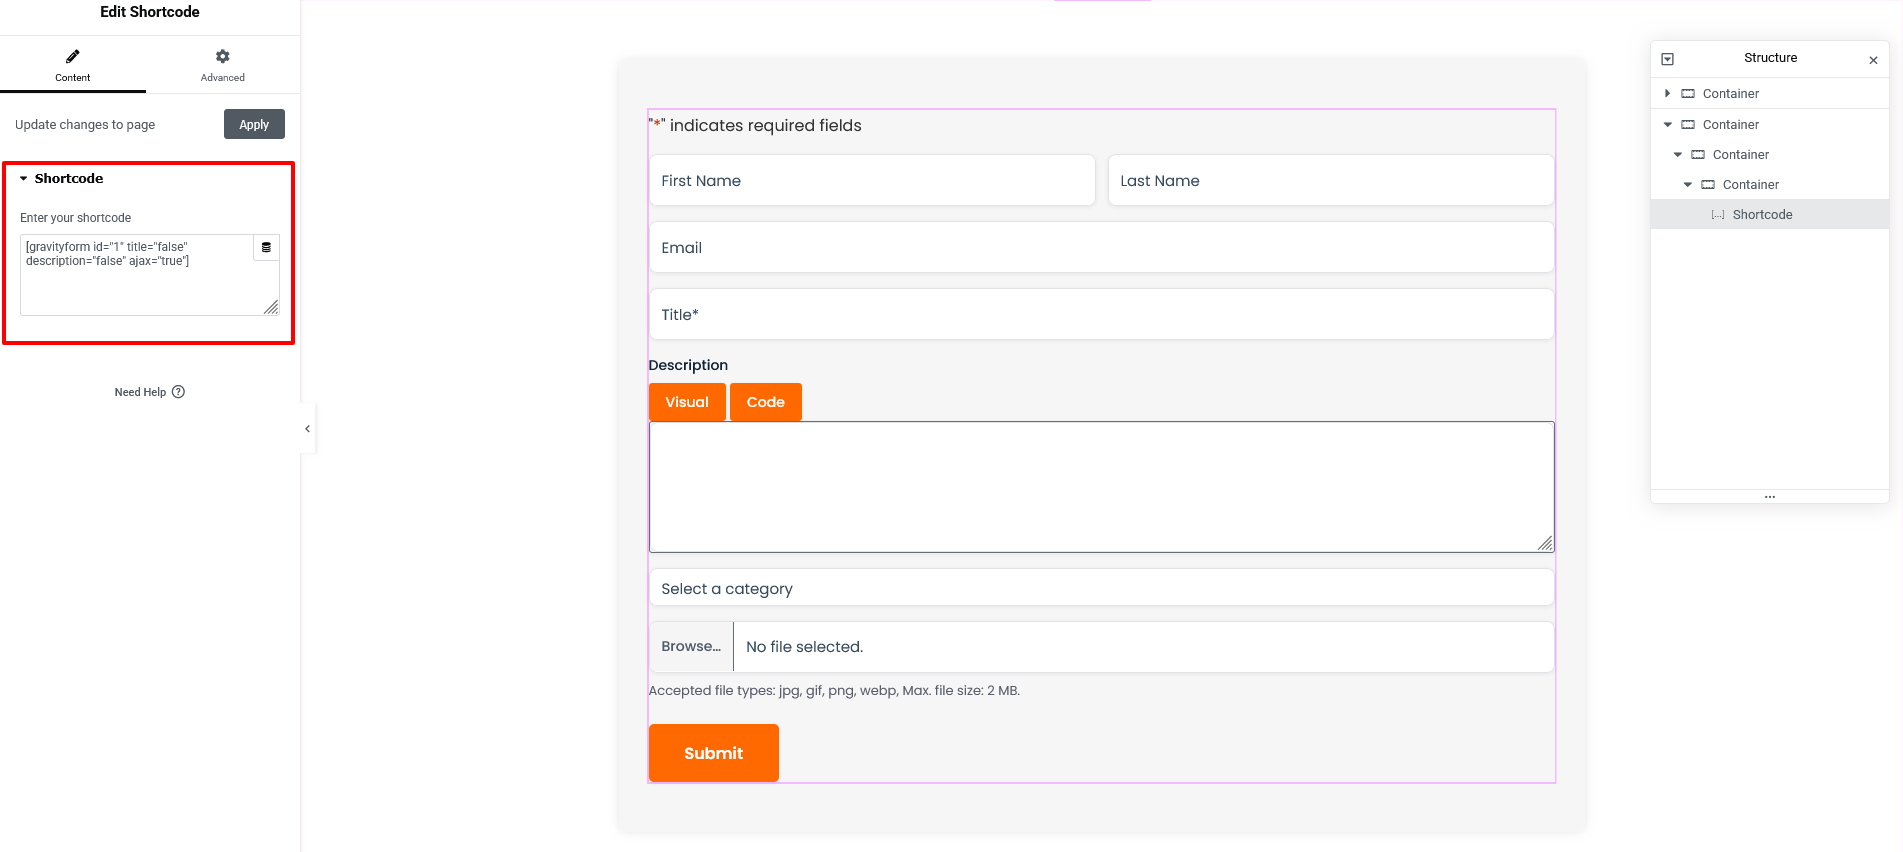
Step 4 — Add the Form to a Page
Use this shortcode anywhere: [ gravityform id="123" title="true" description="false" ajax="true" ]
Replace 123 with your form ID.
Publish your page (example: Submit a Blog).
Step 5 — Test the Submission
Open the form on the frontend
Format content using the editor (bold, headings, images, lists, etc.)
Submit the form
Check:
Posts → All Posts
You should see a new post created — with formatting preserved.
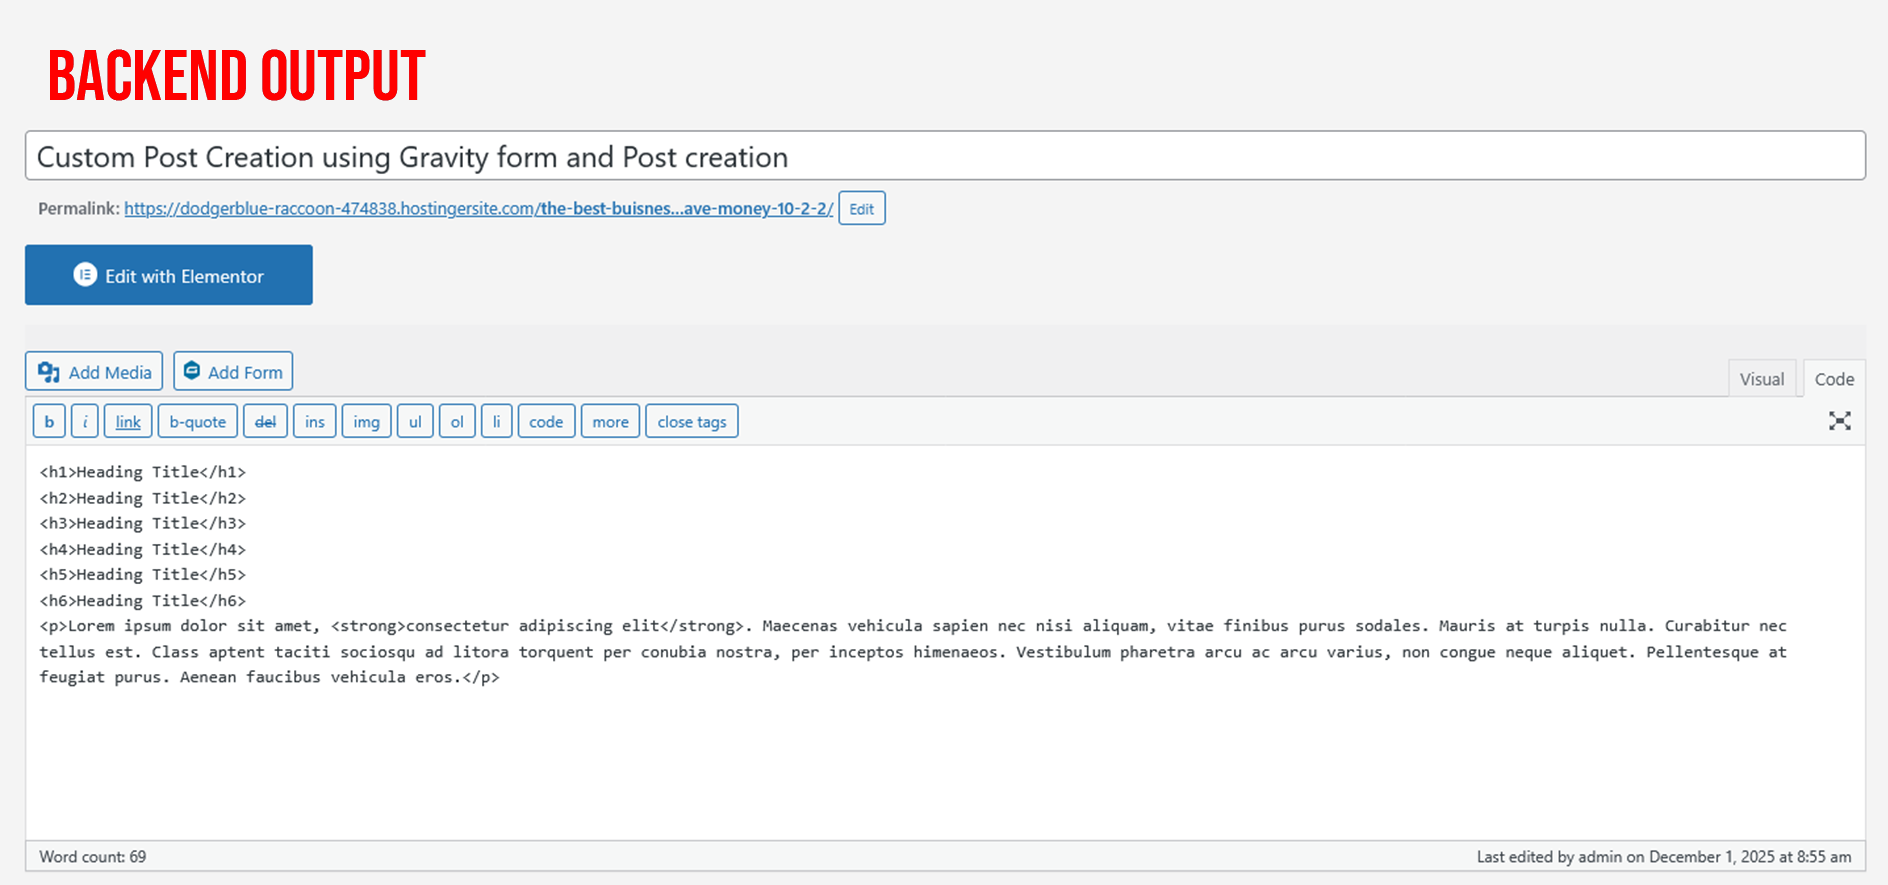
In WP Admin go to Posts → All Posts and find the new post (status based on your feed setting).
Click Edit on the post and check the Visual tab in the editor — the content should render as formatted HTML (not raw HTML tags).
View the post on the frontend and confirm headings, lists, images and styling display correctly.
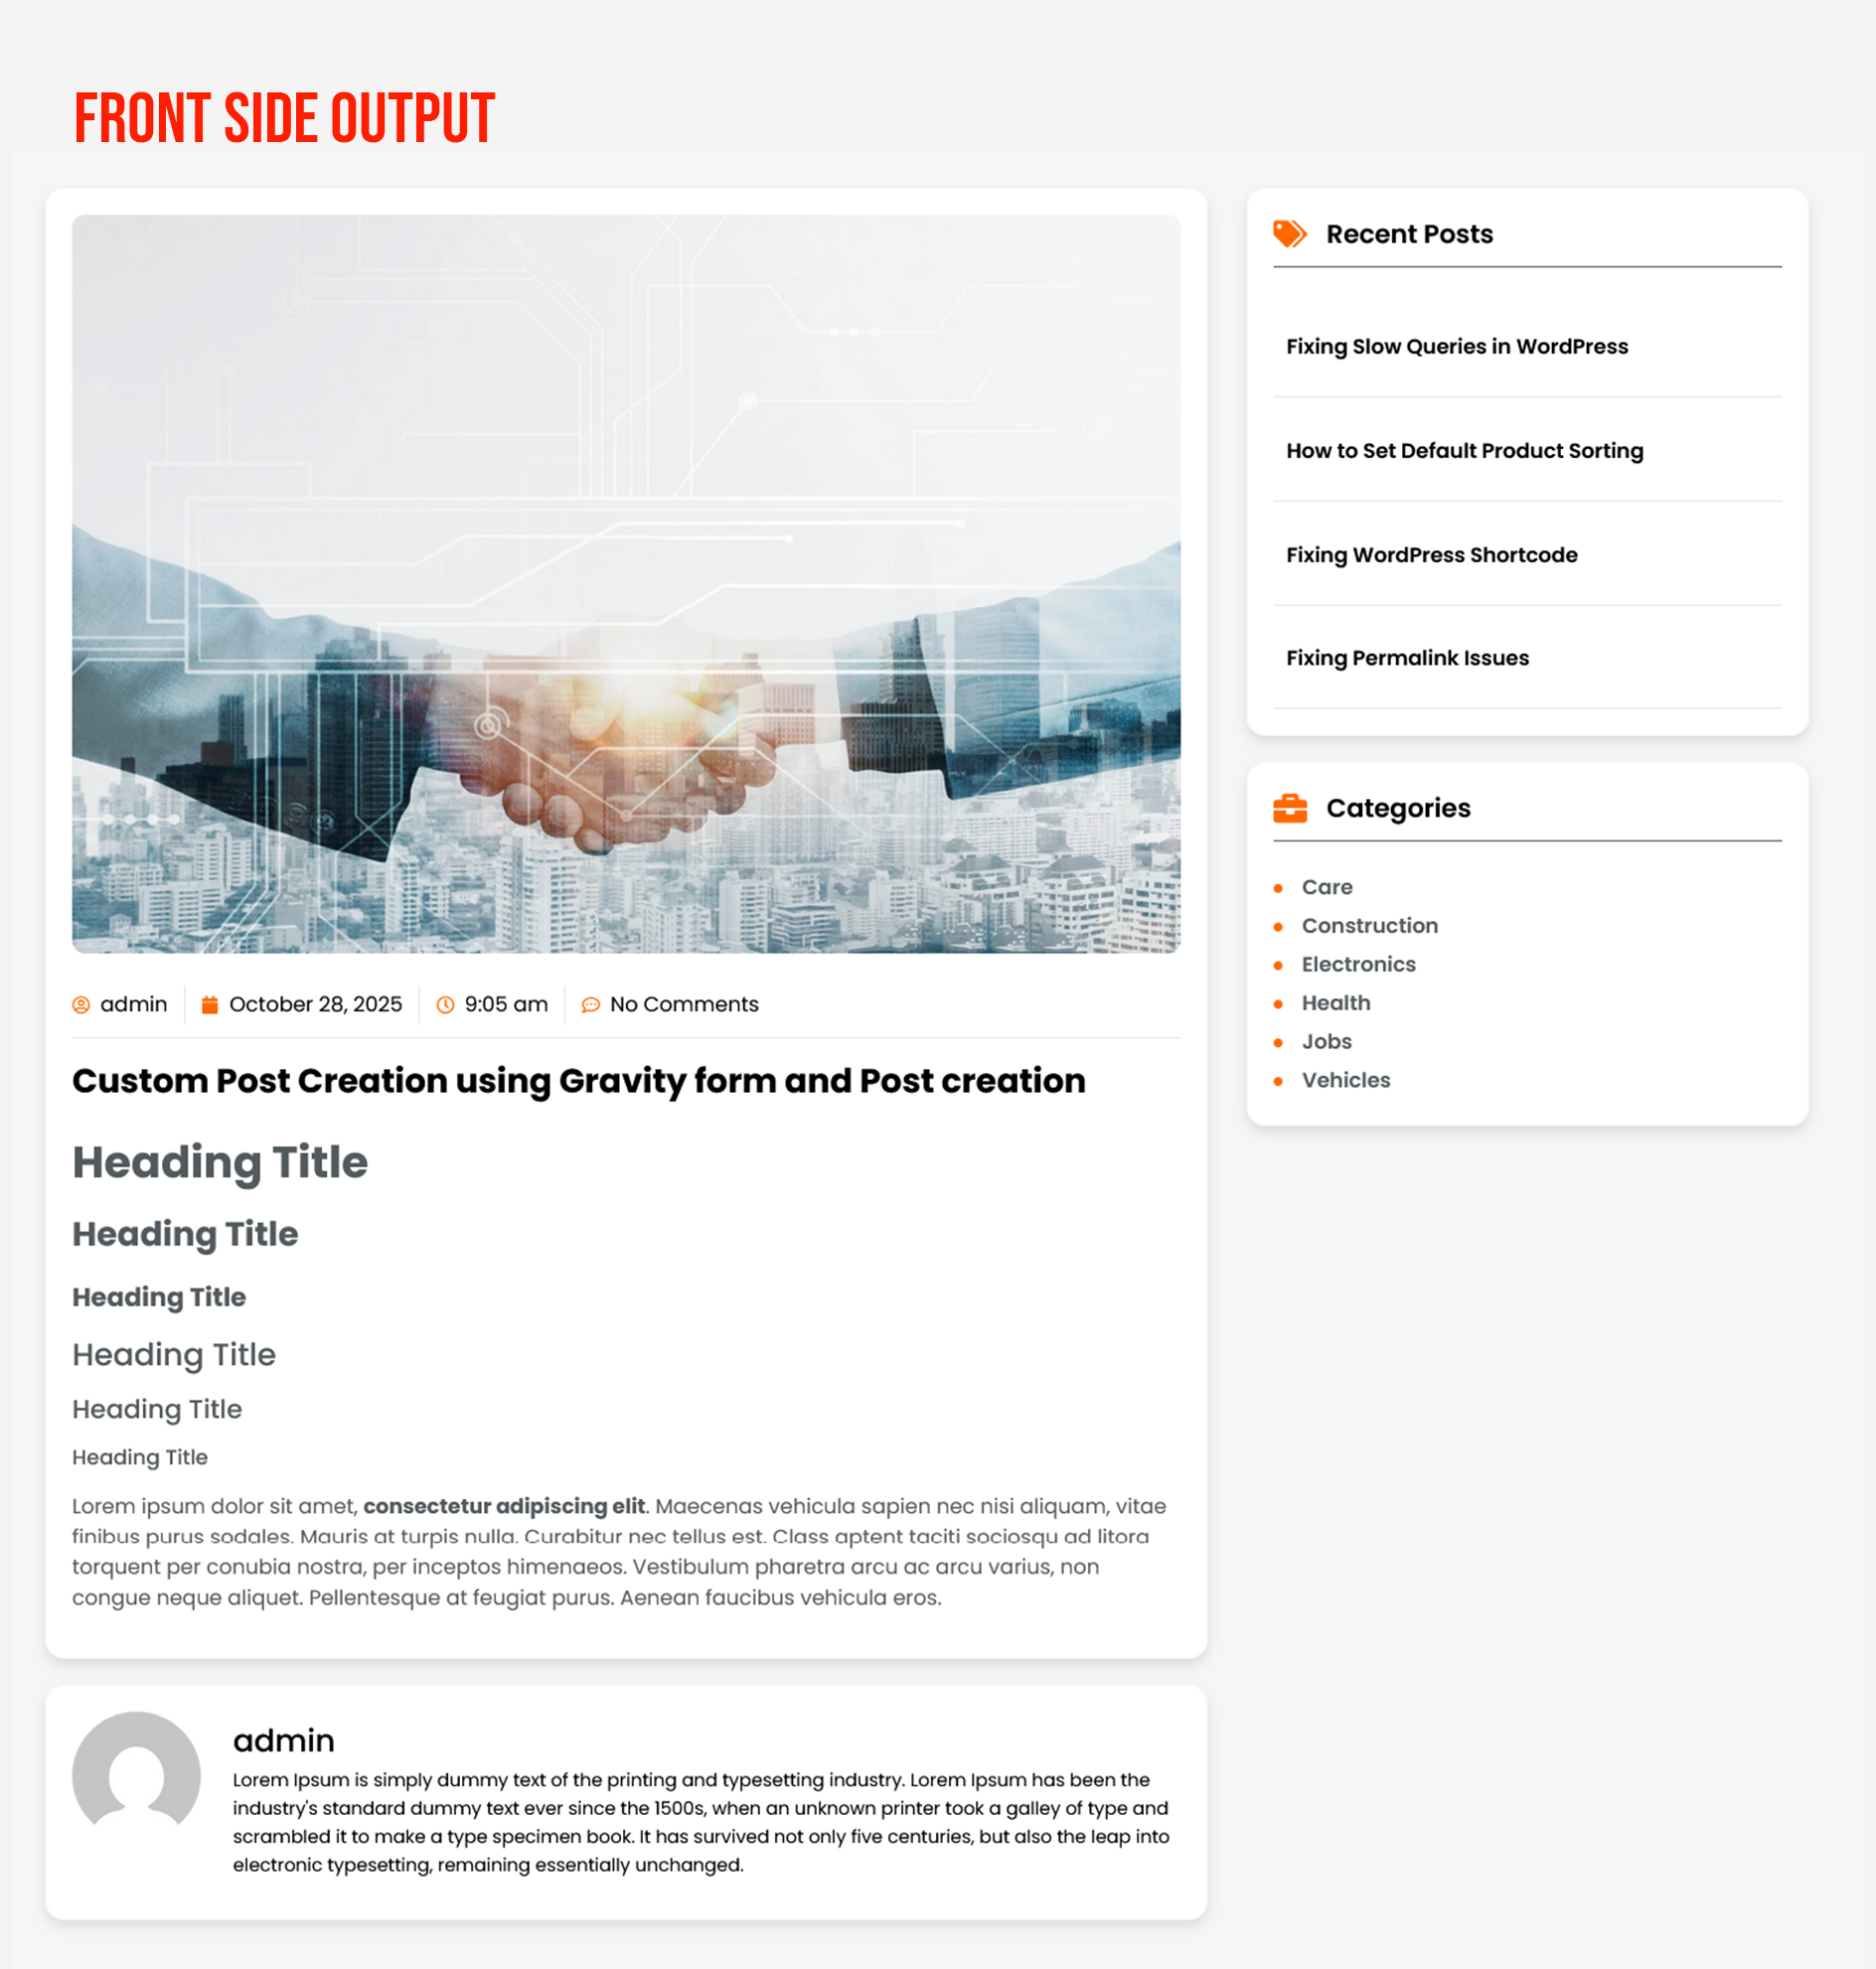
Final Result
You now have a fully working frontend content editor inside Gravity Forms — without additional plugins.
Works with WordPress media uploader
Supports formatting, links, images, headings
Perfect for guest posting, user-generated content, and custom submission workflows
Conclusion
Adding a rich text editor to Gravity Forms dramatically improves the user experience for forms involving long-form content.
Whether you’re building a submission portal, directory, review system, or frontend publishing workflow — this upgrade makes Gravity Forms behave more like a real blogging platform.
If your project requires custom Gravity Forms functionality, enhanced user experience, or plugin-free custom editors, our team can handle the complete development—from planning and implementation to testing and launch.
You can Book a Free Project Consultation to discuss your requirements, timelines, and how we can deliver a scalable, high-quality solution for your website.
Youtube Video Url
Youtube Video Url
Try a Free 2-Hour Test Task
Experience our quality, speed, and communication on any small WordPress task before you commit. No contract. No cost. No obligation. [For New Agency Partners]
"*" indicates required fields
Try a Free 2-Hour Test Task
Experience our quality, speed, and communication on any small WordPress task before you commit. No contract. No cost. No obligation. [For New Agency Partners]