Table of Contents
Mega menus are one of the best ways to display large navigation structures in a clean, organized, and visually appealing layout. They make it easy for users to browse multiple categories, products, and services without confusion.
If you’re using Divi, the Divi Pixel Balloon Module provides a powerful and code-free way to build fully customizable mega menus. In this guide, you’ll learn how to create a beautiful mega menu using Divi and Divi Pixel Balloon, step by step.
Overview
With Divi + Divi Pixel Balloon Module, you can create:
- Multi-column mega menus
- Product category menus
- Image-based dropdowns
- Service menus with icons
- Custom link panels
- Fully responsive and animated mega menus
Step-by-Step Guide to Create a Mega Menu in Divi Using Divi Pixel Balloon
1. Install & Activate the Divi Pixel Plugin
If Divi Pixel is not installed yet:
- Go to Plugins → Add New
- Upload your Divi Pixel ZIP file
- Click Activate
- Go to Divi Pixel → Modules
- Make sure the Balloon Module is enabled
This module is required for creating the mega menu dropdown.
2. Create the Mega Menu Layout in Divi Library
This layout will act as your mega menu’s content.
- Go to Dashboard → Divi → Divi Library
- Click Add New
- Enter a layout name (e.g., Practice Mega Menu)
- Select Layout Type → Layout
- Click Submit
- Design your mega menu using rows, columns, icons, text, images, buttons, and any Divi modules you need
- Save Your Layout

3. Create or Edit Your Global Header in Divi
If you already have a global header, skip to the next step.
To create one:
- Go to Dashboard → Divi → Theme Builder
- Click Add Global Header
- Open it with Divi Builder
- Add a Menu Module and design your header as needed
This is where the Balloon Module will be attached.
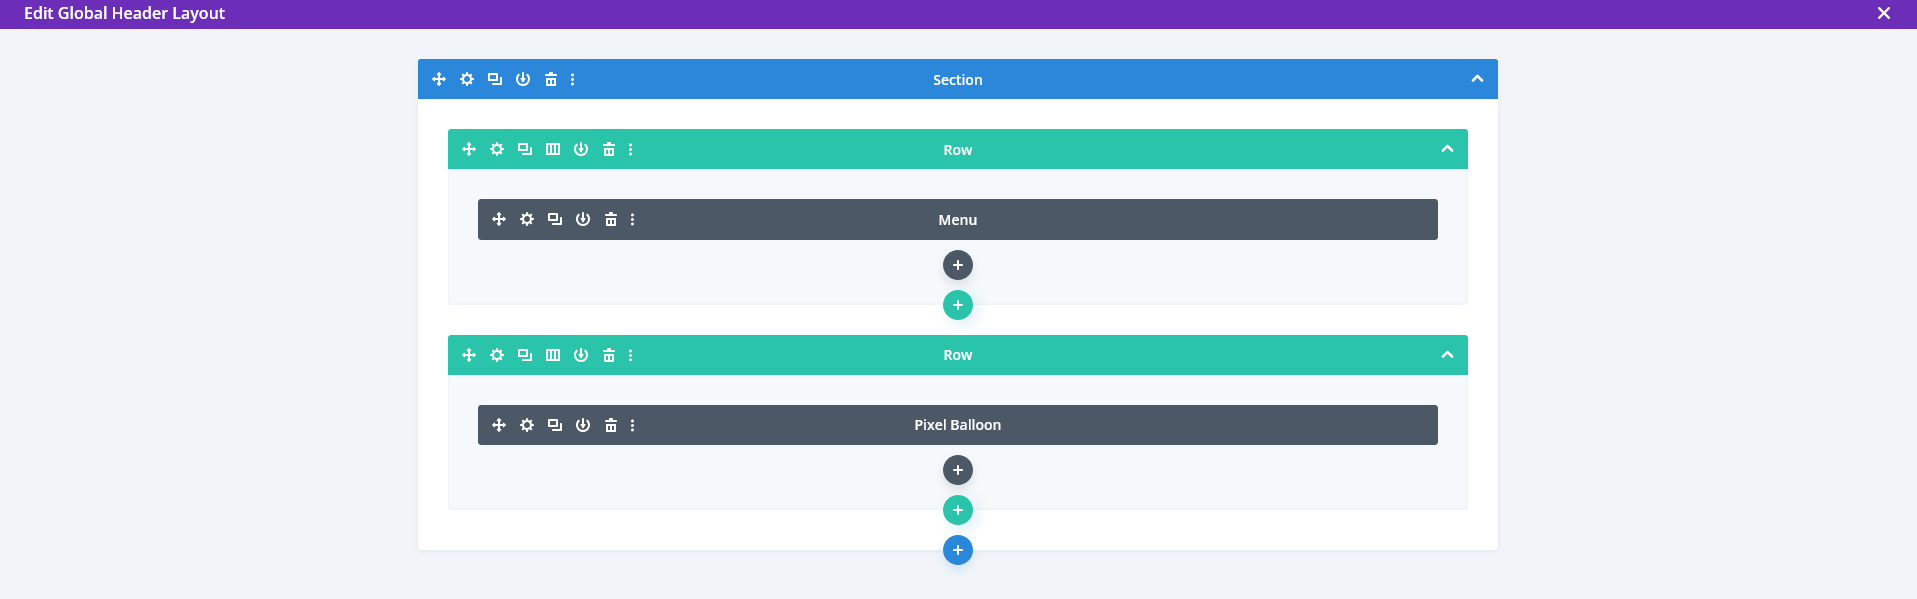
4. Add the Divi Pixel Balloon Module and Configure It
Inside your Global Header layout:
- Click + Add New Module
- Select Divi Pixel Balloon
Configure the following options:
Balloon Settings
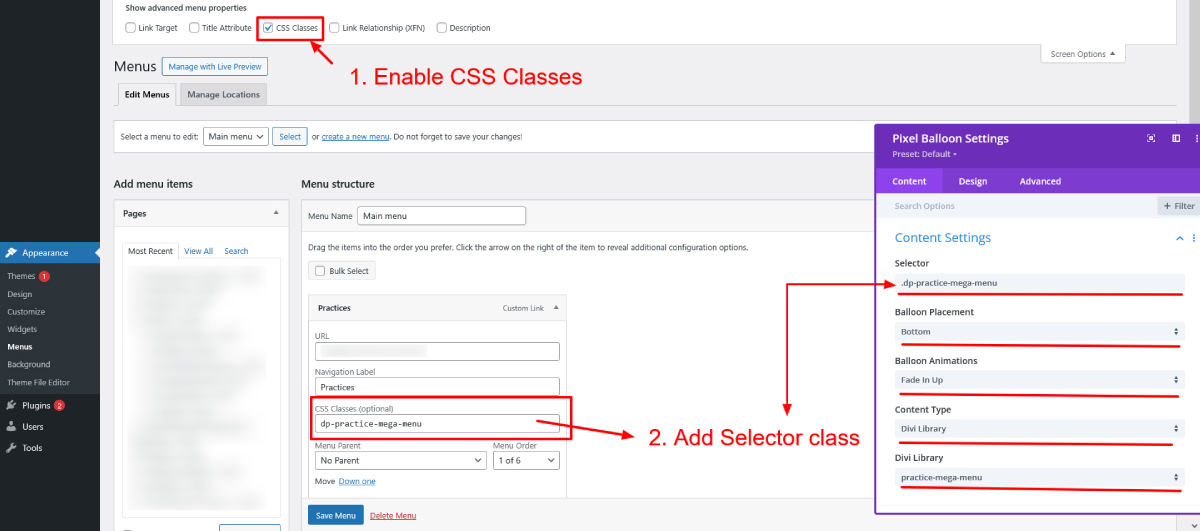
- Selector: .dp-practice-mega-menu
(Add any class name you prefer, but remember it for later.) - Balloon Placement: Bottom
(You may also choose Top, Left, or Right based on design.) - Balloon Animation: Fade In, Fade In Left, Fade In Top, Fade In Right
- Content Type: Divi Library
- Divi Library Layout: Select the layout you created in Step 2 (e.g., Practice Mega Menu)
Save your settings.

5. Attach the Mega Menu to a Menu Item
Now choose which menu item will trigger your mega menu.
- Go to Dashboard → Appearance → Menus
- Select the menu you want to modify
- Click Screen Options (top right)
- Enable CSS Classes
- Expand the menu item where you want the mega menu to appear
- In the CSS Classes field, enter the same selector used earlier:
.dp-practice-mega-menu - Save Menu
This links your menu item to the Balloon mega menu.
6. Test Your Mega Menu
Once everything is configured:
- Save your Global Header
- Visit your website
- Hover or click the menu item
- The mega menu should appear smoothly with your chosen animation

Conclusion
Creating a mega menu in Divi is incredibly easy and flexible using the Divi Pixel Balloon Module. You can visually design your mega menu in Divi Builder, customize triggers, select animations, and create a modern, user-friendly navigation experience without writing code.
Transform your site with expert Divi website development. From custom menus to full-featured designs, we build websites that deliver results. Book a Free Consultation now.