Table of Contents
A contact form is one of the most important elements on a website. But simply adding fields and a Submit button is not always enough. A good contact form should clearly tell visitors when their submission has been received, optionally redirect them to a dedicated page, and send you all the information they entered in an easy-to-read email.
With Divi 5, you can configure all of these options directly inside the Contact Form module.
In this guide, we’ll show you how to configure:
- A custom success message after form submission
- A redirect URL after successful submission
- The email address that receives form submissions
- A custom email message pattern
- Dynamic field values using %%Field ID%%
By the end of this tutorial, your Divi 5 contact form will provide a better experience for both your website visitors and your team.
What You Can Configure in a Divi 5 Contact Form
Divi 5 gives you several useful options for controlling what happens after a visitor submits your form.
For example, you can configure the form to:
- Display a custom success message.
- Redirect visitors to a thank-you page.
- Send the submitted information to your email address.
- Customize exactly how the submitted information appears in the email.
For this tutorial, we’ll use a simple contact form containing three fields:
- Name
- Email Address
- Message
1. Add a Custom Success Message
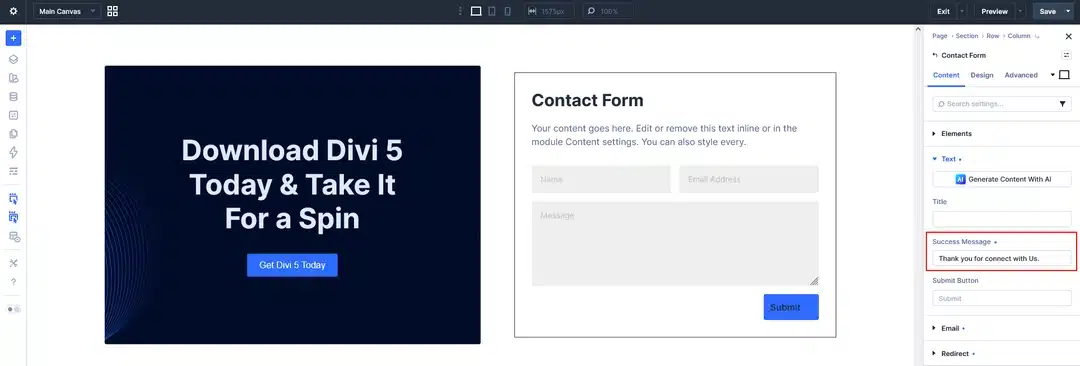
The first option you can configure is the Success Message.
A success message appears after the visitor successfully submits the contact form. This gives the visitor immediate confirmation that their information was received.
How to Add a Success Message
Open your Divi 5 Contact Form module.
Go to:
Contact Form → Text → Success Message
Enter the message you want visitors to see after submitting the form.
For example:
Thank you for connecting with us!
You can use any message that fits your website and communication style.
Example
A simple success message could be:
Thank you for contacting us! We have received your message and will get back to you shortly.
This is useful because the visitor does not have to wonder whether the form submission worked.
[Insert Screenshot: Success Message setting]
2. Redirect Visitors to a Custom URL
Sometimes displaying a success message inside the form isn’t enough. You may want to send visitors to a dedicated Thank You page after they submit the form.
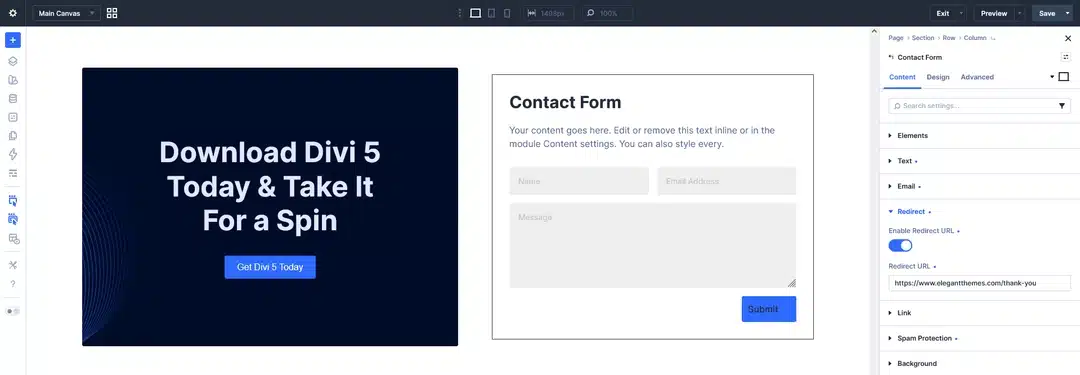
Divi 5 allows you to do this using the Redirect settings.
How to Enable a Redirect
Open the Contact Form module and go to:
Contact Form → Redirect
Enable:
Enable Redirect URL
Once enabled, enter the URL where you want the visitor to be redirected.
For example:
https://www.example.com/thank-you/
After the visitor successfully submits the form, they will automatically be redirected to that URL.
Why Use a Thank You Page?
A dedicated thank-you page can be useful when you want to:
- Confirm that the submission was successful
- Provide additional information
- Show another call-to-action
- Promote a service or product
- Track conversions
- Add analytics or marketing tracking
- Provide a download or next step
For example, instead of simply showing:
Thank you for connecting with us!
You could redirect the visitor to:
https://www.example.com/thank-you/
where you can provide additional information or guide them toward the next action.
3. Configure Email Notifications & Message Pattern
After setting up the success message and redirect, you can configure where the form submissions should be sent and how the submitted information should appear in the email.
Go to:
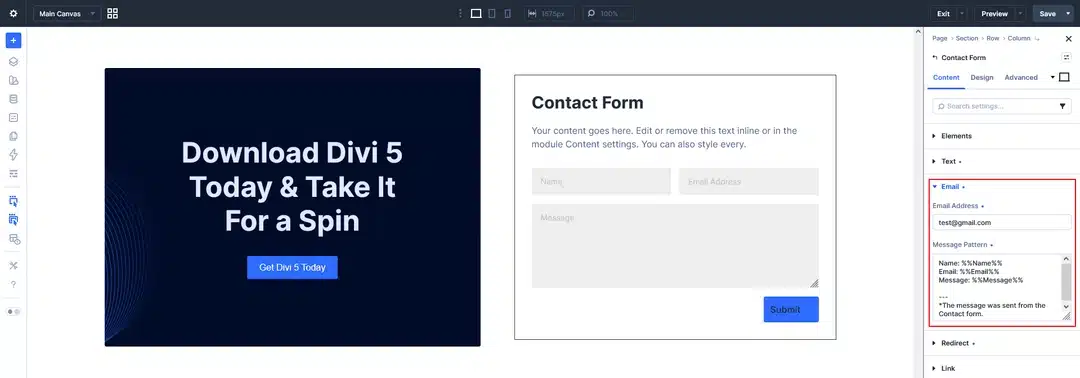
Contact Form → Email
Add Your Email Address
In the Email Address field, enter the email address where you want to receive the contact form submissions.
For example:
For one or more email example:
[email protected], [email protected]
Add a Custom Message Pattern
Next, open the Message Pattern field and add the information you want to receive in the email.
For example:
Name: %%Name%%

Email: %%Email%%

Message: %%Message%%

---

*The message was sent from the Contact form.
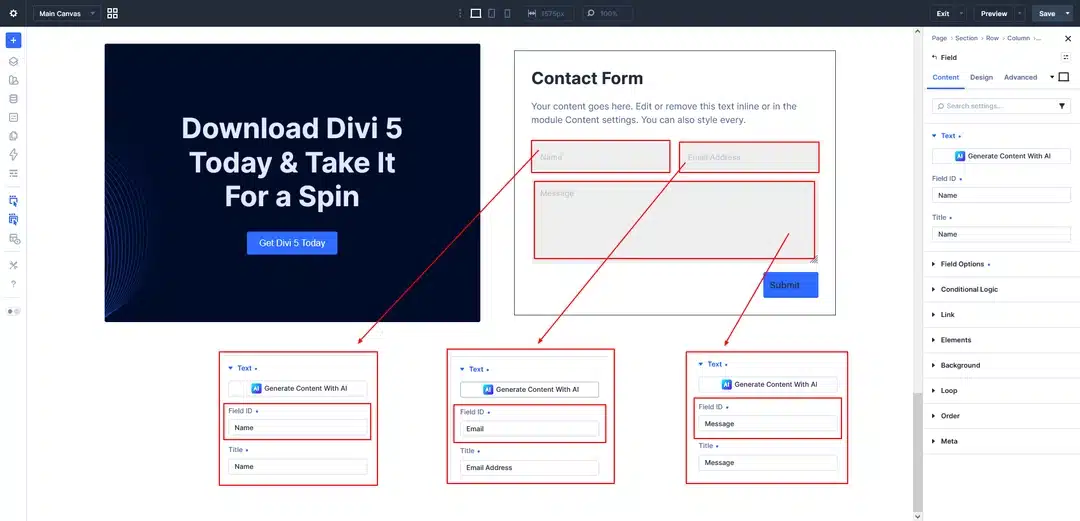
Here, %%Name%%, %%Email%%, and %%Message%% are dynamic values connected to your form fields.
Make sure the value inside %% %% matches the Field ID of the corresponding field.
For example:
- Name field → Field ID: Name → use %%Name%%
- Email field → Field ID: Email → use %%Email%%
- Message field → Field ID: Message → use %%Message%%
When a visitor submits the form, Divi automatically replaces these placeholders with the actual information they entered.
For example, if the visitor enters:
Name: John Smith
Email: [email protected]
Message: I would like more information.
The email you receive will look like:
Name: John Smith
Email: [email protected]
Message: I would like more information.
—
*The message was sent from the Contact form.
Tip: Whenever you add a new field to your contact form, check its Field ID and use that ID inside the %%Field ID%% format in your Message Pattern.
4. Success Message vs. Redirect URL
Divi 5 gives you both a Success Message and a Redirect URL, but you should choose the behavior that best fits your website.
Use a Success Message When:
- You want visitors to stay on the same page.
- You only need a simple confirmation.
- You don’t need a dedicated thank-you page.
- You want a quick and simple setup.
Example:
Thank you for contacting us! We will get back to you shortly.
Use a Redirect URL When:
- You have a dedicated thank-you page.
- You want to track form conversions.
- You want to provide additional information after submission.
- You want to offer a download or another call-to-action.
- You want visitors to move to a specific page after submitting the form.
For more advanced websites, a dedicated thank-you page can provide greater flexibility.
5. Test Your Contact Form
After configuring the Success Message, Redirect URL, Email Address, and Message Pattern, always test the form before publishing your changes.
Submit the form using real test information.
Check the following:
Front-End Test
Make sure:
- The form submits successfully.
- Required fields work correctly.
- The success message appears if you are using one.
- The redirect works if you enabled a redirect URL.
Email Test
Check the email that you receive and make sure:
- The correct recipient receives the email.
- The visitor’s name appears correctly.
- The visitor’s email appears correctly.
- The visitor’s message appears correctly.
- All %%Field ID%% placeholders are replaced with the submitted values.
If you see something like:
Name: %%Name%%
instead of the visitor’s actual name, check the Field ID and make sure it exactly matches the placeholder used in the Message Pattern.
Complete Divi 5 Contact Form Configuration
For the example in this tutorial, the final configuration looks like this:
Success Message
Thank you for connecting with us!
Redirect
Enable Redirect URL: Enabled
https://www.example.com/thank-you/
Email Address
Message Pattern
Name: %%Name%%

Email: %%Email%%

Message: %%Message%%

---

*The message was sent from the Contact form.
Final Thoughts
Setting up a Divi 5 Contact Form goes beyond simply adding a few fields and a Submit button. By configuring Success Messages, Redirect URLs, Email Notifications, and Custom Message Patterns, you can create a much more professional and useful form experience.
The key thing to remember when creating custom email notifications is the %%Field ID%% format.
Simply identify the Field ID of each form field and use it inside your Message Pattern:
%%Field ID%%
For example:
Name: %%Name%%
Email: %%Email%%
Message: %%Message%%
When the form is submitted, Divi replaces these dynamic placeholders with the information entered by the visitor.
With these settings properly configured, you can make your Divi 5 contact forms more informative, easier to manage, and more useful for both website visitors and administrators.